Spring Security - OAuth 2(2): 권한 부여 서버 구현
in DEV on SpringSecurity, Oauth2
이 포스트에서는 스프링 시큐리티를 이용해 맞춤형 OAuth 2 권한 부여 서버를 구축해본다.
- OAuth 2 권한 부여 서버 구현
- 권한 부여 서버에 대한 클라이언트 관리
- OAuth 2 그랜트 유형 이용
목차
개발 환경
- 언어: java
- Spring Boot ver: 3.2.3
- Spring ver: 6.1.4
- Spring Security ver: 6.2.2
- IDE: intelliJ
- SDK: JDK 17
- 의존성 관리툴: Maven
권한 부여 서버의 역할은 사용자를 인증하고, 클라이언트가 리소스 서버에 접근할 수 있는 토큰을 제공하는 것이다.
토큰을 얻기 위한 여러 가지 흐름을 그랜트라고 하며, 권한 부여 서버의 동작은 그랜트 유형에 따라 달라진다.
여기선 OAuth 2 그랜트 유형에 맞게 권한 부여 서버를 구성해본다.
- 승인 코드 그랜트 유형
- 암호 그랜트 유형
- 클라이언트 자격 증명 그랜트 유형
갱신 토큰을 발생하도록 권한 부여 서버를 구성하는 방법도 함께 본다.
2019.11 스프링 시큐리티 OAuth 2 인증서버의 종속성 지원이 중단되었다.
Spring Security OAuth
No Authorization Server Support
이에 따라 클라이언트와 리소스 서버를 구현할 수 있는 대안은 있지만, 권한 부여 서버를 위한 대안은 없다.
다행히 스프링 시큐리티팀은 새로운 권한 부여 서버를 개발 중이라는 공지를 했다.
(spring-authorization-server 를 2020.04 에 오픈)
Announcing the Spring Authorization Server
2020.02 이후로
spring-boot-starter-oauth2-authorization-server를 이용하여 인증 서버를 구축하는 것이 가능해보이는데 일단 나중에 알아보자..
OAuth 2.0 Features Matrix 에서 스프링 시큐리티 프로젝트에서 구현되는 다양한 기능을 확인할 수 있다.
맞춤형 권한 부여 서버를 구현하는 대신 Keycloak 이나 Okta 같은 타사 툴을 선택할 수도 있다.
위와 같은 이유로 아래에 나오는 내용은 보지 않아도 됨…
1. 맞춤형 권한 부여 서버 구현
OAuth 2 에서 가장 중요한 것은 액세스 토큰을 얻는 것이며, OAuth 2 아키텍처에서 액세스 토큰을 발행하는 구성 요소는 권한 부여 서버이기 때문에 권한 부여 서버가 없으면 OAuth 2 흐름도 없다.
리소스 서버가 액세스 토큰을 검증하는 방법은 1.3. JWT 를 이용하는 리소스 서버 구현 을 참고하세요.
소스는 github 에 있습니다.
pom.xml
<?xml version="1.0" encoding="UTF-8"?>
<project xmlns:xsi="http://www.w3.org/2001/XMLSchema-instance" xmlns="http://maven.apache.org/POM/4.0.0"
         xsi:schemaLocation="http://maven.apache.org/POM/4.0.0 https://maven.apache.org/xsd/maven-4.0.0.xsd">
    <modelVersion>4.0.0</modelVersion>
    <parent>
        <groupId>org.springframework.boot</groupId>
        <artifactId>spring-boot-starter-parent</artifactId>
        <version>3.2.3</version>
        <relativePath/> <!-- lookup parent from repository -->
    </parent>
    <groupId>com.assu.study</groupId>
    <artifactId>chap1301</artifactId>
    <version>0.0.1-SNAPSHOT</version>
    <name>chap1301</name>
    <description>chap1301</description>

    <properties>
        <java.version>17</java.version>
        <spring-cloud.version>Hoxton.SR1</spring-cloud.version>
    </properties>
    <dependencies>
        <!--		<dependency>-->
        <!--			<groupId>org.springframework.boot</groupId>-->
        <!--			<artifactId>spring-boot-starter-oauth2-authorization-server</artifactId>-->
        <!--		</dependency>-->
        <dependency>
            <groupId>org.springframework.cloud</groupId>
            <artifactId>spring-cloud-starter-oauth2</artifactId>
        </dependency>

        <dependency>
            <groupId>org.springframework.boot</groupId>
            <artifactId>spring-boot-starter-security</artifactId>
        </dependency>
        <dependency>
            <groupId>org.springframework.boot</groupId>
            <artifactId>spring-boot-starter-web</artifactId>
        </dependency>

        <dependency>
            <groupId>org.springframework.boot</groupId>
            <artifactId>spring-boot-starter-test</artifactId>
            <scope>test</scope>
        </dependency>
        <dependency>
            <groupId>org.springframework.security</groupId>
            <artifactId>spring-security-test</artifactId>
            <scope>test</scope>
        </dependency>
    </dependencies>

    <!-- dependencyManagement 추가 -->
    <dependencyManagement>
        <dependencies>
            <dependency>
                <groupId>org.springframework.cloud</groupId>
                <artifactId>spring-cloud-dependencies</artifactId>
                <version>${spring-cloud.version}</version>
                <type>pom</type>
                <scope>import</scope>
            </dependency>
        </dependencies>
    </dependencyManagement>

    <build>
        <plugins>
            <plugin>
                <groupId>org.springframework.boot</groupId>
                <artifactId>spring-boot-maven-plugin</artifactId>
                <version>${parent.version}</version>
            </plugin>
        </plugins>
    </build>

</project>
이제 AuthorizationServerConfigurerAdapter 클래스를 확장하고, 특정 메서드들을 재정의해나가며 맞춤 구성을 해나간다.
/config/AuthServerConfig.java
import org.springframework.context.annotation.Configuration;
import org.springframework.security.oauth2.config.annotation.web.configuration.AuthorizationServerConfigurerAdapter;
import org.springframework.security.oauth2.config.annotation.web.configuration.EnableAuthorizationServer;

@Configuration
@EnableAuthorizationServer  // 스프링 부트에 OAuth 2 권한 부여 서버에 관한 구성을 활성화하도록 지시
public class AuthServerConfig extends AuthorizationServerConfigurerAdapter {
  // ... TODO
}
권한 부여 서버를 이용하려면 아래와 같은 조건이 마련되어야 한다.
- 사용자 관리 구현
- 하나 이상의 클라이언트 등록
- 어떤 그랜트 유형을 지원할 지 결정
2. 사용자 관리 정의
권한 부여 서버는 OAuth 2 프레임워크에서 사용자 인증을 담당하는 구성 요소이기 때문에 자연스럽게 사용자를 관리하는 역할도 한다.
UserDetails, UserDetailsService, UserDetailsManager 계약을 이용하여 자격 증명을 관리하고, 암호 관리는 PasswordEncoder 계약을 이용한다.
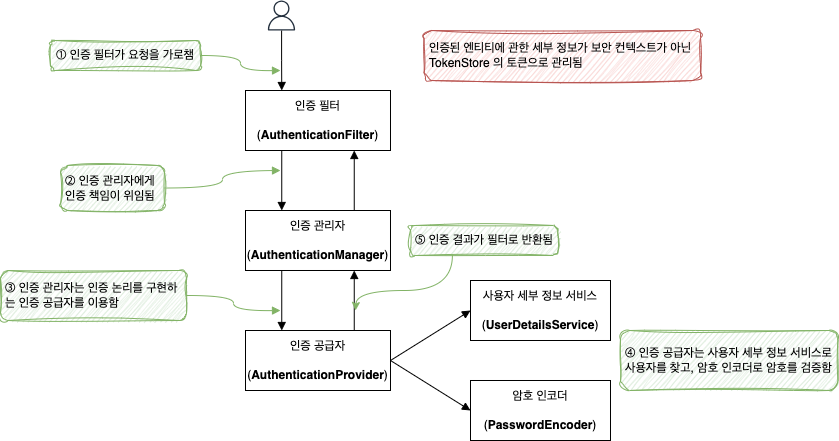
위 다이어그램에는 SecurityContext 가 없다.
이제 인증의 결과가 SecurityContext 가 아닌 TokenStore 의 토큰으로 관리되기 때문이다.
이제 사용자 관리에 필요한 구성 클래스를 작성한다.
/config/WebSecurityConfig.java
import org.springframework.context.annotation.Bean;
import org.springframework.context.annotation.Configuration;
import org.springframework.security.authentication.AuthenticationManager;
import org.springframework.security.authentication.ProviderManager;
import org.springframework.security.core.userdetails.User;
import org.springframework.security.core.userdetails.UserDetails;
import org.springframework.security.core.userdetails.UserDetailsService;
import org.springframework.security.crypto.password.NoOpPasswordEncoder;
import org.springframework.security.crypto.password.PasswordEncoder;
import org.springframework.security.provisioning.InMemoryUserDetailsManager;

/**
 * 사용자 관리 구성 클래스
 */
@Configuration
public class WebSecurityConfig {

  @Bean
  public UserDetailsService customUserDetailsService() {
    // UserDetailsService 로써 InMemoryUserDetailsManager 선언
    InMemoryUserDetailsManager uds = new InMemoryUserDetailsManager();

    UserDetails user = User.withUsername("assu")
        .password("1111")
        .authorities("read")
        .build();

    uds.createUser(user);

    return uds;
  }

  // UserDetailsService 를 재정의하면 PasswordEncoder 도 재정의해야함
  @Bean
  public PasswordEncoder passwordEncoder() {
    return NoOpPasswordEncoder.getInstance();
  }

  // AuthenticationManager 를 스프링 컨텍스트에 빈으로 노출시킨 후 AuthServerConfig 에서 사용
  @Bean
  public AuthenticationManager authenticationManager() {
    return new ProviderManager();
  }
}
/config/AuthServerConfig.java
import org.springframework.context.annotation.Configuration;
import org.springframework.security.authentication.AuthenticationManager;
import org.springframework.security.oauth2.config.annotation.web.configuration.AuthorizationServerConfigurerAdapter;
import org.springframework.security.oauth2.config.annotation.web.configuration.EnableAuthorizationServer;
import org.springframework.security.oauth2.config.annotation.web.configurers.AuthorizationServerEndpointsConfigurer;

/**
 * 인증 구성 클래스
 */
@Configuration
@EnableAuthorizationServer  // 스프링 부트에 OAuth 2 권한 부여 서버에 관한 구성을 활성화하도록 지시
public class AuthServerConfig extends AuthorizationServerConfigurerAdapter {

  private final AuthenticationManager authenticationManager;

  public AuthServerConfig(AuthenticationManager authenticationManager) {
    this.authenticationManager = authenticationManager;
  }

  // 권한 부여 서버에 AuthenticationManager 를 등록
  @Override
  public void configure(AuthorizationServerEndpointsConfigurer endpoints) {
    endpoints.authenticationManager(authenticationManager);
  }
}
이제 사용자가 인증 서버(권한 부여 서버)에서 인증할 수 있다.
3. 권한 부여 서버에 클라이언트 등록
권한 부여 서버에 클라이언트를 알리는 방법에 대해 알아본다.
OAuth 2 아키텍처에서 클라이언트 앱이 권한 부여 서버를 호출하려면 클라이언트 자격 증명이 필요한데, 권한 부여 서버는 사용자 자격 증명 뿐 아니라 클라이언트 자격 증명도 관리한다.
Spring Security - OAuth 2(2): 승인 코드 그랜트 유형을 이용한 간단한 SSO App 구현 을 보면 구축한 클라이언트 애플리케이션은 깃허브를 인증 서버로 이용한다.
그러기 위해 깃허브에 구축한 애플리케이션을 등록하여 클라이언트 자격 증명인 Client ID, Client secrets 를 받은 후 구축한 클라이언트에서 권한 부여 서버(깃허브)에 인증하는데 이용하였다.
비슷하게 이번에 구축하는 권한 부여 서버도 알려진 클라이언트의 요청만 받으므로 클라이언트를 먼저 알려주어야 한다.
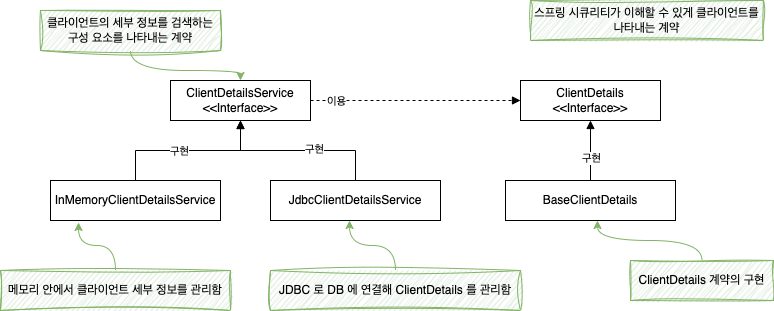
권한 부여 서버에서 클라이언트를 정의하는 일은 ClientDetails 계약이 담당하고, 해당 ID 로 ClientDetails 를 검색하는 객체를 정의하는 계약은 ClientDetailService 이다.
UserDetails, UserDetailsService 인터페이스와 유사하다.
InMemoryClientDetailsService 는 ClientDetailsService 인터페이스의 구현체이고, 메모리 안에서 ClientDetails 를 관리한다. (UserDetails 와 InMemoryUserDetailsManager 처럼)
JdbcClientDetailsService 는 JdbcUserDetailsService 와 비슷하다.
이제 클라이언트의 구성을 정의하고, InMemoryClienDetailsService 를 이용해 설정한다.
BaseClientDetials 클래스는 ClientDetails 인터페이스의 구현체이다.
/config/AuthServerConfig.java
package com.assu.study.chap1301.config;

import org.springframework.context.annotation.Configuration;
import org.springframework.security.oauth2.config.annotation.configurers.ClientDetailsServiceConfigurer;
import org.springframework.security.oauth2.config.annotation.web.configuration.AuthorizationServerConfigurerAdapter;
import org.springframework.security.oauth2.config.annotation.web.configuration.EnableAuthorizationServer;
import org.springframework.security.oauth2.provider.client.BaseClientDetails;
import org.springframework.security.oauth2.provider.client.InMemoryClientDetailsService;

import java.util.List;
import java.util.Map;

/**
 * 인증 구성 클래스
 */
@Configuration
@EnableAuthorizationServer  // 스프링 부트에 OAuth 2 권한 부여 서버에 관한 구성을 활성화하도록 지시
public class AuthServerConfig extends AuthorizationServerConfigurerAdapter {

  //  ...

  // 클라이언트 구성을 정의하고, InMemoryClientDetailsService 를 이용해 설정
  // ClientDetailsService 인스턴스를 설정하도록 configurer() 메서드 재정의
  @Override
  public void configure(ClientDetailsServiceConfigurer clients) throws Exception {
    // ClientDetailsService 구현을 이용하여 인스턴스 생성
    InMemoryClientDetailsService service = new InMemoryClientDetailsService();

    // ClientDetails 의 인스턴스를 만든 후 클라이언트에 대한 필수 세부 정보 설정
    BaseClientDetails cd = new BaseClientDetails();
    cd.setClientId("client");
    cd.setClientSecret("secret");
    cd.setScope(List.of("read"));
    cd.setAuthorizedGrantTypes(List.of("password"));

    // InMemoryClientDetailsService 에 ClientDetails 인스턴스 추가
    service.setClientDetailsStore(Map.of("client", cd));

    // 권한 부여 서버에서 사용할 수 있게 ClientDetailsService 구성
    clients.withClientDetails(service);
  }
}
위 코드는 아래와 같이 더 간결하게도 작성할 수 있다.
/config/AuthServerConfig.java
package com.assu.study.chap1301.config;

import org.springframework.context.annotation.Configuration;
import org.springframework.security.oauth2.config.annotation.configurers.ClientDetailsServiceConfigurer;
import org.springframework.security.oauth2.config.annotation.web.configuration.AuthorizationServerConfigurerAdapter;
import org.springframework.security.oauth2.config.annotation.web.configuration.EnableAuthorizationServer;

/**
 * 인증 구성 클래스
 */
@Configuration
@EnableAuthorizationServer  // 스프링 부트에 OAuth 2 권한 부여 서버에 관한 구성을 활성화하도록 지시
public class AuthServerConfig extends AuthorizationServerConfigurerAdapter {

  //  ...

  // 클라이언트 구성을 정의하고, InMemoryClientDetailsService 를 이용해 설정
  // ClientDetailsService 인스턴스를 설정하도록 configurer() 메서드 재정의
  @Override
  public void configure(ClientDetailsServiceConfigurer clients) throws Exception {
    clients.inMemory()  // ClientDetailsService 구현을 이용하여 메모리에 저장된 ClientDetails 관리
        .withClient("client")
        .secret("secret")
        .authorizedGrantTypes("password", "refresh_token")
        .scopes("read");
  }
}
간결하게 작성하는 것이 좋지만, 실제 운영 시엔 DB 에 클라이언트 세부 정보를 저장하는 경우가 많으므로 처음에 나온 방법대로 ClientDetailsService 계약을 이용하는 것이 좋다.
여기선 클라이언트의 세부 정보를 메모리에서 관리하지만 실제 운영 시엔 DB 에 저장하여 관리해야 한다. (사용자 세부 정보도 마찬가지)
클라이언트 세부 정보를 DB 로 관리하는 구현은 3. 스프링 시큐리티가 사용자를 관리하는 방법 지정 을 참고하세요.
참고 사이트 & 함께 보면 좋은 사이트
본 포스트는 로렌티우 스필카 저자의 스프링 시큐리티 인 액션을 기반으로 스터디하며 정리한 내용들입니다.
- 스프링 시큐리티 인 액션
- Configuration Migrations
- Spring Boot 3.x + Security 6.x 기본 설정 및 변화
- 스프링 부트 2.0에서 3.0 스프링 시큐리티 마이그레이션 (변경점)
- 스프링 시큐리티 OAuth 2 종속성 지원 중단
- Spring Cloud 와 Spring Boot 호환 버전
- No Authorization Server Support
- 새로운 권한 부여 서버를 개발 중이라는 공지
- OAuth 2.0 Features Matrix 에서 스프링 시큐리티
- spring-authorization-server를 이용하여 인증 서버(auth server) 만들기
- Spring boot 3.1.2 + Spring Boot Starter OAuth2 Authorization Server 적용기
- Spring 기반 OAuth 2.1 Authorization Server 개발 찍먹해보기
- HttpSeurity.apply() derpeciated
