Node.js - MySQL, 시퀄라이즈
in DEV on Javascript Nodejs Mysql Sequelize
이 포스트는 시퀄라이즈의 사용법에 대해 알아본다.
소스는 assu10/nodejs.git 에 있습니다.
- MySQL
- 시퀄라이즈
- MySQL 연결
- 모델 정의
- 관계 정의
- 1:N (
hasMany,belongsTo)- 1:1 (
hasOne,belongsTo)- N:M (
belongsToMany,belongsToMany)- 쿼리
- 관계 쿼리
- SQL 쿼리
- 쿼리 수행
1. MySQL
지금까지는 모든 데이터를 변수에 저장했는데 변수에 저장했다는 것은 컴퓨터 메모리에 저장했다는 의미이고,
이 의미는 서버가 종료되면 메모리가 정리되면서 저장했던 데이터도 모두 사라진다는 의미이다.
이를 방지하기 위해 데이터베이스를 사용하는데 이 포스트에선 MySQL 에 대해 알아본다.
MySQL 의 기본 개념과 워크벤치 사용법은 따로 찾아보세요. ^^
포스트 기준일 mysql 설치버전은 8.0.27 입니다.
mysql 설치 및 접속
> brew install mysql  # mysql 설치
> brew services start mysql # mysql 시작
> mysql_secure_installation # root 비밀번호 설정
> mysql -h localhost -u root -p # mysql 접속
워크벤치 설치
> brew install --cask mysqlworkbench
저는 워크벤치 대신 jetBrain 의 datagrip 을 사용합니다.
2. 시퀄라이즈
시퀄라이즈는 MySQL 작업을 쉽게 할 수 있도록 도와주는 ORM 라이브러리 이다.
ORM (Object-relational Mapping)
자바스크립트 객체와 데이터베이스의 릴레이션을 매핑해주는 도구
시퀄라이즈는 MySQL 외 MariaDB, PostgreSQL, SQLite, MSSQL 등 다른 데이터베이스와 같이 쓸 수도 있다.
시퀄라이즈를 쓰는 이유는 자바스크립트 구문을 알아서 SQL 로 바꿔주기 때문이다.
> npm init --y
> npm i express morgan nunjucks sequelize sequelize-cli mysql2
> npm i -D eslint eslint-config-prettier eslint-plugin-prettier nodemon
> npm i -D prettier --save-exact
sequelize-cli- 시퀄라이즈 명령어를 실행하기 위한 패키지
mysql2- MySQL 과 시퀄라이즈를 이어주는 드라이버로, mysql2 자체가 데이터베이스 프로그램은 아니므로 오해하면 안 됨.
package.json
{
  "name": "chap07",
  "version": "1.0.0",
  "description": "",
  "main": "app.js",
  "scripts": {
    "start": "nodemon app"
  },
  "keywords": [

  ],
  "author": "",
  "license": "ISC",
  "dependencies": {
    "express": "^4.17.1",
    "morgan": "^1.10.0",
    "mysql2": "^2.3.3",
    "nunjucks": "^3.2.3",
    "sequelize": "^6.12.0-beta.1",
    "sequelize-cli": "^6.3.0"
  },
  "devDependencies": {
    "eslint": "^8.4.0",
    "eslint-config-prettier": "^8.3.0",
    "eslint-plugin-prettier": "^4.0.0",
    "nodemon": "^2.0.15",
    "prettier": "2.5.1"
  }
}
.eslintrc.json
{
  "env": {
    "browser": true,
    "es2021": true,
    "node": true
  },
  "extends": [
    "eslint:recommended",
    "plugin:prettier/recommended"
  ],
  "parserOptions": {
    "ecmaVersion": 13,
    "sourceType": "module"
  },
  "rules": {
  }
}
.prettierrc.js
module.exports = {
    singleQuote: true,
    // 문자열은 따옴표로 formatting
    semi: true,
    //코드 마지막에 세미콜른이 있게 formatting
    useTabs: false,
    //탭의 사용을 금하고 스페이스바 사용으로 대체하게 formatting
    tabWidth: 2,
    // 들여쓰기 너비는 2칸
    trailingComma: 'all',
    // 자세한 설명은 구글링이 짱이긴하나 객체나 배열 키:값 뒤에 항상 콤마를 붙히도록 	  	//formatting
    printWidth: 80,
    // 코드 한줄이 maximum 80칸
    arrowParens: 'avoid',
    // 화살표 함수가 하나의 매개변수를 받을 때 괄호를 생략하게 formatting
    endOfLine: "auto"
};
패키지 설치 후 sequelize init 명령어 혹은 전역 설치 없이 명령어를 사용하려면 npx sequelize init 을 호출한다.
> npx sequelize init

Sequelize CLI [Node: 16.6.0, CLI: 6.3.0, ORM: 6.12.0-beta.1]

Created "config/config.json"
Successfully created models folder at "/Users/assu/Developer/01_nodejs/mynode/chap07/models".
Successfully created migrations folder at "/Users/assu/Developer/01_nodejs/mynode/chap07/migrations".
Successfully created seeders folder at "/Users/assu/Developer/01_nodejs/mynode/chap07/seeders".
models/index.js 를 아래와 같이 수정한다.
models/index.js
'use strict';

const Sequelize = require('sequelize');

const env = process.env.NODE_ENV || 'development';
const config = require('../config/config')[env];
const db = {};

// 시퀄라이즈 MySQL 연결 객체 생성
let sequelize;
if (config.use_env_variable) {
  sequelize = new Sequelize(process.env[config.use_env_variable], config);
} else {
  sequelize = new Sequelize(
    config.database,
    config.username,
    config.password,
    config,
  );
}

// 연결 객체를 나중에 재사용하기 위함
db.sequelize = sequelize;

module.exports = db;
3. MySQL 연결
시퀄라이즈를 통해 express 앱과 MySQL 을 연결한다.
app.js
const express = require('express');
const path = require('path');
const morgan = require('morgan');
const nunjucks = require('nunjucks');

const { sequelize } = require('./models');

const app = express();
app.set('port', process.env.PORT || 3000);
app.set('view engine', {
  express: app,
  watch: true,
});

// models/index.js 의 db.sequelize 를 불러와서 sync 메서드를 사용해 서버 실행 시 MySQL 과 연동되도록 함
sequelize
  .sync({ force: false }) // true 로 설정 시 서버 실행 시마다 테이블 재생성
  .then(() => {
    console.log('데이터베이스 연결 성공');
  })
  .catch(err => {
    console.error('ERR~~', err);
  });

app.use(morgan('dev'));
app.use(express.static(path.join(__dirname, 'public')));
app.use(express.json());
app.use(express.urlencoded({ extended: false }));

app.use((req, res, next) => {
  const error = new Error(`${req.method} ${req.url} 라우터 없음`);
  error.status = 404;
  next(error);
});

app.use((err, req, res, next) => {
  res.locals.message = err.message;
  res.locals.error = process.env.NODE_ENV !== 'production' ? err : {};
  res.status(err.status || 500);
  res.render('error');
});

app.listen(app.get('port'), () => {
  console.log(app.get('port'), '번 포트에서 대기 중');
});
config/config.json
{
  "development": {
    "username": "root",
    "password": "1234",
    "database": "nodejs",
    "host": "127.0.0.1",
    "dialect": "mysql"
  },
  "test": {
    "username": "root",
    "password": null,
    "database": "database_test",
    "host": "127.0.0.1",
    "dialect": "mysql"
  },
  "production": {
    "username": "root",
    "password": null,
    "database": "database_production",
    "host": "127.0.0.1",
    "dialect": "mysql"
  }
}
npm start 로 서버 실행 시 아래와 같이 로그가 뜨면 정상적으로 DB 연결이 성공한 것이다.
npm start

> chap07@1.0.0 start
> nodemon app

[nodemon] 2.0.15
[nodemon] to restart at any time, enter `rs`
[nodemon] watching path(s): *.*
[nodemon] watching extensions: js,mjs,json
[nodemon] starting `node app.js`
3000 번 포트에서 대기 중
Executing (default): SELECT 1+1 AS result
데이터베이스 연결 성공
4. 모델 정의
users 테이블을 생성한 후 그에 연결될 모델을 만든다.
CREATE TABLE users (
	id INT NOT NULL AUTO_INCREMENT,
    name VARCHAR(20) NOT NULL,
    age INT UNSIGNED NOT NULL,
    married TINYINT NOT NULL,
    comment TEXT NULL,
    created_at DATETIME NOT NULL DEFAULT now(),
    PRIMARY KEY(id),
    UNIQUE INDEX name_UNIQUE (name ASC))
COMMENT = '사용자 정보'
DEFAULT CHARACTER SET = utf8
ENGINE = InnoDB;
models/user.js
const Sequelize = require('sequelize');

module.exports = class User extends Sequelize.Model {
  // 테이블에 대한 설정
  static init(sequelize) {
    return super.init(
            // 테이블 컬럼에 대한 설정
            {
              name: {
                type: Sequelize.STRING(20),
                allowNull: false,
                unique: true,
              },
              age: {
                type: Sequelize.INTEGER.UNSIGNED,
                allowNull: false,
              },
              married: {
                type: Sequelize.BOOLEAN,
                allowNull: false,
              },
              comment: {
                type: Sequelize.TEXT,
                allowNull: true,
              },
              created_at: {
                type: Sequelize.DATE,
                allowNull: false,
                defaultValue: Sequelize.NOW,
              },
            },
            // 테이블 자체에 대한 설정
            {
              sequelize,
              timestamps: false,
              underscored: false,
              modelName: 'User',
              tableName: 'users',
              paranoid: false,
              charset: 'utf8',
              collate: 'utf8_general_ci',
            },
    );
  }
  // 다른 모델과의 관계
  static associate(db) {}
};
User 모델을 만든 후 모듈로 exports 한다.
모델은 크게 static init 메서드 와 static associate 메서드 로 나뉘는데
static init 메서드 는 테이블에 대한 설정을 하고, static associate 메서드 는 다른 모델과의 관계를 정의한다.
static init 메서드 의 첫 번째 인수는 테이블 컬럼에 대한 설정이고, 두 번째 인수는 테이블 자체에 대한 설정이다.
시퀄라이즈는 알아서 id 를 기본키로 연결하므로 id 컬럼은 따로 적어줄 필요가 없다. 컬럼에 대한 데이터 유효성은 validate 를 통해 할 수 있는데 시퀄라이즈 공식 홈페이지 상의 나온 속성은 아래와 같다.
sequelize.define('foo', {
  bar: {
    type: DataTypes.STRING,
    validate: {
      is: /^[a-z]+$/i,          // matches this RegExp
      is: ["^[a-z]+$",'i'],     // same as above, but constructing the RegExp from a string
      not: /^[a-z]+$/i,         // does not match this RegExp
      not: ["^[a-z]+$",'i'],    // same as above, but constructing the RegExp from a string
      isEmail: true,            // checks for email format (foo@bar.com)
      isUrl: true,              // checks for url format (http://foo.com)
      isIP: true,               // checks for IPv4 (129.89.23.1) or IPv6 format
      isIPv4: true,             // checks for IPv4 (129.89.23.1)
      isIPv6: true,             // checks for IPv6 format
      isAlpha: true,            // will only allow letters
      isAlphanumeric: true,     // will only allow alphanumeric characters, so "_abc" will fail
      isNumeric: true,          // will only allow numbers
      isInt: true,              // checks for valid integers
      isFloat: true,            // checks for valid floating point numbers
      isDecimal: true,          // checks for any numbers
      isLowercase: true,        // checks for lowercase
      isUppercase: true,        // checks for uppercase
      notNull: true,            // won't allow null
      isNull: true,             // only allows null
      notEmpty: true,           // don't allow empty strings
      equals: 'specific value', // only allow a specific value
      contains: 'foo',          // force specific substrings
      notIn: [['foo', 'bar']],  // check the value is not one of these
      isIn: [['foo', 'bar']],   // check the value is one of these
      notContains: 'bar',       // don't allow specific substrings
      len: [2,10],              // only allow values with length between 2 and 10
      isUUID: 4,                // only allow uuids
      isDate: true,             // only allow date strings
      isAfter: "2011-11-05",    // only allow date strings after a specific date
      isBefore: "2011-11-05",   // only allow date strings before a specific date
      max: 23,                  // only allow values <= 23
      min: 23,                  // only allow values >= 23
      isCreditCard: true,       // check for valid credit card numbers

      // Examples of custom validators:
      isEven(value) {
        if (parseInt(value) % 2 !== 0) {
          throw new Error('Only even values are allowed!');
        }
      }
      isGreaterThanOtherField(value) {
        if (parseInt(value) <= parseInt(this.otherField)) {
          throw new Error('Bar must be greater than otherField.');
        }
      }
    }
  }
});
시퀄라이즈의 자료형은 MySQL 자료형과 약간 다르다.
| MySQL | 시퀄라이즈 |
|---|---|
| VARCHAR(100) | STRING(100) |
| INT | INTEGER |
| TINYINT | BOOLEAN |
| DATETIME | DATE |
| INT UNSIGNED | INTEGER.UNSIGNED |
| INT UNSIGNED ZEROFILL | INTEGER.UNSIGNED.ZEROFILL |
| NOT NULL | allowNull: false |
| UNIQUE | unique: true |
| DEFAULT now() | defaultValue: Sequelize.NOW |
super.init 메서드의 두 번째 인수
sequelize- static init 메서드의 매개변수와 연결되는 옵션으로 db.sequelize 객체를 넣어야 함
- models/index.js 에서 연결
timestamps- true 면 시퀄라이즈가 자동으로 createdAt, updatedAt 컬럼 추가
underscored- 시퀄라이즈는 기본적으로 테이블명과 컬럼명을 Camel Case 로 만드는데 true 로 설정 시 이를 Snake case 로 바꿔줌
modelNametableNameparanoid- true 로 설정 시 deletedAt 컬럼이 생기고, 데이터를 삭제할 때 데이터를 삭제하는 대신 deletedAt 에 지운 시각이 기록됨
- 이 속성을 사용하기 위해선 timestamps 가 true 로 설정되어 있어야 함
charset, collate- 각각 utf8, utf8_general_ci 로 설정해야 한글 입력 가능
- 이모지까지 입력해야 할 경우 utf8mb4 와 utf8mb4_general_ci 로 설정
이제 Comment 모델로 생성해보자.
CREATE TABLE comments (
	id INT NOT NULL AUTO_INCREMENT,
    commenter INT NOT NULL,
    comment VARCHAR(100) NOT NULL,
    created_at DATETIME NOT NULL DEFAULT now(),
    PRIMARY KEY(id),
    INDEX commenter_idx (commenter ASC),
    CONSTRAINT commenter FOREIGN KEY (commenter) REFERENCES users (id)
    ON DELETE CASCADE
    ON UPDATE CASCADE)
COMMENT = '댓글'
DEFAULT CHARSET=utf8mb4
ENGINE=InnoDB;
models/comment.js
const Sequelize = require('sequelize');

module.exports = class Comment extends Sequelize.Model {
  static init(sequelize) {
    return super.init(
      {
        comment: {
          type: Sequelize.STRING(100),
          allowNull: false,
        },
        created_at: {
          type: Sequelize.DATE,
          allowNull: true,
          defaultValue: Sequelize.NOW,
        },
      },
      {
        sequelize,
        timestamps: false,
        modelName: 'Comment',
        tableName: 'comments',
        paranoid: false,
        charset: 'utf8mb4',
        collate: 'utf8mb4_general_ci',
      },
    );
  }

  static associate(db) {}
};
보면 users 테이블과 연결된 컬럼인 commenter 컬럼이 없는데 이 부분은 모델을 정의할 때 넣어도 되지만 시퀄라이즈 자체에서 관계를 따로 정의할 수도 있다.
해당 내용은 바로 뒷부분에 나온다.
모델 생성 후 models/index.js 와 연결한다.
'use strict';

const Sequelize = require('sequelize');
const User = require('./user');
const Comment = require('./comment');

...

// 연결 객체를 나중에 재사용하기 위함
db.sequelize = sequelize;

// db 객체에 모델을 담아두기 때문에 앞으로 db 객체를 require 해서 User, Comment 모델에 접근 가능
db.User = User;
db.Comment = Comment;

// 각 모델의 static.init 메서드 호출, 이게 실행되어야 테이블에 모델로 연결
User.init(sequelize);
Comment.init(sequelize);

// 다른 테이블과의 관계 연결
User.associate(db);
Comment.associate(db);

module.exports = db;
5. 관계 정의
MySQL 에서는 join 기능으로 여러 테이블 간의 관계를 파악하여 결과를 도출한다.
시퀄라이즈는 join 기능도 알아서 구현한다. 대신 테이블 간에 어떤 관계가 있는지 시퀄라이즈에게 알려주어야 한다.
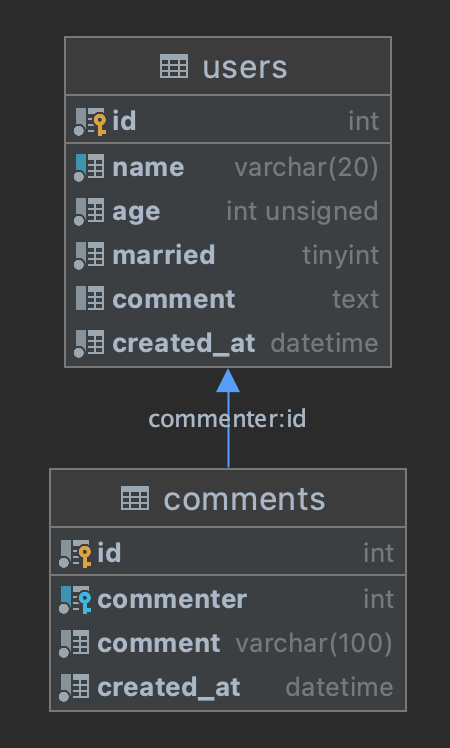
5.1. 1:N (hasMany, belongsTo)
먼저 아래 만들 테이블의 ERD 와 Schema 는 아래와 같다.

CREATE TABLE `users` (
  `id` int NOT NULL AUTO_INCREMENT,
  `name` varchar(20) NOT NULL,
  `age` int unsigned NOT NULL,
  `married` tinyint NOT NULL,
  `comment` text,
  `created_at` datetime NOT NULL DEFAULT CURRENT_TIMESTAMP,
  PRIMARY KEY (`id`),
  UNIQUE KEY `name_UNIQUE` (`name`)
) ENGINE=InnoDB DEFAULT CHARSET=utf8mb3 COMMENT='사용자 정보'
CREATE TABLE `comments` (
  `id` int NOT NULL AUTO_INCREMENT,
  `commenter` int NOT NULL,
  `comment` varchar(100) NOT NULL,
  `created_at` datetime NOT NULL DEFAULT CURRENT_TIMESTAMP,
  PRIMARY KEY (`id`),
  KEY `commenter_idx` (`commenter`),
  CONSTRAINT `commenter` FOREIGN KEY (`commenter`) REFERENCES `users` (`id`)
      ON DELETE CASCADE ON UPDATE CASCADE
) ENGINE=InnoDB DEFAULT CHARSET=utf8mb4 COLLATE=utf8mb4_0900_ai_ci COMMENT='댓글'
시퀄라이즈는 1:N 관계를 hasMany 와 belongsTo 메서드로 표현한다.
hasMany 메서드로 users 테이블의 row 조회 시 연결된 comments 테이블의 row 들도 함께 조회할 수 있다.
belongsTo 메서드로 comments 테이블의 row 조회 시 연결된 users 테이블의 row 도 함께 조회할 수 있다.
다른 모델의 정보가 들어가는 테이블에 belongsTo 를 사용한다.
db.User.hasMany(db.Comment, { foreignKey: 'commenter', sourceKey: 'id' });
db.Comment.belongsTo(db.User, { foreignKey: 'commenter', targetKey: 'id' });
models/user.js
const Sequelize = require('sequelize');

module.exports = class User extends Sequelize.Model {
  // 테이블에 대한 설정
  static init(sequelize) {
    return super.init(
            // 테이블 컬럼에 대한 설정
            {
              name: {
                type: Sequelize.STRING(20),
                allowNull: false,
                unique: true,
              },
              age: {
                type: Sequelize.INTEGER.UNSIGNED,
                allowNull: false,
              },
              married: {
                type: Sequelize.BOOLEAN,
                allowNull: false,
              },
              comment: {
                type: Sequelize.TEXT,
                allowNull: true,
              },
              created_at: {
                type: Sequelize.DATE,
                allowNull: false,
                defaultValue: Sequelize.NOW,
              },
            },
            // 테이블 자체에 대한 설정
            {
              sequelize,
              timestamps: false,
              underscored: false,
              modelName: 'User',
              tableName: 'users',
              paranoid: false,
              charset: 'utf8',
              collate: 'utf8_general_ci',
            },
    );
  }
  // 다른 모델과의 관계
  static associate(db) {
    db.User.hasMany(db.Comment, { foreignKey: 'commenter', sourceKey: 'id' });
  }
};
models/comment.js
const Sequelize = require('sequelize');

module.exports = class Comment extends Sequelize.Model {
  // 테이블에 대한 설정
  static init(sequelize) {
    // 테이블 컬럼에 대한 설정
    return super.init(
            {
              comment: {
                type: Sequelize.STRING(100),
                allowNull: false,
              },
              created_at: {
                type: Sequelize.DATE,
                allowNull: true,
                defaultValue: Sequelize.NOW,
              },
            },
            // 테이블 자체에 대한 설정
            {
              sequelize,
              timestamps: false,
              modelName: 'Comment',
              tableName: 'comments',
              paranoid: false,
              charset: 'utf8mb4',
              collate: 'utf8mb4_general_ci',
            },
    );
  }
  // 다른 모델과의 관계, commenter 라는 FK 컬럼 생성
  // foreignKey 를 설정하지 않으면 UserId (모델명+기본키) 로 FK 컬럼 생성
  static associate(db) {
    db.Comment.belongsTo(db.User, { foreignKey: 'commenter', targetKey: 'id' });
  }
};
Comment 모델에 foreignKey 인 commenter 컬럼을 추가한다.
Commenter 모델의 외래 키 컬럼은 commenter 이고, User 모델의 id 컬럼을 가리킨다.
만일 foreignKey 를 따로 지정하지 않으면 기본적으로 모델명+기본키인 컬럼이 외래키로 모델에 생성된다. 예) user + id = UserId
npm start 를 서버를 재실행하면 아래와 같은 쿼리가 실행이 되는 것을 확인할 수 있다.
Executing (default): CREATE TABLE IF NOT EXISTS `users` (`id` INTEGER NOT NULL auto_increment , `name` VARCHAR(20) NOT NULL UNIQUE, `age` INTEGER UNSIGNED NOT NULL, `married` TINYINT(1) NOT NULL, `comment` TEXT, `created_at` DATETIME NOT NULL, PRIMARY KEY (`id`)) ENGINE=InnoDB DEFAULT CHARSET=utf8 COLLATE utf8_general_ci;
Executing (default): SHOW INDEX FROM `users` FROM `nodejs`
Executing (default): CREATE TABLE IF NOT EXISTS `comments` (`id` INTEGER NOT NULL auto_increment , `comment` VARCHAR(100) NOT NULL, `created_at` DATETIME, `commenter` INTEGER, PRIMARY KEY (`id`), FOREIGN KEY (`commenter`) REFERENCES `users` (`id`) ON DELETE SET NULL ON UPDATE CASCADE) ENGINE=InnoDB DEFAULT CHARSET=utf8mb4 COLLATE utf8mb4_general_ci;
Executing (default): SHOW INDEX FROM `comments` FROM `nodejs`
데이터베이스 연결 성공
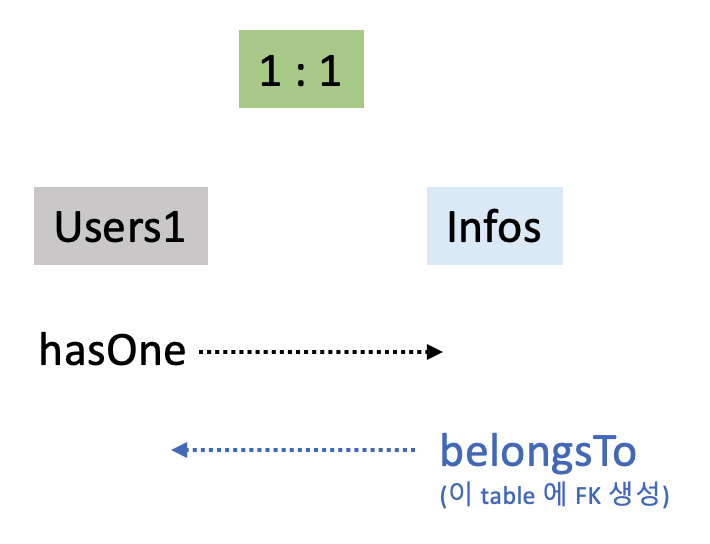
5.2. 1:1 (hasOne, belongsTo)
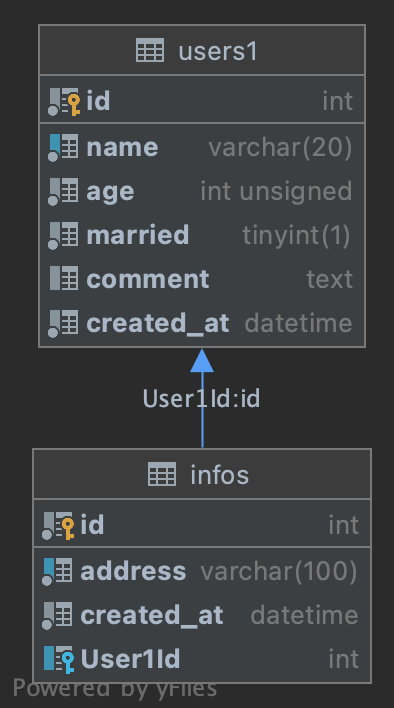
CREATE TABLE `users1` (
  `id` int NOT NULL AUTO_INCREMENT,
  `name` varchar(20) NOT NULL,
  `age` int unsigned NOT NULL,
  `married` tinyint(1) NOT NULL,
  `comment` text,
  `created_at` datetime NOT NULL,
  PRIMARY KEY (`id`),
  UNIQUE KEY `name` (`name`)
) ENGINE=InnoDB DEFAULT CHARSET=utf8mb3
CREATE TABLE `infos` (
  `id` int NOT NULL AUTO_INCREMENT,
  `address` varchar(100) NOT NULL,
  `created_at` datetime NOT NULL,
  `User1Id` int DEFAULT NULL,
  PRIMARY KEY (`id`),
  UNIQUE KEY `address` (`address`),
  KEY `User1Id` (`User1Id`),
  CONSTRAINT `infos_ibfk_1` FOREIGN KEY (`User1Id`) REFERENCES `users1` (`id`)
      ON DELETE SET NULL ON UPDATE CASCADE
) ENGINE=InnoDB DEFAULT CHARSET=utf8mb3
db.User.hasOne(db.Info, { foreignKey: 'UserId', sourceKey: 'id' });
db.Info.belongsTo(db.User, { foreignKey: 'UserId', targetKey: 'id' });
models/user1.js
const Sequelize = require('sequelize');

module.exports = class User1 extends Sequelize.Model {
  // 테이블에 대한 설정
  static init(sequelize) {
    return super.init(
      // 테이블 컬럼에 대한 설정
      {
        name: {
          type: Sequelize.STRING(20),
          allowNull: false,
          unique: true,
        },
        age: {
          type: Sequelize.INTEGER.UNSIGNED,
          allowNull: false,
        },
        married: {
          type: Sequelize.BOOLEAN,
          allowNull: false,
        },
        comment: {
          type: Sequelize.TEXT,
          allowNull: true,
        },
        created_at: {
          type: Sequelize.DATE,
          allowNull: false,
          defaultValue: Sequelize.NOW,
        },
      },
      // 테이블 자체에 대한 설정
      {
        sequelize,
        timestamps: false,
        underscored: false,
        modelName: 'User1',
        tableName: 'users1',
        paranoid: false,
        charset: 'utf8',
        collate: 'utf8_general_ci',
      },
    );
  }
  // 다른 모델과의 관계
  static associate(db) {
    db.User1.hasOne(db.Info);
  }
};
models/info.js
const Sequelize = require('sequelize');

module.exports = class Info extends Sequelize.Model {
  // 테이블에 대한 설정
  static init(sequelize) {
    return super.init(
      // 테이블 컬럼에 대한 설정
      {
        address: {
          type: Sequelize.STRING(100),
          allowNull: false,
          unique: true,
        },
        created_at: {
          type: Sequelize.DATE,
          allowNull: false,
          defaultValue: Sequelize.NOW,
        },
      },
      // 테이블 자체에 대한 설정
      {
        sequelize,
        timestamps: false,
        underscored: false,
        modelName: 'Info',
        tableName: 'infos',
        paranoid: false,
        charset: 'utf8',
        collate: 'utf8_general_ci',
      },
    );
  }
  // 다른 모델과의 관계
  // foreignKey 를 설정하지 않으면 User1Id (모델명+기본키) 로 FK 컬럼 생성
  static associate(db) {
    db.Info.belongsTo(db.User1);
  }
};
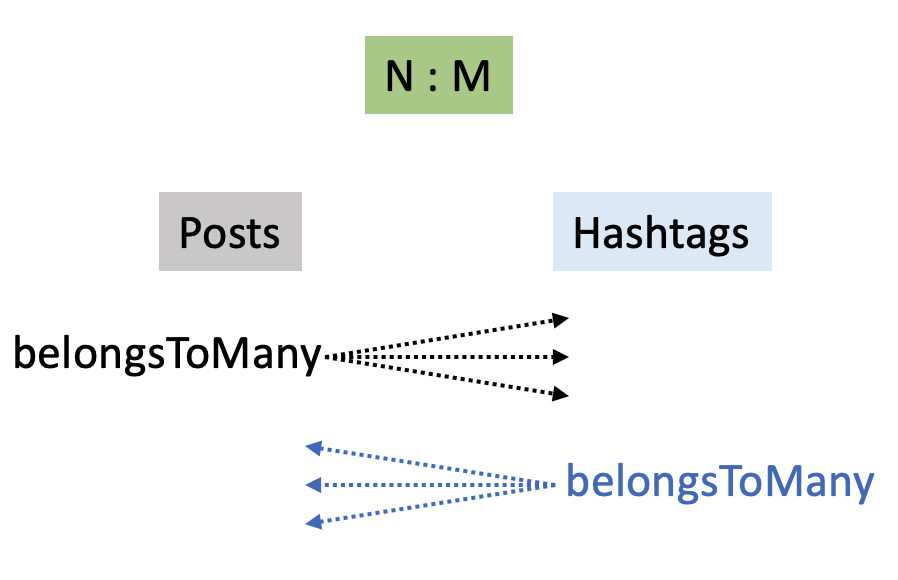
5.3. N:M (belongsToMany, belongsToMany)
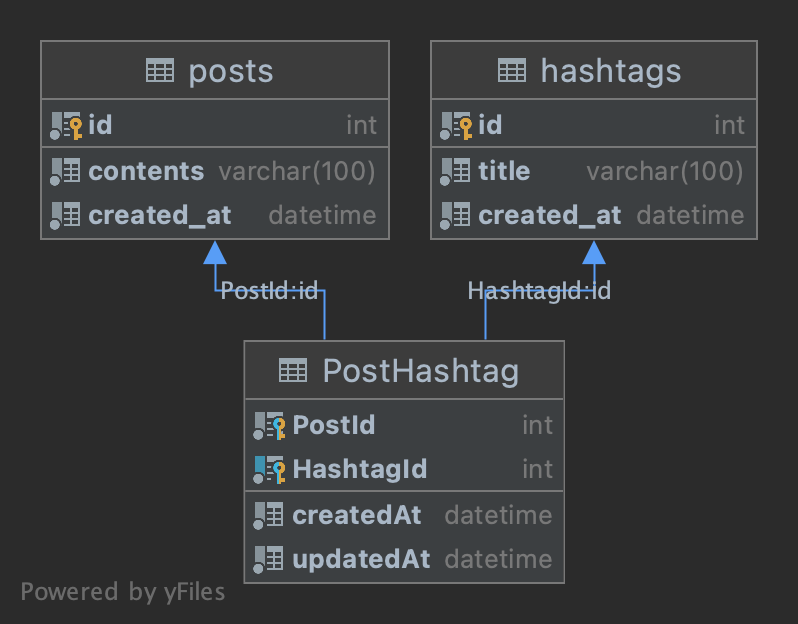
CREATE TABLE `posts` (
   `id` int NOT NULL AUTO_INCREMENT,
   `contents` varchar(100) NOT NULL,
   `created_at` datetime NOT NULL,
   PRIMARY KEY (`id`)
) ENGINE=InnoDB DEFAULT CHARSET=utf8mb3
CREATE TABLE `hashtags` (
    `id` int NOT NULL AUTO_INCREMENT,
    `title` varchar(100) NOT NULL,
    `created_at` datetime NOT NULL,
    PRIMARY KEY (`id`)
) ENGINE=InnoDB DEFAULT CHARSET=utf8mb3
CREATE TABLE `PostHashtag` (
  `createdAt` datetime NOT NULL,
  `updatedAt` datetime NOT NULL,
  `PostId` int NOT NULL,
  `HashtagId` int NOT NULL,
  PRIMARY KEY (`PostId`,`HashtagId`),
  KEY `HashtagId` (`HashtagId`),
  CONSTRAINT `posthashtag_ibfk_1` FOREIGN KEY (`PostId`) REFERENCES `posts` (`id`)
      ON DELETE CASCADE ON UPDATE CASCADE,
  CONSTRAINT `posthashtag_ibfk_2` FOREIGN KEY (`HashtagId`) REFERENCES `hashtags` (`id`)
      ON DELETE CASCADE ON UPDATE CASCADE
) ENGINE=InnoDB DEFAULT CHARSET=utf8mb3
db.Post.belongsToMany(db.Hashtag, { through: 'PostHashtag' });
db.Hashtag.belongsToMany(db.Post, { throuth: 'PostHashtag' });
N:M 관계 특성상 새로운 모델이 생성되는데 위 예시로 보면 postId, hashtagId 컬럼을 가진 PostHashtag 모델이 생성된다.
자동으로 만들어진 모델들도 아래와 같이 접근할 수 있다.
db.sequelize.models.PostHashtag
models/post.js
const Sequelize = require('sequelize');

module.exports = class Post extends Sequelize.Model {
  // 테이블에 대한 설정
  static init(sequelize) {
    return super.init(
      // 테이블 컬럼에 대한 설정
      {
        contents: {
          type: Sequelize.STRING(100),
          allowNull: false,
        },
        created_at: {
          type: Sequelize.DATE,
          allowNull: false,
          defaultValue: Sequelize.NOW,
        },
      },
      // 테이블 자체에 대한 설정
      {
        sequelize,
        timestamps: false,
        underscored: false,
        modelName: 'Post',
        tableName: 'posts',
        paranoid: false,
        charset: 'utf8',
        collate: 'utf8_general_ci',
      },
    );
  }
  // 다른 모델과의 관계
  // belongsToMany 인 경우 through 필수
  static associate(db) {
    db.Post.belongsToMany(db.Hashtag, { through: 'PostHashtag' });
  }
};
models/hashtags.js
const Sequelize = require('sequelize');

module.exports = class Hashtag extends Sequelize.Model {
  // 테이블에 대한 설정
  static init(sequelize) {
    return super.init(
      // 테이블 컬럼에 대한 설정
      {
        title: {
          type: Sequelize.STRING(100),
          allowNull: false,
        },
        created_at: {
          type: Sequelize.DATE,
          allowNull: false,
          defaultValue: Sequelize.NOW,
        },
      },
      // 테이블 자체에 대한 설정
      {
        sequelize,
        timestamps: false,
        underscored: false,
        modelName: 'Hashtag',
        tableName: 'hashtags',
        paranoid: false,
        charset: 'utf8',
        collate: 'utf8_general_ci',
      },
    );
  }
  // 다른 모델과의 관계
  // belongsToMany 인 경우 through 필수
  static associate(db) {
    db.Hashtag.belongsToMany(db.Post, { through: 'PostHashtag' });
  }
};
6. 쿼리
시퀄라이즈 쿼리는 프로미스를 반환하므로 then 을 붙여 결과값을 받을 수 있고, async/await 문법과 같이 사용할 수도 있다.
아래는 각 SQL 에 해당하는 시퀄라이즈 쿼리이다.
INSERT INTO users(name, age, married, comment) VALUES ('assu', 20, 0, '나의 소개')
const { User } = require('../models');

User.create({
  name: 'assu',
  age: 20,
  married: false,
  comment: '나의 소개'
});
SELECT * FROM users;
User.findAll({});
SELECT * FROM users LIMIT 1;
User.findOne({});
SELECT name, married FROM users;
User.findAll({
  attributes: ['name', 'married']
});
SELECT name, age FROM users WHERE married = 1 AND age > 30;
const { Op } = require('sequelize');

User.findAll({
  attributes: ['name', 'age'],
  where: {
    married: true,
    age: { [Op.gt]: 30 },
  }
});
Op.gt 는 Sequelize 객체 내부의 Op 객체를 불러와 사용하는 문법이다.
{ [Op.gt]: 30 } 문법은 ES2015 문법으로, ES2015+ (ES6+) 기본 의 1.3. 객체 리터럴 을 참고하세요.
자주 사용되는 연산자는 Op.gt(초과), Op.gte(이상), Op.lt(미만), Op.lte(이하), Op.ne(같지 않음), Op.or, Op.in, Op.notIn 이 있다.
SELECT id, name FROM users WHERE married = 0 OR age > 30;
const { Op } = require('sequelize');

User.findAll({
  attributes: ['id', 'name'],
  where: {
      [Op.or]: [{ married: false}, {age: { [Op.gt]: 30 } }],
  },
});
SELECT id, name FROM users ORDER BY age DESC;
User.findAll({
  attributes: ['id', 'name'],
  order: [['age', 'DESC']]
});
SELECT id, name FROM users ORDER BY age DESC LIMIT 1;
User.findAll({
  attributes: ['id', 'name'],
  order: [['age', 'DESC']],
  limit: 1,
});
SELECT id, name FROM users ORDER BY age DESC LIMIT 1 OFFSET 1;
User.findAll({
  attributes: ['id', 'name'],
  order: [['age', 'DESC']],
  limit: 1,
  offset: 1,
});
UPDATE users SET comment = '바꿈' WHERE id = 1;
User.update({
  comment: '바꿈'
}, {
  where: { id: 2 }
});
DELETE FROM users WHERE id = 2;
User.destroy({
  where: { id: 2 }
});
6.1. 관계 쿼리
6.1.1. 관계 쿼리 조회
관계 쿼리는 MySQL 로 치면 join 의 기능이다.
findOne, findAll 메서드는 Promise 의 결과로 모델을 반환한다.
(findAll 은 모델의 배열 반환)
const user = await User.findOne({});
console.log(user.nick);
앞에서 만든 User 와 Comment 모델은 1:N (hasMany-belongsTo) 관계이다.
만일 특정 사용자를 조회하면서 그 사람의 댓글까지 모두 조회하고 싶다면 include 속성을 사용한다.
const user = await User.findOnd({
  include: [{
      model: Comment,
  }]
});

console.log(user.Comments);
어떤 모델과 관계가 있는지 include 배열 에 넣어주면 된다.
댓글을 여러 개일 수 있으므로 (hasMany) user.Comments 로 접근 가능하다.
위처럼 한번에 댓글을 조회하거나 아니면 아래처럼 조회할 수도 있다.
const user = await User.findOne({});
const comments = await user.getComments();
console.log(comments);
관계를 설정하면 getComments(조회), setComments(수정), addComment(하나 생성), addComments(여러 개 생성), removeComments(삭제) 메서드를 지원한다.
동사 + 모델명 형식인데 모델명을 변경하고 싶으면 관계 설정 시에 as 옵션 을 사용하면 된다.
user.js
db.User.hasMany(db.Comment, { foreignKey: 'commenter', sourceKey: 'id' });

-->

db.User.hasMany(db.Comment, { foreignKey: 'commenter', sourceKey: 'id', as: 'Answers' });
쿼리를 할 때는 user.getComments(); 대신 user.getAnswers(); 로 한다.
include 나 관계 쿼리 메서드에도 where, attributes 옵션 사용이 가능하다.
const user = await User.findOne({
  include: [{
      model: Comment,
      where: {
          id: 1,
      },
      attributes: ['id']
  }]
});

// 또는

const comments = await user.getComments({
  where: {
      id: 1,
  },
  attributes: ['id']
});
위 쿼리는 댓글을 가져올 때는 id 가 1인 댓글만 가져오고, 컬럼도 id 만 가져오도록 한다.
6.1.2. 관계 쿼리 생성, 수정, 삭제
관계 쿼리의 생성, 수정, 삭제는 관계 쿼리 조회와는 약간 다르다.
const user = await User.findOne({});
const comment = await Comment.create();

await user.addComment(commnet);

// 또는

await user.addComment(comment.id);
여러 개를 추가할 때는 배열로 추가한다.
const user = await User.findOne({});
const comment1 = await Comment.create();
const comment2 = await Comment.create();

await user.addComment([comment1, comment2]);
수정이나 삭제도 마찬가지이다.
6.2. SQL 쿼리
시퀄라이즈 쿼리 대신 직접 SQL 문을 통해 쿼리할 수도 있다.
const [result, metadata] = await sequelize.query('SELECT * FROM comments');
console.log(result);
7. 쿼리 수행
git 에서 public/sequelize.js, view/error.html, view/sequelize.html 파일을 복사해두세요.
이제 sequelize.js 에 나오는 GET, POST, PUT, DELETE 요청에 해당하는 라우터를 만든다.
routes/index.js
const express = require('express');
const User = require('../models/user');

const router = express.Router();

// GET /
router.get('/', async (req, res, next) => {
  try {
    const users = await User.findAll();
    res.render('sequelize', { users });
  } catch (err) {
    console.error(err);
    next(err);
  }
});

module.exports = router;
routes/users.js
const express = require('express');
const User = require('../models/user');
const Comment = require('../models/comment');

const router = express.Router();

router
  .route('/')
  .get(async (req, res, next) => {
    try {
      const users = await User.findAll();
      res.json(users);
    } catch (err) {
      console.error(err);
      next(err);
    }
  })
  .post(async (req, res, next) => {
    try {
      const user = await User.create({
        name: req.body.name,
        age: req.body.age,
        married: req.body.married,
      });
      console.log(user);
      res.status(201).json(user); // 201: Created 요청이 성공적으로 처리되어 자원이 생성되었음
    } catch (err) {
      console.error(err);
      next(err);
    }
  });

router.get('/:id/comments', async (req, res, next) => {
  try {
    const comments = await Comment.findAll({
      include: {
        model: User,
        where: { id: req.params.id },
      },
    });
    console.log(comments);
    res.json(comments);
  } catch (err) {
    console.error(err);
    next(err);
  }
});

module.exports = router;
routes/comments.js
const express = require('express');
const { Comment } = require('../models');

const router = express.Router();

router.post('/', async (req, res, next) => {
  try {
    const comments = await Comment.create({
      commenter: req.body.id,
      comment: req.body.comment,
    });
    console.log(comments);
    res.status(201).json(comments);
  } catch (err) {
    console.error(err);
    next(err);
  }
});

router
        .route('/:id')
        .patch(async (req, res, next) => {
          try {
            const result = await Comment.update(
                    {
                      comment: req.body.comment,
                    },
                    {
                      where: { id: req.params.id },
                    },
            );
            res.json(result);
          } catch (err) {
            console.error(err);
            next(err);
          }
        })
        .delete(async (req, res, next) => {
          try {
            const result = await Comment.destroy({
              where: {
                id: req.params.id,
              },
            });
            res.json(result);
          } catch (err) {
            console.error(err);
            next(err);
          }
        });

module.exports = router;
app.js
const express = require('express');
const path = require('path');
const morgan = require('morgan');
const nunjucks = require('nunjucks');

const { sequelize } = require('./models');

// 생성한 라우터 등록
const indexRouter = require('./routes');
const usersRouter = require('./routes/users');
const commentsRouter = require('./routes/comments');

const app = express();
app.set('port', process.env.PORT || 3000);
/*app.set('views engine', {
  express: app,
  watch: true,
});*/
app.set('view engine', 'html');
nunjucks.configure('views', {
  express: app,
  watch: true,
});

// models/index.js 의 db.sequelize 를 불러와서 sync 메서드를 사용해 서버 실행 시 MySQL 과 연동되도록 함
sequelize
  .sync({ force: false }) // true 로 설정 시 서버 실행 시마다 테이블 재생성
  .then(() => {
    console.log('데이터베이스 연결 성공');
  })
  .catch(err => {
    console.error('ERR~~', err);
  });

app.use(morgan('dev'));
app.use(express.static(path.join(__dirname, 'public')));
app.use(express.json());
app.use(express.urlencoded({ extended: false }));

// 생성한 라우터 연결
app.use('/', indexRouter);
app.use('/users', usersRouter);
app.use('/comments', commentsRouter);

app.use((req, res, next) => {
  const error = new Error(`${req.method} ${req.url} 라우터 없음`);
  error.status = 404;
  next(error);
});

app.use((err, req, res, next) => {
  res.locals.message = err.message;
  res.locals.error = process.env.NODE_ENV !== 'production' ? err : {};
  res.status(err.status || 500);
  res.render('error');
});

app.listen(app.get('port'), () => {
  console.log(app.get('port'), '번 포트에서 대기 중');
});
본 포스트는 조현영 저자의 Node.js 교과서 2판을 기반으로 스터디하며 정리한 내용들입니다.
