AWS - Load Balancing (1): ELB
이 포스트는 ELB 종류 중 ALB 와 NLB 에 대해 알아본다.
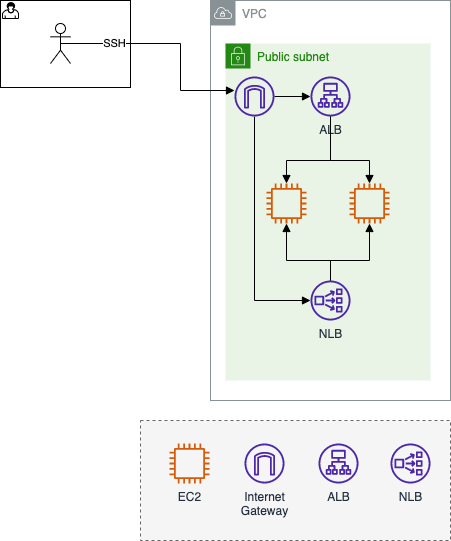
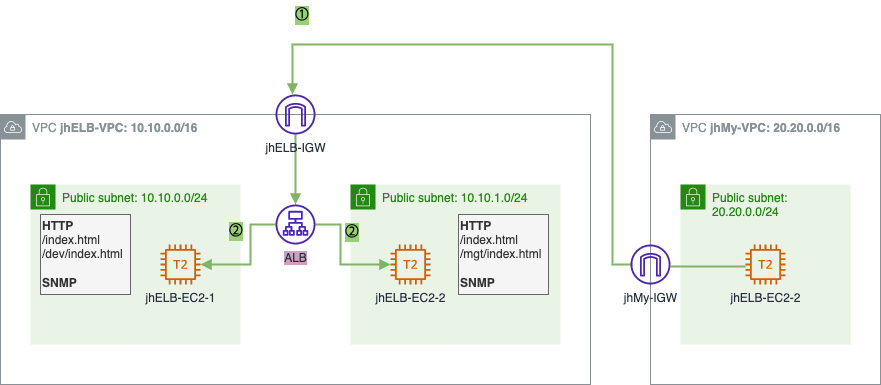
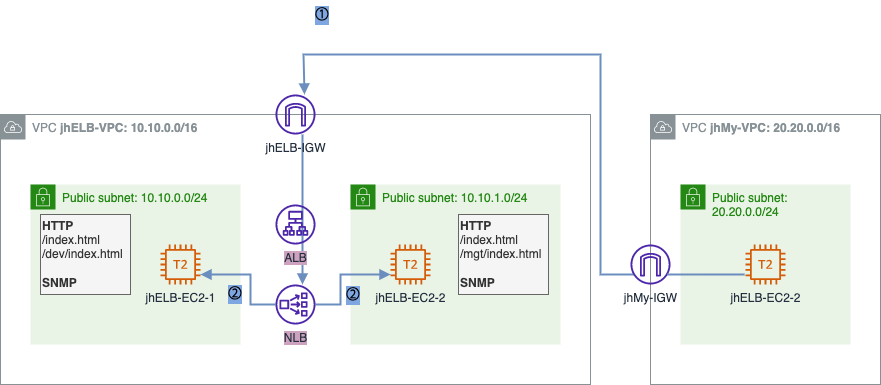
아래는 이번 포스트에서 다뤄볼 범위 도식화이다.
1. ELB (Elastic Load Balancing)
지속적인 서비스 제공을 위해 서버를 다중화 구성하여 서비스의 연속성을 보장하는 고가용성 구성 시 서버의 상태를 파악하여 데이터를 분산 전달하는 접점 역할을 하는 것이 Load Balancer 이다.
ELB 는 AWS 에서 제공하는 Load Balancing 기술로 EC2 인스턴스의 상태를 확인하여 데이터를 분산 전달하는 단일 접점 역할을 한다.
Load Balancer 는 Listener 와 Target Group 으로 구성되어 있다.
Load Balancer 구성
Listener- 부하 분산 처리를 위한 서비스 정의
- 프로토콜 및 포트를 사용하여 연결 요청을 확인하는 프로세스
- Load Balancer 에서 서비스하고자 하는 프로토콜과 포트는 지정하는 규칙을 생성
Target Group- 부하 분산 대상 그룹 정의
- 하나 이상의 대상을 라우팅하여 부하 분산을 할 때 사용
- Target Group 에 속한 대상에 대해 주기적으로 확인하는 프로세스(=
Keepalive) 를 통해 상태 확인(=Health Check) 을 수행 - 이 후 정상인 대상에게만 데이터 전달
ELB 종류
ALB (Application Load Balancer)- HTTP(S) 와 같이 웹 애플리케이션에 대한 분산 처리 제공 (애플리케이션 레벨의 Load Balancer)
- URL 경로 기반 라우팅, 호스트 기반 라우팅, HTTP 헤더 기반 라우팅 등 다양한 규칙을 생성하여 포워드, 리다이렉션, 지정 HTTP 응답 등의 작업 수행
- Lambda 를 호출하여 HTTP(S) 요청 처리 가능
- HTTP(S) 에 특화되어 상세한 제어가 가능
- 클라이언트 IP 를 보존하지 않고 자신의 IP 로 대체하여 전달 (클라이언트 IP 는
X-Forwarded-for헤더에 담아서 전달)
NLB (Network Load Balancer)- TCP 나 UDP 프로토콜에 대한 포트 정보를 정의하여 네트워크 기반의 분산 처리 제공 (OSI 4계층 레벨의 Load Balancer)
- 고정 IP 나 EIP 보유 가능
- VPC Endpoint Service 로 연결하여 PrivateLink 구성 가능
- TCP, UDP 모든 포트에 대해 빠른 처리 속도로 부하 분산
- 클라이언트 IP 보존
CLB (Classic Load Balancer)- VPC 의 예전 버전인 EC2-Classic 에 대해서도 분산 처리를 제공할 수 있는 이전 세대의 Load Balancer
| ALB | NLB | |
| 프로토콜 | HTTP, HTTPS | TCP, UDP, TLS |
| 처리 속도 | 느림 | 빠름 |
| OSI 계층 | 7계층 | 4계층 |
| IP 를 통한 관리 | 미지원 | 지원 |
| PrivateLink 지원 | 미지원 | 지원 |
| URL 경로 기반 라우팅 | 지원 | 미지원 |
| 호스트 기반 라우팅 | 지원 | 미지원 |
| Security Group 을 적용 가능 여부 | 가능 | 불가능 |
2. ALB 와 NLB 를 통한 로드 밸런싱 테스트
ELB 의 3가지 유형의 Load Balancer 중 ALB 와 NLB 를 이용하여 부하 분산을 통한 고가용성 환경을 구성한 후 각 Load Balancer 의 차이점을 알아본다.
- 기본 환경 구성
- CloudFormation 적용
- CloudFormation 을 통해 생성된 자원 확인
- 기본 통신 환경 검증
- ALB 를 통한 로드 밸런싱
- ALB 생성
- ALB 검증
- NLB 를 통한 로드 밸런싱
- NLB 생성
- NLB 검증
- Resource 삭제
2.1. 기본 환경 구성
- CloudFormation 적용
- CloudFormation 을 통해 생성된 자원 확인
- 기본 통신 환경 검증
2.1.1. CloudFormation 적용
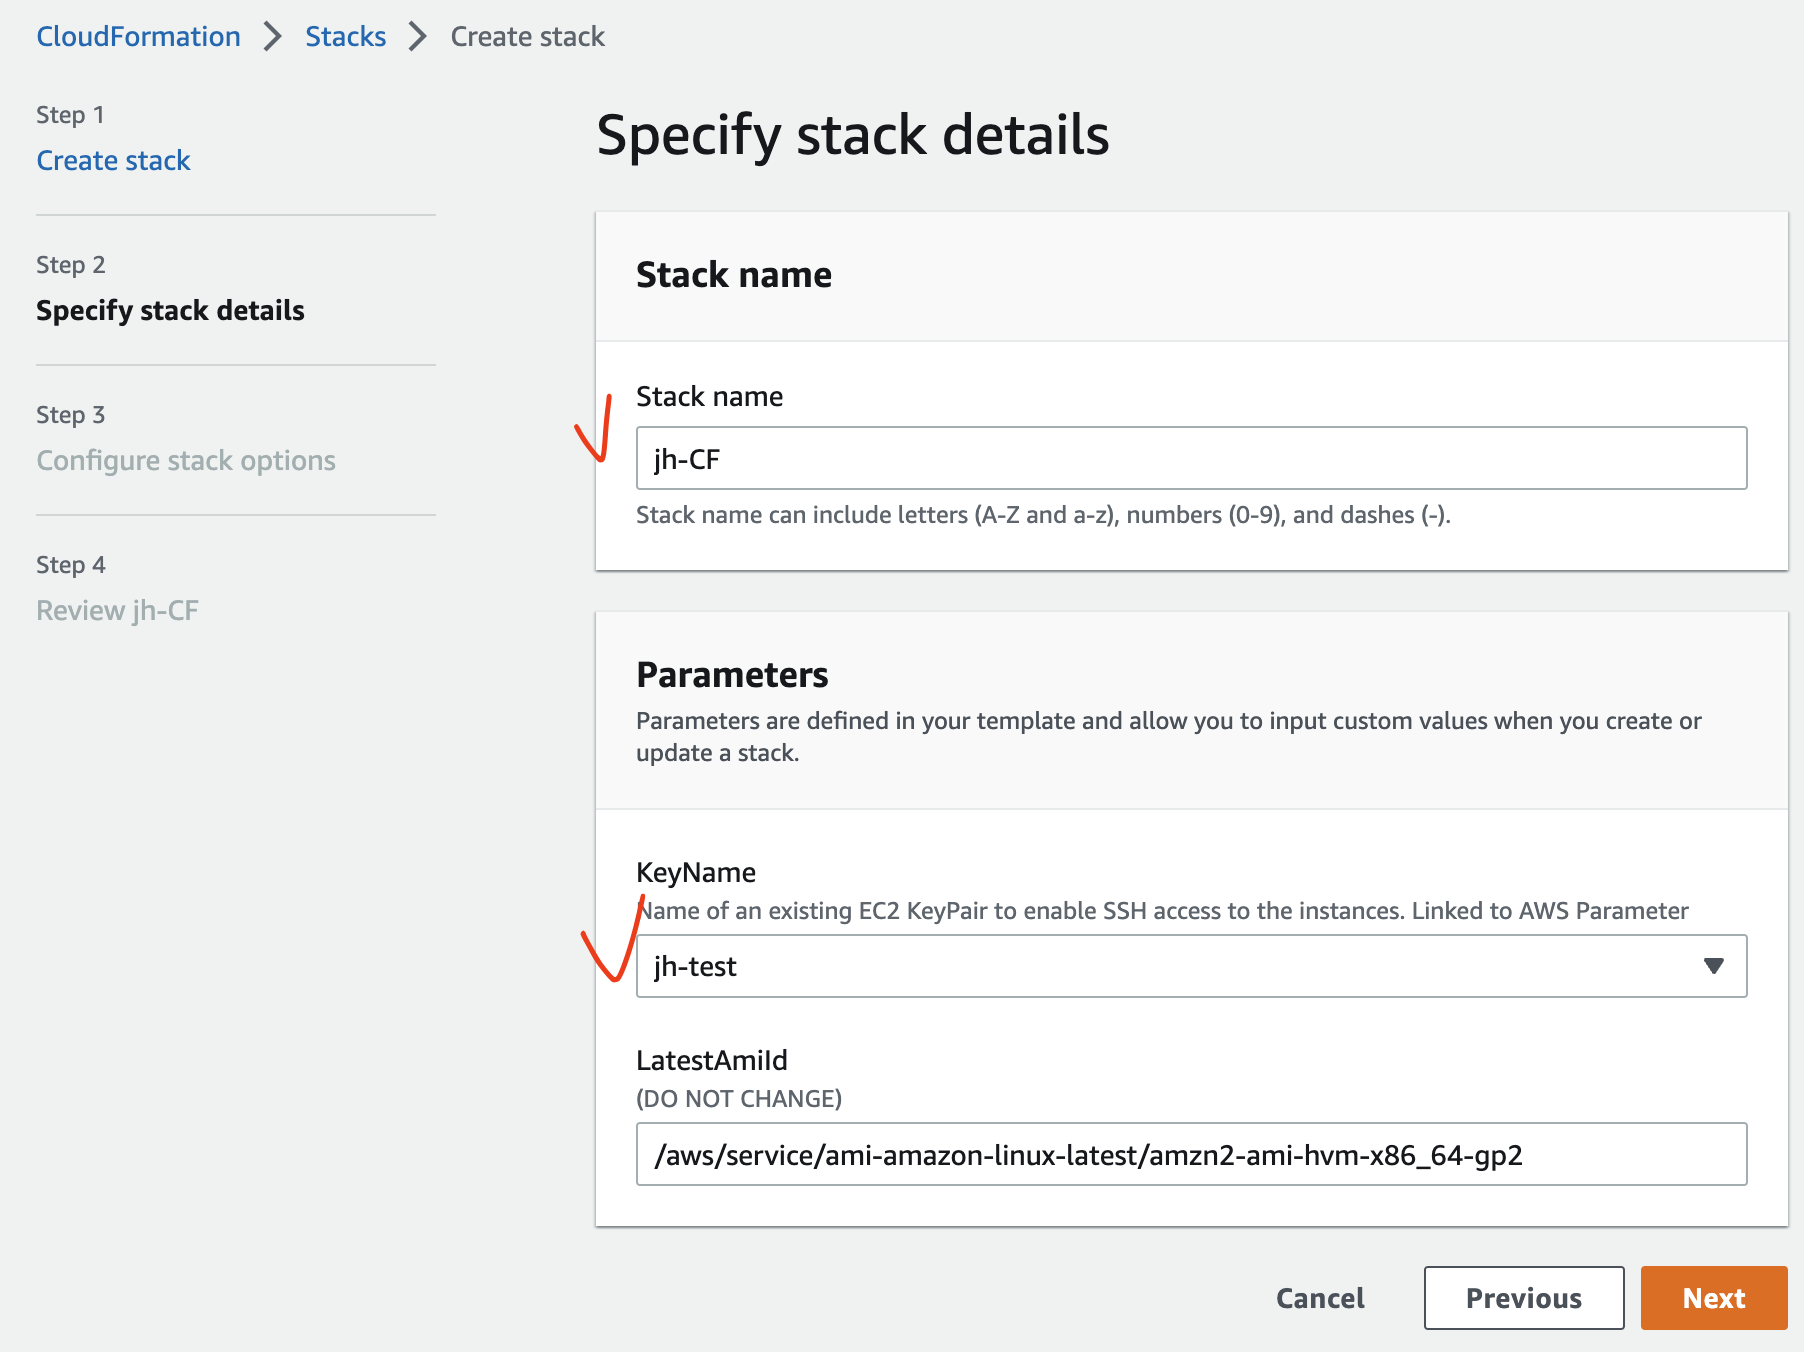
[CloudFormation] - [Stacks]
CloudFormation Template Download CloudFormation Template (펼쳐보기)
Parameters:
  KeyName:
    Description: Name of an existing EC2 KeyPair to enable SSH access to the instances. Linked to AWS Parameter
    Type: AWS::EC2::KeyPair::KeyName
    ConstraintDescription: must be the name of an existing EC2 KeyPair.
  LatestAmiId:
    Description: (DO NOT CHANGE)
    Type: 'AWS::SSM::Parameter::Value<AWS::EC2::Image::Id>'
    Default: '/aws/service/ami-amazon-linux-latest/amzn2-ami-hvm-x86_64-gp2'
    AllowedValues:
      - /aws/service/ami-amazon-linux-latest/amzn2-ami-hvm-x86_64-gp2

Resources:
  ELBVPC:
    Type: AWS::EC2::VPC
    Properties:
      CidrBlock: 10.10.0.0/16
      Tags:
        - Key: Name
          Value: jhELB-VPC

  MyVPC:
    Type: AWS::EC2::VPC
    Properties:
      CidrBlock: 20.20.0.0/16
      Tags:
        - Key: Name
          Value: jhMy-VPC

  ELBIGW:
    Type: AWS::EC2::InternetGateway
    Properties:
      Tags:
        - Key: Name
          Value: jhELB-IGW

  MyIGW:
    Type: AWS::EC2::InternetGateway
    Properties:
      Tags:
        - Key: Name
          Value: jhMy-IGW

  ELBIGWAttachment:
    Type: AWS::EC2::VPCGatewayAttachment
    Properties:
      InternetGatewayId: !Ref ELBIGW
      VpcId: !Ref ELBVPC

  MyIGWAttachment:
    Type: AWS::EC2::VPCGatewayAttachment
    Properties:
      InternetGatewayId: !Ref MyIGW
      VpcId: !Ref MyVPC

  ELBPublicRT:
    Type: AWS::EC2::RouteTable
    Properties:
      VpcId: !Ref ELBVPC
      Tags:
        - Key: Name
          Value: jhELB-Public-RT

  ELBDefaultPublicRoute:
    Type: AWS::EC2::Route
    DependsOn: ELBIGWAttachment
    Properties:
      RouteTableId: !Ref ELBPublicRT
      DestinationCidrBlock: 0.0.0.0/0
      GatewayId: !Ref ELBIGW

  MyPublicRT:
    Type: AWS::EC2::RouteTable
    Properties:
      VpcId: !Ref MyVPC
      Tags:
        - Key: Name
          Value: jhMy-Public-RT

  MyDefaultPublicRoute:
    Type: AWS::EC2::Route
    DependsOn: MyIGWAttachment
    Properties:
      RouteTableId: !Ref MyPublicRT
      DestinationCidrBlock: 0.0.0.0/0
      GatewayId: !Ref MyIGW

  ELBPublicSN1:
    Type: AWS::EC2::Subnet
    Properties:
      VpcId: !Ref ELBVPC
      AvailabilityZone: !Select [0, !GetAZs '']
      CidrBlock: 10.10.0.0/24
      Tags:
        - Key: Name
          Value: jhELB-Public-SN-1

  ELBPublicSN2:
    Type: AWS::EC2::Subnet
    Properties:
      VpcId: !Ref ELBVPC
      AvailabilityZone: !Select [2, !GetAZs '']
      CidrBlock: 10.10.1.0/24
      Tags:
        - Key: Name
          Value: jhELB-Public-SN-2

  MyPublicSN:
    Type: AWS::EC2::Subnet
    Properties:
      VpcId: !Ref MyVPC
      AvailabilityZone: !Select [0, !GetAZs '']
      CidrBlock: 20.20.0.0/24
      Tags:
        - Key: Name
          Value: jhMy-Public-SN

  ELBPublicSNRouteTableAssociation:
    Type: AWS::EC2::SubnetRouteTableAssociation
    Properties:
      RouteTableId: !Ref ELBPublicRT
      SubnetId: !Ref ELBPublicSN1

  ELBPublicSNRouteTableAssociation2:
    Type: AWS::EC2::SubnetRouteTableAssociation
    Properties:
      RouteTableId: !Ref ELBPublicRT
      SubnetId: !Ref ELBPublicSN2

  MyPublicSNRouteTableAssociation:
    Type: AWS::EC2::SubnetRouteTableAssociation
    Properties:
      RouteTableId: !Ref MyPublicRT
      SubnetId: !Ref MyPublicSN

  MySG:
    Type: AWS::EC2::SecurityGroup
    Properties:
      GroupDescription: Enable HTTP access via port 80 and SSH access via port 22
      VpcId: !Ref MyVPC
      Tags:
        - Key: Name
          Value: jhMy-SG
      SecurityGroupIngress:
        - IpProtocol: tcp
          FromPort: '22'
          ToPort: '22'
          CidrIp: 0.0.0.0/0

  ELBSG:
    Type: AWS::EC2::SecurityGroup
    Properties:
      GroupDescription: Enable HTTP access via port 80 and SSH access via port 22
      VpcId: !Ref ELBVPC
      Tags:
        - Key: Name
          Value: jhELBSG
      SecurityGroupIngress:
        - IpProtocol: tcp
          FromPort: '80'
          ToPort: '80'
          CidrIp: 0.0.0.0/0
        - IpProtocol: udp
          FromPort: '161'
          ToPort: '161'
          CidrIp: 0.0.0.0/0
        - IpProtocol: tcp
          FromPort: '22'
          ToPort: '22'
          CidrIp: 0.0.0.0/0

  MyEC2:
    Type: AWS::EC2::Instance
    Properties:
      InstanceType: t2.micro
      ImageId: !Ref LatestAmiId
      KeyName: !Ref KeyName
      Tags:
        - Key: Name
          Value: jhMy-EC2
      NetworkInterfaces:
        - DeviceIndex: 0
          SubnetId: !Ref MyPublicSN
          GroupSet:
            - !Ref MySG
          AssociatePublicIpAddress: true
      UserData:
        Fn::Base64: !Sub |
          #!/bin/bash
          yum install net-snmp-utils -y

  ELBEC21:
    Type: AWS::EC2::Instance
    Properties:
      InstanceType: t2.micro
      ImageId: !Ref LatestAmiId
      KeyName: !Ref KeyName
      Tags:
        - Key: Name
          Value: jhELB-EC2-1
      NetworkInterfaces:
        - DeviceIndex: 0
          SubnetId: !Ref ELBPublicSN1
          GroupSet:
            - !Ref ELBSG
          AssociatePublicIpAddress: true
      UserData:
        Fn::Base64: !Sub |
          #!/bin/bash
          hostname jhELB-EC2-1
          yum install httpd -y
          yum install net-snmp net-snmp-utils -y
          yum install tcpdump -y
          service httpd start
          chkconfig httpd on
          service snmpd start
          chkconfig snmpd on
          echo "<h1>jhELB-EC2-1 Web Server</h1>" > /var/www/html/index.html
          mkdir /var/www/html/dev
          echo "<h1>jhELB-EC2-1 Dev Web Page</h1>" > /var/www/html/dev/index.html

  ELBEC22:
    Type: AWS::EC2::Instance
    Properties:
      InstanceType: t2.micro
      ImageId: !Ref LatestAmiId
      KeyName: !Ref KeyName
      Tags:
        - Key: Name
          Value: jhELB-EC2-2
      NetworkInterfaces:
        - DeviceIndex: 0
          SubnetId: !Ref ELBPublicSN2
          GroupSet:
            - !Ref ELBSG
          AssociatePublicIpAddress: true
      UserData:
        Fn::Base64: !Sub |
          #!/bin/bash
          hostname jhELB-EC2-2
          yum install httpd -y
          yum install net-snmp net-snmp-utils -y
          yum install tcpdump -y
          service httpd start
          chkconfig httpd on
          service snmpd start
          chkconfig snmpd on
          echo "<h1>jhELB-EC2-2 Web Server</h1>" > /var/www/html/index.html
          mkdir /var/www/html/mgt
          echo "<h1>jhELB-EC2-2 Mgt Web Page</h1>" > /var/www/html/mgt/index.html
key pair 생성은 AWS - Infra 의 3. 사전 준비 를 참고하세요.
SNMP (Simple Network Management Protocol)
네트워크 관리를 위한 규약으로 네트워크 상의 장치로부터 정보를 수집/관리함.
SNMP 를 지원하는 대표적인 장치로는 라우터, 스위치, 서버, 프린터, 모뎀랙 등이 있음.OID (Object Identifier) 값을 호출하여 디바이스에 대한 정보를 파악할 수 있음.
e.g.) OID 1.3.6.1.2.1.1.5.0 → System Name
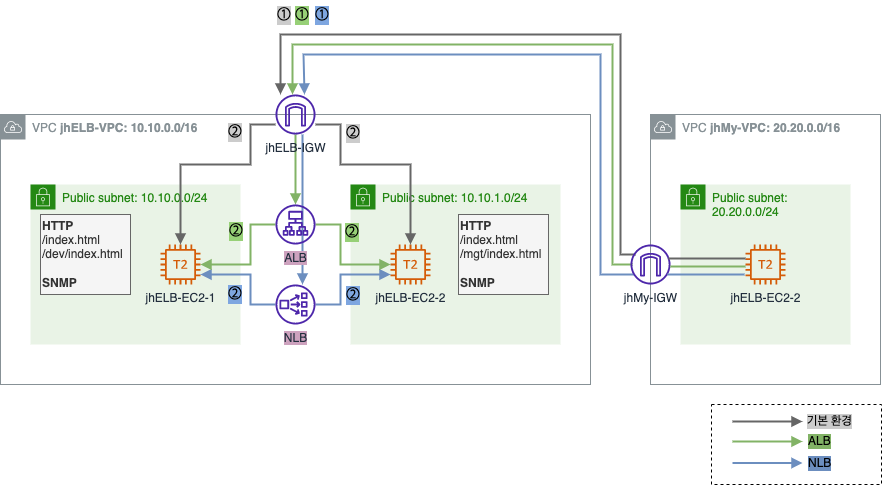
2.1.2. CloudFormation 을 통해 생성된 자원 확인
- VPC
- jhELB-VPC
- IP CIDR: 10.10.0.0/16
- jhMy-VPC
- IP CIDR: 20.20.0.0/16
- jhELB-VPC
- Public Subnet
- jhELB-Public-SN-1
- IP CIDR: 10.10.0.0/24
- AZ: ap-northeast-2a
- jhELB-Public-SN-2
- IP CIDR: 10.10.1.0/24
- AZ: ap-northeast-2c
- jhMy-Public-SN
- IP CIDR: 20.20.0.0/24
- AZ: ap-northeast-2a
- jhELB-Public-SN-1
- Public Routing Table
- jhELB-Public-RT
- 연결: jhELB-Public-SN-1, jhELB-Public-SN-2
- jhMy-Public-RT
- 연결: jhMy-Public-SN
- jhELB-Public-RT
- IGW
- jhELB-IGW
- 연결: jhELB-VPC
- jhMy-IGW
- 연결: jhMy-VPC
- jhELB-IGW
- Public EC2 Instance
- jhMyEC2
- 연결: jhMy-Public-SN
- jhELB-EC2-1
- 연결: jhELB-Public-SN-1
- 데몬: HTTP, SNMP 구성
- jhELB-EC2-2
- 연결: jhELB-Public-SN-2
- 데몬: HTTP, SNMP 구성
- jhMyEC2
- Security Group
- jhELB-SG
- 프로토콜(inbound): SSH, HTTP, SNMP
- 대상(Source): 0.0.0.0/0
- jhMy-SG
- 프로토콜(inbound): TCP
- 대상(Source): 0.0.0.0/0
- jhELB-SG
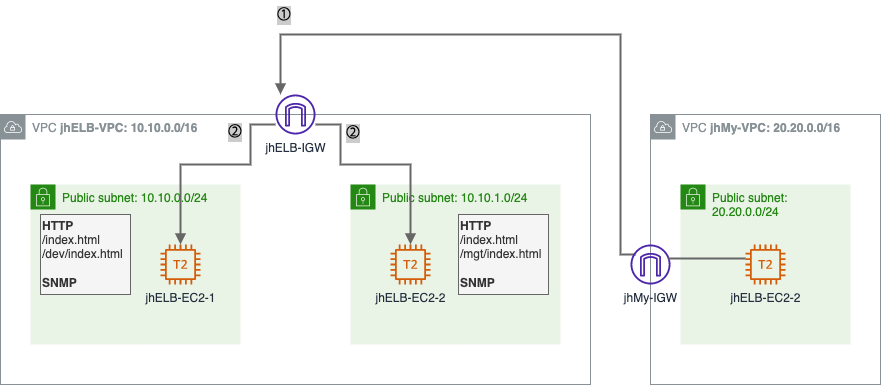
2.1.3. 기본 환경 검증
jhMy-EC2 Instance 에서 jhELB-EC2-1 과 jhELB-EC2-2 로 HTTP, SNMP 서비스 통신을 확인해본다.
# jhMy-EC2 에 SSH 접근
$ ssh -i sandbox-jh.pem ec2-user@13.125.xx.xx

# jhELB-EC2-1 서비스 확인 (13.125.xx.xx = jhELBEC2-1 public IP)

# HTTP 서비스 확인
[ec2-user@ip-20-20-0-xx ~]$ curl 13.125.xx.xx/index.html
<h1>jhELB-EC2-1 Web Server</h1>
[ec2-user@ip-20-20-0-xx ~]$ curl 13.125.xx.xx/dev/index.html
<h1>jhELB-EC2-1 Dev Web Page</h1>

# SNMP 서비스 확인
[ec2-user@ip-20-20-0-xx ~]$ snmpget -v2c -c public 13.125.xx.xx 1.3.6.1.2.1.1.5.0
SNMPv2-MIB::sysName.0 = STRING: jhELB-EC2-1


# jhELB-EC2-2 서비스 확인 (15.164.xx.xx = jhELB-EC2-2 public IP)

# HTTP 서비스 확인
[ec2-user@ip-20-20-0-xx ~]$ curl 15.164.xx.xx/index.html
<h1>jhELB-EC2-2 Web Server</h1>
[ec2-user@ip-20-20-0-xx ~]$ curl 15.164.xx.xx/mgt/index.html
<h1>jhELB-EC2-2 Mgt Web Page</h1>

# SNMP 서비스 확인
[ec2-user@ip-20-20-0-xx ~]$ snmpget -v2c -c public 15.164.xx.xx 1.3.6.1.2.1.1.5.0
SNMPv2-MIB::sysName.0 = STRING: jhELB-EC2-2
2.2. ALB 를 통한 로드 밸런싱
ALB 를 통해 HTTP 서비스를 부하 분산해보고, 경로 기반 라우팅 에 대해서도 한번 알아본다.
- ALB 생성
- ALB 검증
2.2.1. ALB 생성
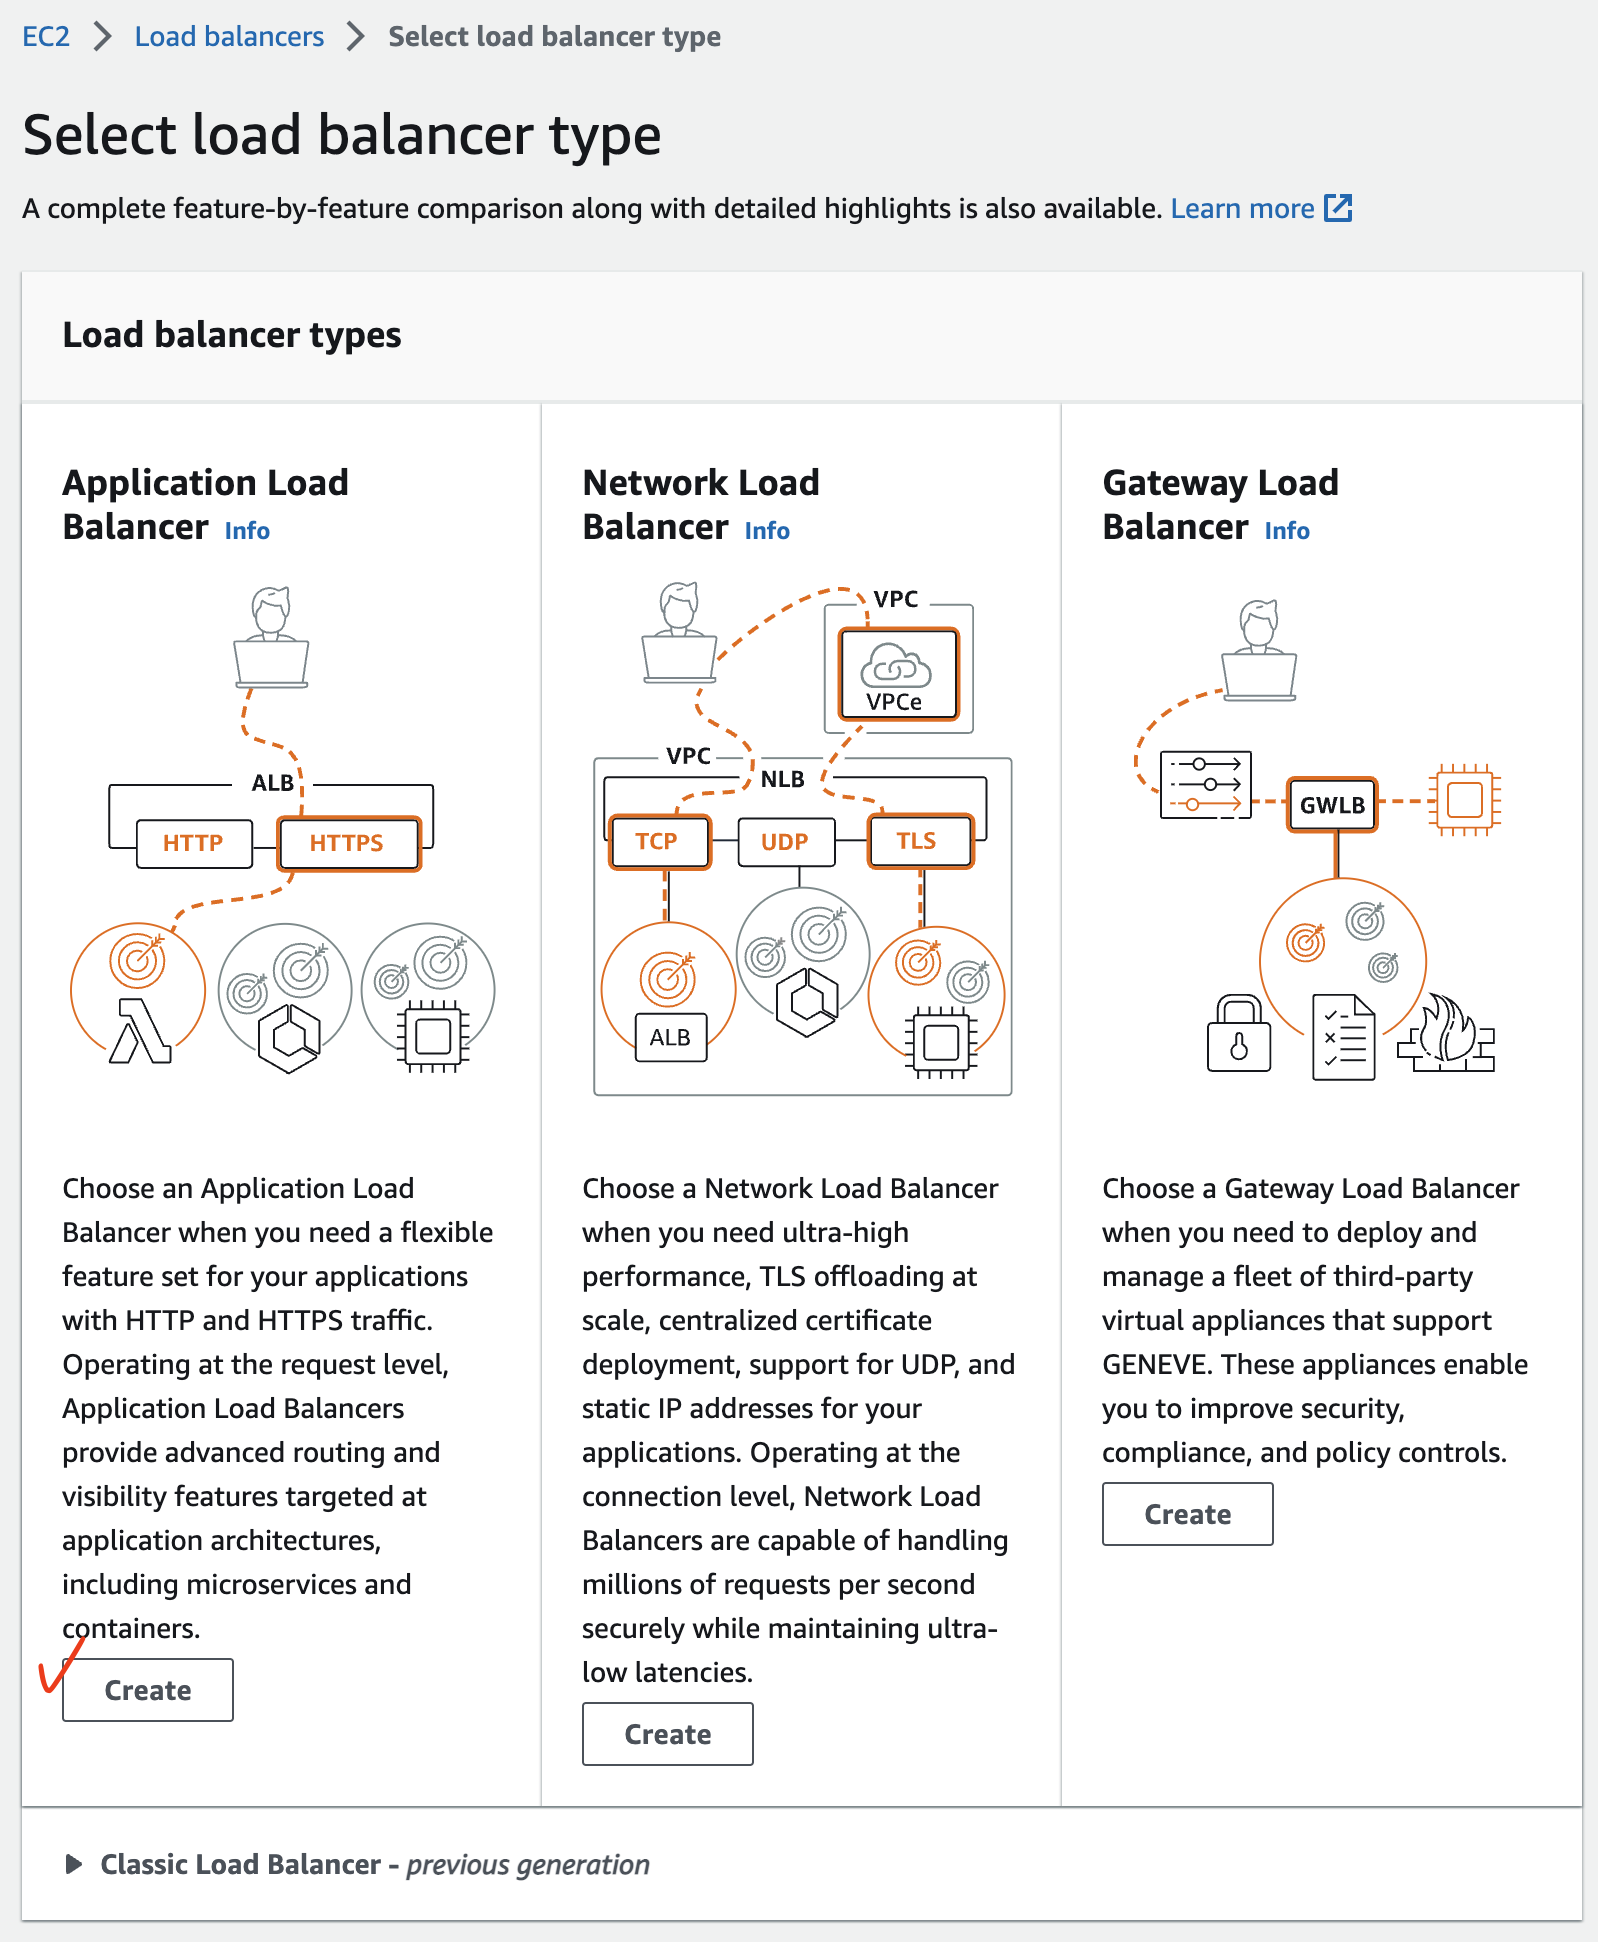
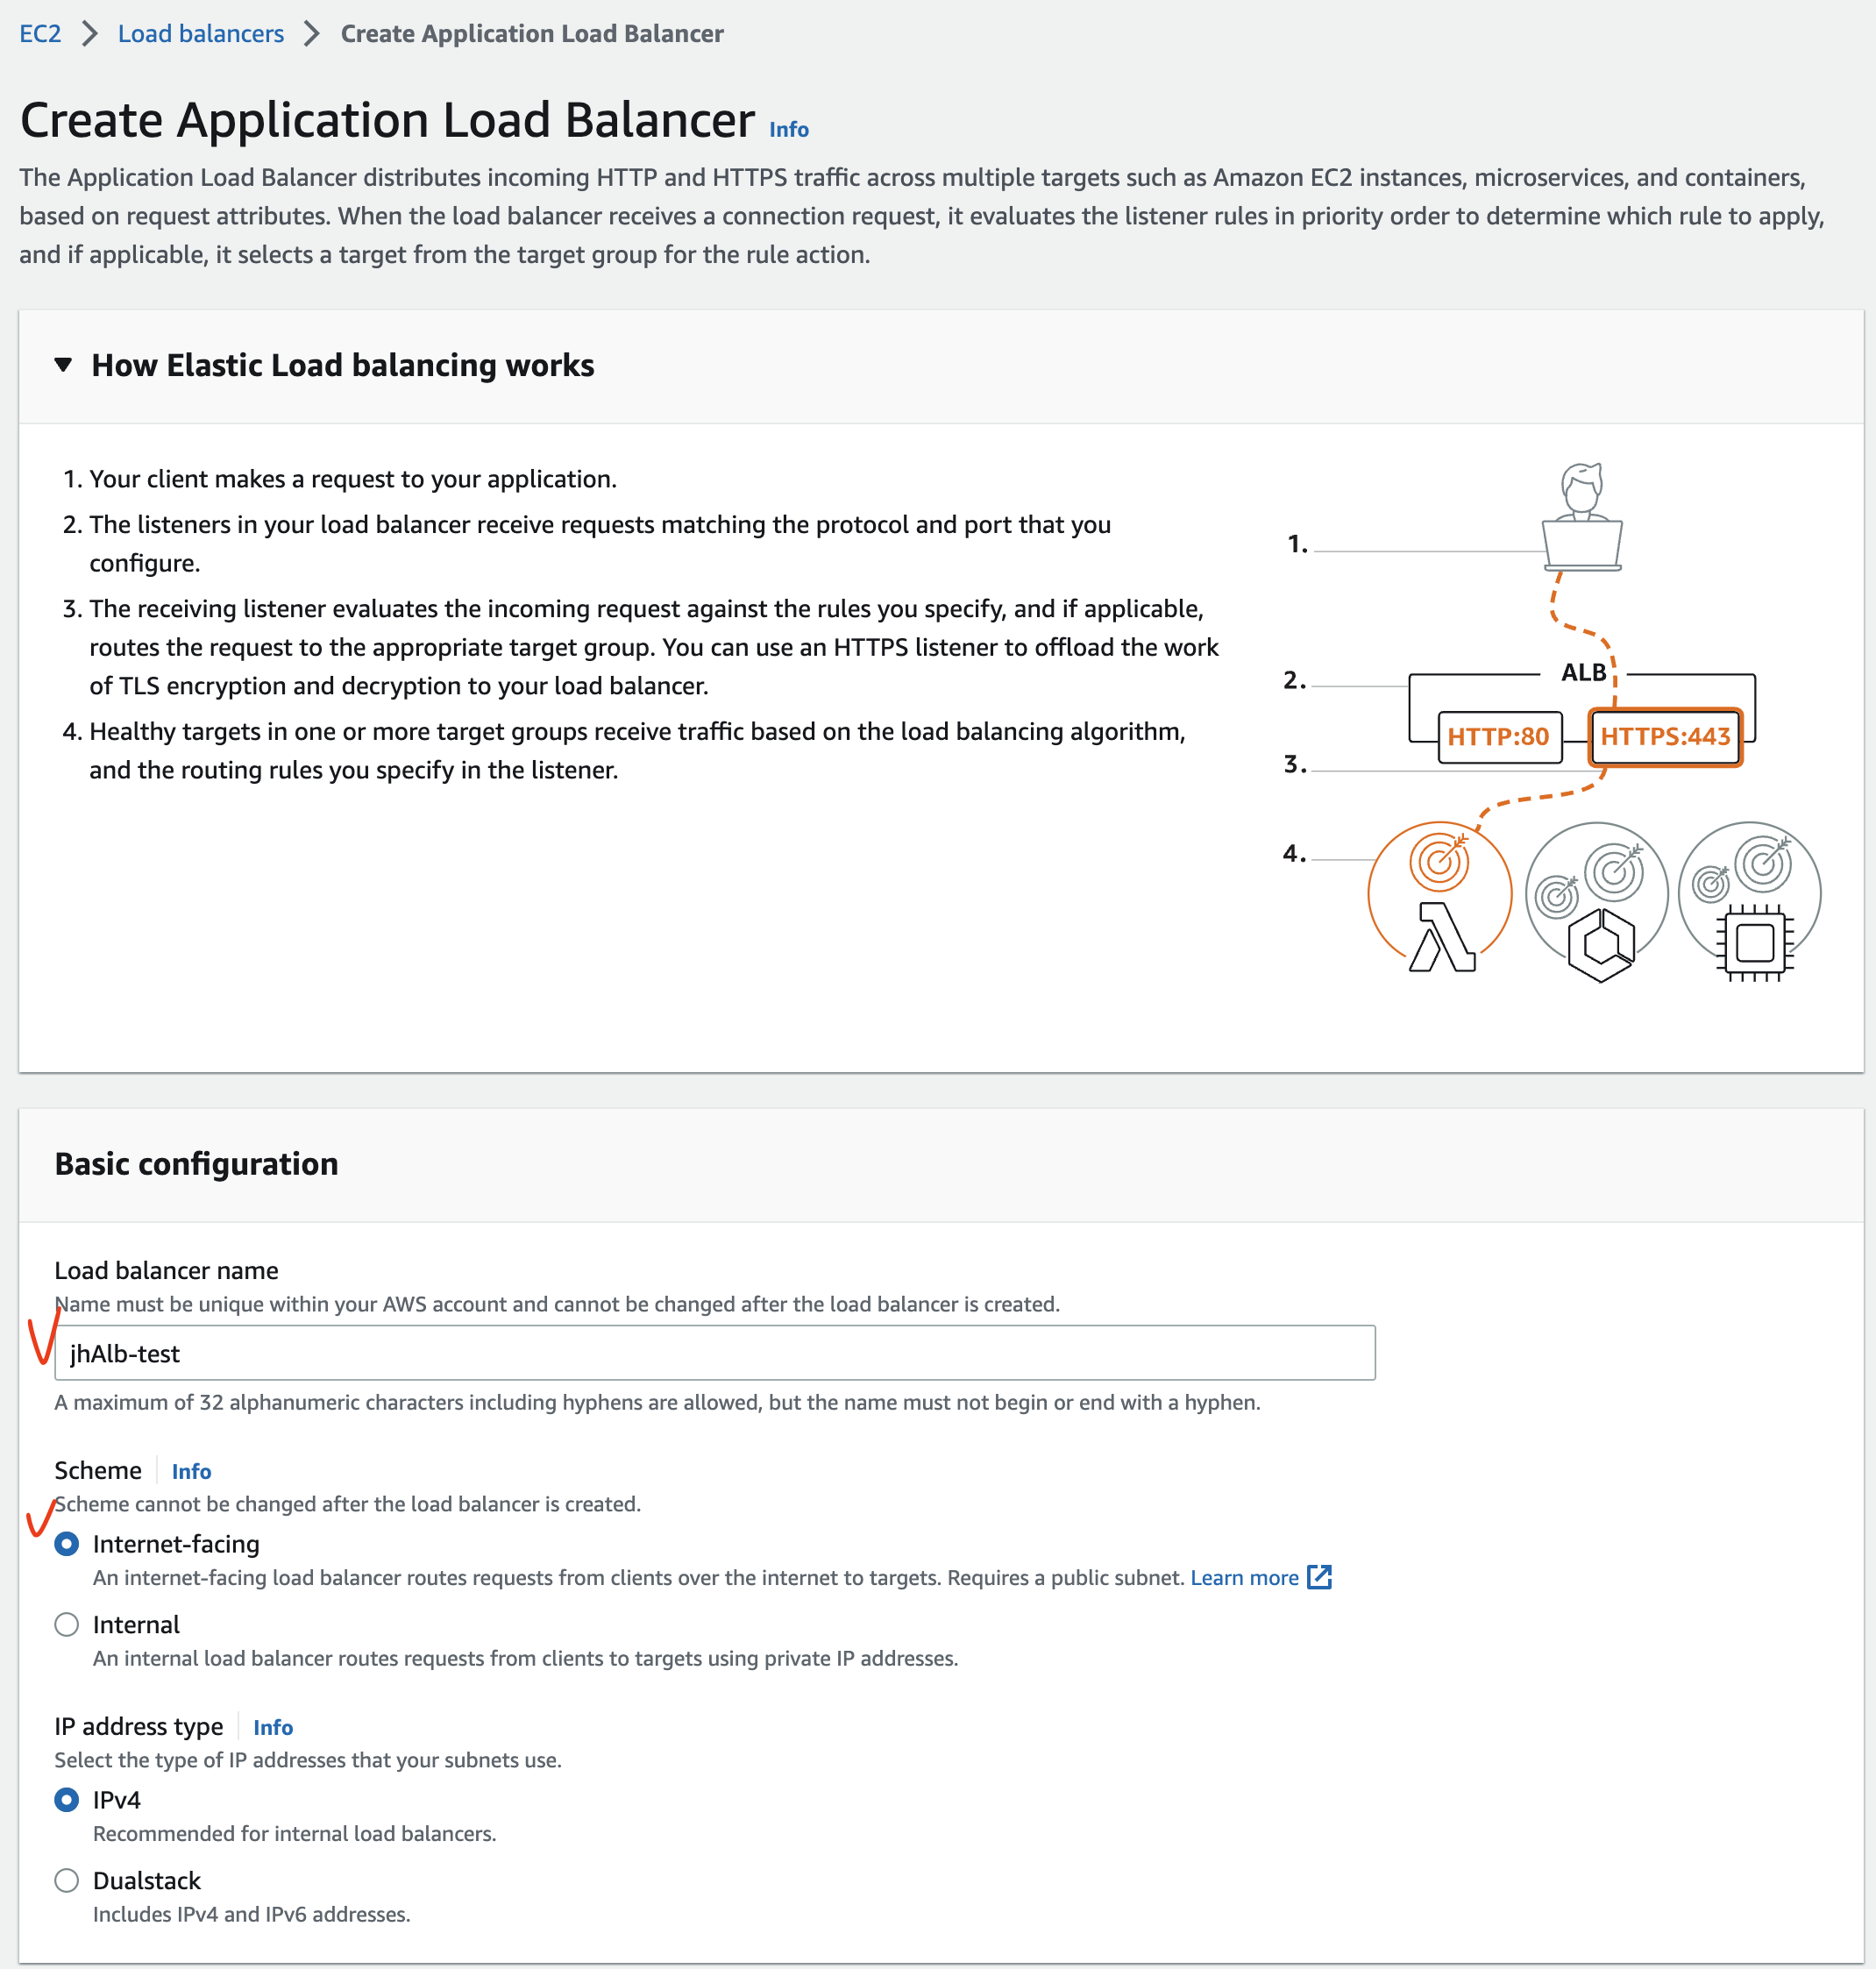
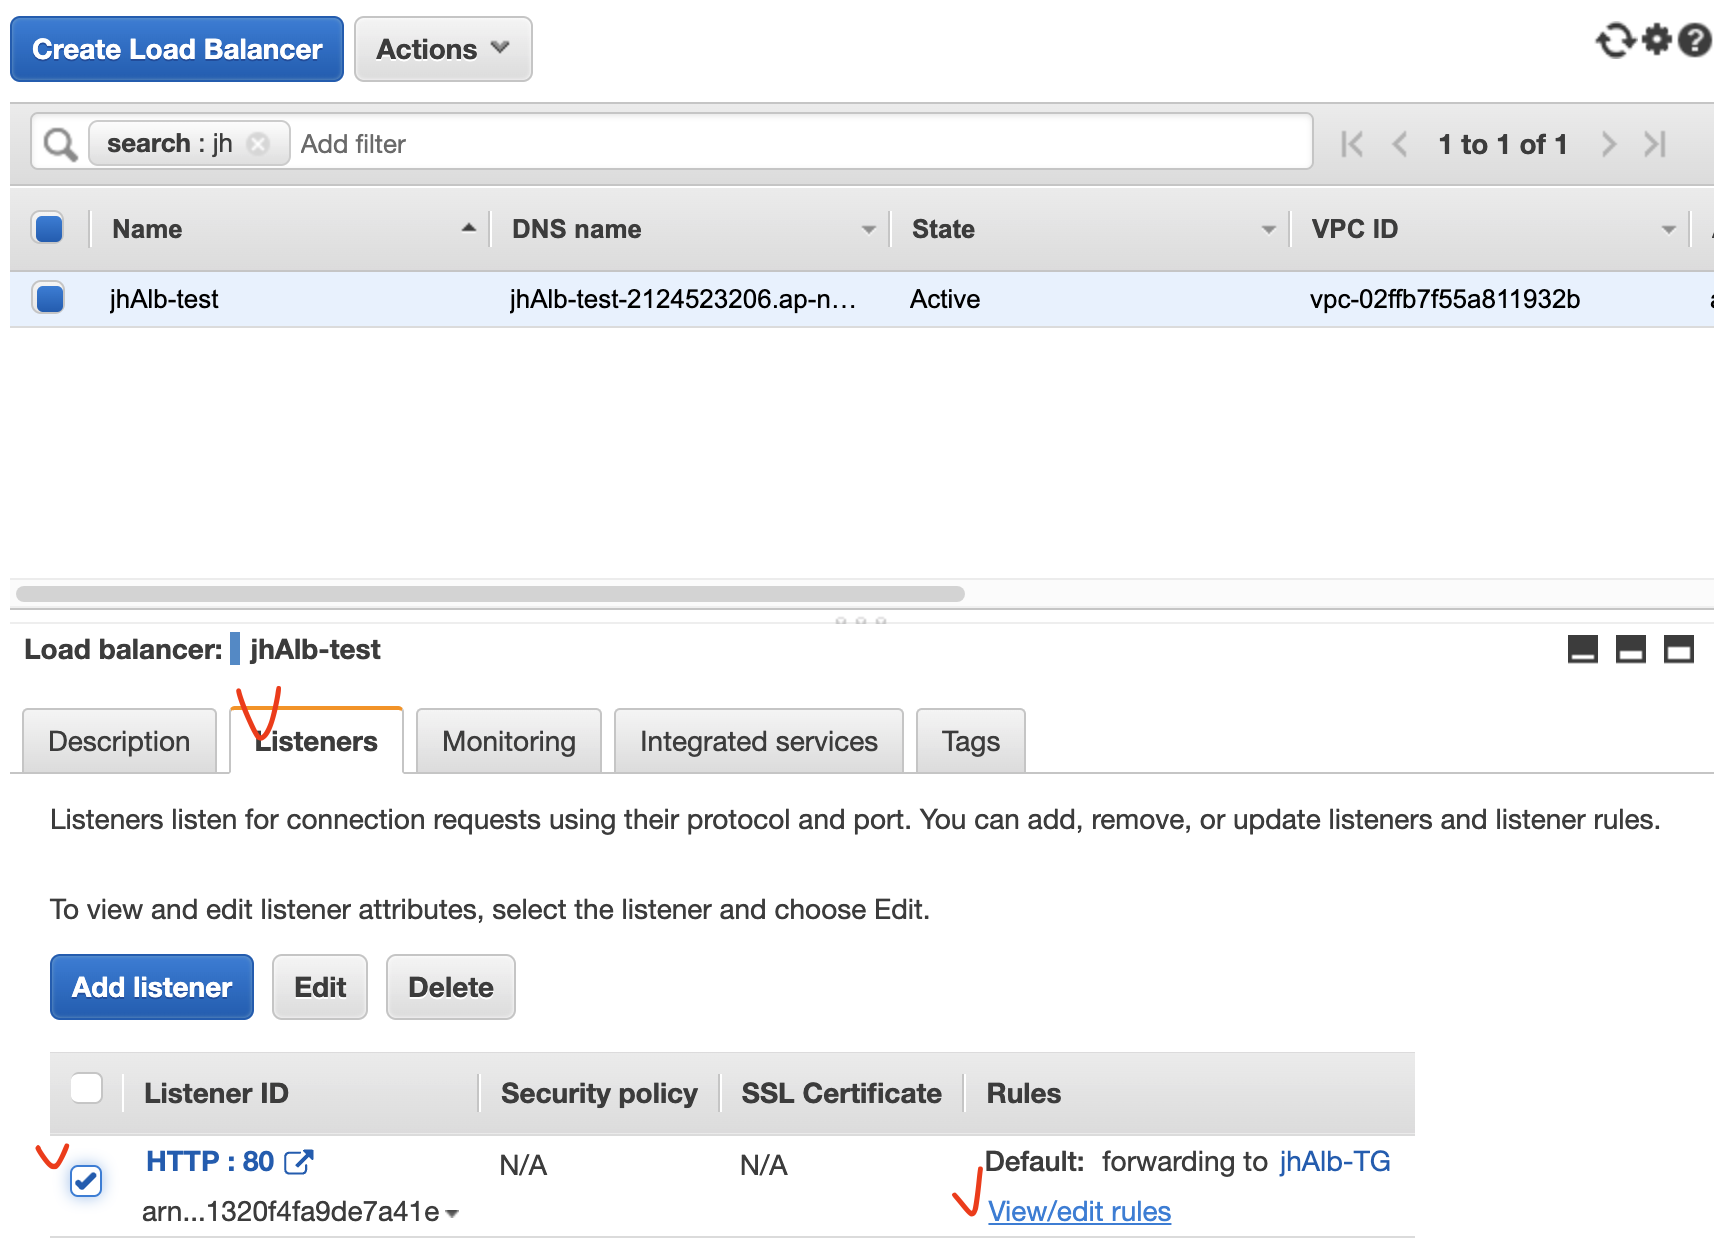
[EC2] - [Load Balancers]
The Application Load Balancer distributes incoming HTTP and HTTPS traffic across multiple targets such as Amazon EC2 instances, microservices, and containers, based on request attributes. When the load balancer receives a connection request, it evaluates the listener rules in priority order to determine which rule to apply, and if applicable, it selects a target from the target group for the rule action.
Application Load Balancer는 수신 HTTP 및 HTTPS 트래픽을 요청 속성을 기반으로 Amazon EC2 인스턴스, 마이크로서비스 및 컨테이너와 같은 여러 대상에 배포합니다. 로드 밸런서는 연결 요청을 수신하면 우선 순위에 따라 리스너 규칙을 평가하여 적용할 규칙을 결정한 다음 해당되는 경우, 대상 그룹에서 규칙 작업의 대상을 선택합니다.
- 클라이언트가 애플리케이션에 요청을 보냅니다.
- 로드 밸런서의 리스너는 구성한 프로토콜 및 포트와 일치하는 요청을 수신합니다.
- 수신 리스너는 지정된 규칙에 따라 수신 요청을 평가하고, 해당되는 경우 요청을 적절한 대상 그룹으로 라우팅합니다. HTTPS 리스너를 사용하여 TLS 암호화 및 복호화 작업을 로드 밸런서로 오프로드할 수 있습니다.
- 하나 이상의 대상 그룹에 있는 정상 대상은 로드 밸런싱 알고리즘과 리스너에서 지정한 라우팅 규칙을 기반으로 트래픽을 수신합니다.
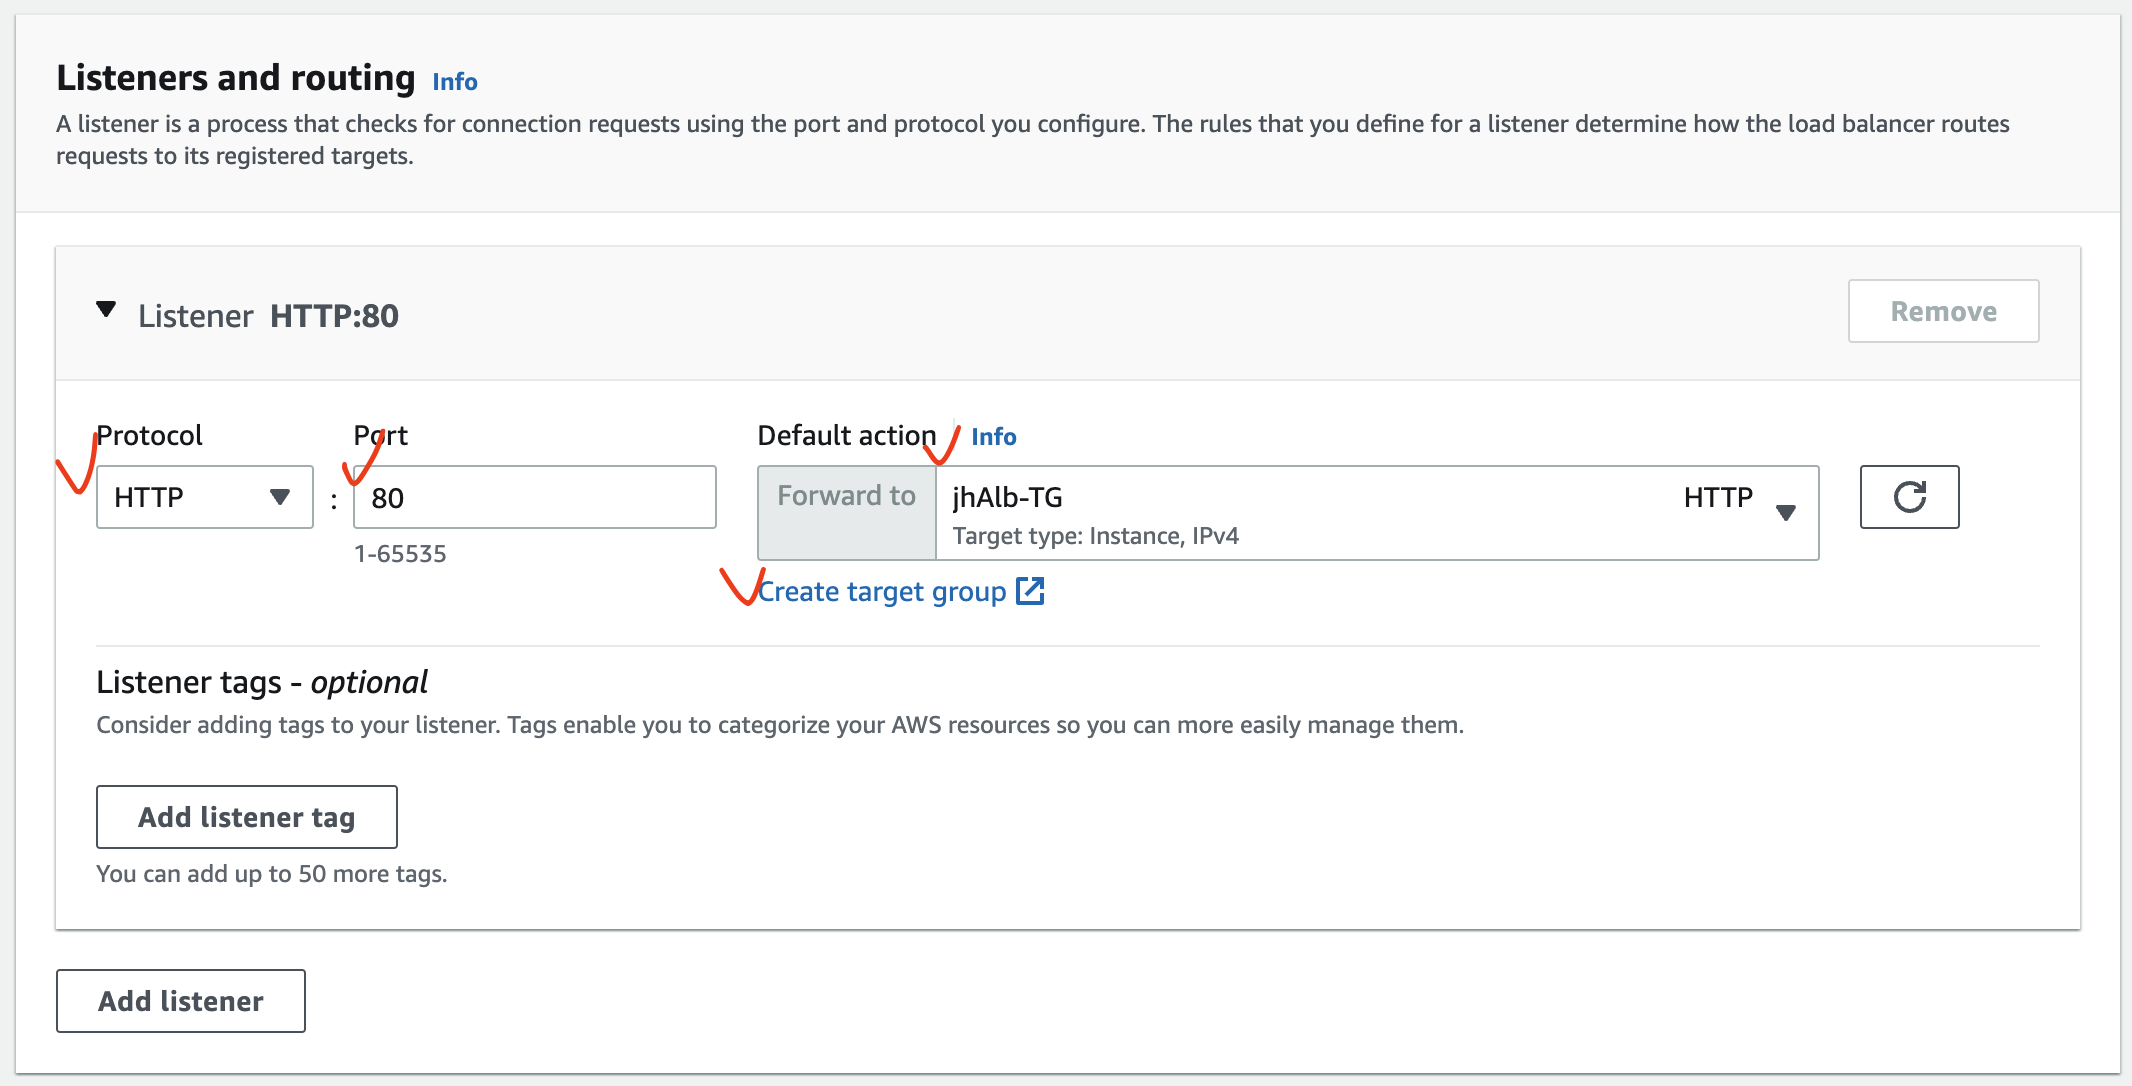
Load Balancer 가용 영역 지정 시 가용 영역당 1개의 Subnet 만 지정 가능하다. 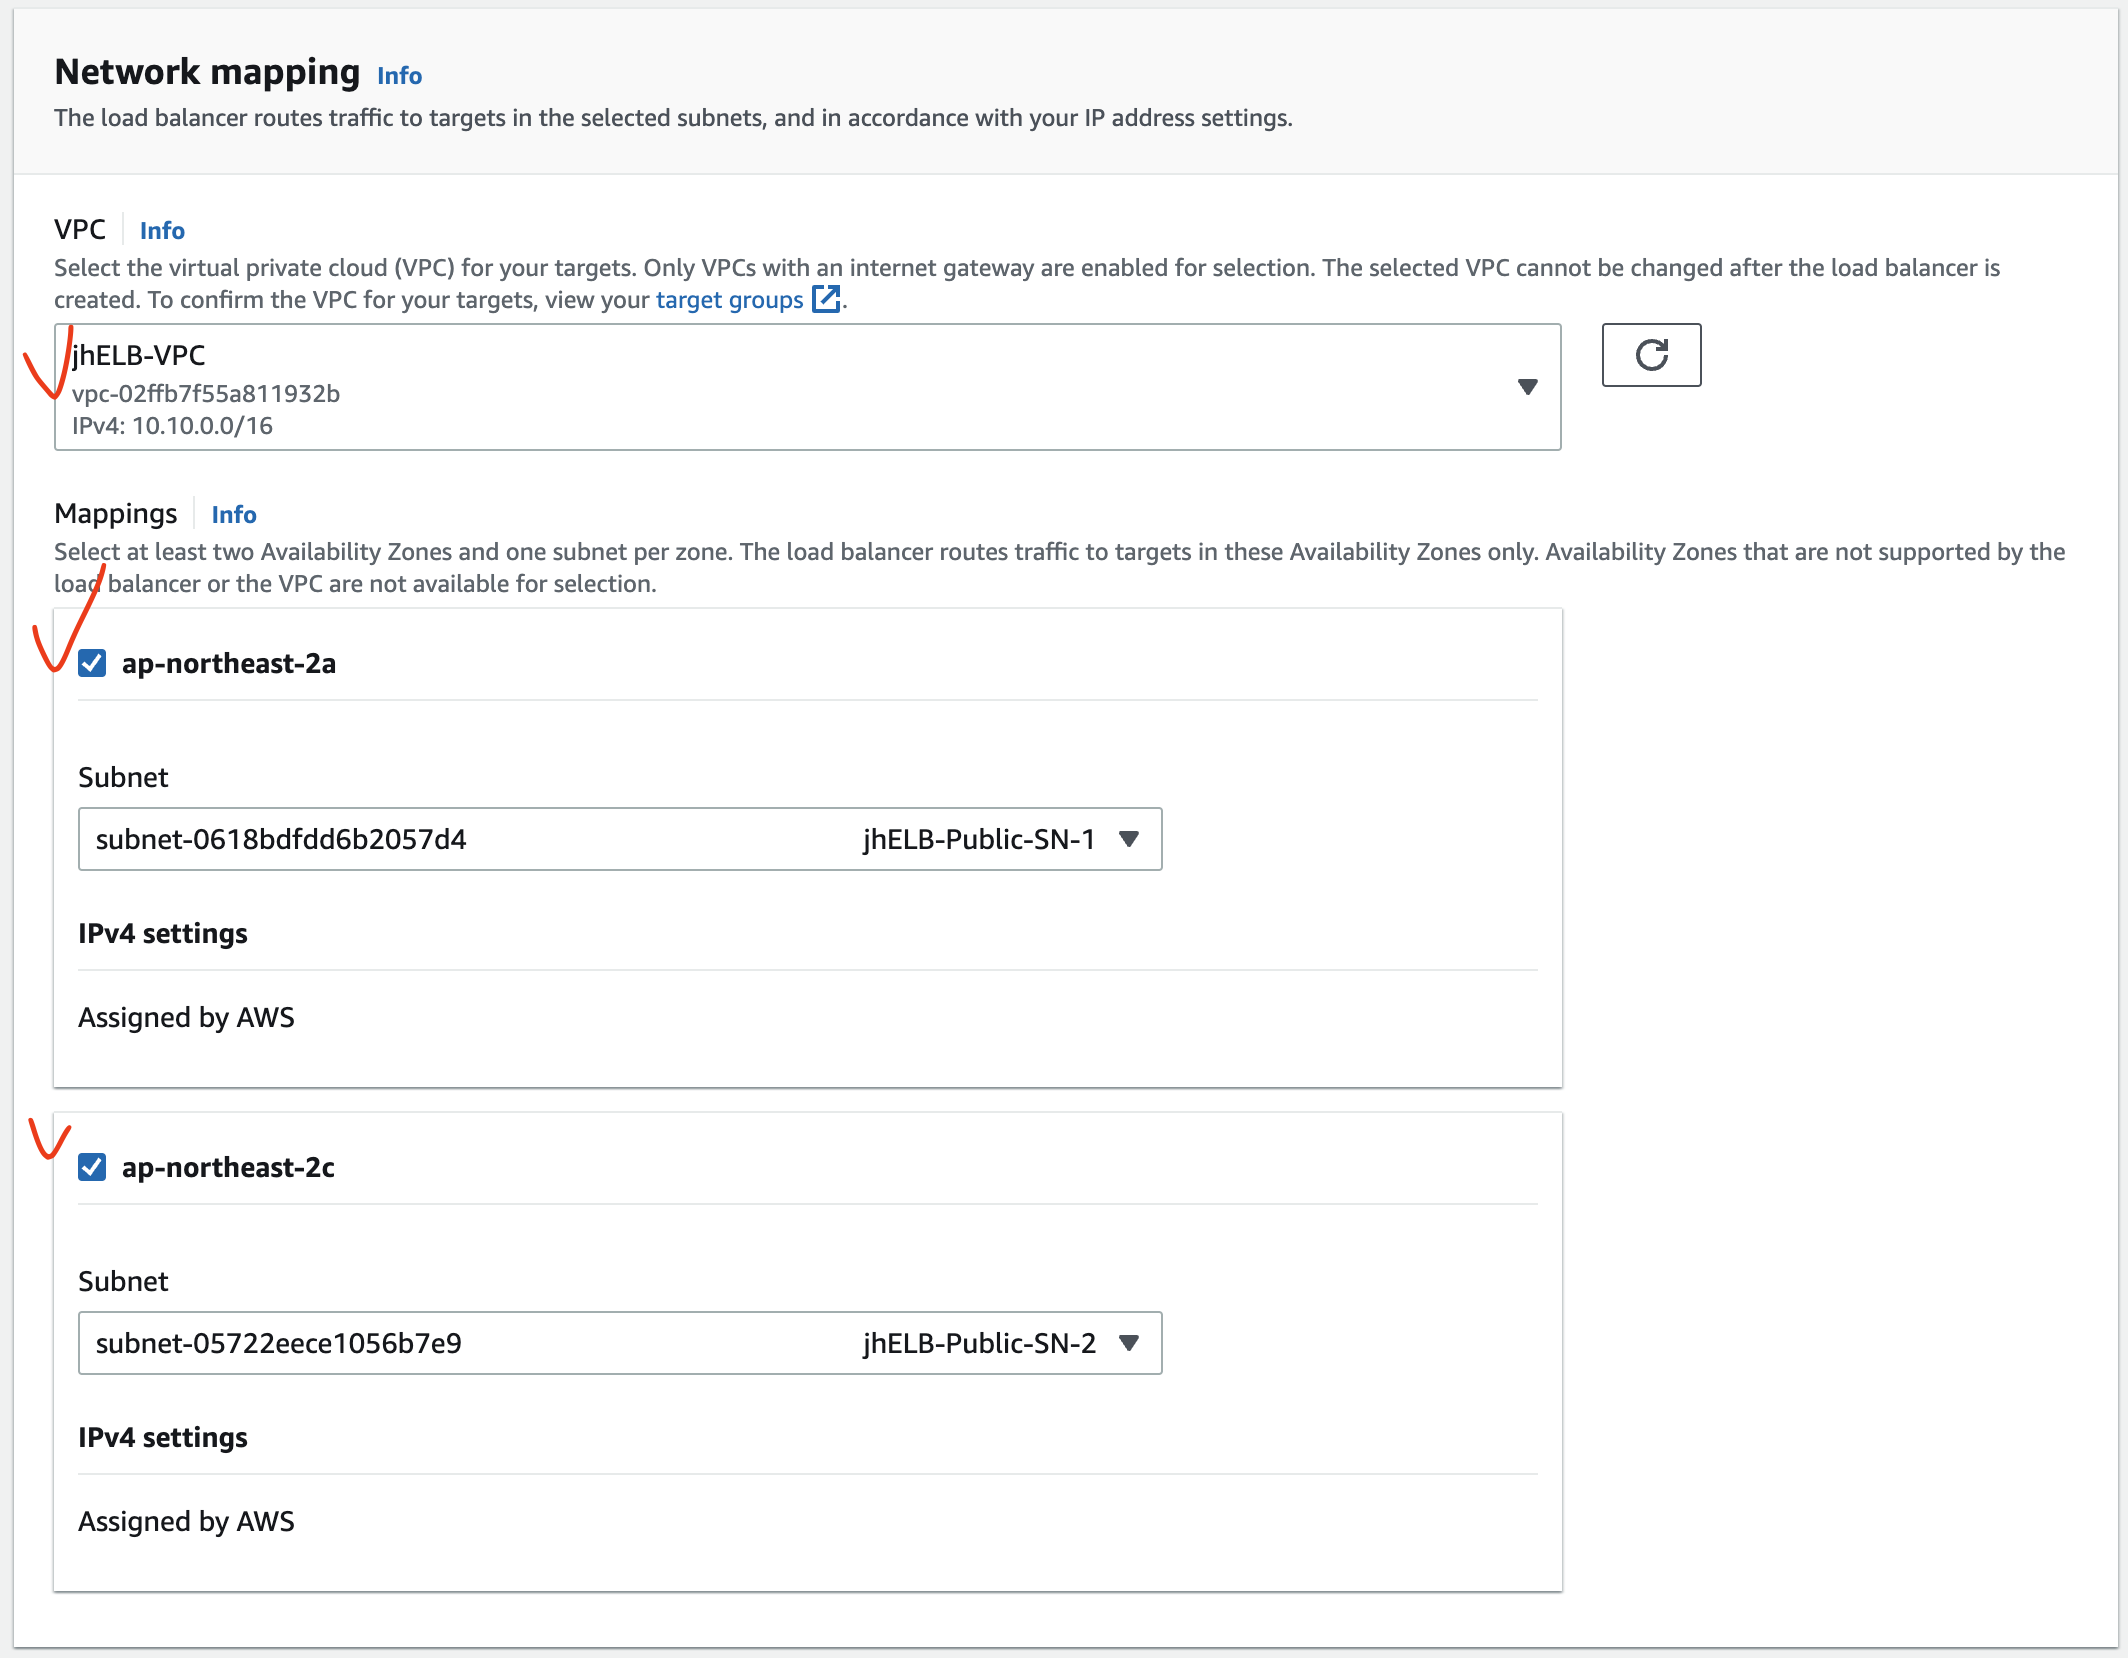
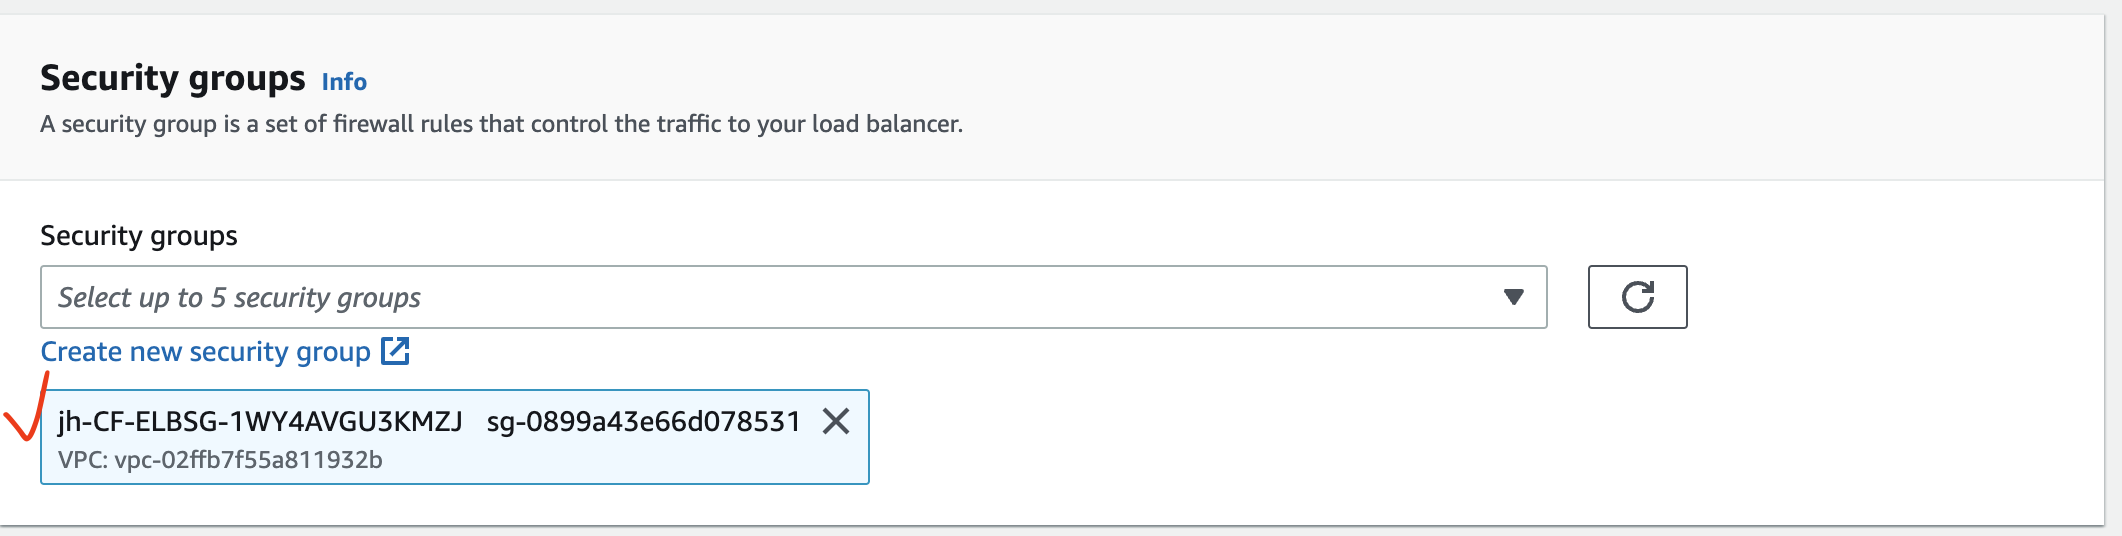
ALB 는 Security Group 을 지정해주어야 한다.
Security Group 의 상세한 내용은 AWS - Security (1): Security Group, ACL, VPC Flow Log 을 참고하세요.
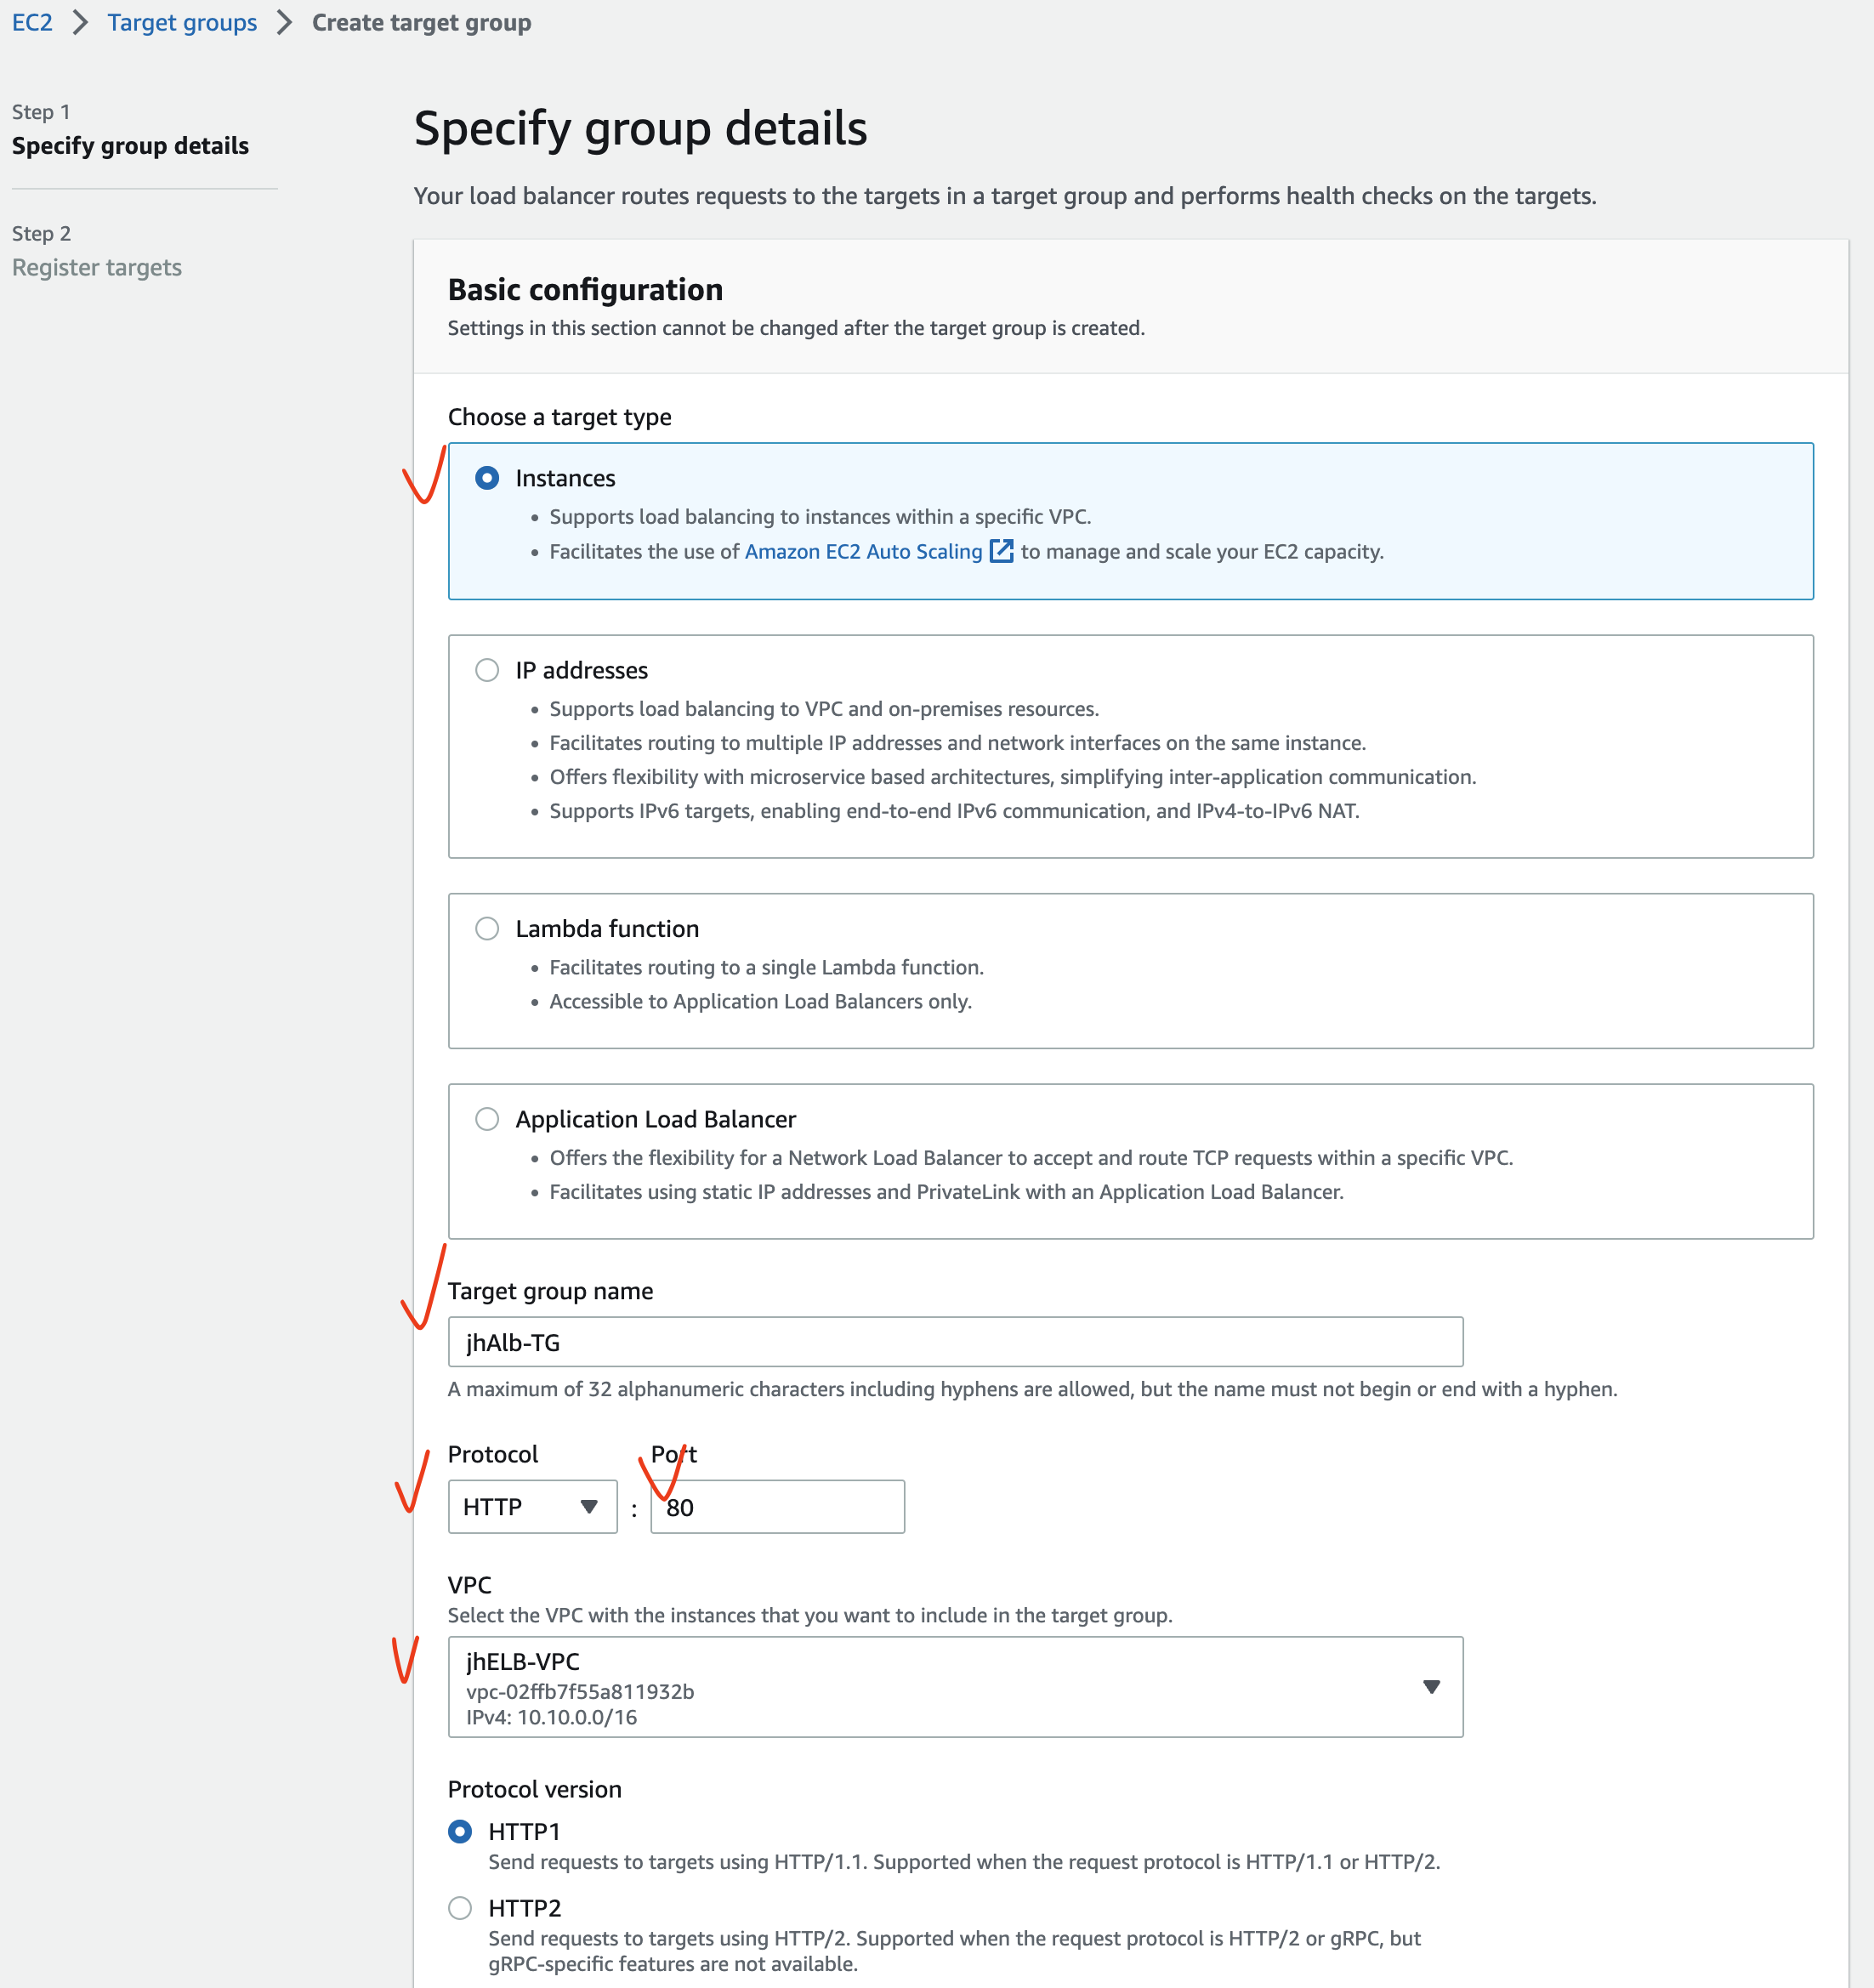
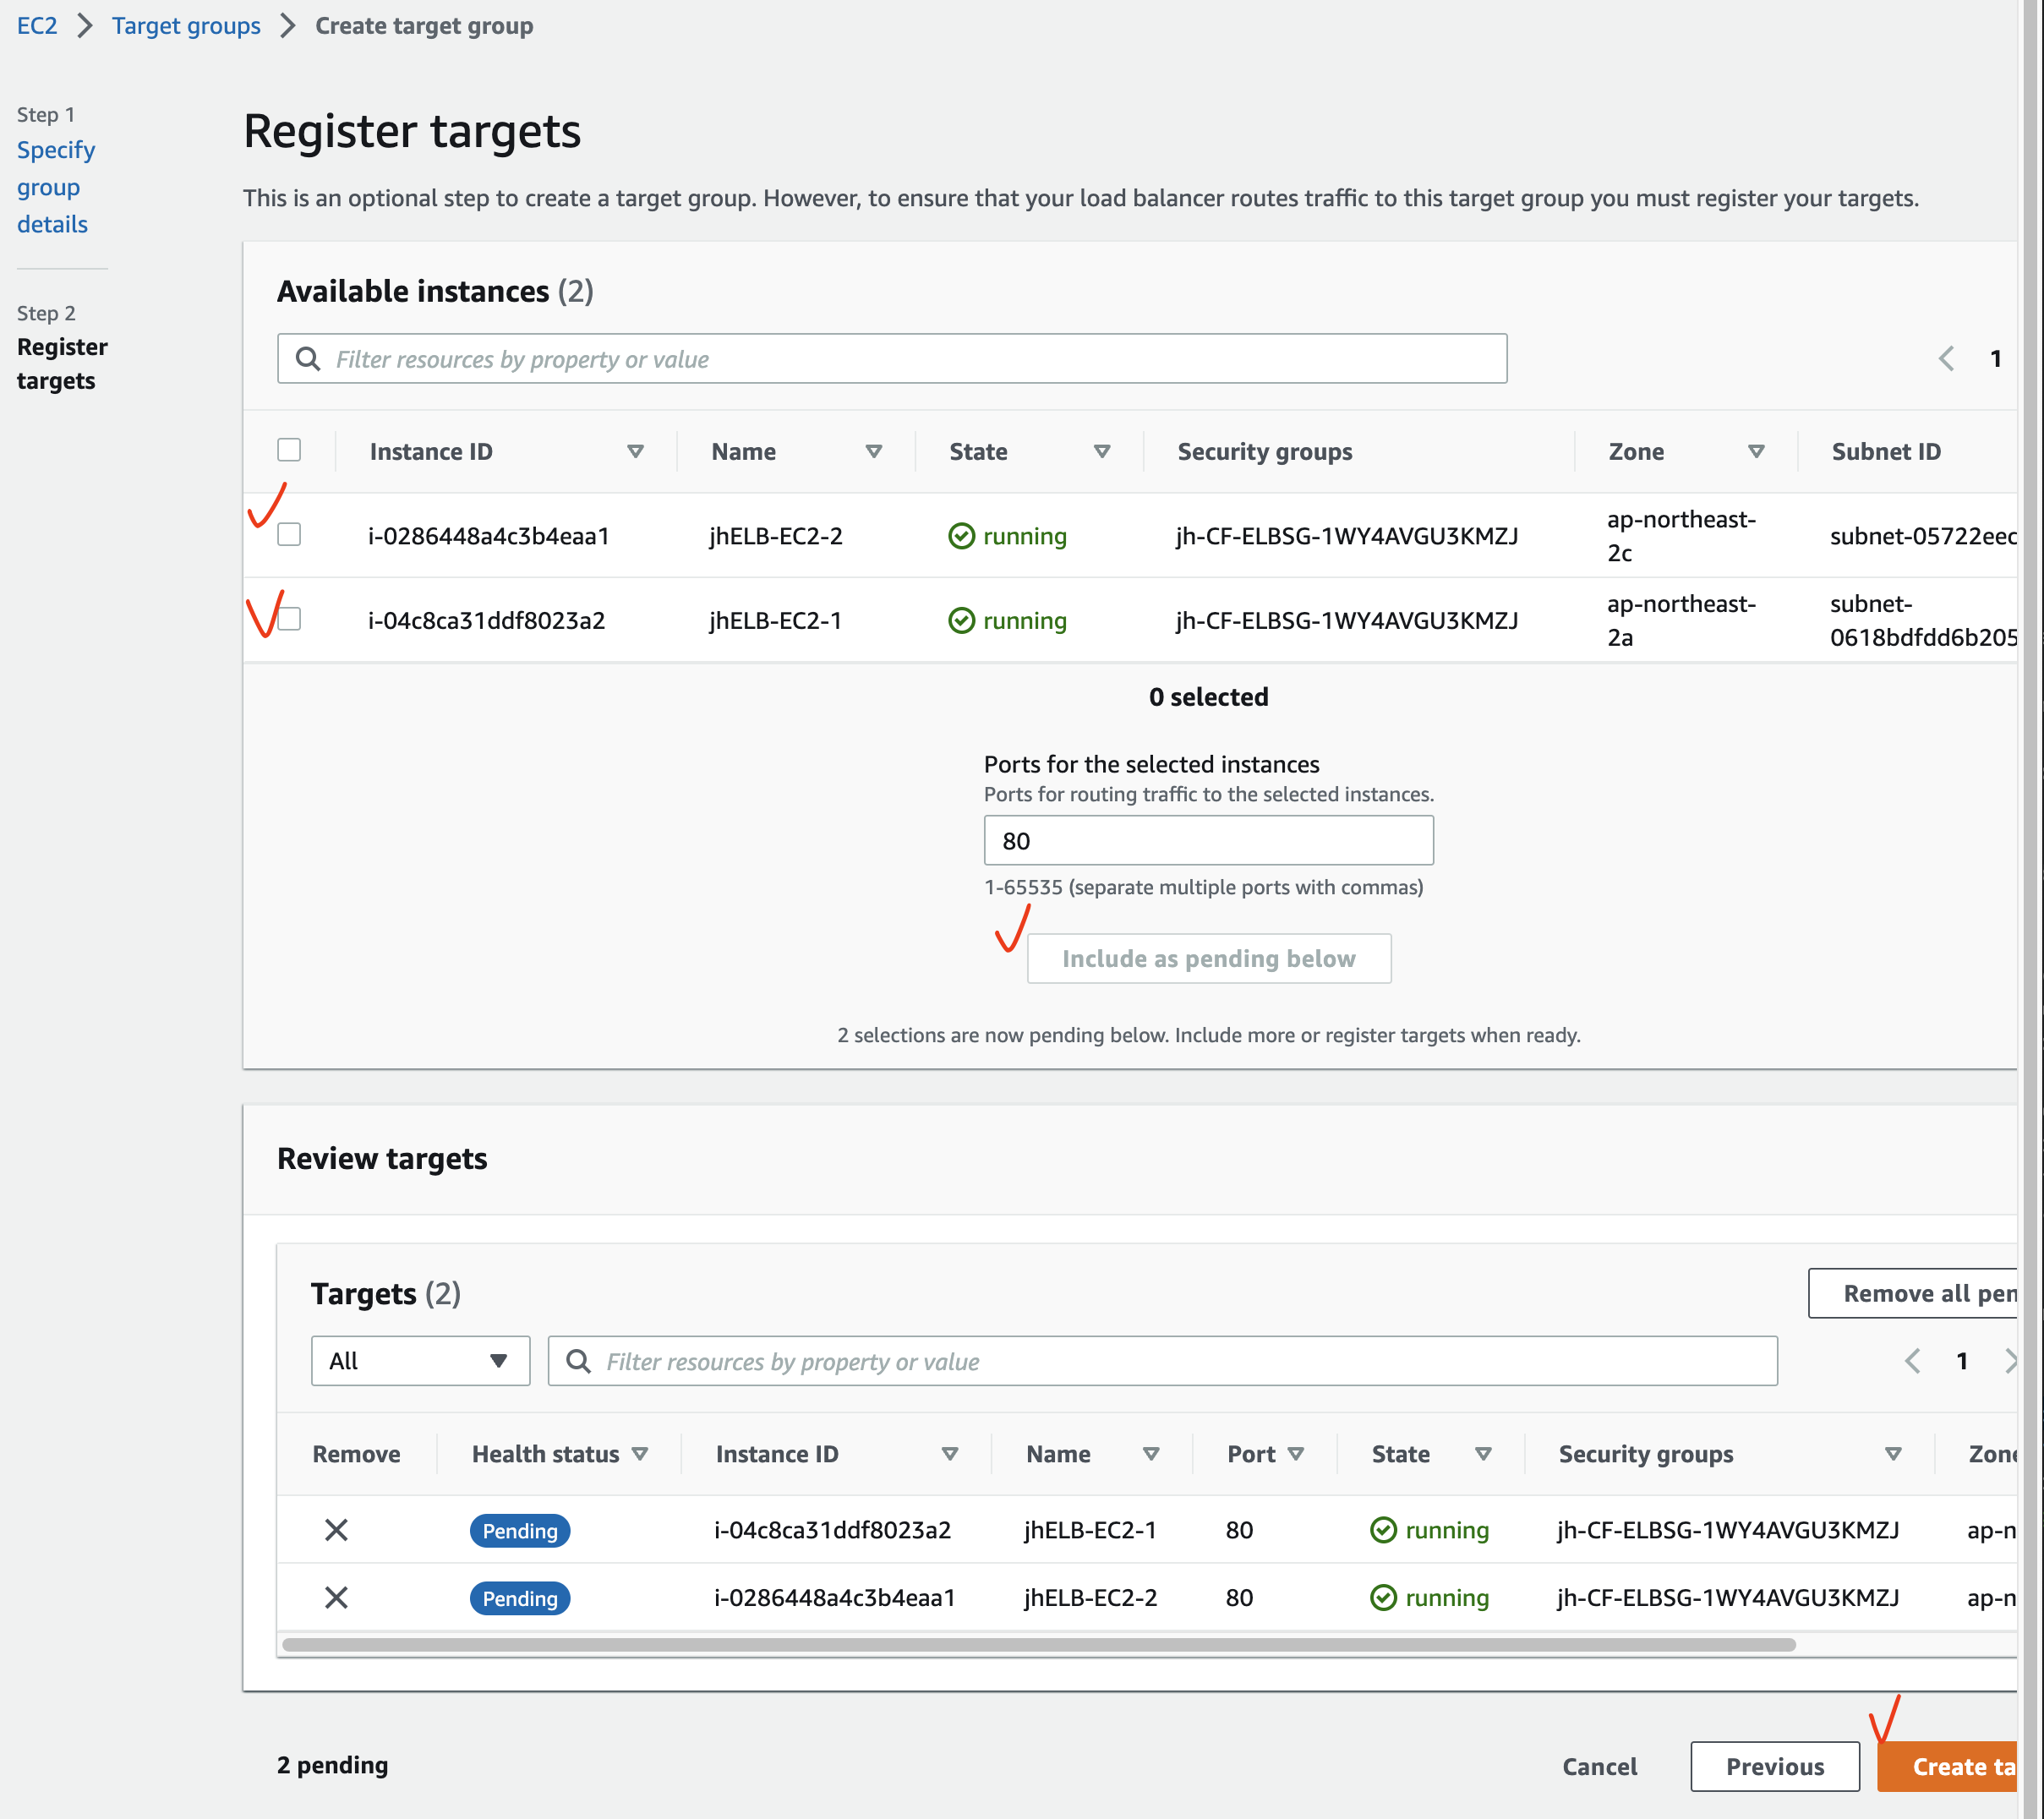
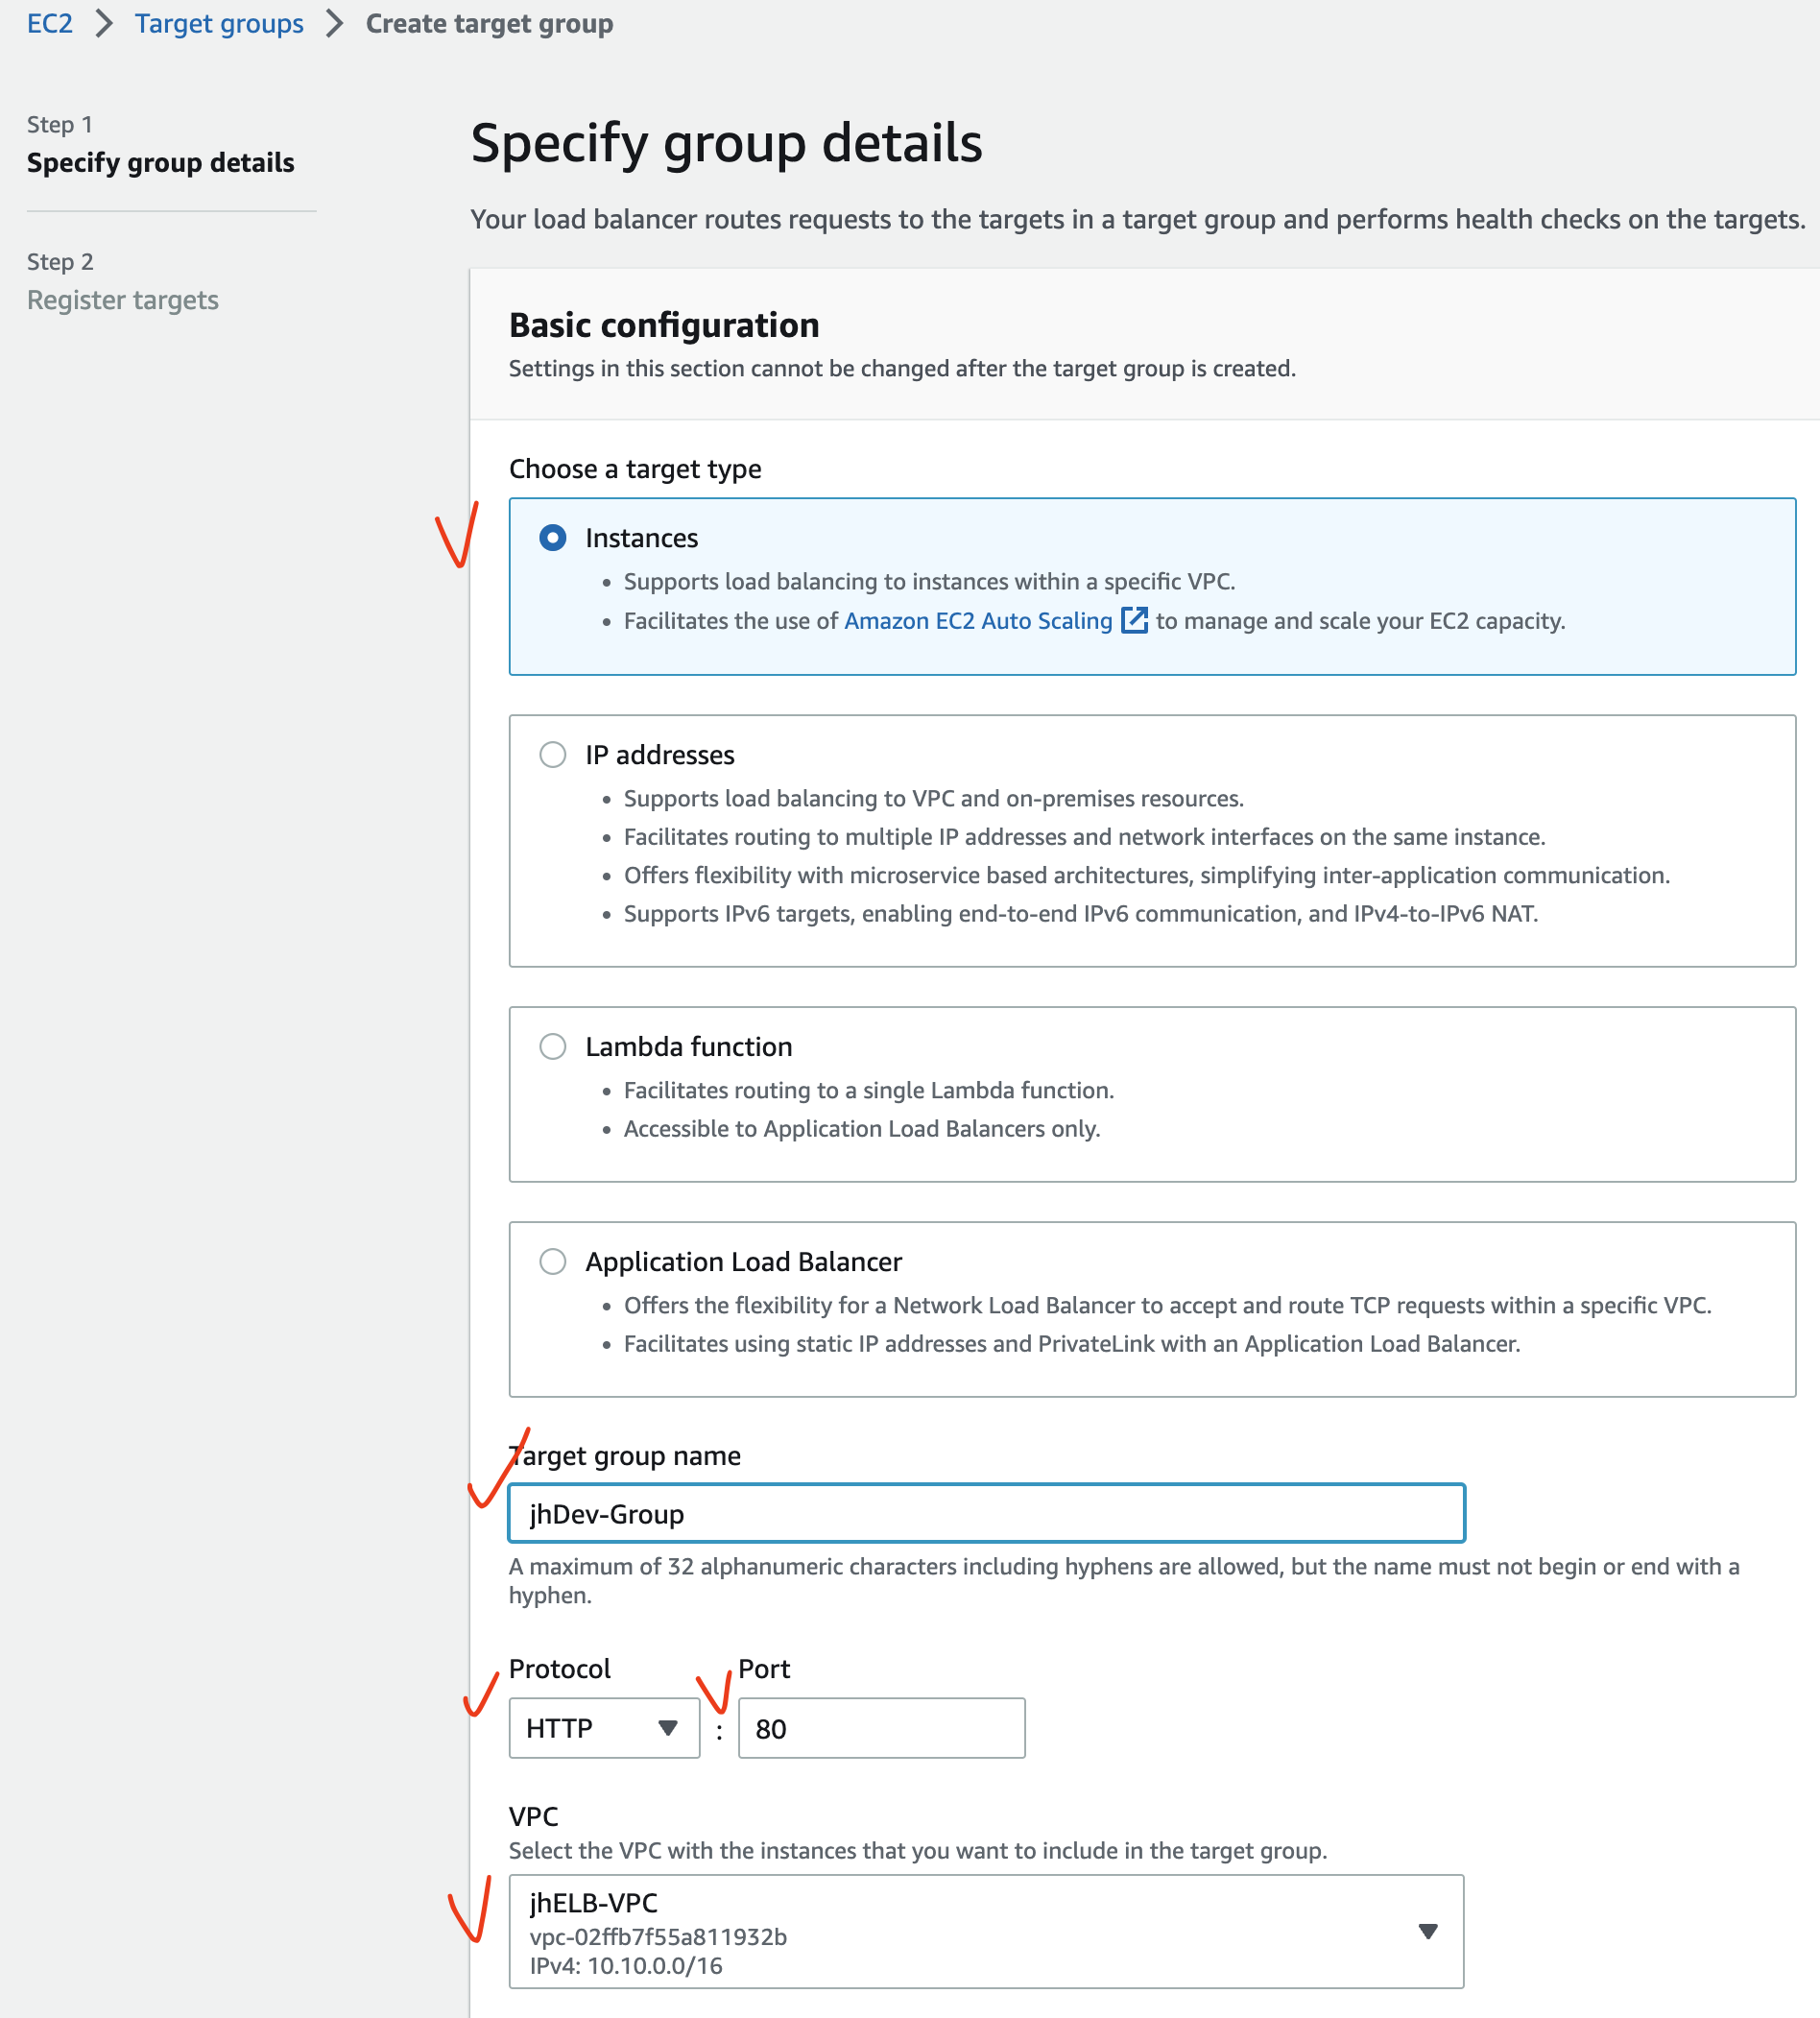
Create target group 를 눌러 Target group 을 생성한다. (하단 이미지 참조)
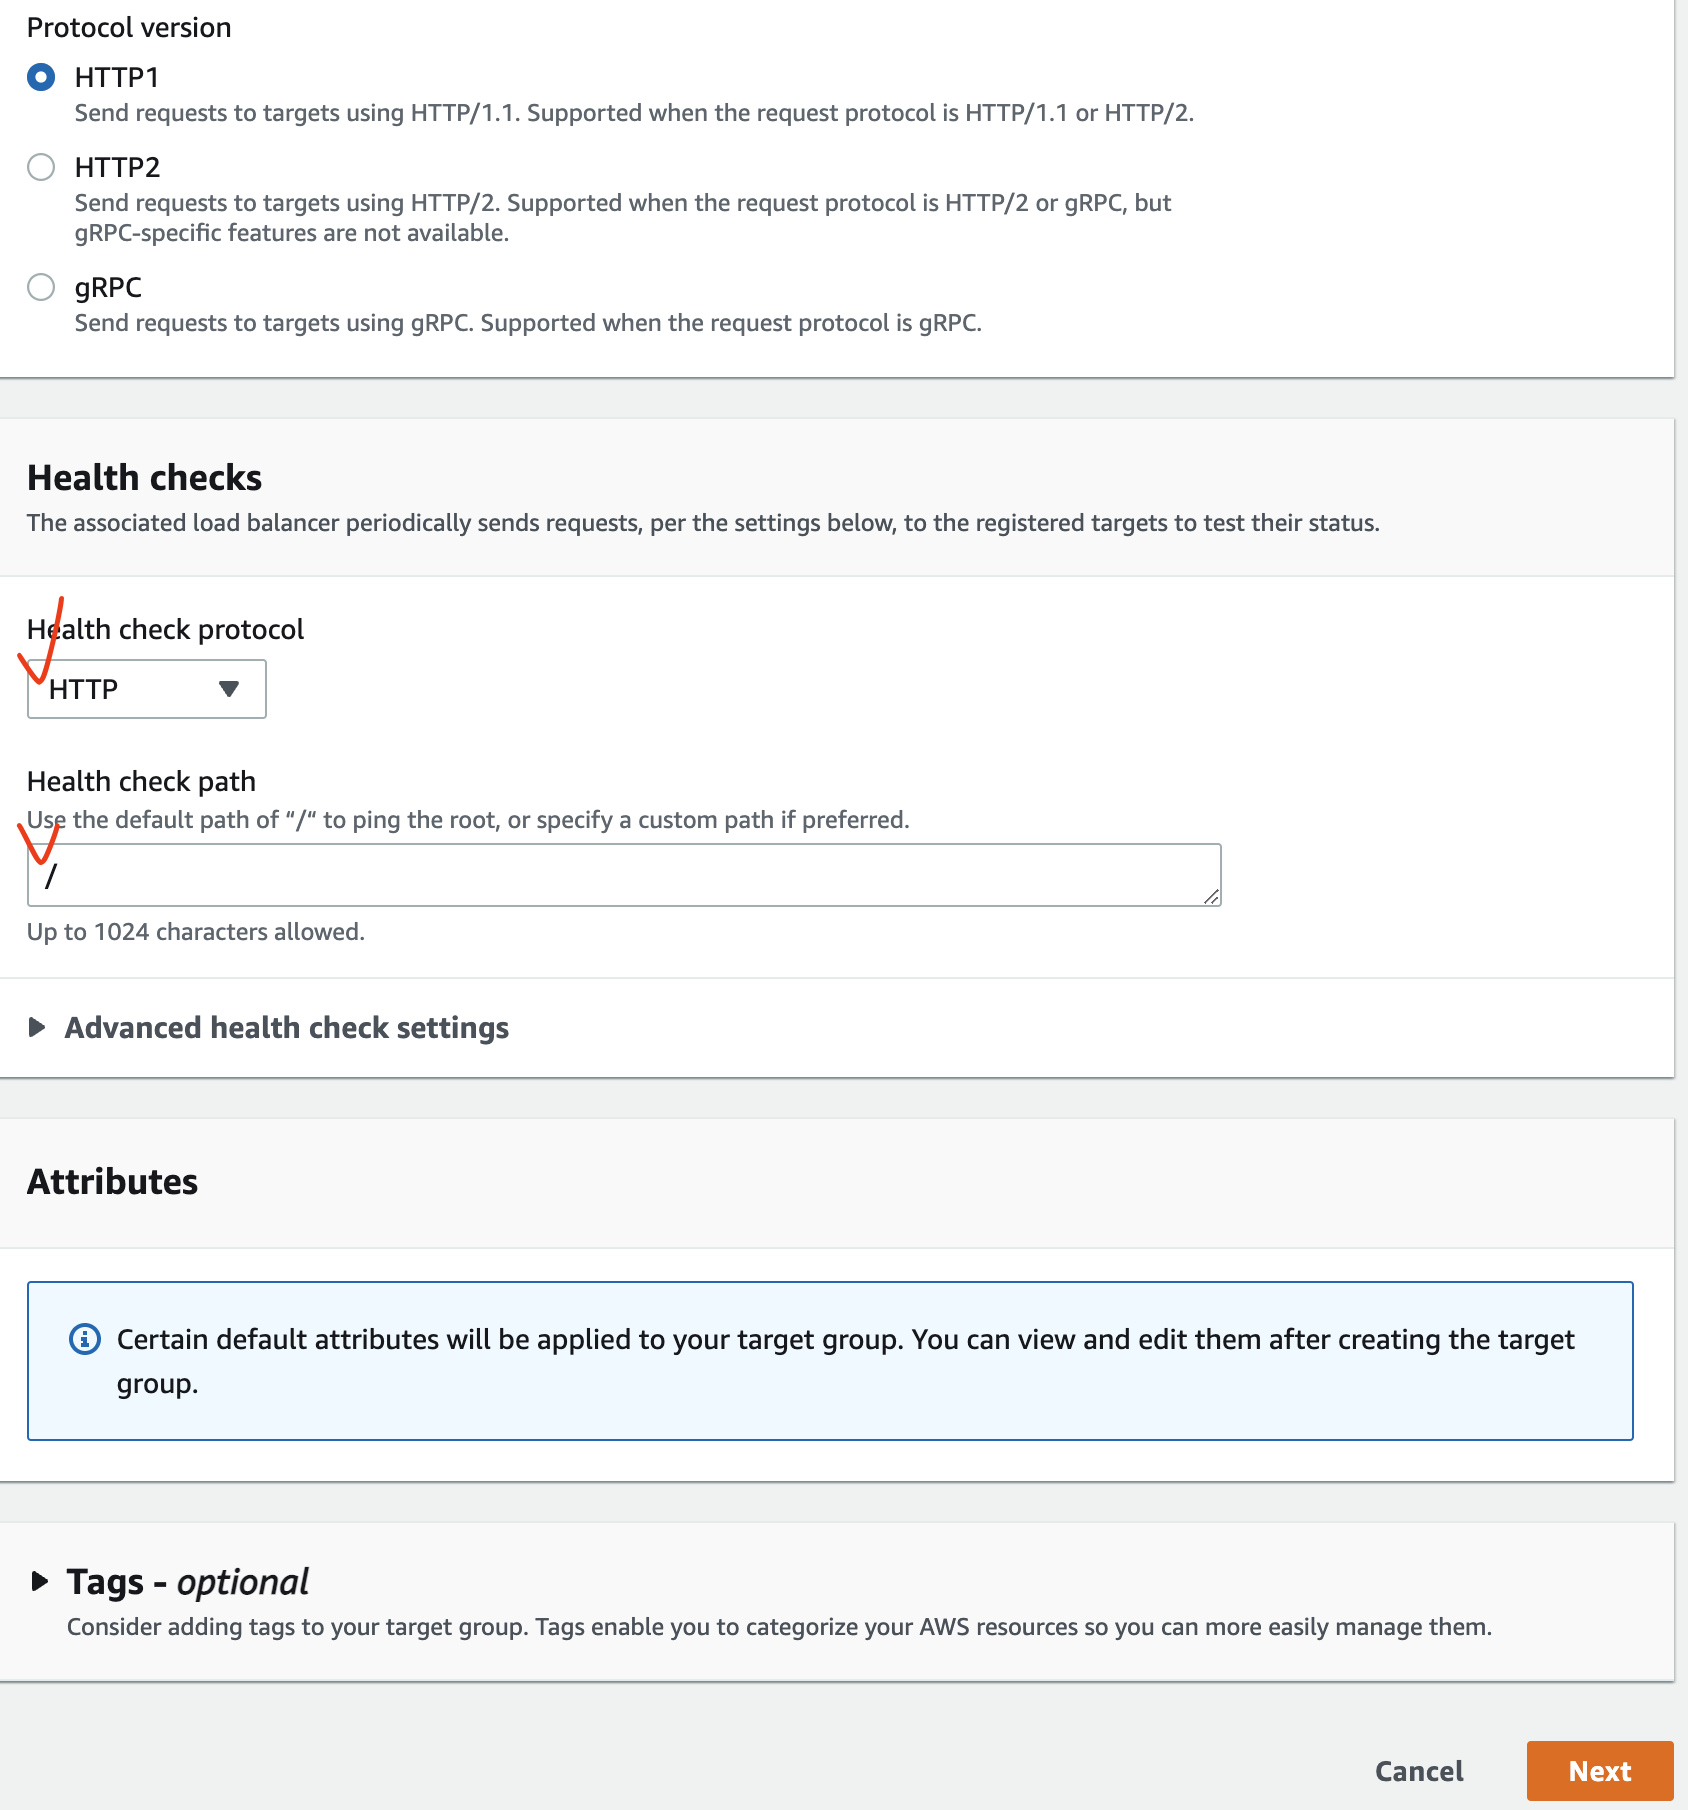
Health checks 의 각 항목이 의미하는 것은 아래와 같다.
Health check protocol: ALB 에서는 HTTP(S) 만 선택 가능Healthy threshold: 비정상 상태에서 정상 상태 확인까지 확인하는 검사 횟수Unhealthy threshold: 대상을 비정상으로 간주하기까지의 연속적 검사 실패 횟수Timeout: 상태 검사 실패까지 제한 시간Interval: 상태 검사 간격 시간Success codes: 응답 성공을 확인하는 HTTP code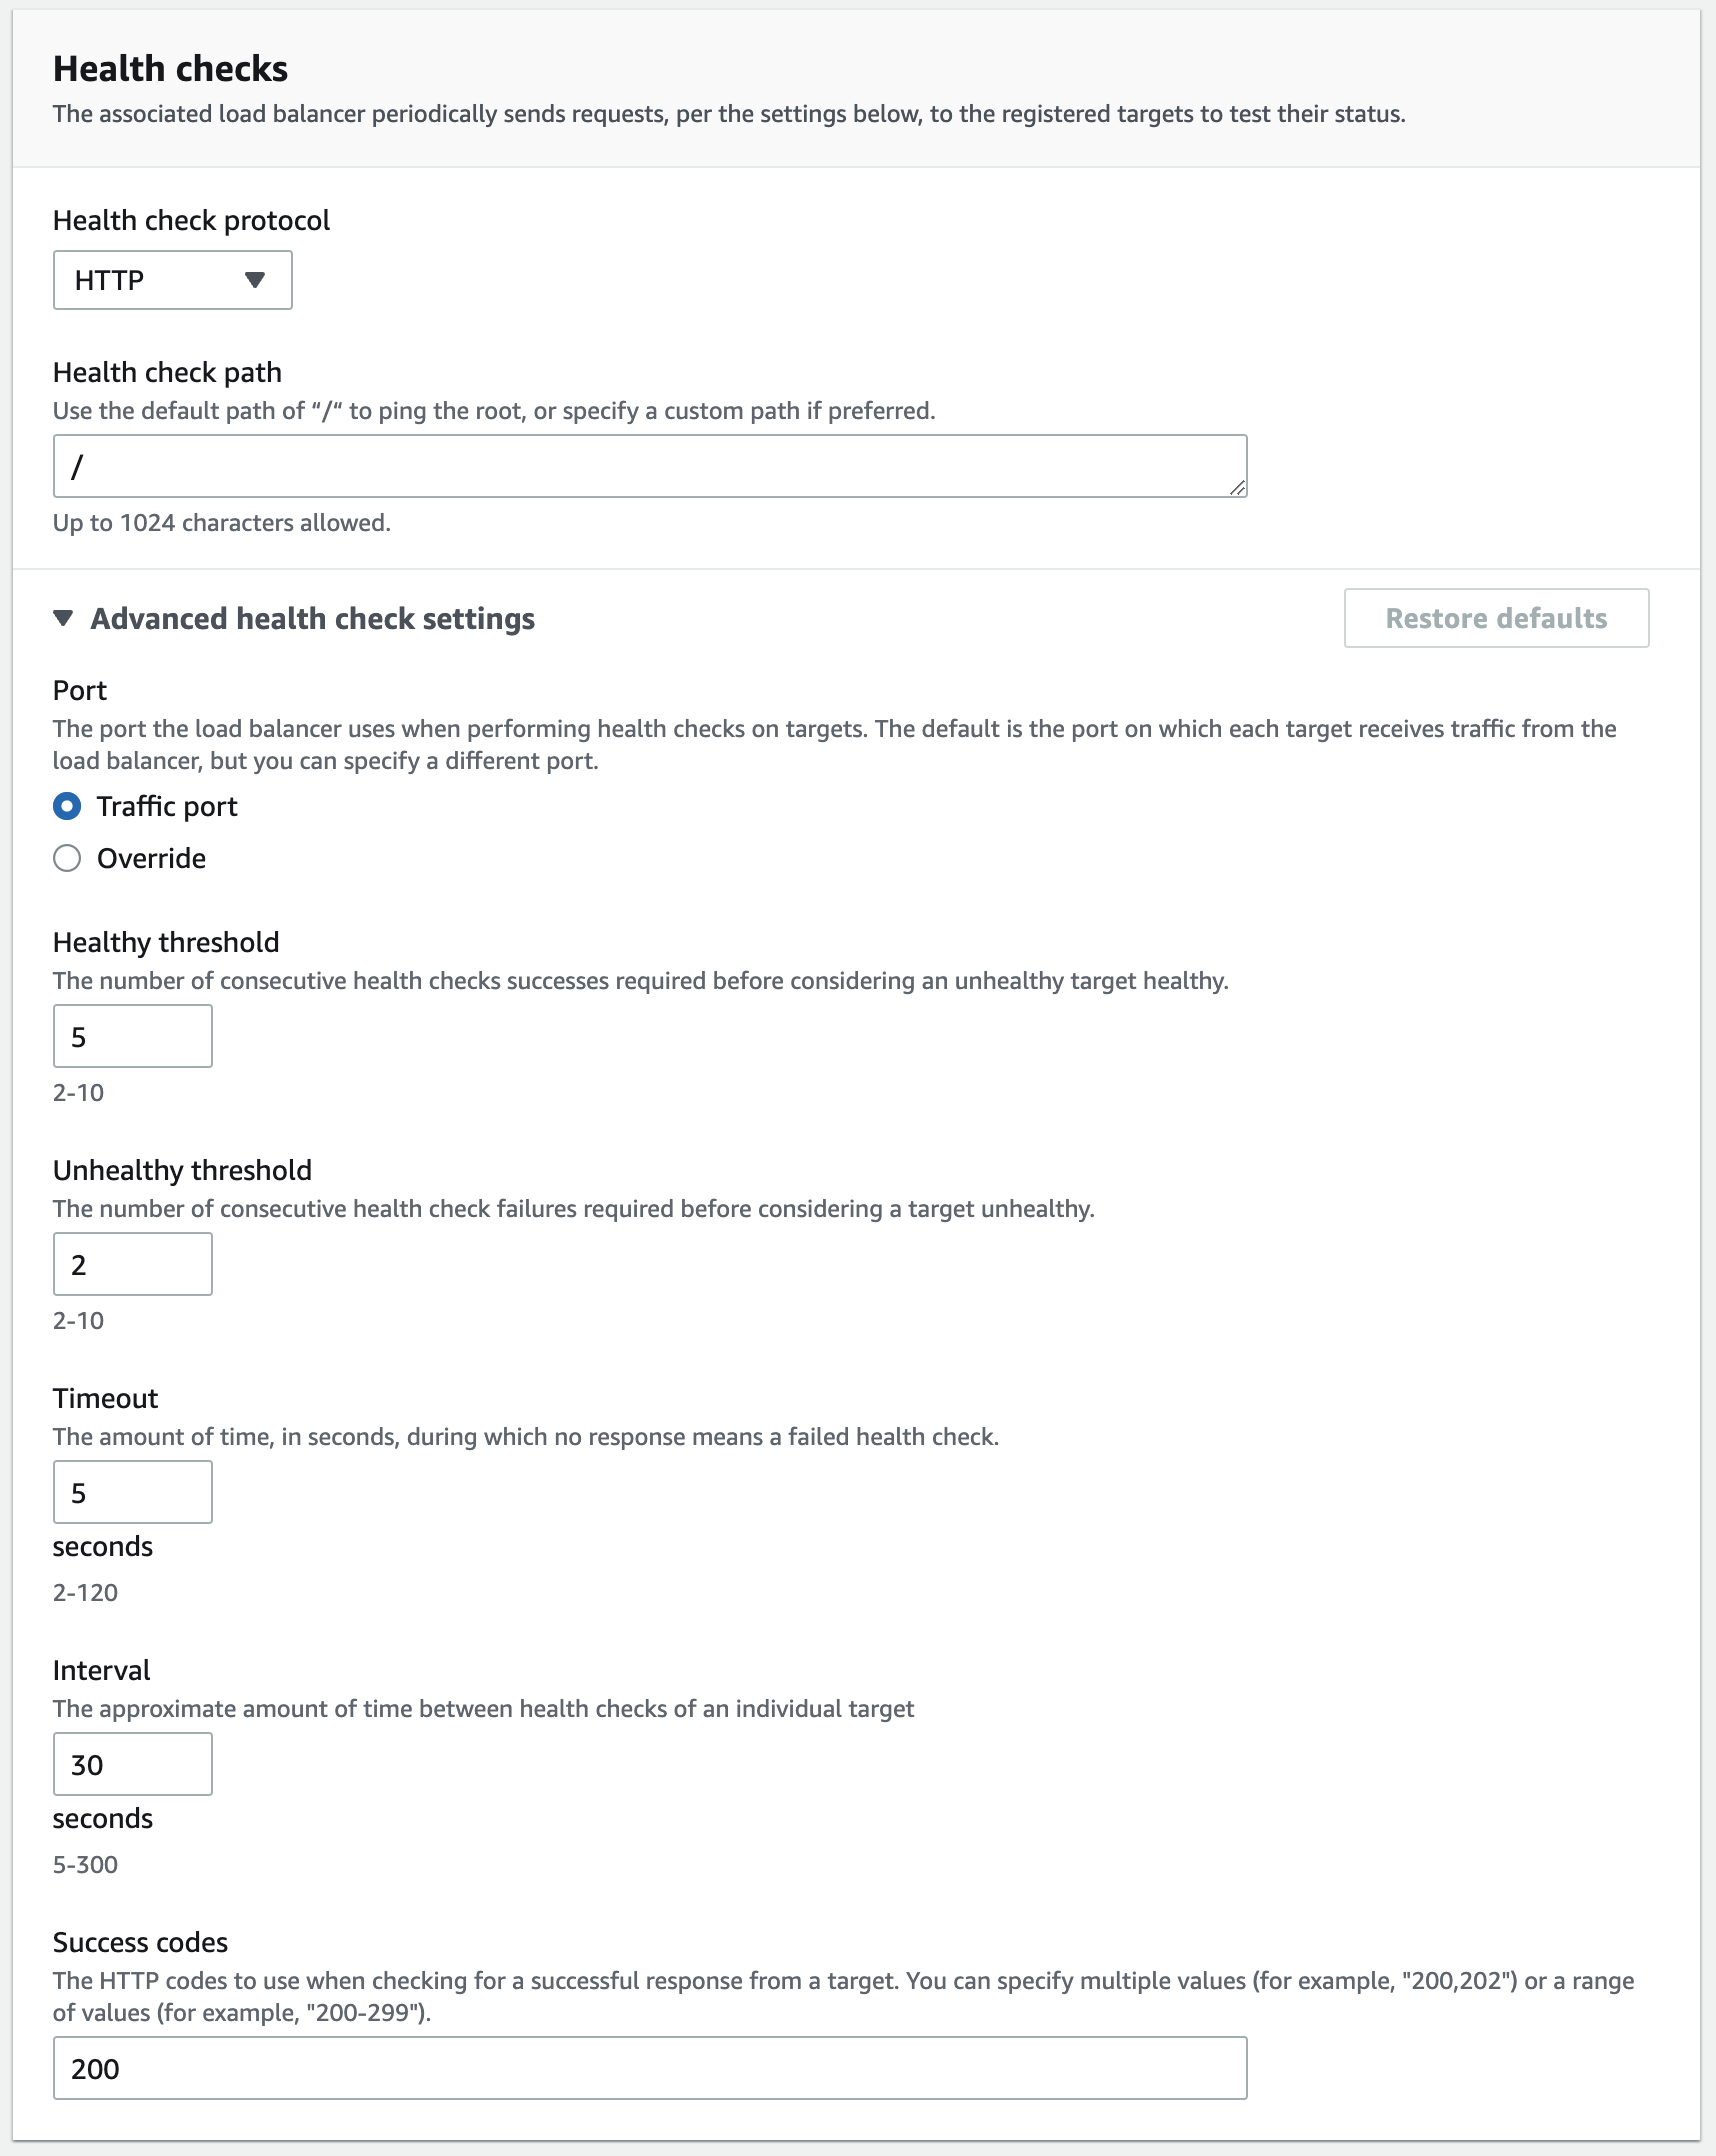

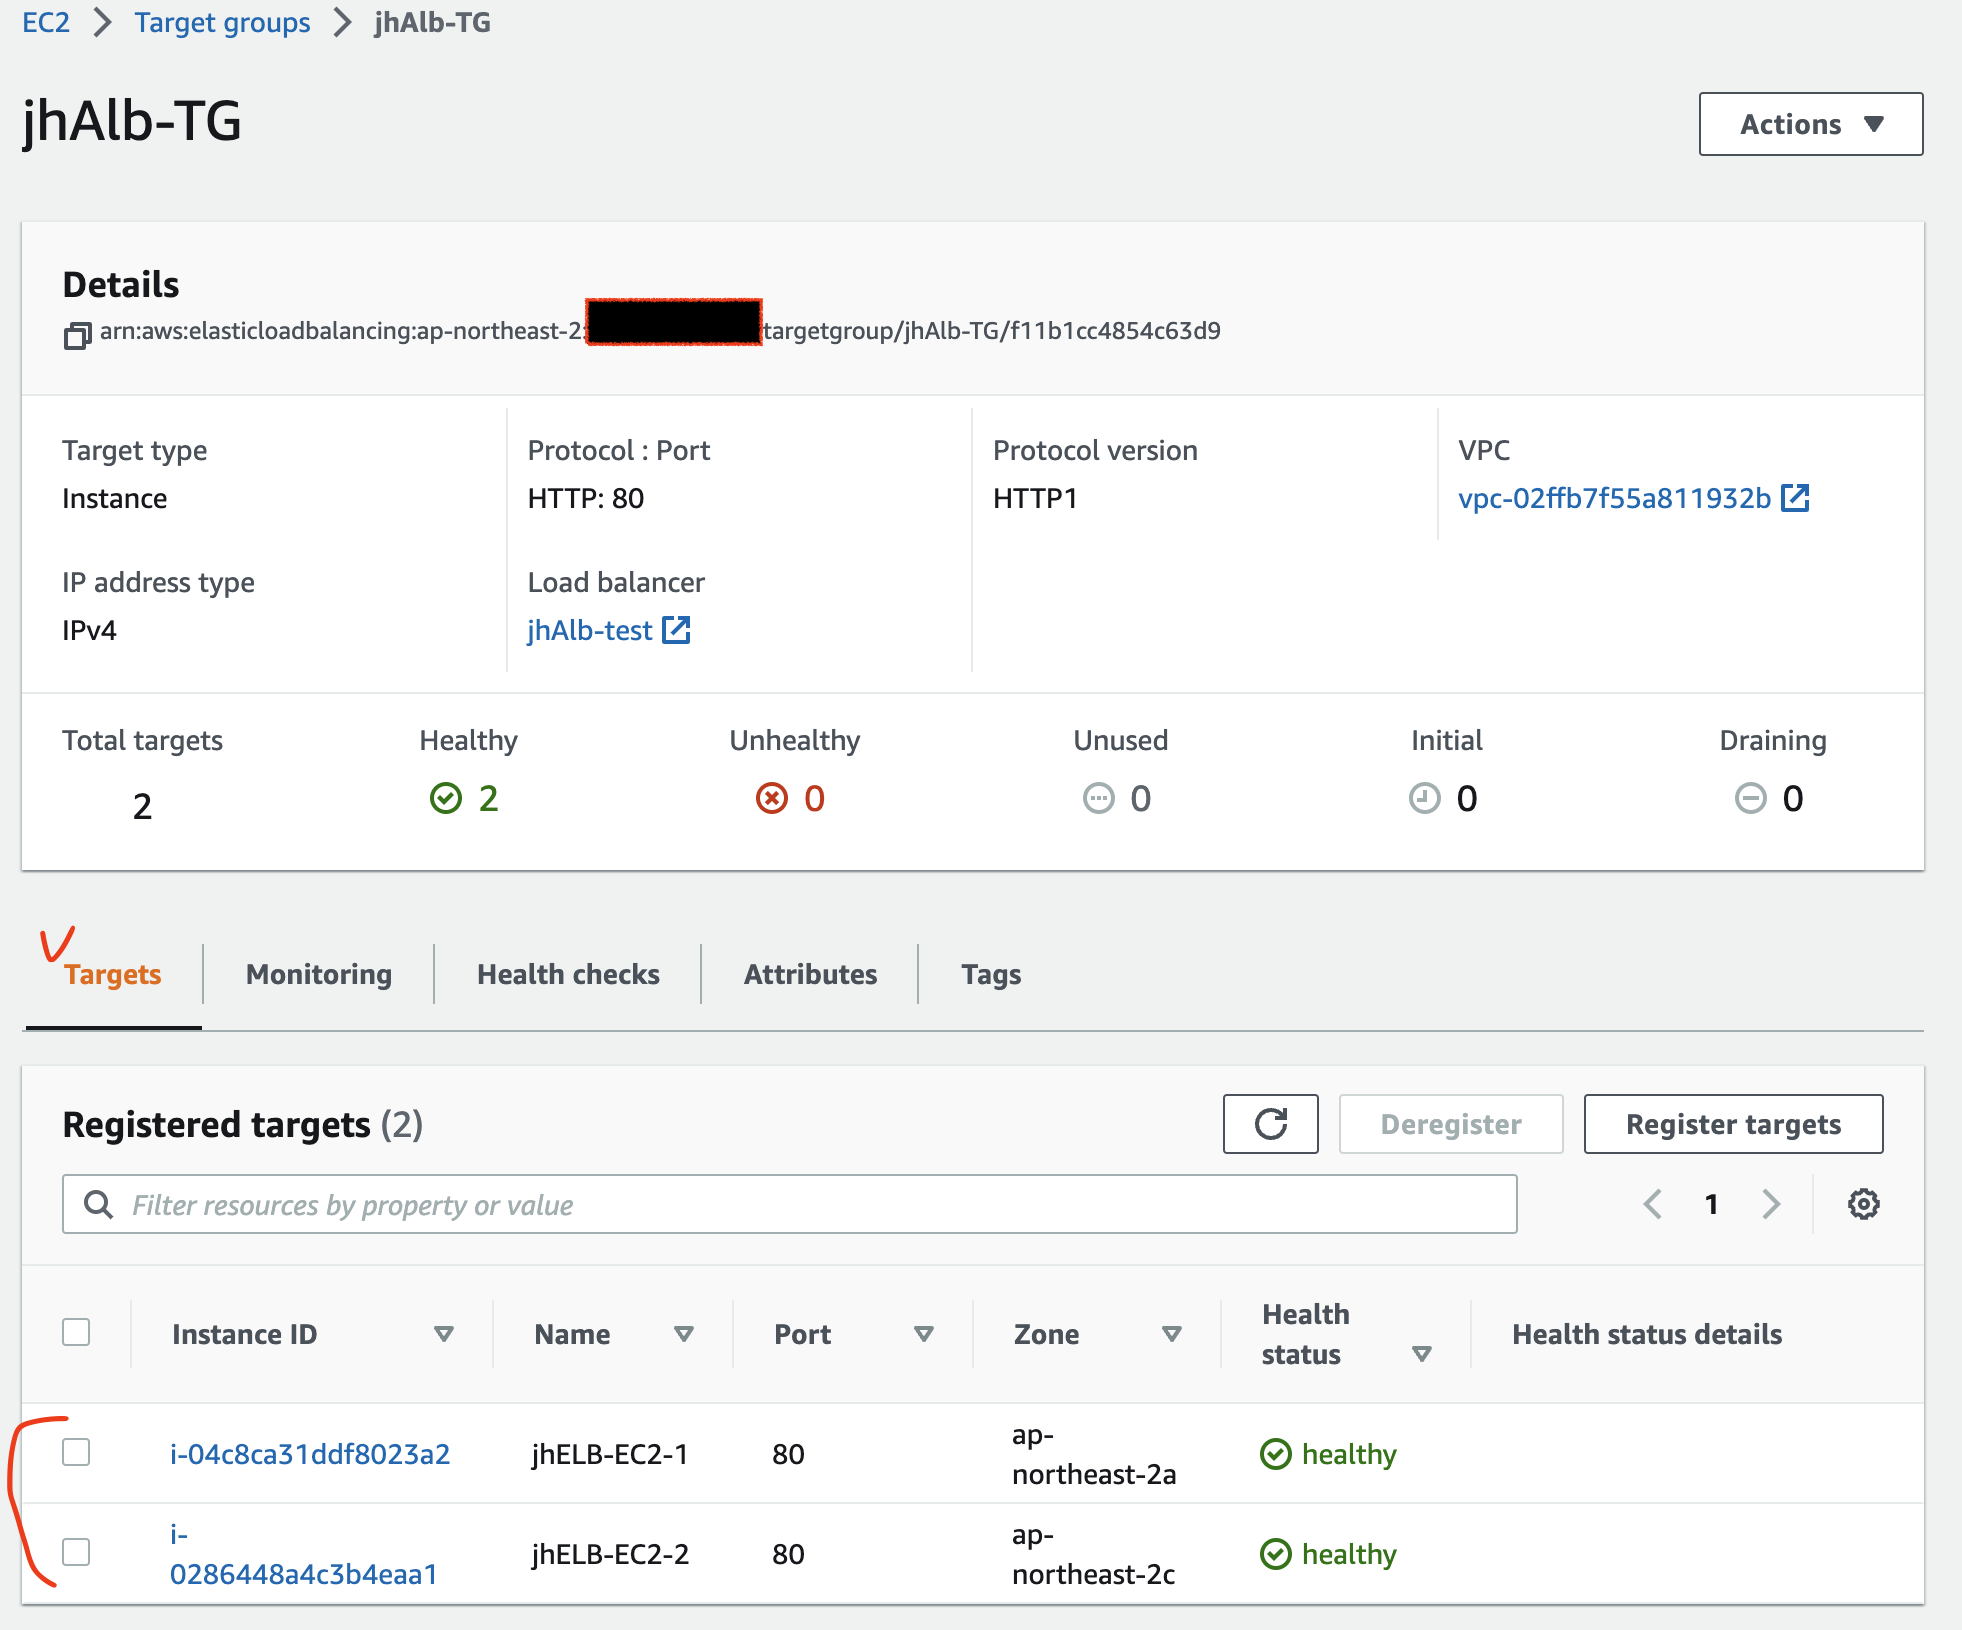
2.2.2. ALB 검증
이제 ALB 로드 밸런싱 동작을 알아보면서 경로 기반 라우팅도 함께 알아보자.
이제 jhMy-EC2 에 SSH 접속하여 ALB DNS 주소로 curl 명령어를 통해 HTTP 접근을 해보면 jhELB-EC2-1 과 jhELB-EC2-2 가 번갈아가며 접속되는 것을 확인할 수 있다. (=ALB 에서 로드 밸런싱되어 부하 분산되고 있음)
$ ssh -i sandbox-jh.pem ec2-user@13.125.xx.xx
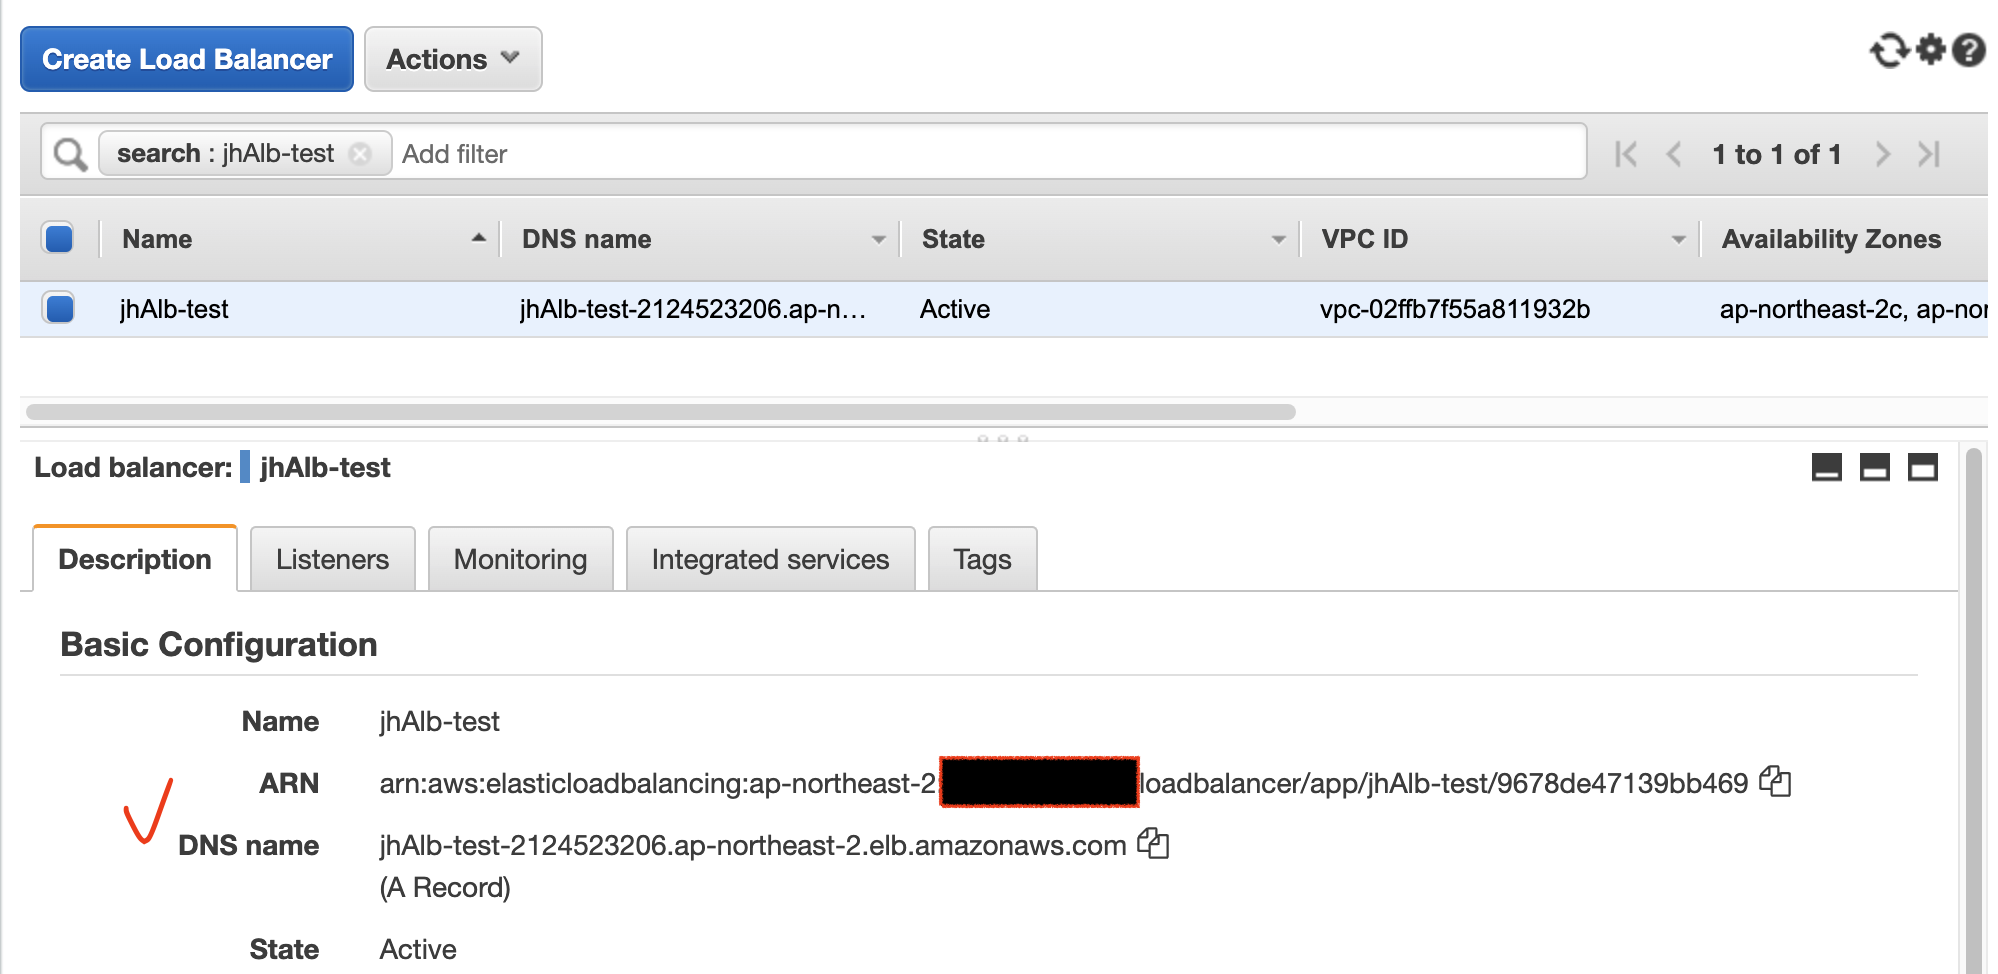
[ec2-user@ip-20-20-0-xx ~]$ curl jhAlb-test-2124523206.ap-northeast-2.elb.amazonaws.com/index.html
<h1>jhELB-EC2-2 Web Server</h1>
[ec2-user@ip-20-20-0-xx ~]$ curl jhAlb-test-2124523206.ap-northeast-2.elb.amazonaws.com/index.html
<h1>jhELB-EC2-2 Web Server</h1>
[ec2-user@ip-20-20-0-xx ~]$ curl jhAlb-test-2124523206.ap-northeast-2.elb.amazonaws.com/index.html
<h1>jhELB-EC2-1 Web Server</h1>
[ec2-user@ip-20-20-0-xx ~]$ curl jhAlb-test-2124523206.ap-northeast-2.elb.amazonaws.com/index.html
<h1>jhELB-EC2-1 Web Server</h1>
ALB 를 통한 로드 밸런싱 구성도를 다시 한번 보도록 하자.
/dev/index.html 은 jhELB-EC2-1 에만 있고, /mgt/index.html 은 jhELB-EC2-2 에만 있다.
만일 ALB 를 통해 /dev/index.html 을 계속 요청했을 경우 jhELB-EC2-2 로 라우팅되는 경우에는 정상적인 응답을 주지 못한다.
이럴 때에는 경로 기반 라우팅 기능 을 사용할 수 있다.
경로 기반 라우팅 기능 은 HTTP 접근을 위한 URL 경로 정보를 확인하여 원하는 대상으로 라우팅하는 기능이다.
예를 들면 /dev/index.html 은 jhELB-EC2-1 으로만 전달하고, /mgt/index.html 은 jhELB-EC2-2 로만 전달하는 경로 기반 라우팅 을 설정하면 위의 문제를 해결할 수 있다.
경로 기반 라우팅 기능 을 사용하기 위해 먼저 Target group 을 분리한다.
[EC2] - [Load Balancing] - [Target Groups]
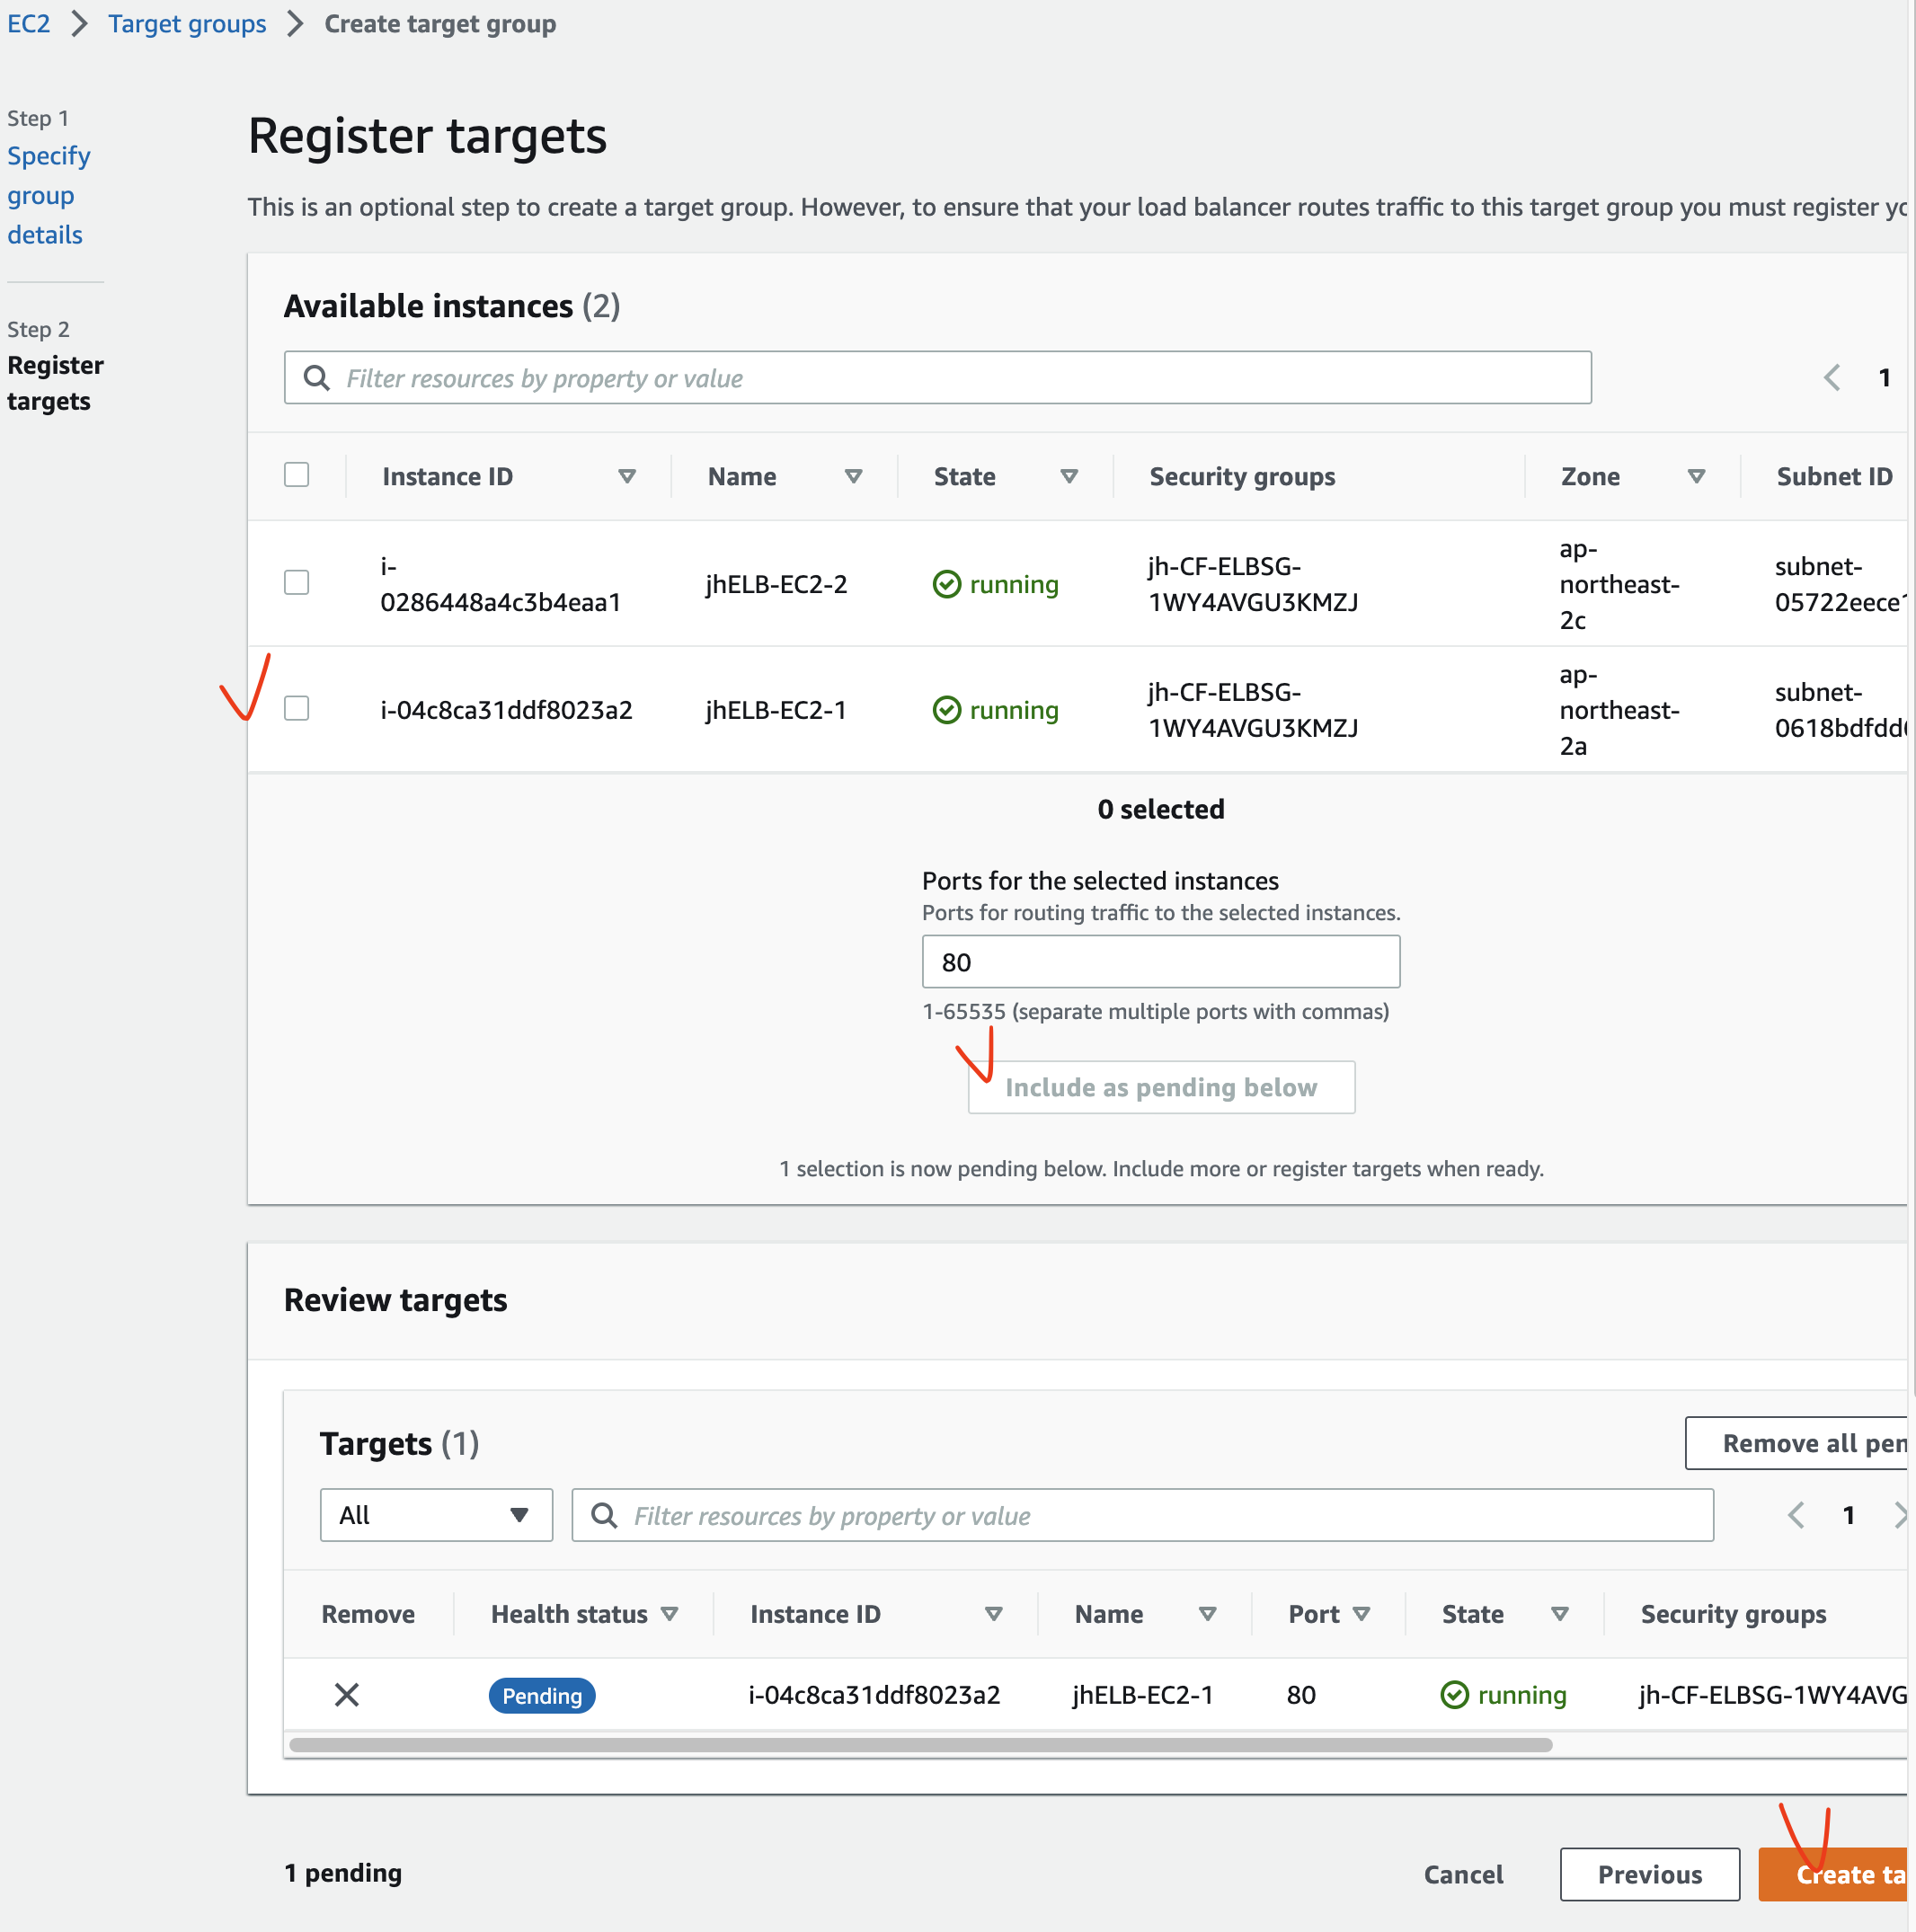
위와 동일하게 jhMng-Group Target group 생성 후 jhELB-EC2-2 를 등록한다.
이제 ALB 의 Listener 에서 경로 기반 라우팅을 설정한다.
아래 화면에서 Insert Rule 을 클릭한다. 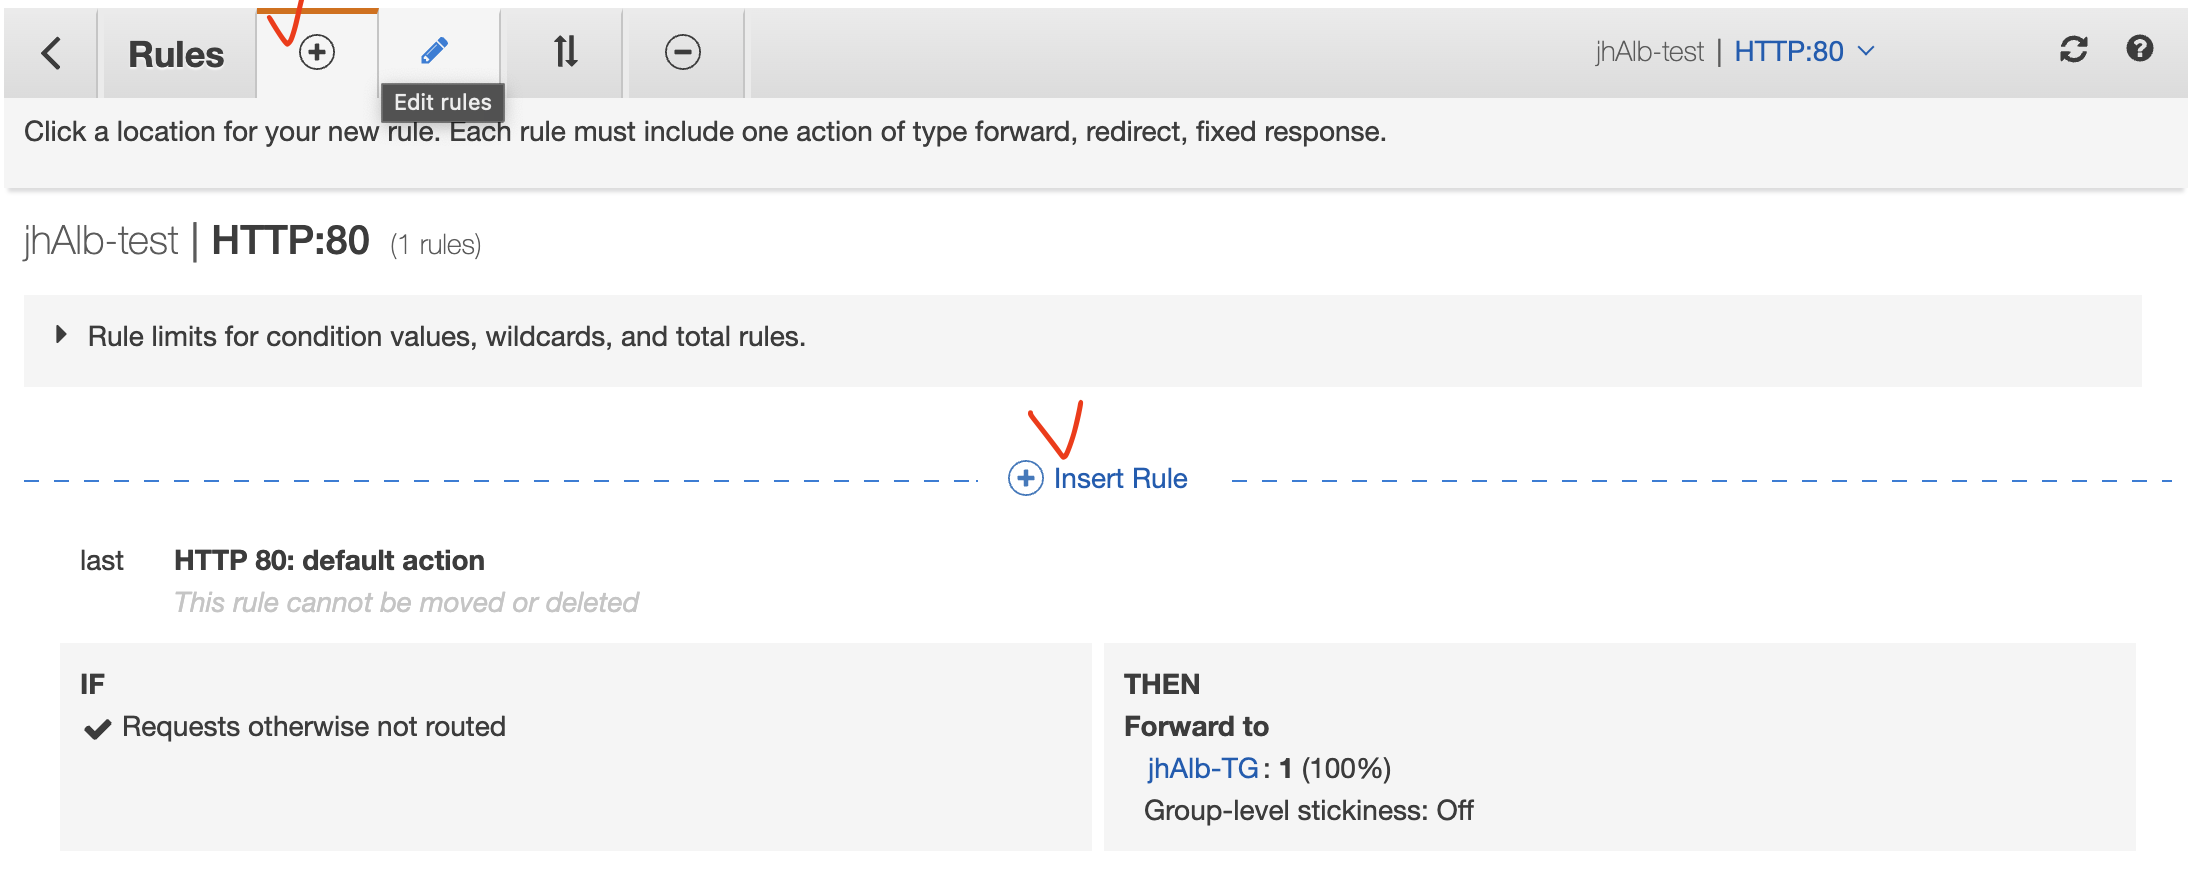
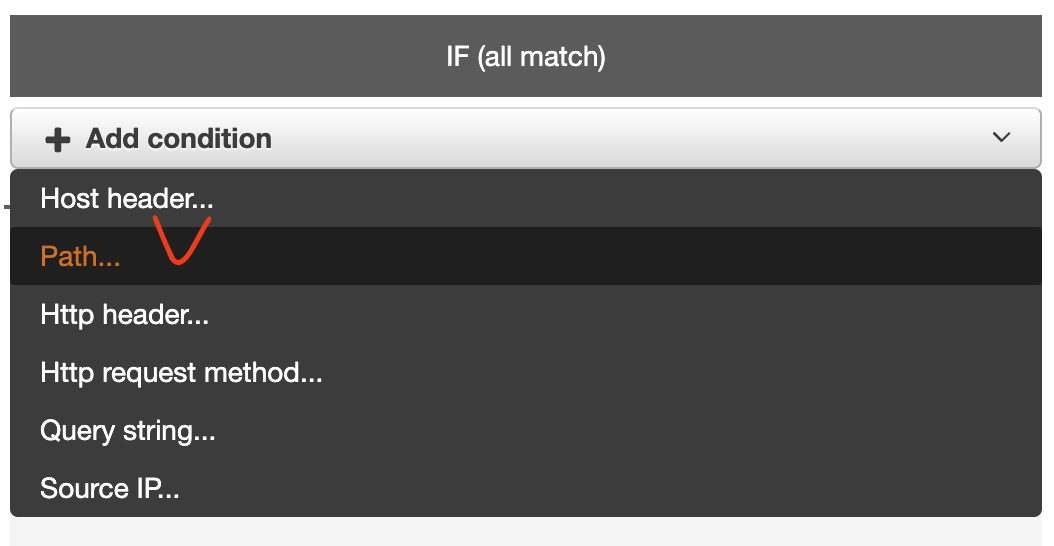
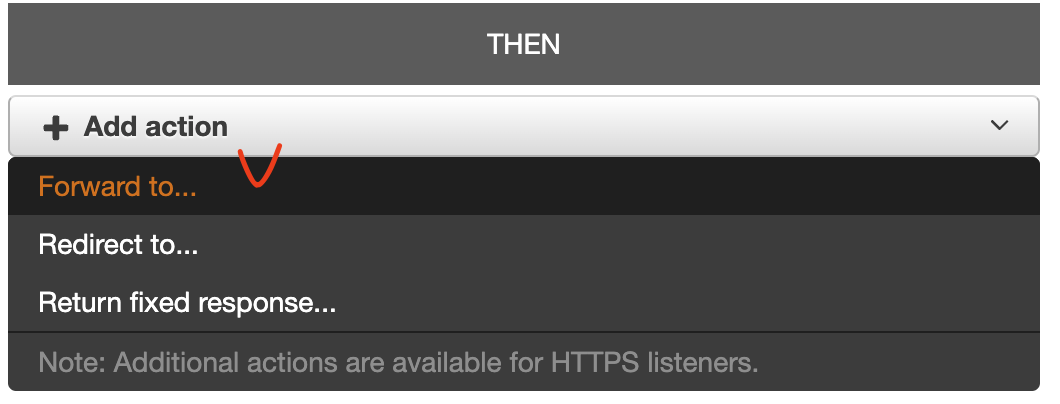
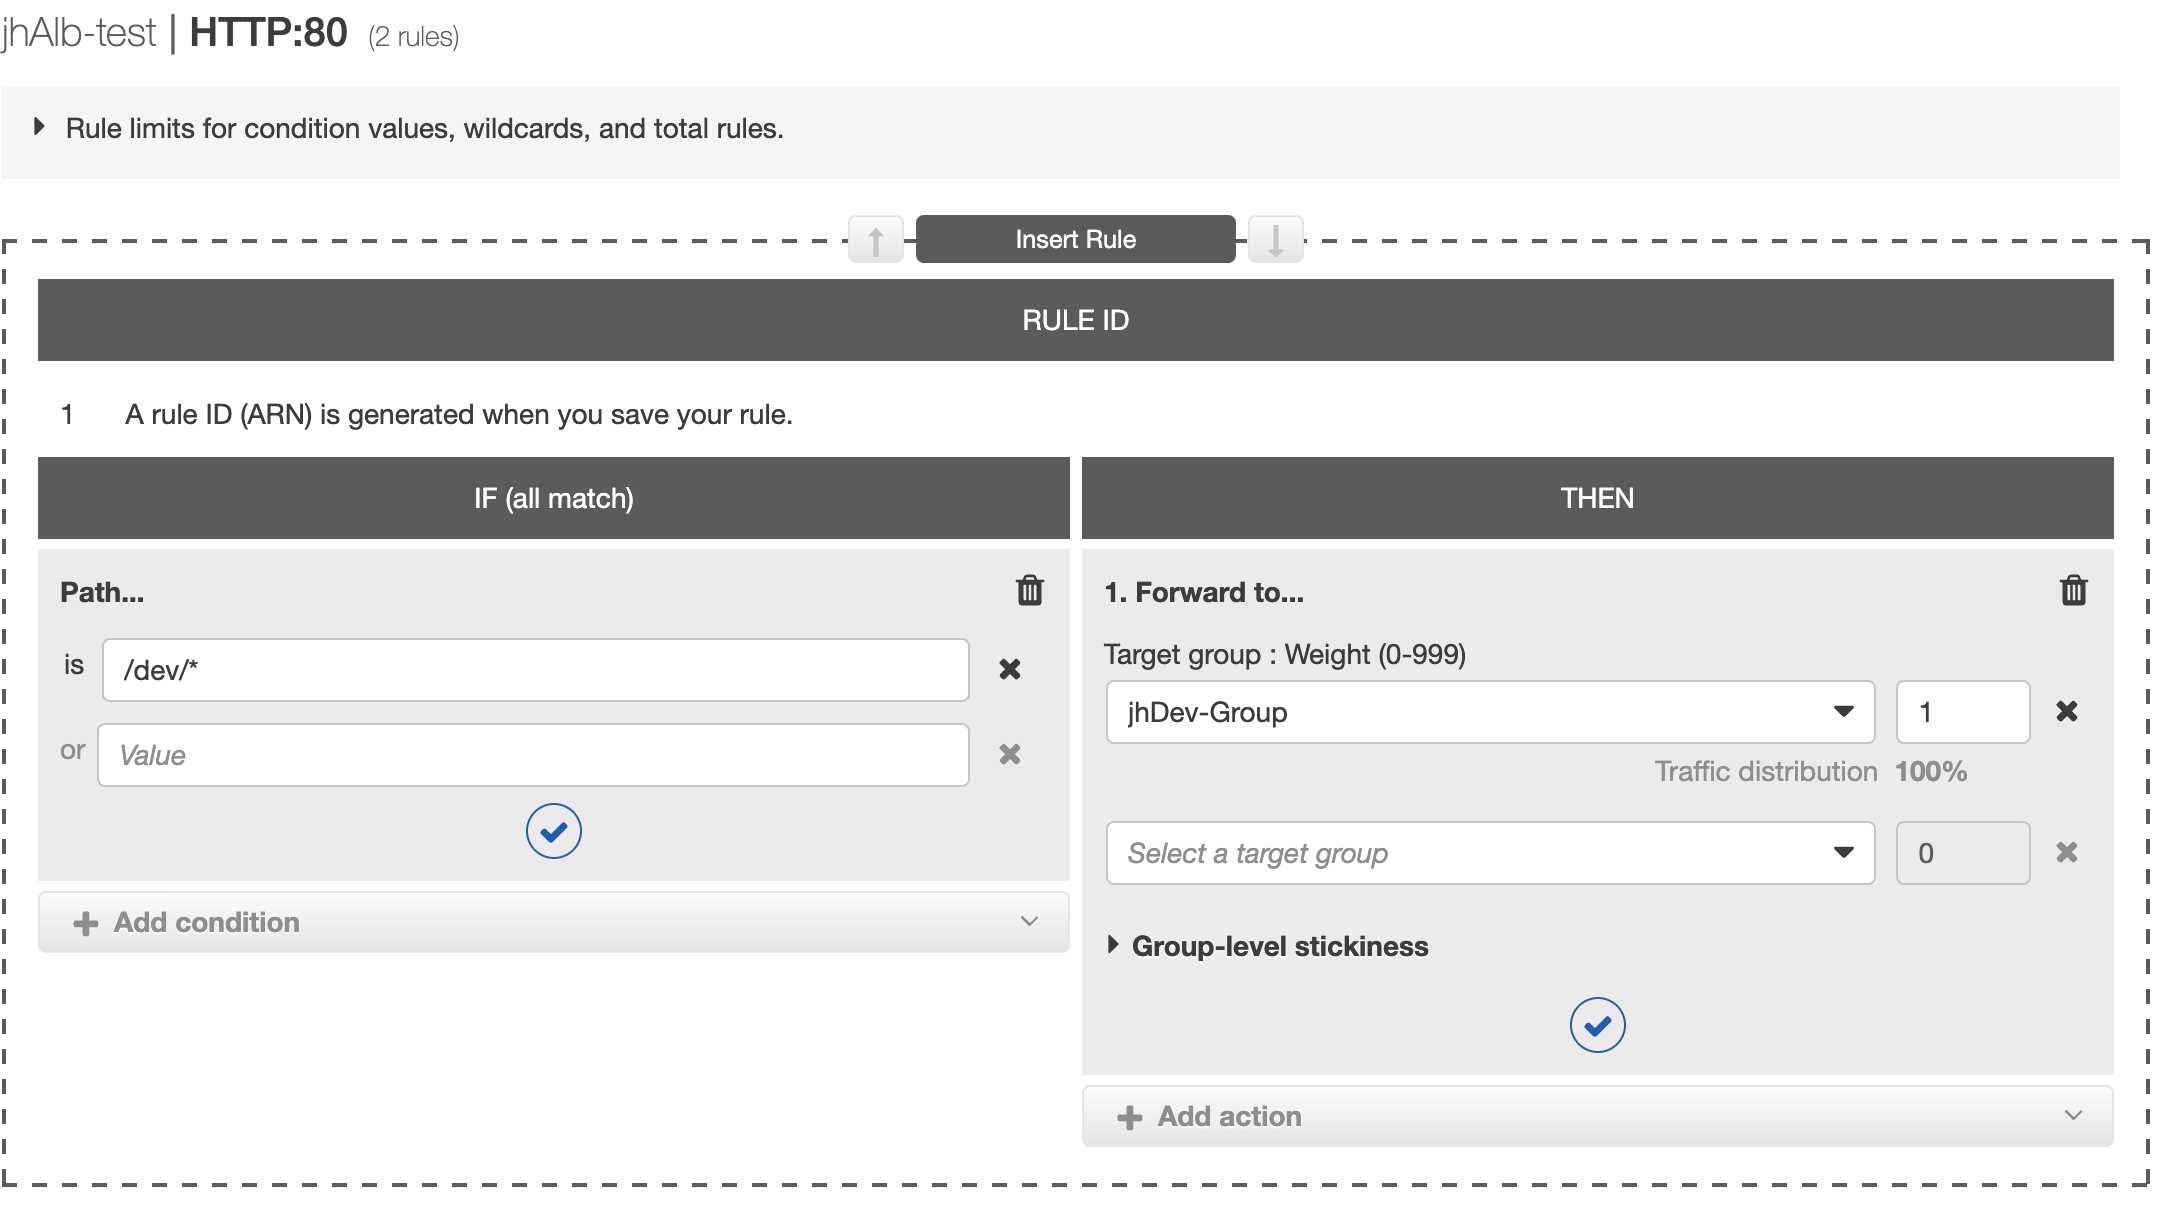
동일하게 jhMng-Group 에 대한 조건도 추가한다. 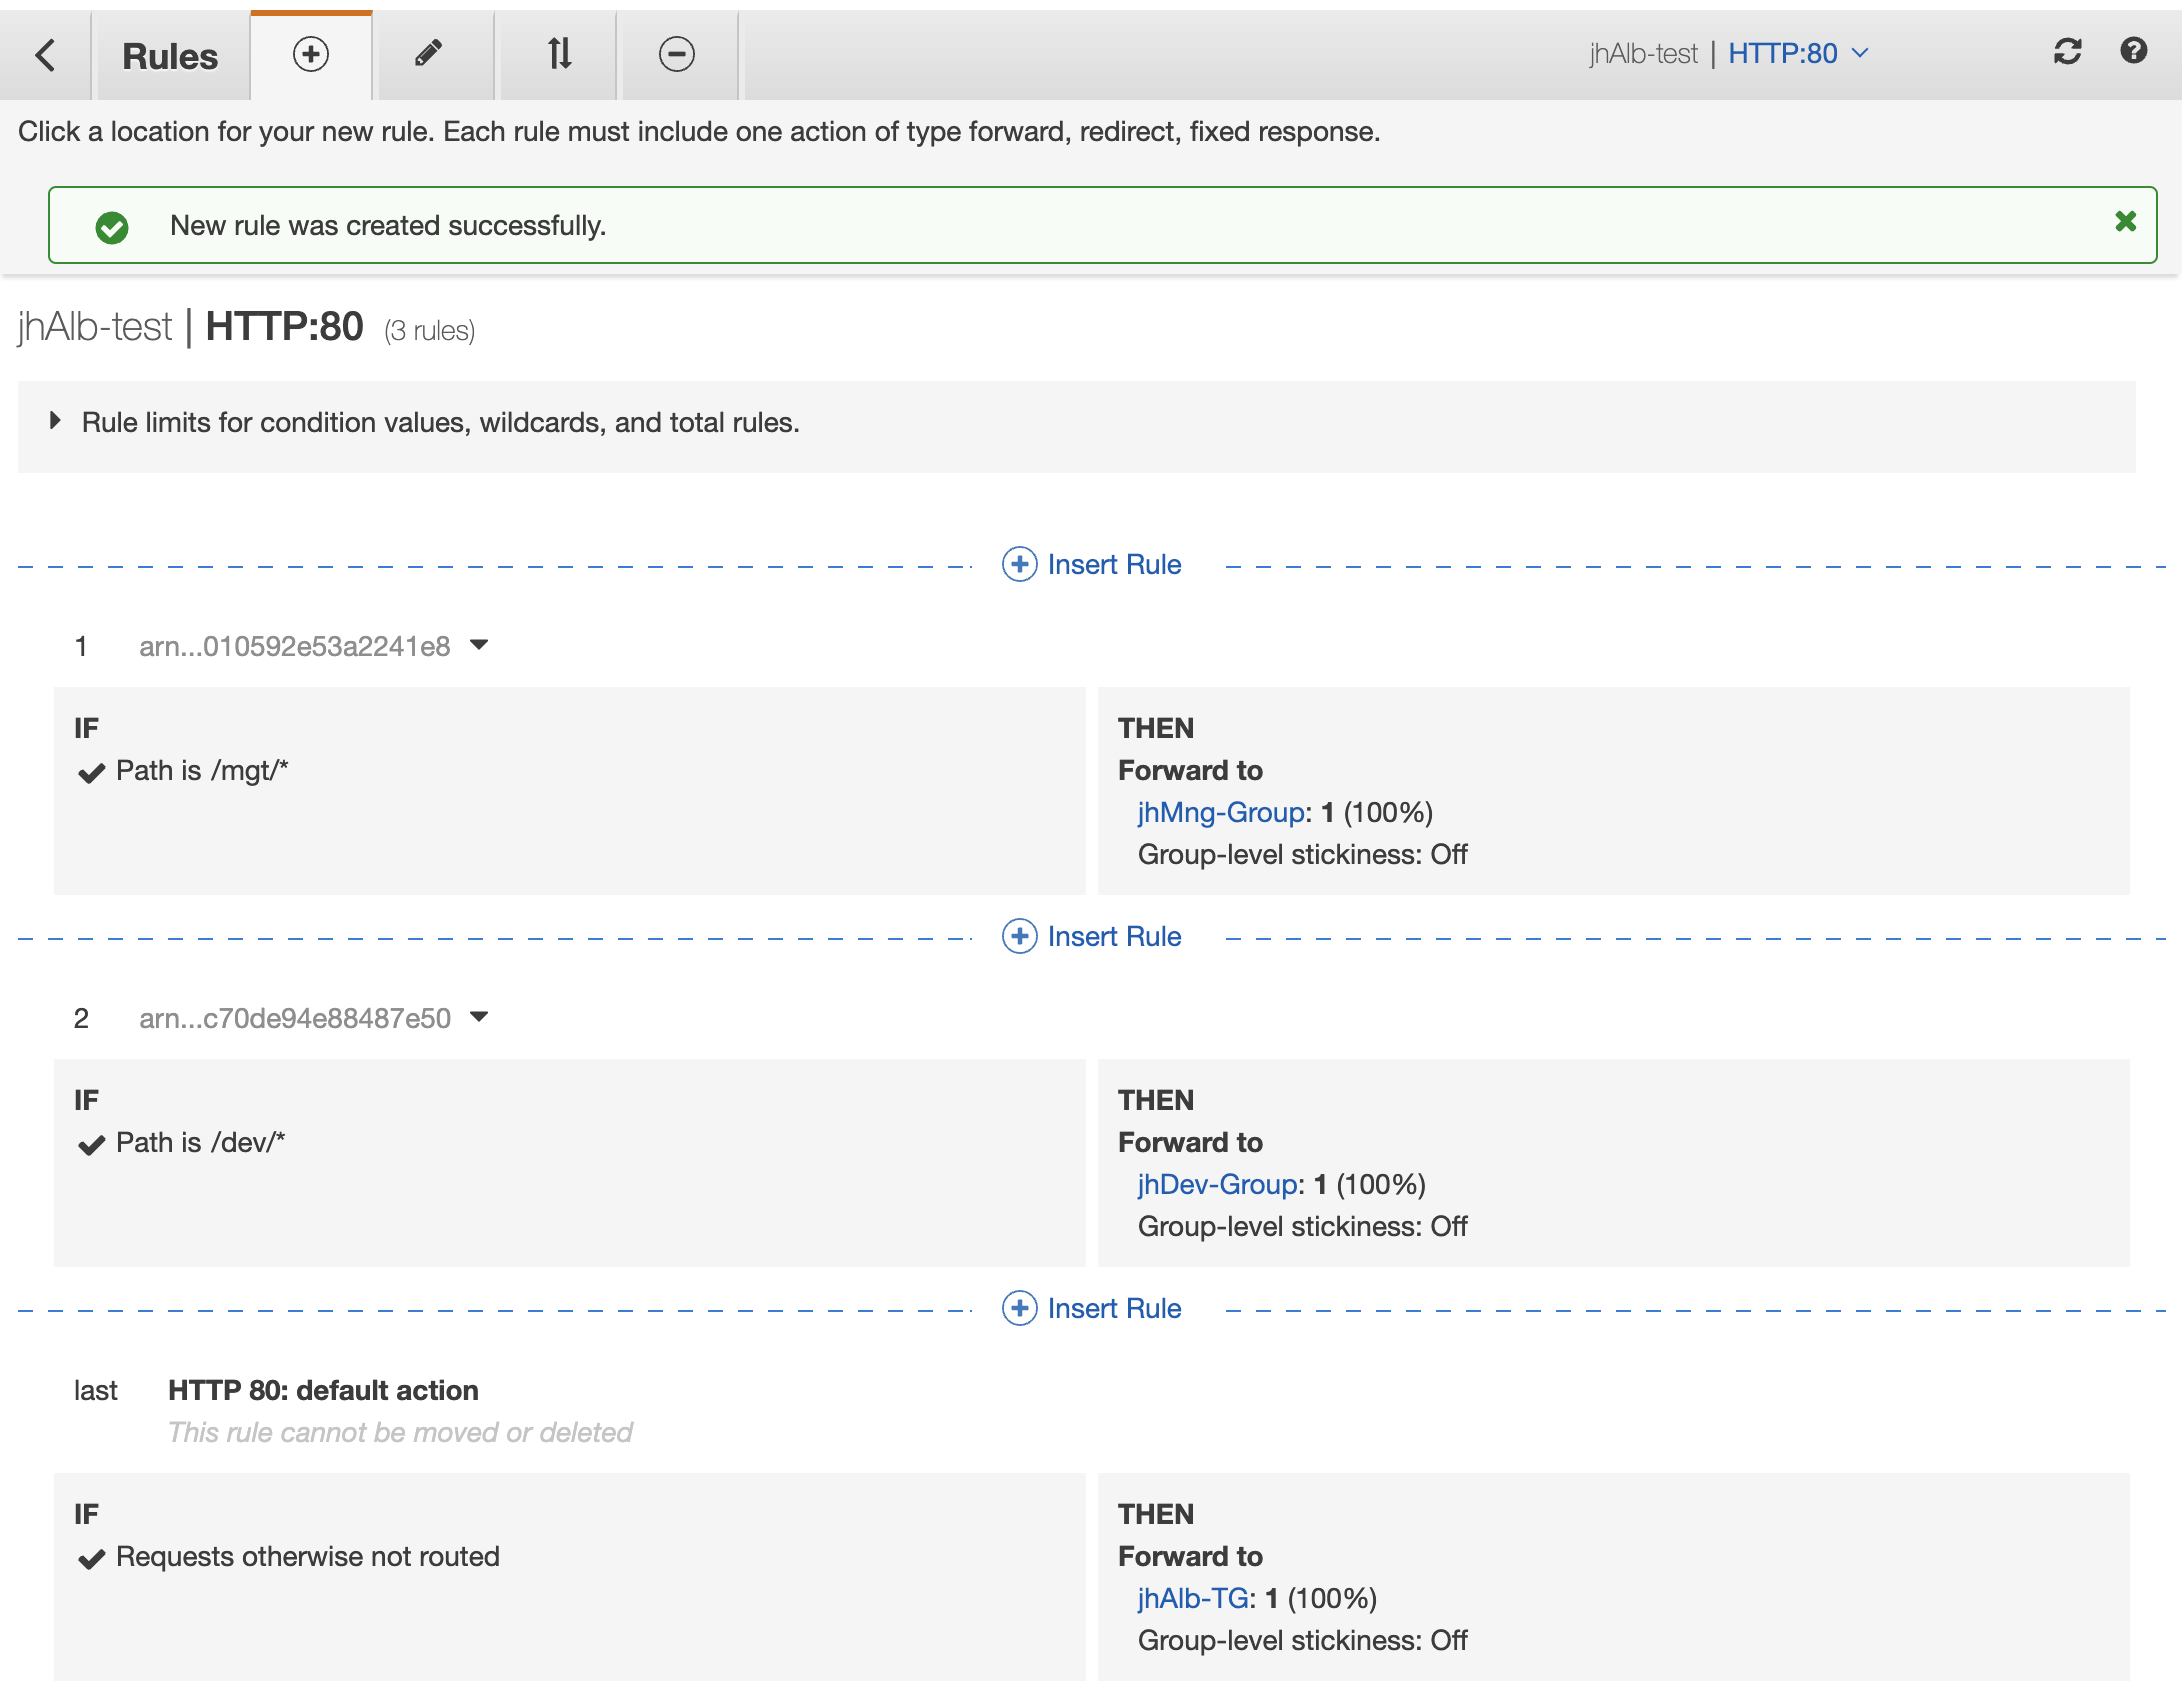
경로 기반 라우팅 설정이 끝났다.
이제 다시 jhMy-EC2 SSH 접속 후 /dev/index.html 과 /mgt/index.html 을 호출하면 각각 jhELB-EC2-1 과 jhELB-EC2-2 로만 전달되는 것을 확인할 수 있다.
$ ssh -i sandbox-jh.pem ec2-user@13.125.xx.xx

[ec2-user@ip-20-20-0-xx ~]$ curl jhAlb-test-2124523206.ap-northeast-2.elb.amazonaws.com/dev/index.html
<h1>jhELB-EC2-1 Dev Web Page</h1>
[ec2-user@ip-20-20-0-xx ~]$ curl jhAlb-test-2124523206.ap-northeast-2.elb.amazonaws.com/dev/index.html
<h1>jhELB-EC2-1 Dev Web Page</h1>

[ec2-user@ip-20-20-0-xx ~]$ curl jhAlb-test-2124523206.ap-northeast-2.elb.amazonaws.com/mgt/index.html
<h1>jhELB-EC2-2 Mgt Web Page</h1>
[ec2-user@ip-20-20-0-xx ~]$ curl jhAlb-test-2124523206.ap-northeast-2.elb.amazonaws.com/mgt/index.html
<h1>jhELB-EC2-2 Mgt Web Page</h1>
2.3. NLB 를 통한 로드 밸런싱
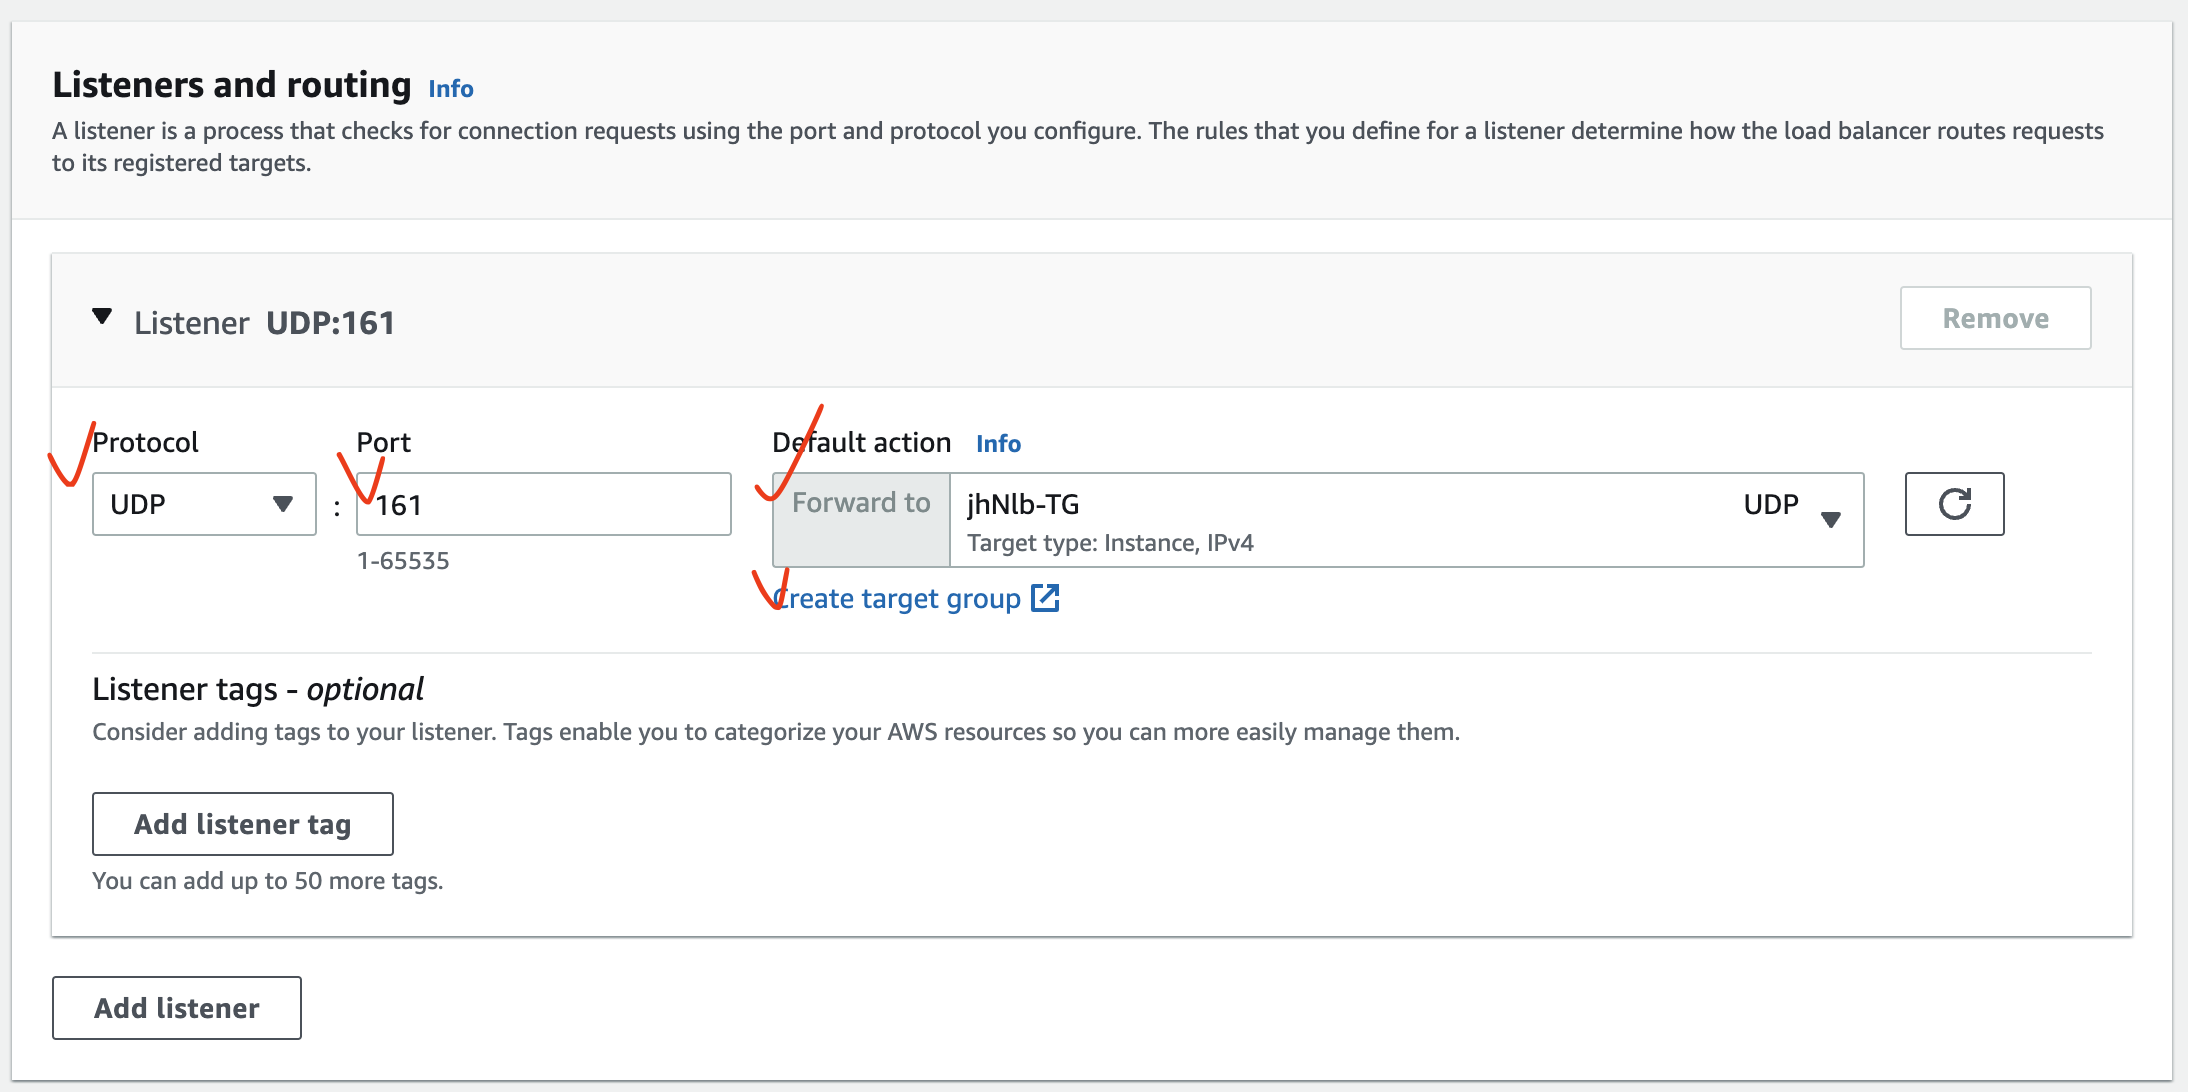
NLB 를 통해 UDP 프로토콜 중 SNMP 서비스를 부하 분산한다. (SNMP 는 UDP 161 port 사용)
- NLB 생성
- NLB 검증
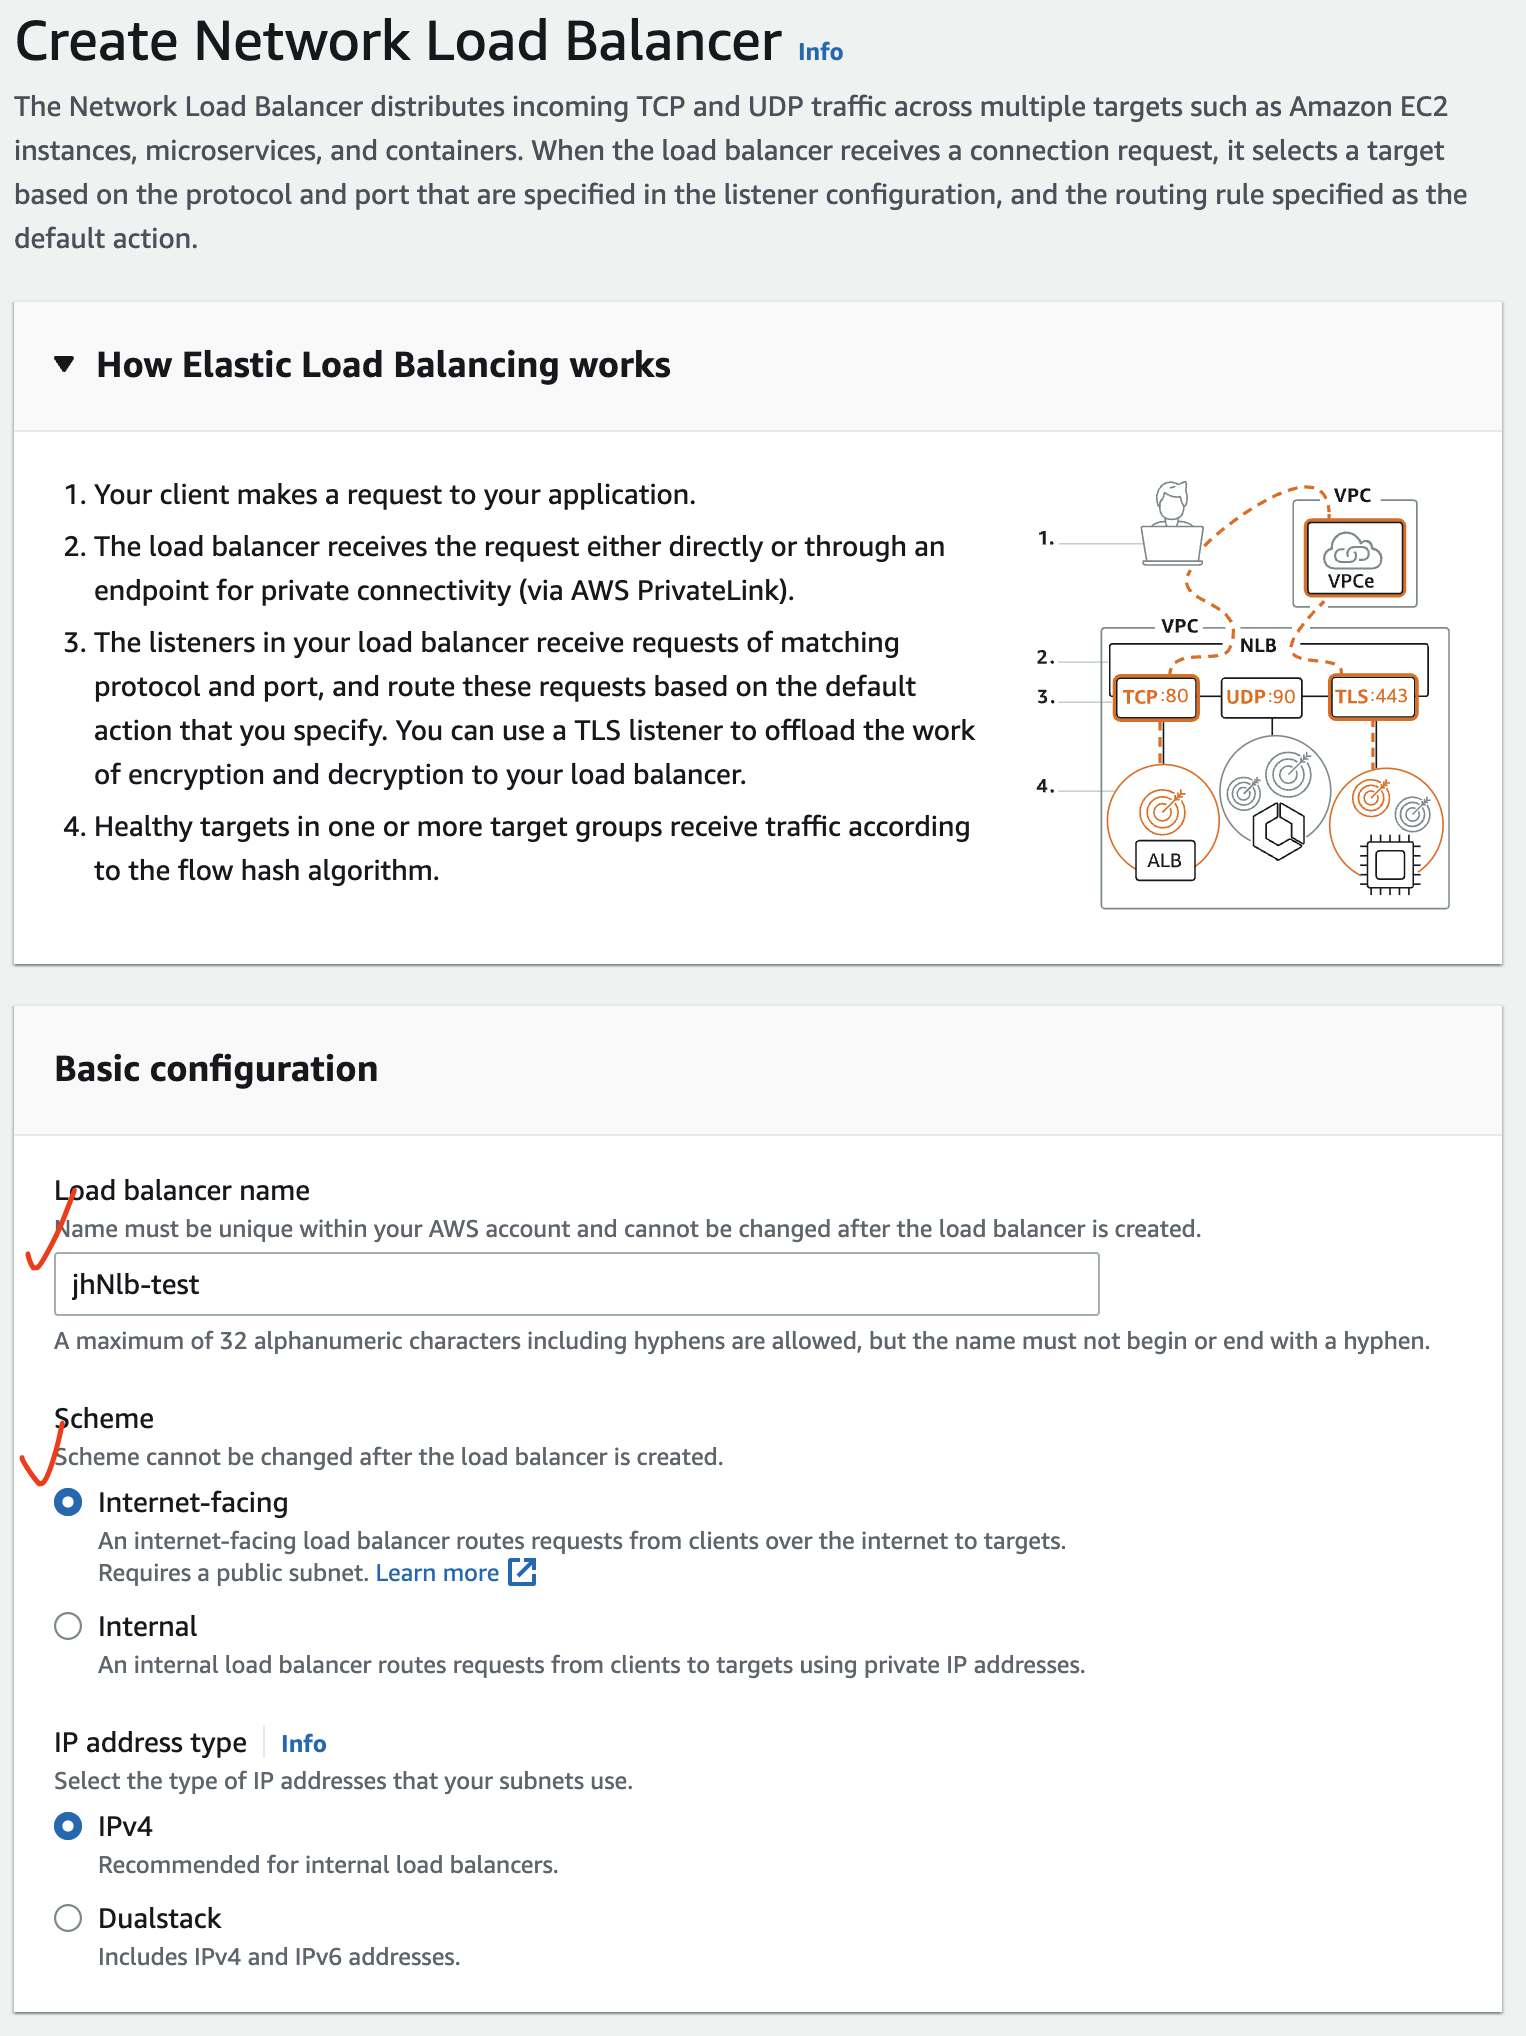
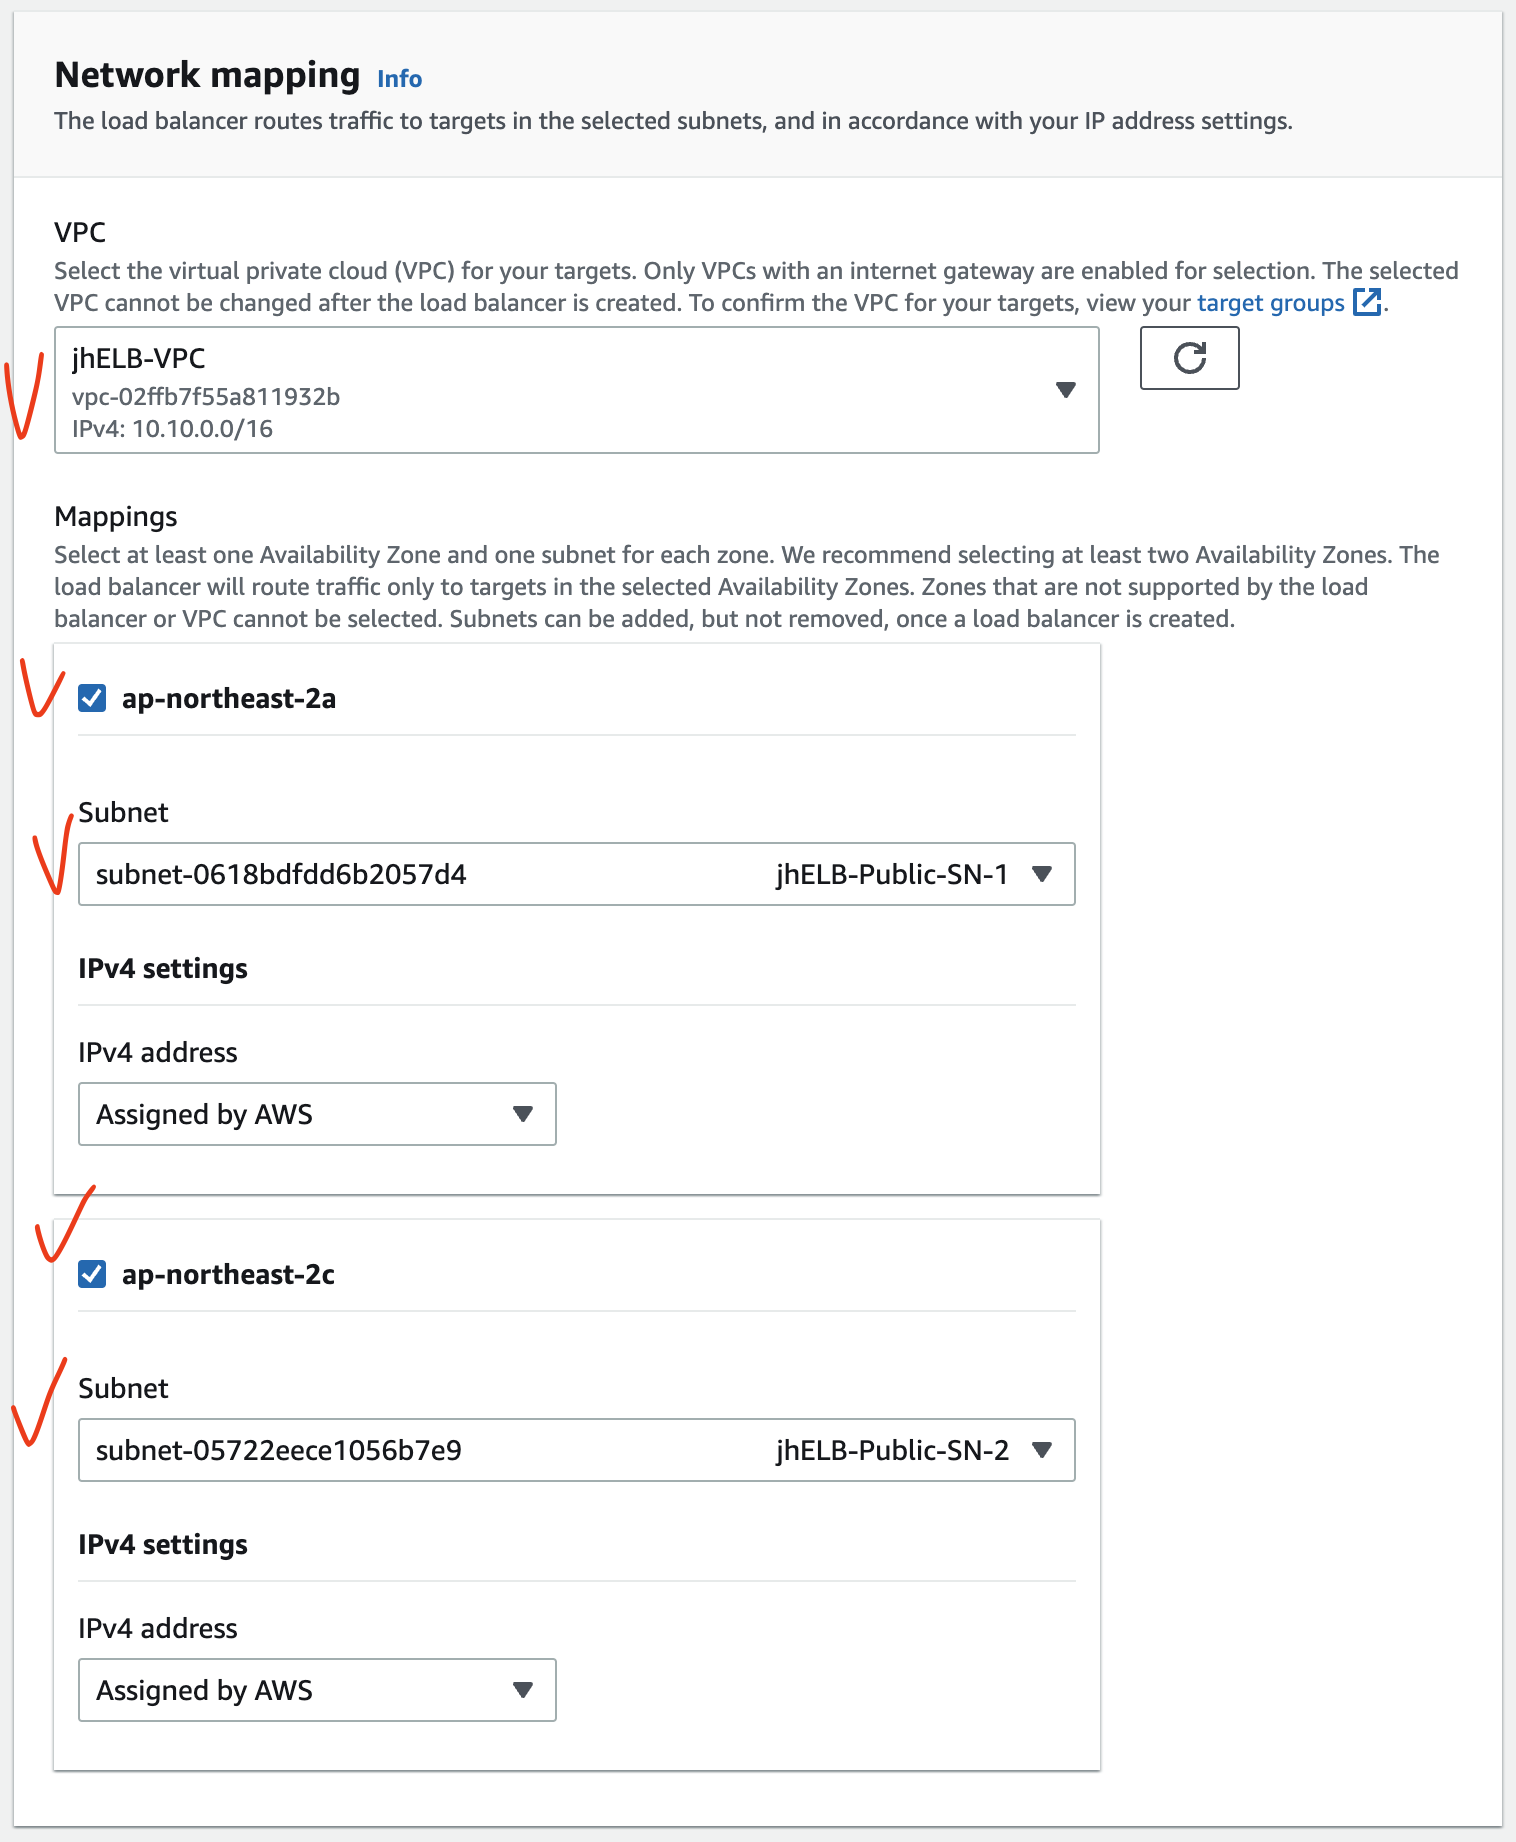
2.3.1. NLB 생성
[EC2] - [Load Balancers]
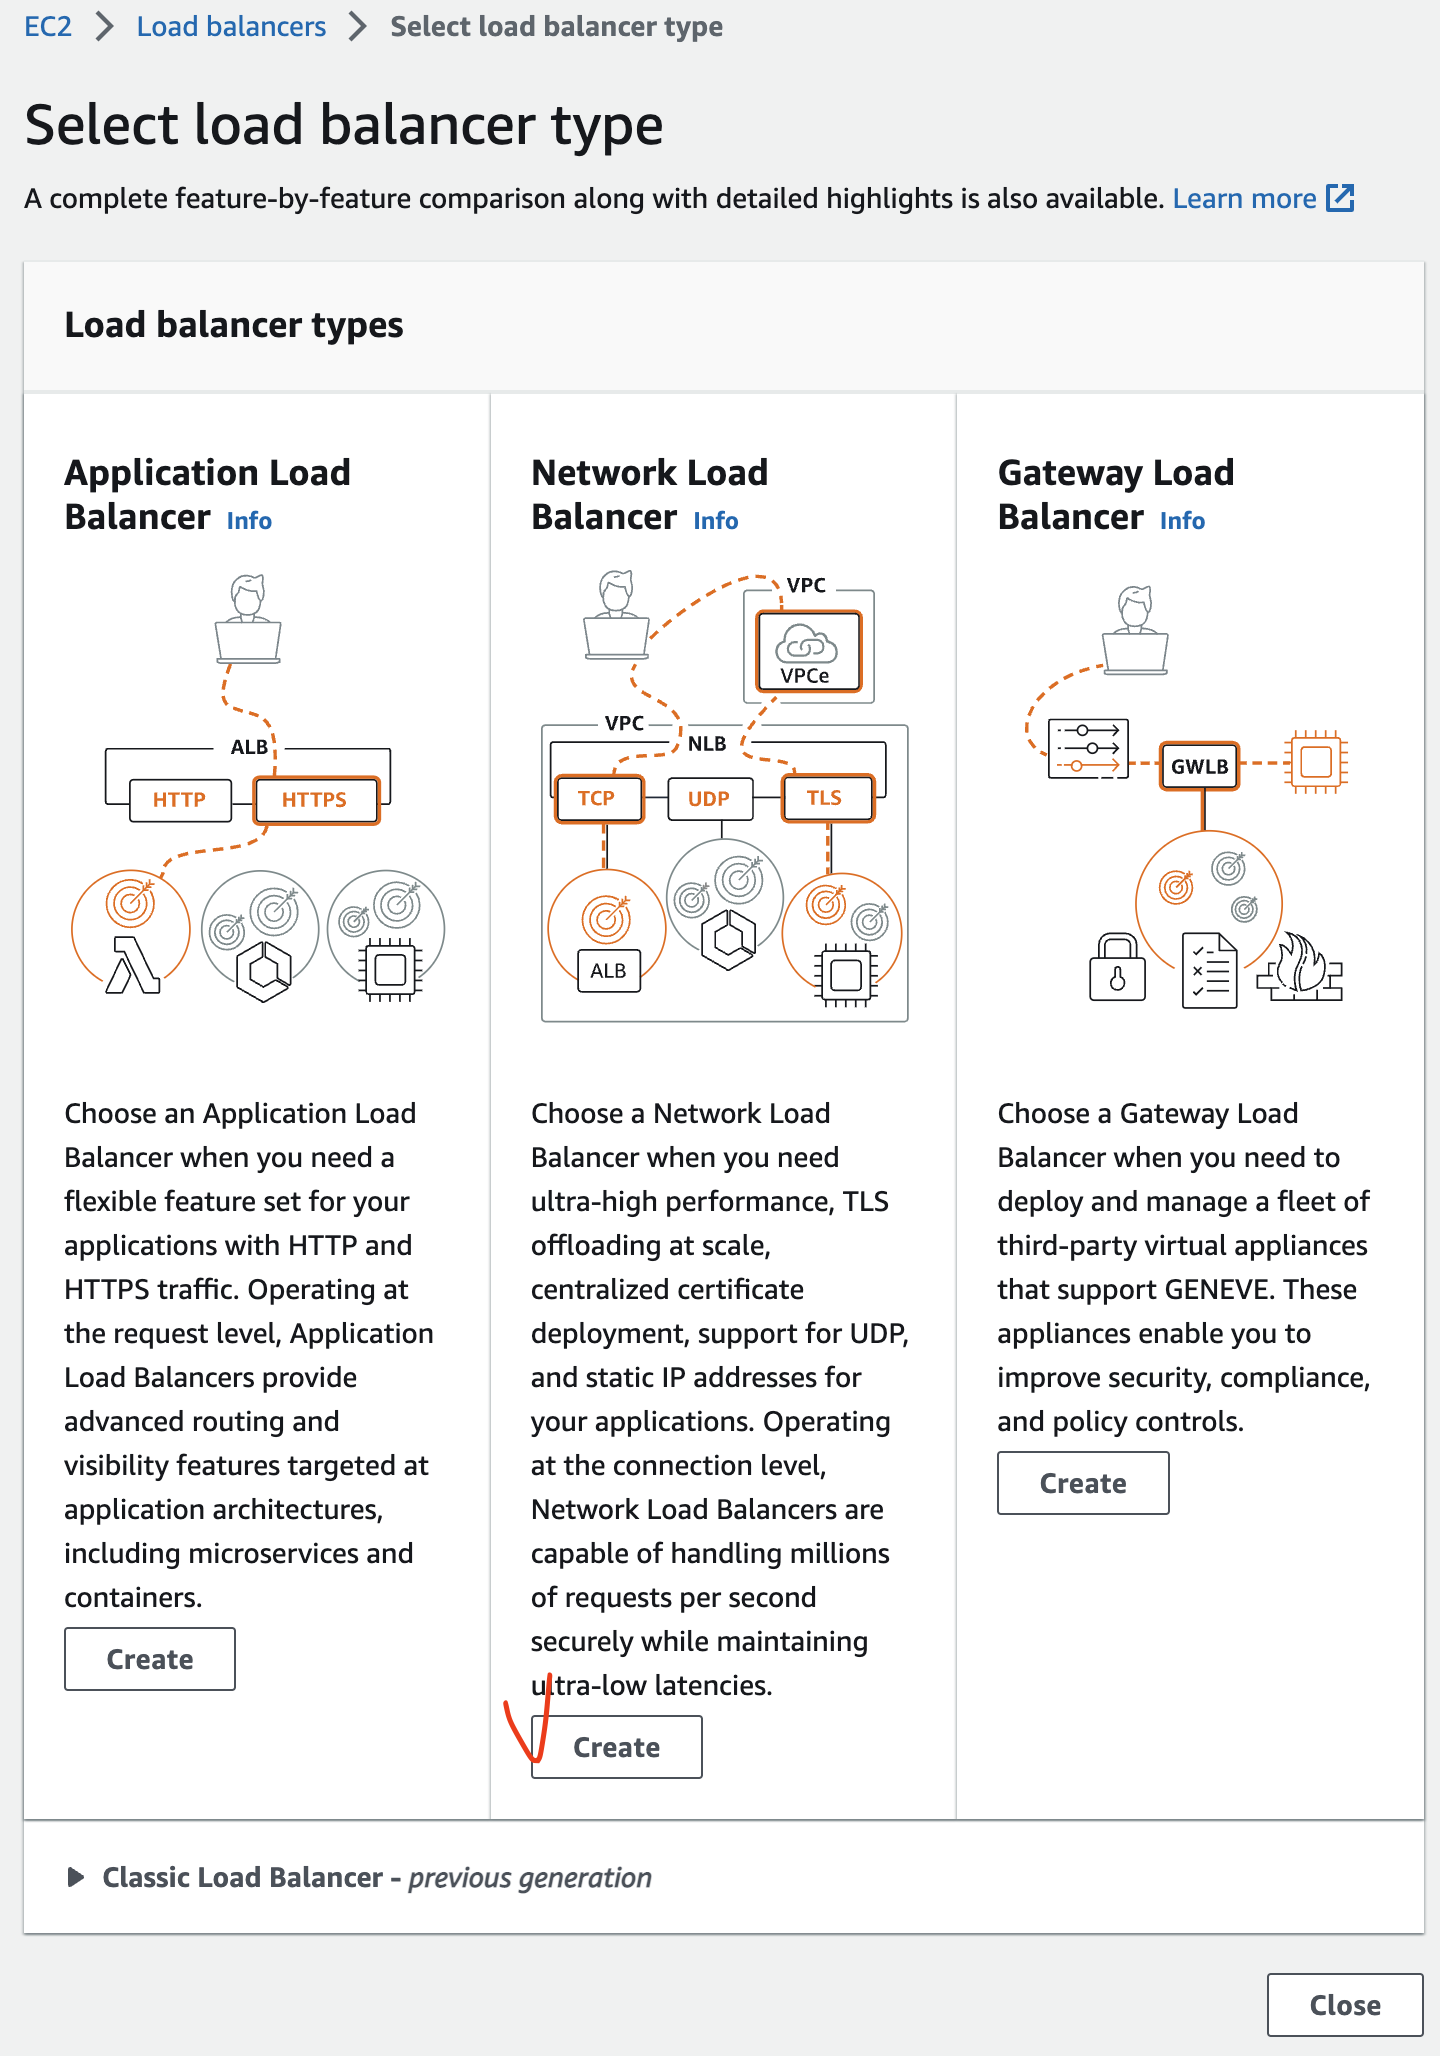
The Network Load Balancer distributes incoming TCP and UDP traffic across multiple targets such as Amazon EC2 instances, microservices, and containers. When the load balancer receives a connection request, it selects a target based on the protocol and port that are specified in the listener configuration, and the routing rule specified as the default action.
Network Load Balancer는 수신하는 TCP 및 UDP 트래픽을 Amazon EC2 인스턴스, 마이크로서비스 및 컨테이너와 같은 여러 대상에 분산합니다. 로드 밸런서는 연결 요청을 수신하면 리스너 구성에 지정된 프로토콜 및 포트와 기본 작업으로 지정된 라우팅 규칙을 기반으로 대상을 선택합니다.
- 클라이언트가 애플리케이션에 요청을 보냅니다.
- 로드 밸런서는 직접 또는 프라이빗 연결을 위한 엔드포인트를 통해(AWS PrivateLink를 통해) 요청을 수신합니다.
- 로드 밸런서의 리스너는 일치하는 프로토콜 및 포트의 요청을 수신하고 지정한 기본 작업에 따라 해당 요청을 라우팅합니다. TLS 리스너를 사용하여 암호화 및 복호화 작업을 로드 밸런서로 오프로드할 수 있습니다.
- 하나 이상의 대상 그룹에 있는 정상 대상은 흐름 해시 알고리즘에 따라 트래픽을 수신합니다.
ALB 와 달리 NLB 는 Security Group 을 설정하지 않는다. 보안 정책은 종단 장치인 Instance 레벨에서 적용하여 보안 조치를 한다.
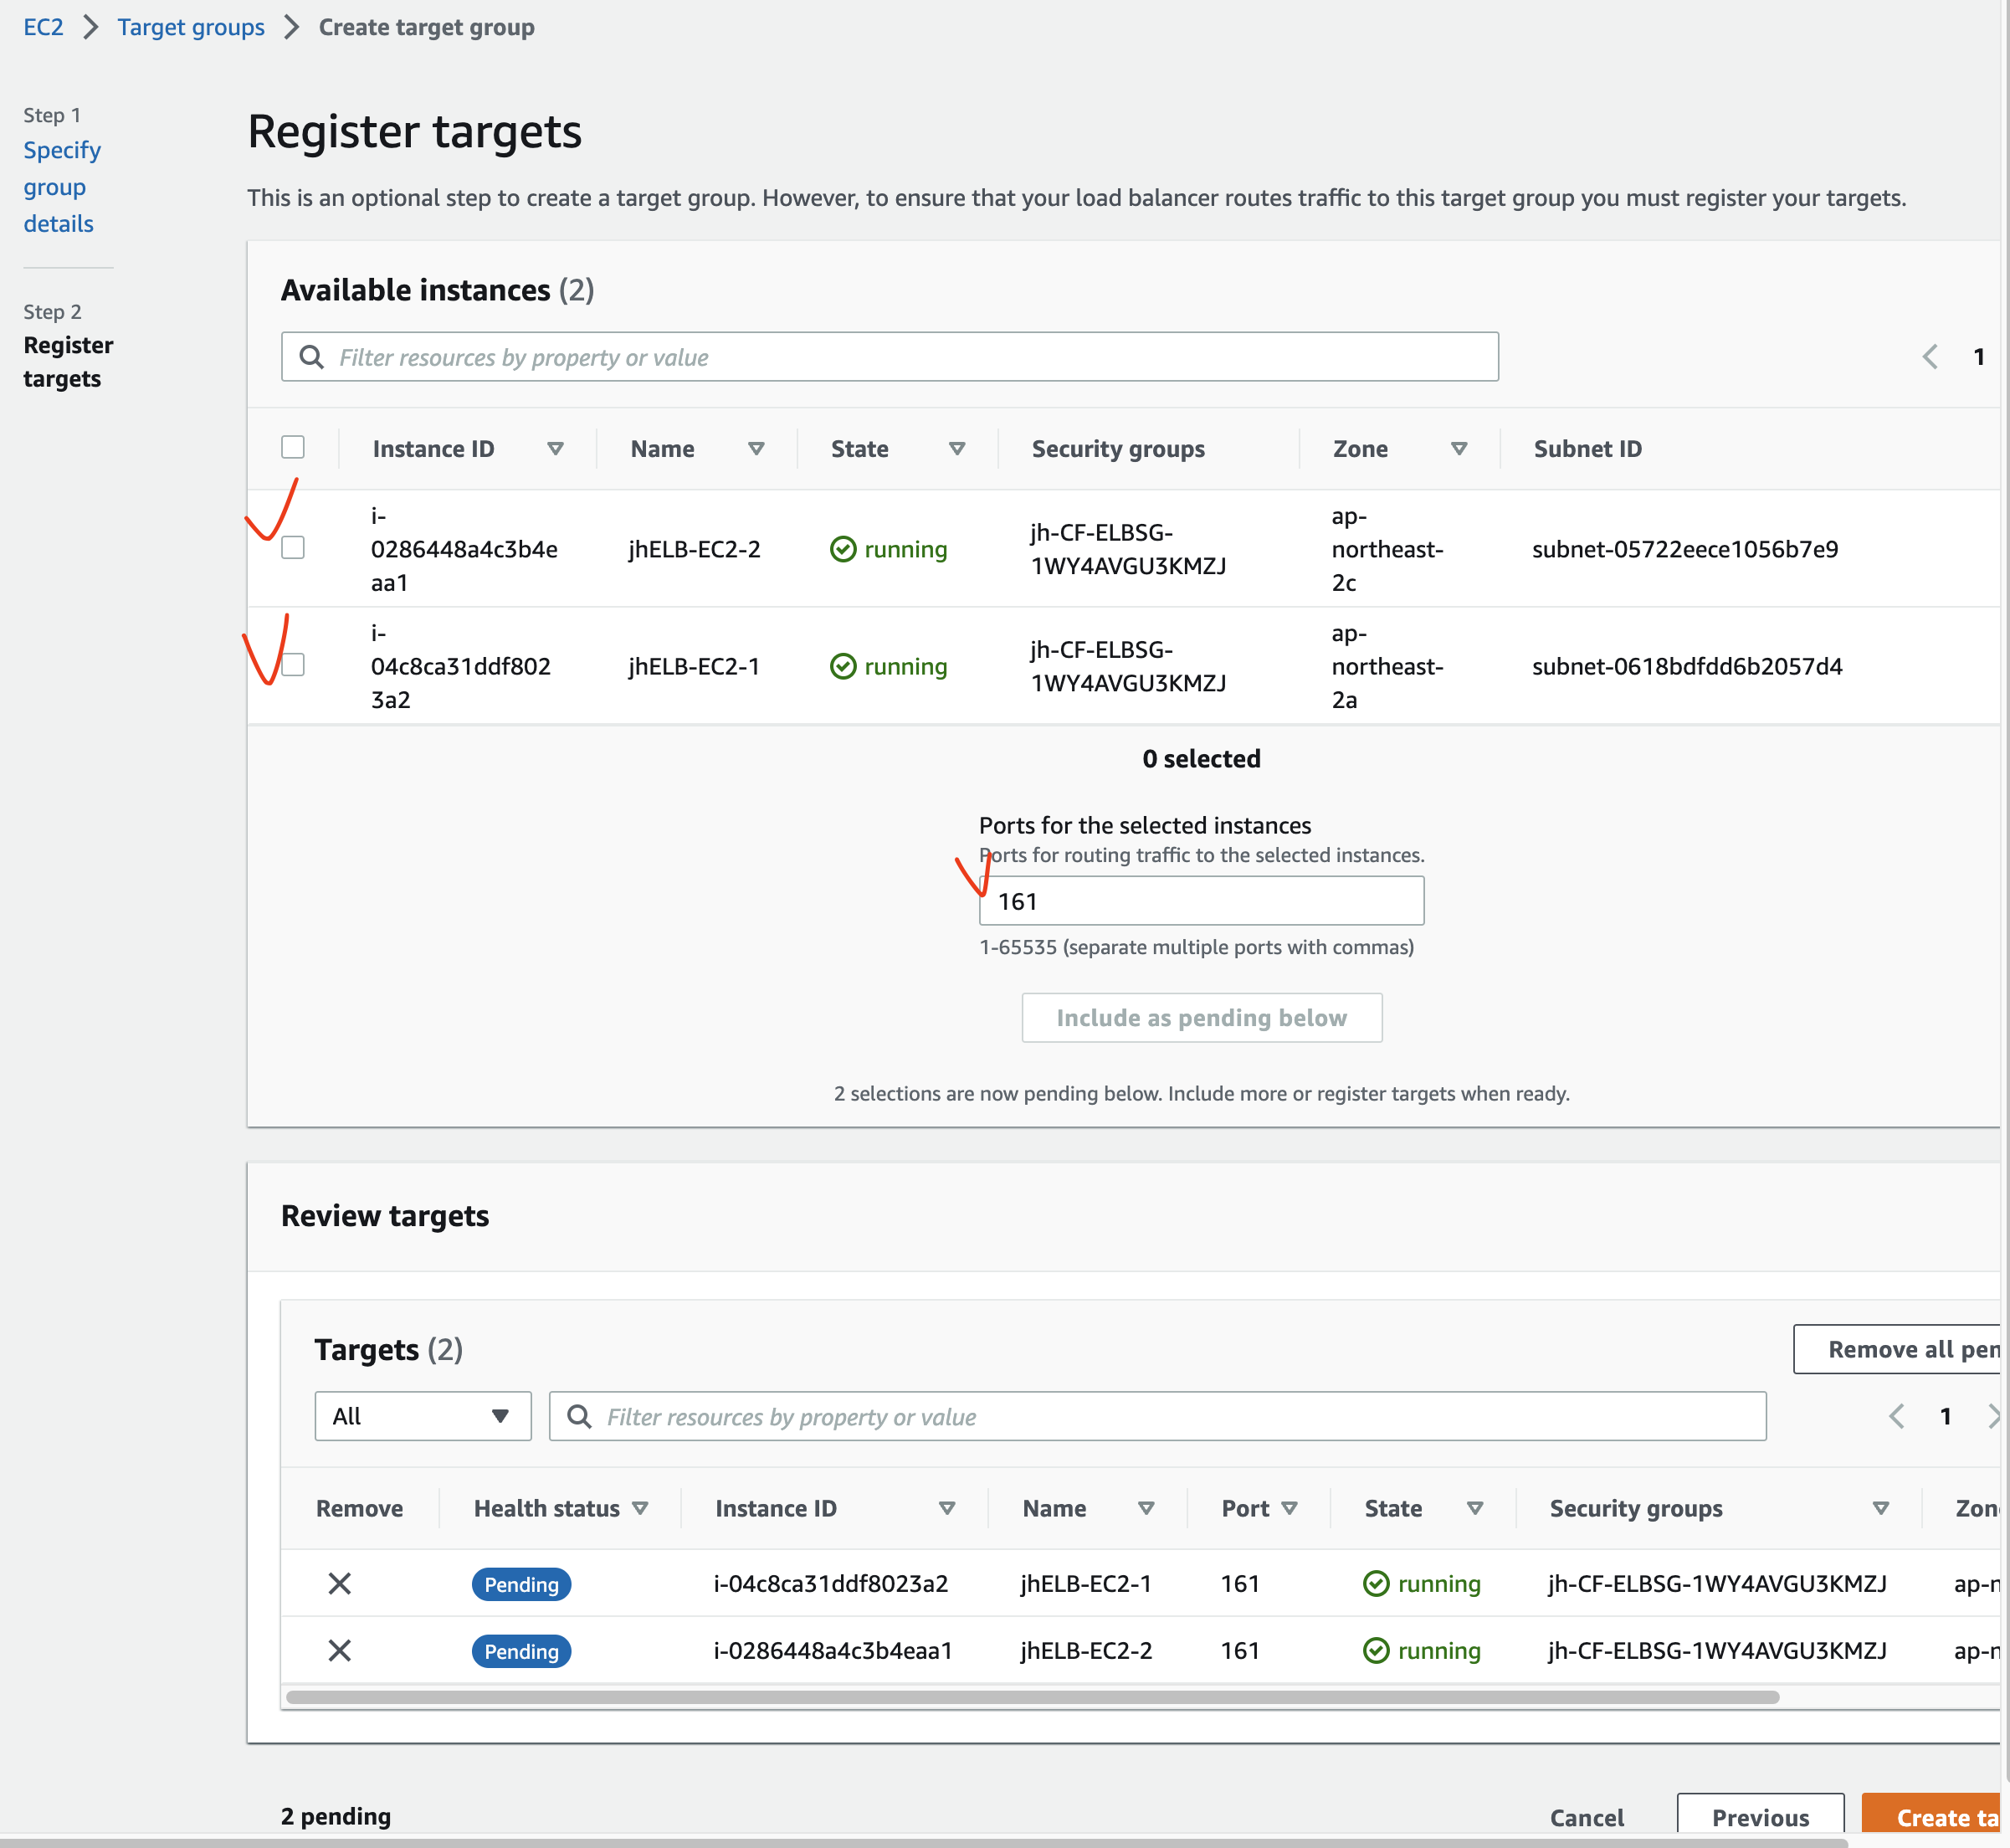
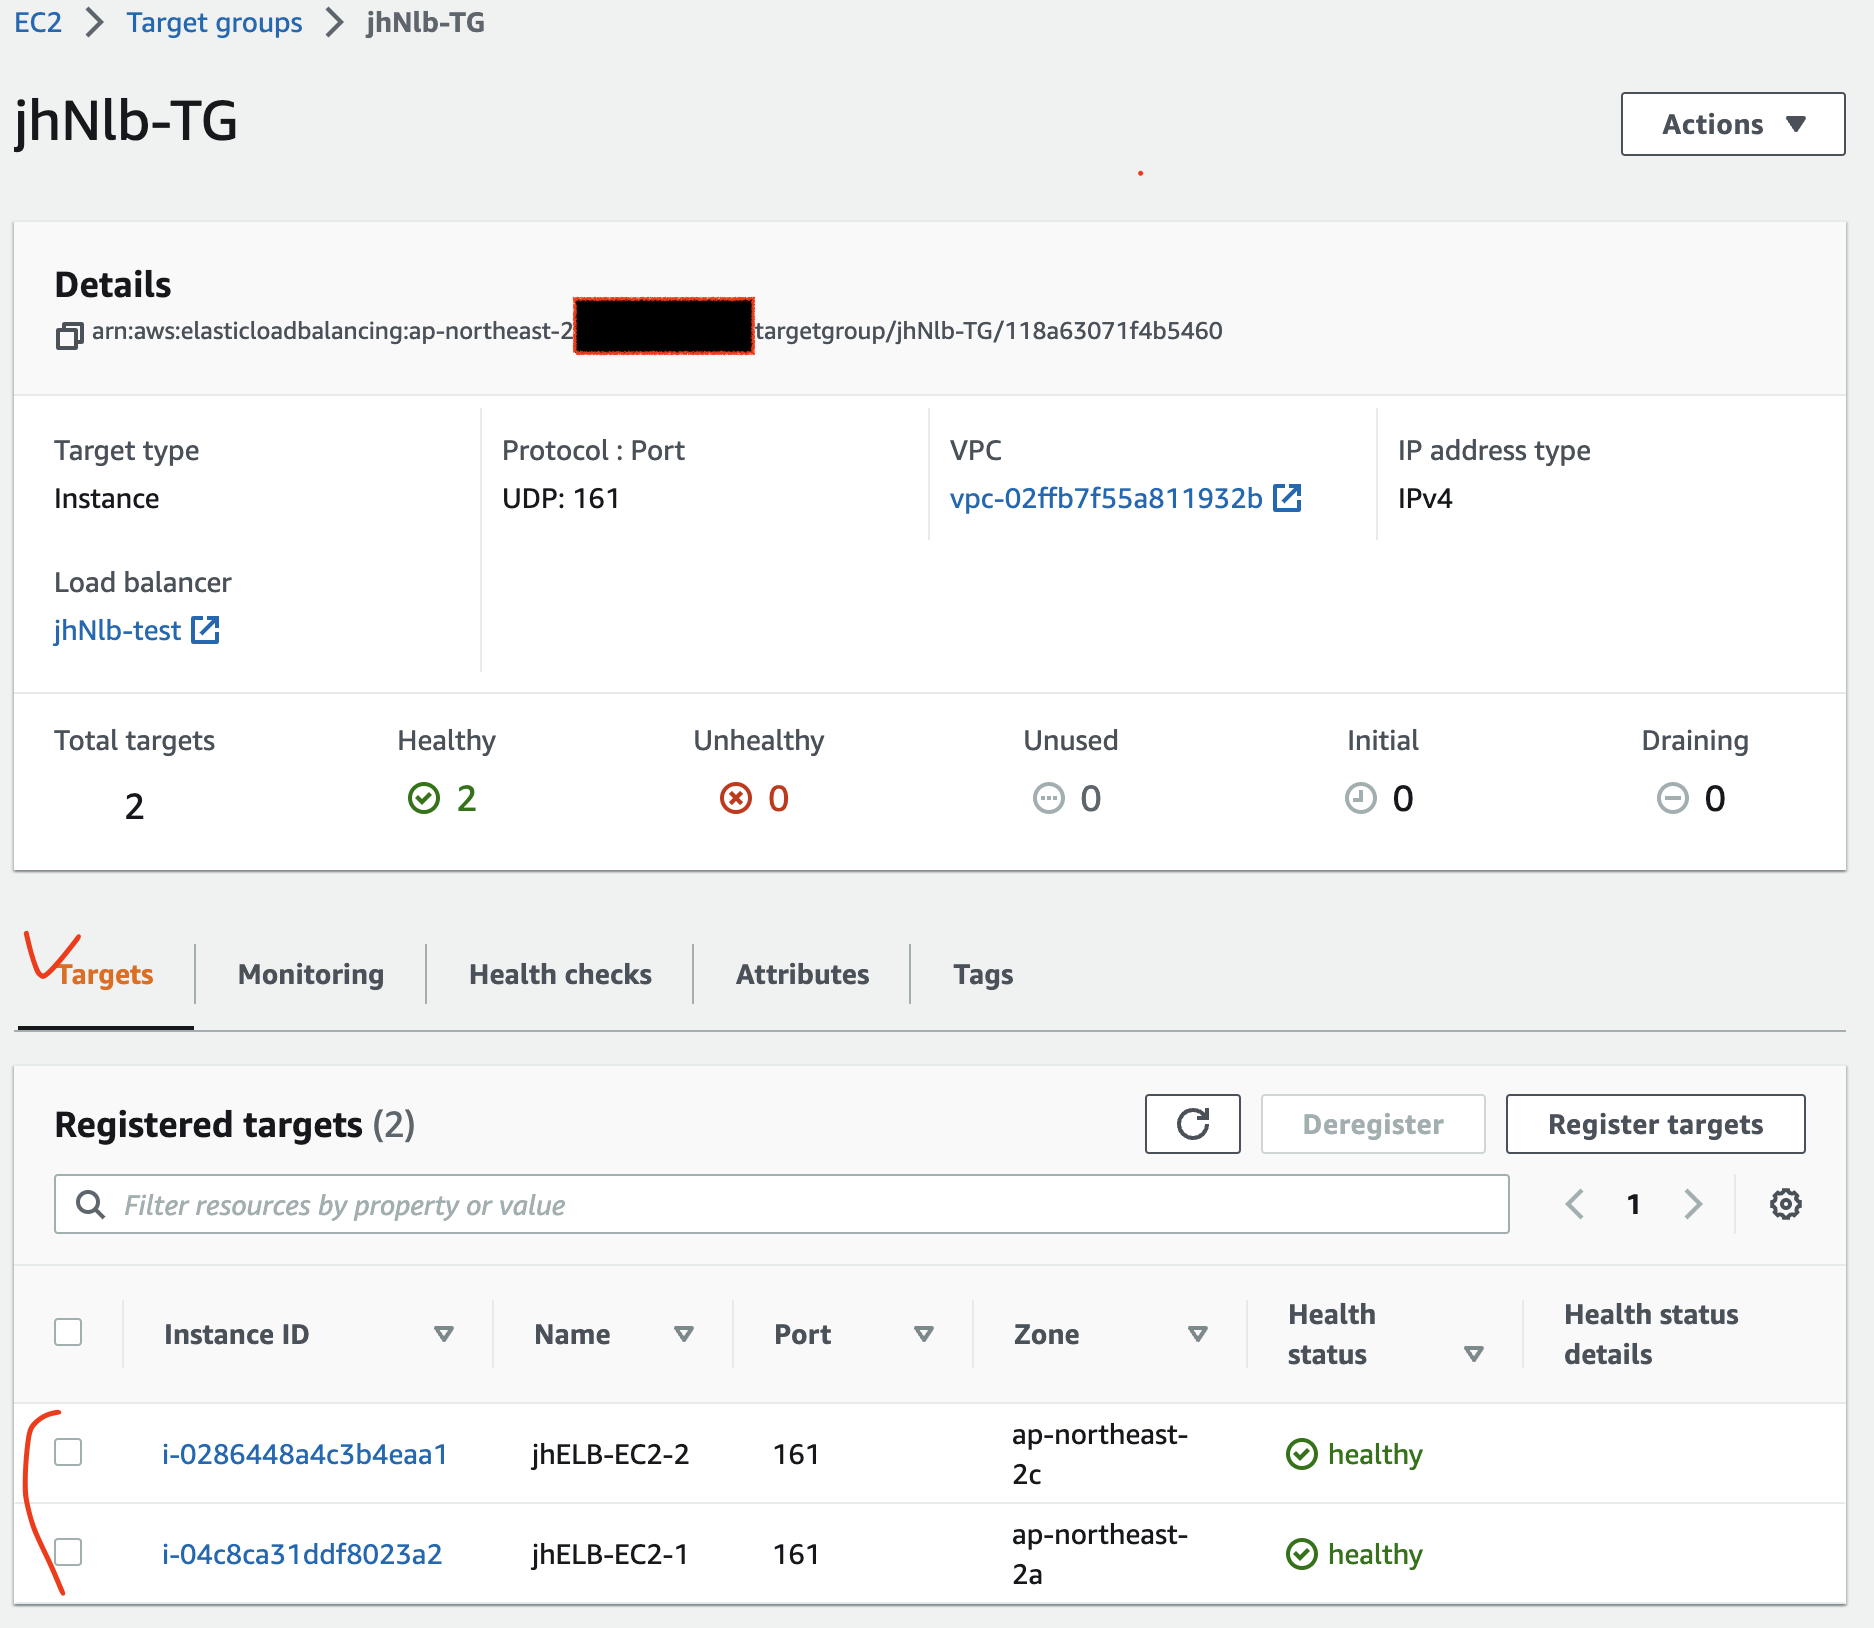
Create target group 를 눌러 Target group 을 생성한다. (하단 이미지 참조)

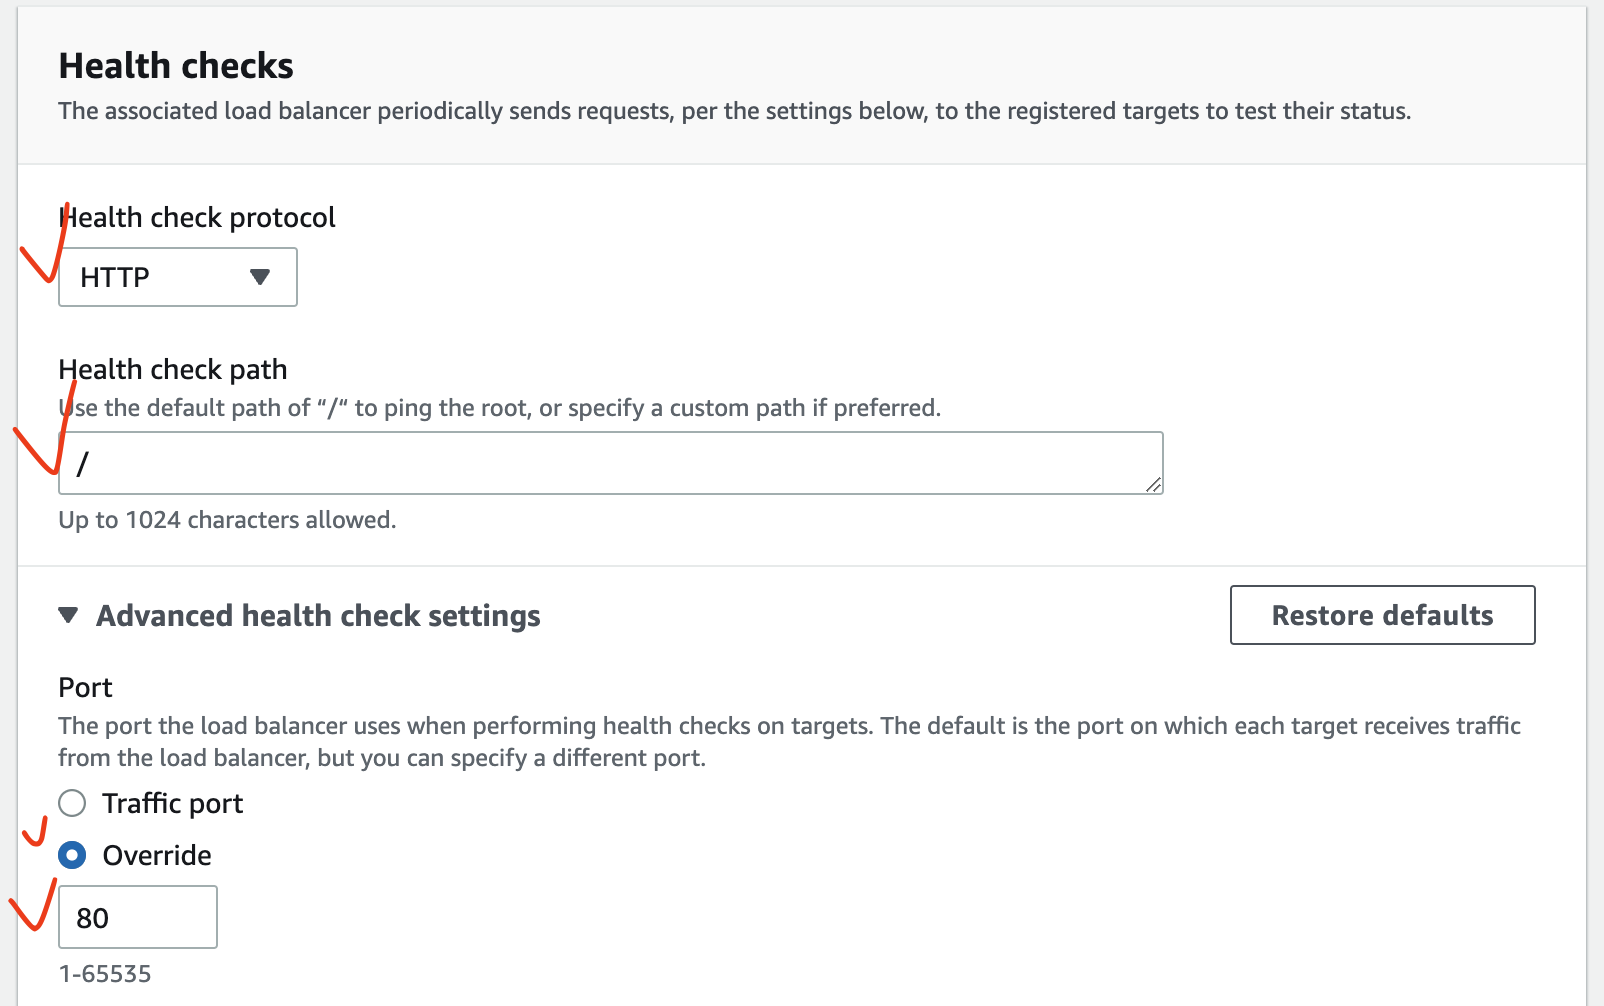
Health check protocol 은 TCP, HTTP, HTTPS 가 지원되는데 jhELB-EC2-1 과 jhELB-EC2-1 는 HTTP 서비스가 동작중이므로 HTTP 를 선택한다.
Health check 는 주기적으로 요청을 보낸 후 응답을 확인하여 상태를 확인하는 개념이라 단방향 통신인 UDP 는 Health check 프로세스에 부적합하다.
2.3.2. NLB 검증
이제 jhMyEC2 SSH 접속하여 SNMP 서비스를 확인해보자.
$ ssh -i sandbox-jh.pem ec2-user@13.125.xx.xx

# snmpget 명령어로 NLB DNS name 으로 시스템명(SNMP OID 1.3.6.1.2.1.1.5.0) 요청 시 EC2-1 과 2 를 번갈아 응답
# 즉, UDP 프로토콜 161 포트로 전달하는 SNMP 요청을 NLB 가 부하분산하고 있음
[ec2-user@ip-20-20-0-xx ~]$ snmpget -v2c -c public jhNlb-test-d32630795753d17b.elb.ap-northeast-2.amazonaws.com 1.3.6.1.2.1.1.5.0
SNMPv2-MIB::sysName.0 = STRING: jhELB-EC2-1
[ec2-user@ip-20-20-0-xx ~]$ snmpget -v2c -c public jhNlb-test-d32630795753d17b.elb.ap-northeast-2.amazonaws.com 1.3.6.1.2.1.1.5.0
SNMPv2-MIB::sysName.0 = STRING: jhELB-EC2-2

[ec2-user@ip-20-20-0-xx ~]$ snmpget -v2c -c public jhNlb-test-d32630795753d17b.elb.ap-northeast-2.amazonaws.com 1.3.6.1.2.1.1.5.0
SNMPv2-MIB::sysName.0 = STRING: jhELB-EC2-1
[ec2-user@ip-20-20-0-xx ~]$ snmpget -v2c -c public jhNlb-test-d32630795753d17b.elb.ap-northeast-2.amazonaws.com 1.3.6.1.2.1.1.5.0
# jhELB-EC2-1 SSH 접속
$ ssh -i sandbox-jh.pem ec2-user@13.125.xx.xx

[ec2-user@jhELB-EC2-1 ~]$ sudo tcpdump udp port 161 -nn
tcpdump: verbose output suppressed, use -v or -vv for full protocol decode
listening on eth0, link-type EN10MB (Ethernet), capture size 262144 bytes

05:55:09.381106 IP 13.125.xx.xx.50959 > 10.10.0.67.161:  GetRequest(28)  .1.3.6.1.2.1.1.5.0
05:55:09.381297 IP 10.10.0.67.161 > 13.125.xx.xx.50959:  GetResponse(39)  .1.3.6.1.2.1.1.5.0="jhELB-EC2-1"
위의 13.125.xx.xx.50959 > 10.10.0.67.161 을 보면 13.125.xx.xx.50959 은 jhMyEC2 의 public ip 이고, 10.10.0.67.161 은 jhELB-EC2-1 의 private IP 이다.
NLB 는 출발지 IP 를 사용자의 public IP 를 그대로 유지하는 한편, ALB 는 출발지 IP 를 사용자의 IP 가 아닌 ALB 자신의 로컬 IP 로 통신한다.
NLB 가 출발지 IP 를 유지하는 것은 Target Group 의 Target 유형에 따라 다른데,
Instance 유형이면 유지하고, IP address 유형이면 유지하지 않음
2.4. Resource 삭제
아래의 순서대로 Resource 를 삭제한다.
- Load Balancer 삭제 ([EC2] - [Load Balancing] - [Load Balancers] - [Actions])
- Target Group 삭제 ([EC2] - [Load Balancing] - [Target Groups] - [Actions])
- CloudFormation Stack 삭제 ([CloudFormation] - [Stacks] - [Delete])
CloudFormation Stack 이 삭제되면 위의 2.1.2. CloudFormation 을 통해 생성된 자원 확인 의 자원이 모두 삭제되었는지 확인한다.
참고 사이트 & 함께 보면 좋은 사이트
본 포스트는 김원일, 서종호 저자의 따라하며 배우는 AWS 네트워크 입문을 기반으로 스터디하며 정리한 내용들입니다.
- 따라하며 배우는 AWS 네트워크 입문
- 따라하며 배우는 AWS 네트워크 입문 - 책가이드
- 따라하며 배우는 AWS 네트워크 입문 - 팀블로그
- SNMP 쉽게 이해하기 #1
- ELB 기반 웹서버 로그에서 클라이언트 IP 주소 캡처
