Clean Architecture - 테스트
in DEV on Clean Architecture, Architecture, Test, Bdd, @webmvctest, Mockmvc, @mockbean, Datajpatest, @import, @sql, @springboottest, Testresttemplate, Jgiven
이 포스트에서는 육각형 아키텍처의 테스트 전략에 대해 알아본다.
아키텍처의 각 요소들을 테스트할 수 있는 테스트 유형에 대해 논의한다.
소스는 github 에 있습니다.
목차
- 1. 테스트 피라미드
- 2. 단위 테스트로 도메인 엔티티 테스트
- 3. 단위 테스트로 유스케이스 테스트: BDD (Behavior-Driven Development)
- 4. 통합 테스트로 웹 어댑터 테스트:
@WebMvcTest,MockMvc,@MockBean - 5. 통합 테스트로 영속성 어댑터 테스트:
@DataJpaTest,@Import,@Sql - 6. 시스템 테스트로 주요 경로 테스트:
@SpringBootTest,TestRestTemplate,JGiven - 7. 테스트 전략
- 정리하며…
- 참고 사이트 & 함께 보면 좋은 사이트
build.gradle
plugins {
  id 'java'
  id 'org.springframework.boot' version '3.3.2'
  id 'io.spring.dependency-management' version '1.1.6'
}

group = 'com.assu.study'
version = '0.0.1-SNAPSHOT'

java {
  toolchain {
    languageVersion = JavaLanguageVersion.of(17)
  }
}

compileJava {
  sourceCompatibility = 17
  targetCompatibility = 17
}

repositories {
  mavenCentral()
}

dependencies {
  compileOnly 'org.projectlombok:lombok'
  annotationProcessor 'org.projectlombok:lombok'

  implementation('org.springframework.boot:spring-boot-starter-web')
  implementation 'org.springframework.boot:spring-boot-starter-validation'
  implementation 'org.springframework.boot:spring-boot-starter-data-jpa'
  implementation 'com.mysql:mysql-connector-j:9.0.0'

  testImplementation('org.springframework.boot:spring-boot-starter-test') {
    exclude group: 'junit' // excluding junit 4
  }
  implementation 'com.tngtech.archunit:archunit:1.3.0'

  //testImplementation 'com.h2database:h2:2.3.230'
}

test {
  useJUnitPlatform()
}
1. 테스트 피라미드
아래 테스트 피라미드는 몇 개의 테스트와 어떤 종류의 테스트를 목표로 해야하는지 결정하는데 도움을 준다.
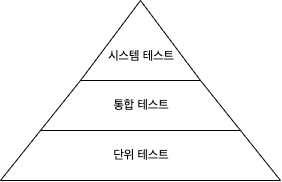
위 그림에 따르면 비용이 많이 드는 테스트는 지양하고, 비용이 적게 드는 테스트를 많이 만들어야 한다.
기본 전제는 만드는 비용이 적고, 유지 보수가 쉬우며, 빨리 실행되고, 안정적인 작은 크기의 테스트들에 대해 높은 커버리지를 유지해야 한다는 것이다.
여러 개의 단위와 단위를 넘는 경계, 아키텍처 경계, 시스템 경계를 결합하는 테스트는 만드는 비용이 비싸고, 실행이 더 느려진다. (기능 에러가 아닌 설정 에러로 인해)
테스트 피라미드는 테스트가 비싸질수록 테스트의 커버리지 목표는 낮게 잡아야 한다는 것을 보여준다.
맥락에 따라 테스트 피라미드에 포함되는 계층은 달라질 수 있는데 육각형 아키텍처를 테스트하기 위한 계층들에 대해 살펴보자.
(이 말은 즉슨 단위 테스트, 통합 테스트, 시스템 테스트의 정의는 프로젝트마다 다른 의미를 가질 수 있다는 말이다.)
- 단위 테스트
- 하나의 클래스를 인스턴스화하고 해당 클래스의 인터페이스를 통해 기능들을 테스트
- 테스트 중인 클래스가 다른 클래스에 의존한다면 의존되는 클래스들은 인스턴스화하지 않고 테스트하는 동안 mock 으로 대체
- 통합 테스트
- 연결된 여러 유닛을 인스턴스화하고 시작점이 되는 클래스의 인터페이스로 데이터를 보낸 후 유닛들의 네트워크가 기대한 대로 동작하는지 검증
- 두 계층 간의 경계를 걸쳐서 테스트할 수 있기 때문에 객체 네트워크가 완전하지 않은 경우 mock 을 대상으로 수행
- 시스템 테스트
- 애플리케이션을 구성하는 모든 객체 네트워크를 가동시켜서 특정 유스케이스가 전 계층에서 잘 동작하는지 검증
2. 단위 테스트로 도메인 엔티티 테스트
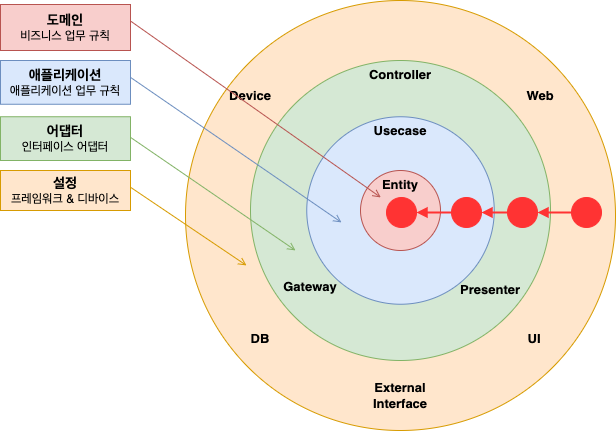
육각형 아키텍처의 중심인 도메인 엔티티를 보자.
1. 도메인 구현 에서 본 Account 엔티티를 보자.
Account 의 상태는 과거 특정 시점의 계좌 잔고(baselineBalance) 와 그 이후의 입출금 내역(activity) 로 구성되어 있다.
withdraw() 메서드가 기대한 대로 동작하는지 검증해본다.
스프링 부트 테스트에 대한 상세한 내용은 Spring Boot - 스프링 부트 테스트 를 참고하세요.
AccountTest.java
package com.assu.study.clean_me.account.domain;

import static com.assu.study.clean_me.common.AccountTestData.defaultAccount;
import static com.assu.study.clean_me.common.ActivityTestData.defaultActivity;
import static org.assertj.core.api.Assertions.assertThat;
import static org.junit.jupiter.api.Assertions.*;

import org.junit.jupiter.api.Test;

class AccountTest {

  @Test
  void calculatesBalance() {
    Account.AccountId accountId = new Account.AccountId(1L);
    Account account =
        defaultAccount()
            .withAccountId(accountId)
            .withBaselineBalance(Money.of(555L))
            .withActivityWindow(
                new ActivityWindow(
                    defaultActivity()
                        .withTargetAccount(accountId)
                        .withMoney(Money.of(999L))
                        .build(),
                    defaultActivity().withTargetAccount(accountId).withMoney(Money.of(1L)).build()))
            .build();

    Money balance = account.calculateBalance();
    assertThat(balance).isEqualTo(Money.of(1555L));
  }

  @Test
  void withdrawalSucceeds() {
    Account.AccountId accountId = new Account.AccountId(1L);
    // 특정 상태의 Account 를 인스턴스화함
    Account account =
        defaultAccount()
            .withAccountId(accountId)
            .withBaselineBalance(Money.of(555L))
            .withActivityWindow(
                new ActivityWindow(
                    defaultActivity()
                        .withTargetAccount(accountId)
                        .withMoney(Money.of(999L))
                        .build(),
                    defaultActivity().withTargetAccount(accountId).withMoney(Money.of(1L)).build()))
            .build();

    boolean success = account.withdraw(Money.of(555L), new Account.AccountId(998L));

    assertThat(success).isTrue();
    assertThat(account.getActivityWindow().getActivities()).hasSize(3);
    assertThat(account.calculateBalance()).isEqualTo(Money.of(1000L));
  }

  @Test
  void withdrawalFailure() {
    Account.AccountId accountId = new Account.AccountId(1L);
    Account account =
        defaultAccount()
            .withAccountId(accountId)
            .withBaselineBalance(Money.of(555L))
            .withActivityWindow(
                new ActivityWindow(
                    defaultActivity()
                        .withTargetAccount(accountId)
                        .withMoney(Money.of(999L))
                        .build(),
                    defaultActivity().withTargetAccount(accountId).withMoney(Money.of(1L)).build()))
            .build();

    boolean success = account.withdraw(Money.of(1556L), new Account.AccountId(111L));

    assertThat(success).isFalse();
    assertThat(account.getActivityWindow().getActivities()).hasSize(2);
    assertThat(account.calculateBalance()).isEqualTo(Money.of(1555L));
  }

  @Test
  void depositSuccess() {
    Account.AccountId accountId = new Account.AccountId(1L);
    Account account =
        defaultAccount()
            .withAccountId(accountId)
            .withBaselineBalance(Money.of(555L))
            .withActivityWindow(
                new ActivityWindow(
                    defaultActivity()
                        .withTargetAccount(accountId)
                        .withMoney(Money.of(999L))
                        .build(),
                    defaultActivity().withTargetAccount(accountId).withMoney(Money.of(1L)).build()))
            .build();

    boolean success = account.deposit(Money.of(445L), new Account.AccountId(111L));

    assertThat(success).isTrue();
    assertThat(account.getActivityWindow().getActivities()).hasSize(3);
    assertThat(account.calculateBalance()).isEqualTo(Money.of(2000L));
  }
}
AccountTestData.java
package com.assu.study.clean_me.common;

import com.assu.study.clean_me.account.domain.Account;
import com.assu.study.clean_me.account.domain.ActivityWindow;
import com.assu.study.clean_me.account.domain.Money;

public class AccountTestData {
  public static AccountBuilder defaultAccount() {
    return new AccountBuilder()
        .withAccountId(new Account.AccountId(42L))
        .withBaselineBalance(Money.of(999L))
        .withActivityWindow(
            new ActivityWindow(
                ActivityTestData.defaultActivity().build(),
                ActivityTestData.defaultActivity().build()));
  }

  public static class AccountBuilder {
    private Account.AccountId accountId;
    private Money baselineBalance;
    private ActivityWindow activityWindow;

    public AccountBuilder withAccountId(Account.AccountId accountId) {
      this.accountId = accountId;
      return this;
    }

    public AccountBuilder withBaselineBalance(Money baselineBalance) {
      this.baselineBalance = baselineBalance;
      return this;
    }

    public AccountBuilder withActivityWindow(ActivityWindow activityWindow) {
      this.activityWindow = activityWindow;
      return this;
    }

    public Account build() {
      return Account.withId(this.accountId, this.baselineBalance, this.activityWindow);
    }
  }
}
ActivityTestData.java
package com.assu.study.clean_me.common;

import com.assu.study.clean_me.account.domain.Account;
import com.assu.study.clean_me.account.domain.Activity;
import com.assu.study.clean_me.account.domain.Money;
import java.time.LocalDateTime;

public class ActivityTestData {

  public static ActivityBuilder defaultActivity() {
    return new ActivityBuilder()
        .withOwnerAccount(new Account.AccountId(42L))
        .withSourceAccount(new Account.AccountId(42L))
        .withTargetAccount(new Account.AccountId(41L))
        .withTimestamp(LocalDateTime.now())
        .withMoney(Money.of(999L));
  }

  public static class ActivityBuilder {
    private Activity.ActivityId id;
    private Account.AccountId ownerAccountId;
    private Account.AccountId sourceAccountId;
    private Account.AccountId targetAccountId;
    private LocalDateTime timestamp;
    private Money money;

    public ActivityBuilder withId(Activity.ActivityId id) {
      this.id = id;
      return this;
    }

    public ActivityBuilder withOwnerAccount(Account.AccountId accountId) {
      this.ownerAccountId = accountId;
      return this;
    }

    public ActivityBuilder withSourceAccount(Account.AccountId accountId) {
      this.sourceAccountId = accountId;
      return this;
    }

    public ActivityBuilder withTargetAccount(Account.AccountId accountId) {
      this.targetAccountId = accountId;
      return this;
    }

    public ActivityBuilder withTimestamp(LocalDateTime timestamp) {
      this.timestamp = timestamp;
      return this;
    }

    public ActivityBuilder withMoney(Money money) {
      this.money = money;
      return this;
    }

    public Activity build() {
      return new Activity(
          this.id,
          this.ownerAccountId,
          this.sourceAccountId,
          this.targetAccountId,
          this.timestamp,
          this.money);
    }
  }
}
도메인 엔티티의 행동은 다른 클래스에 거의 의존하지 않기 때문에 다른 종류의 테스트는 필요하지 않다.
3. 단위 테스트로 유스케이스 테스트: BDD (Behavior-Driven Development)
이제 유스케이스 테스트에 대해 알아본다.
2. 유스케이스 에서 본 SendMoney 유스케이스는 출금 계좌의 잔고가 다른 트랜잭션에 의해 변경되지 않도록 lock 을 건다.
출금 계좌에서 돈이 출금되고 나면 입금 계좌에 lock 을 걸고 돈을 입금시킨다.
이후 두 계좌 모두 lock 을 해제한다.
아래는 트랜잭션이 성공했을 때 기대한대로 동작하는지 검증하는 테스트 코드이다.
SendMoneyServiceTest.java
package com.assu.study.cleanme.account.application.service;

import static org.assertj.core.api.Assertions.assertThat;
import static org.junit.jupiter.api.Assertions.*;
import static org.mockito.ArgumentMatchers.any;
import static org.mockito.ArgumentMatchers.eq;
import static org.mockito.BDDMockito.given;
import static org.mockito.BDDMockito.then;
import static org.mockito.Mockito.times;

import com.assu.study.cleanme.account.application.port.in.SendMoneyCommand;
import com.assu.study.cleanme.account.application.port.out.AccountLock;
import com.assu.study.cleanme.account.application.port.out.LoadAccountPort;
import com.assu.study.cleanme.account.application.port.out.UpdateAccountStatePort;
import com.assu.study.cleanme.account.domain.Account;
import com.assu.study.cleanme.account.domain.Money;
import java.time.LocalDateTime;
import java.util.List;
import java.util.Optional;
import java.util.stream.Collectors;
import org.junit.jupiter.api.Test;
import org.mockito.ArgumentCaptor;
import org.mockito.Mockito;

class SendMoneyServiceTest {
  private final LoadAccountPort loadAccountPort = Mockito.mock(LoadAccountPort.class);
  private final AccountLock accountLock = Mockito.mock(AccountLock.class);
  private final UpdateAccountStatePort updateAccountStatePort =
          Mockito.mock(UpdateAccountStatePort.class);
  private final SendMoneyService sendMoneyService =
          new SendMoneyService(
                  loadAccountPort, accountLock, updateAccountStatePort, moneyTransferProperties());

  @Test
  void givenWithdrawalFails_thenOnlySourceAccountIdLockedAndReleased() {
    // Given (테스트 케이스가 동작하기 위해 갖춰져야 하는 선행 조건 준비)
    Account.AccountId sourceAccountId = new Account.AccountId(41L);
    Account sourceAccount = givenAnAccountWithId(sourceAccountId);

    Account.AccountId targetAccountId = new Account.AccountId(42L);
    Account targetAccount = givenAnAccountWithId(targetAccountId);

    givenWithdrawalWillFail(sourceAccount);
    givenDepositWillSucceed(targetAccount);

    SendMoneyCommand command =
            new SendMoneyCommand(sourceAccountId, targetAccountId, Money.of(300L));

    // When (테스트하고자 하는 대상 코드 실행)
    // 유스케이스 실행
    boolean success = sendMoneyService.sendMoney(command);

    // Then (대상 코드의 수행 결과 판단)
    // 트랜잭션이 성공적이었는지 확인
    assertThat(success).isFalse();

    // sourceAccount 에 대해 lock, release 메서드가 실행되었는지 확인
    then(accountLock).should().lockAccount(eq(sourceAccountId));
    then(accountLock).should().releaseAccount(eq(sourceAccountId));

    // 인출에 실패하면 targetAccount 는 한번도 잠기지 않음
    then(accountLock).should(times(0)).lockAccount(eq(targetAccountId));
  }

  @Test
  void transactionSucceeds() {
    // Given (테스트 케이스가 동작하기 위해 갖춰져야 하는 선행 조건 준비)
    Account sourceAccount = givenSourceAccount();
    Account targetAccount = givenTargetAccount();

    givenWithdrawalWillSucceed(sourceAccount);
    givenDepositWillSucceed(targetAccount);

    Money money = Money.of(500L);

    // 유스케이스의 입력으로 사용할 command
    SendMoneyCommand command =
            new SendMoneyCommand(sourceAccount.getId().get(), targetAccount.getId().get(), money);

    // When (테스트하고자 하는 대상 코드 실행)
    // 유스케이스 실행
    boolean success = sendMoneyService.sendMoney(command);

    // Then (대상 코드의 수행 결과 판단)
    // 트랜잭션이 성공적이었는지 확인
    assertThat(success).isTrue();

    Account.AccountId sourceAccountId = sourceAccount.getId().get();
    Account.AccountId targetAccountId = targetAccount.getId().get();

    // AccountLock 에 대해 특정 메서드가 호출되었는지 확인
    then(accountLock).should().lockAccount(eq(sourceAccountId));
    then(sourceAccount).should().withdraw(eq(money), eq(targetAccountId));
    then(accountLock).should().releaseAccount(sourceAccountId);

    then(accountLock).should().lockAccount(eq(targetAccountId));
    then(targetAccount).should().deposit(eq(money), eq(sourceAccountId));
    then(accountLock).should().releaseAccount(targetAccountId);

    thenAccountsHaveBeenUpdated(sourceAccountId, targetAccountId);
  }

  private void givenWithdrawalWillFail(Account account) {
    // mock 객체 생성
    given(account.withdraw(any(Money.class), any(Account.AccountId.class))).willReturn(false);
  }

  private void thenAccountsHaveBeenUpdated(Account.AccountId... accountIds) {
    ArgumentCaptor<Account> accountCaptor = ArgumentCaptor.forClass(Account.class);

    then(updateAccountStatePort)
            .should(times(accountIds.length))
            .updateActivities(accountCaptor.capture());

    List<Account.AccountId> updatedAccountIds =
            accountCaptor.getAllValues().stream()
                    .map(Account::getId)
                    .map(Optional::get)
                    .collect(Collectors.toList());

    for (Account.AccountId accountId : accountIds) {
      assertThat(updatedAccountIds).contains(accountId);
    }
  }

  private Account givenSourceAccount() {
    return givenAnAccountWithId(new Account.AccountId(41L));
  }

  private Account givenAnAccountWithId(Account.AccountId id) {
    Account account = Mockito.mock(Account.class);

    // account.getId() 호출 시 id 리턴
    given(account.getId()).willReturn(Optional.of(id));

    // loadAccountPort.loadAccount() 호출 시 account 리턴
    given(loadAccountPort.loadAccount(eq(account.getId().get()), any(LocalDateTime.class)))
            .willReturn(account);

    return account;
  }

  private void givenWithdrawalWillSucceed(Account account) {
    // 어떤 금액과 아이디가 들어와도 true 리턴
    given(account.withdraw(any(Money.class), any(Account.AccountId.class))).willReturn(true);
  }

  private void givenDepositWillSucceed(Account account) {
    // 어떤 금액과 아이디가 들어와도 true 리턴
    given(account.deposit(any(Money.class), any(Account.AccountId.class))).willReturn(true);
  }

  private Account givenTargetAccount() {
    return givenAnAccountWithId(new Account.AccountId(42L));
  }

  private MoneyTransferProperties moneyTransferProperties() {
    return new MoneyTransferProperties(Money.of(Long.MAX_VALUE));
  }
}
위 테스트 코드는 BDD (Behavior-Driven Development) 에서 사용되는 Given / When / Then 방식으로 작성되었다.
- Given 섹션
- 입출금 Account 의 인스턴스를 각각 생성 후 적절한 상태로 만듦
- SendMoneyCommand 인스턴스를 만들어서 유스케이스의 입력으로 사용
- When 섹션
- 유스케이스 실행을 위해 sendMoney() 메서드 호출
- Then 섹션
- 트랜잭션이 성공적이었는지 확인
- 입출금 Account, 계좌에 lock 을 걸고 해제하는 책임을 가진 AccountLock 에 대해 특정 메서드가 호출되었는지 검증
Given / When / Then BDD에 대한 내용은 2. Junit 사용:@Test을 참고하세요.
Mockito 의 given() 메서드를 사용하여 mock 객체를 생성한다.
Mockito then() 메서드는 mock 객체에 대해 특정 메서드가 호출되었는지 검증한다.
테스트 중인 유스케이스 서비스는 상태가 없기 때문에 (stateless) then 섹션에서 특정 상태를 검증할 수 없기 때문에 테스트를 할 때는 서비스가 mocking 된 의존 대상의 특정 메서드와 상호 작용을 했는지 여부를 검증한다.
이는 테스트가 코더의 ‘행동’ 변경 뿐 아니라 코드의 ‘구조’ 변경에도 취약해진다는 의미이고, 자연스럽게 코드가 리팩터링되면 테스트도 변경될 확률이 높아진다.
따라서 테스트에서 어떤 상호작용을 검증하고 싶은지 신중히 선택해야 한다.
위 예시처럼 ‘모든’ 동작은 검증하는 대신 핵심만 골라서 집중 테스트하는 것이 좋다.
모든 동작을 검증하면 클래스가 조금이라도 바뀔때마다 테스트를 변경해야 하고 이는 테스트의 가치를 떨어뜨리게 된다.
위 예시는 단위 테스트이긴 하지만 의존성의 상호작용을 테스트하므로 통합 테스트에 가깝다.
4. 통합 테스트로 웹 어댑터 테스트: @WebMvcTest, MockMvc, @MockBean
이제 웹 어댑터를 테스트해보자.
웹 어댑터는 아래의 역할을 한다.
- JSON 문자열 등의 형태로 HTTP 를 통해 입력받음
- 입력에 대한 유효성 검증
- 유스케이스에서 사용할 수 있는 포맷으로 매핑 후 유스케이스에 전달
- 유스케이스의 결과를 JSON 으로 매핑하여 HTTP 응답을 통해 클라이언트에 반환
이제 위 동작들이 기대하는 대로 동작하는지 검증해보자.
SendMoneyControllerTest.java
package com.assu.study.cleanme.account.adapter.in.web;

import static org.mockito.ArgumentMatchers.eq;
import static org.mockito.BDDMockito.then;
import static org.springframework.test.web.servlet.request.MockMvcRequestBuilders.post;
import static org.springframework.test.web.servlet.result.MockMvcResultMatchers.status;

import com.assu.study.cleanme.account.application.port.in.SendMoneyCommand;
import com.assu.study.cleanme.account.application.port.in.SendMoneyUseCase;
import com.assu.study.cleanme.account.domain.Account;
import com.assu.study.cleanme.account.domain.Money;
import org.junit.jupiter.api.Test;
import org.springframework.beans.factory.annotation.Autowired;
import org.springframework.boot.test.autoconfigure.web.servlet.WebMvcTest;
import org.springframework.boot.test.mock.mockito.MockBean;
import org.springframework.http.MediaType;
import org.springframework.test.web.servlet.MockMvc;

// @WebMvcTest 의 controllers 속성을 사용하지 않으면 애플리케이션에 포함된 모든 컨트롤러 클래스 스캔
@WebMvcTest(controllers = SendMoneyController.class)
class SendMoneyControllerTest {
  @Autowired private MockMvc mockMvc;
  @MockBean private SendMoneyUseCase sendMoneyUseCase;

  @Test
  void testSendMoney() throws Exception {
    mockMvc
        .perform(
            post("/accounts/send/{sourceAccountId}/{targetAccountId}/{amount}", 41L, 42L, 500)
                .header("Content-Type", MediaType.APPLICATION_JSON))
        .andExpect(status().isOk());

    SendMoneyCommand command =
        new SendMoneyCommand(
            new Account.AccountId(41L), new Account.AccountId(42L), Money.of(500L));

    then(sendMoneyUseCase).should().sendMoney(eq(command));
  }
}
@WebMvcTest애너테이션,MockMvc에 대한 상세한 내용은 7. 스프링 부트 웹 MVC 테스트:@WebMvcTest를 참고하세요.
@MockBean애너테이션에 대한 상세한 내용은 5.@MockBean을 이용하여 테스트 환경 설정 을 참고하세요.
위 코드는 웹 컨트롤러를 테스트하는 표준적인 통합 테스트 방법이다.
입력 객체를 만들고 mock HTTP 요청을 웹 컨트롤러에 보낸다.
isOk() 메서드로 HTTP 응답 상태가 정상임을 검증하고, mocking 한 유스케이스가 잘 호출되었는지 검증한다.
MockMvc 객체를 이용하여 mocking 했기 때문에 실제로 HTTP 프로토콜을 통해 테스트한 것은 아니다.
프레임워크를 테스트할 필요는 없으니 프레임워크가 HTTP 프로토콜에 맞게 적절히 잘 변환한다고 믿는 것이다.
MockMvc 로 호출 시 controller 는 호출하지만 실제 service 는 호출하지 않는다.
입력을 JSON 에서 SendMoneyCommand 객체로 매핑하는 전 과정과 유스케이스가 실제로 호출되었는지, 그리고 HTTP 응답이 기대한 상태를 반환했는지는 검증한다.
@WebMvcTest 애너테이션은 스프링이 특정 요청 경로, 자바와 JSON 간의 매핑, HTTP 입력 검증 등에 필요한 전체 객체 네트워크를 인스턴스화하도록 만들고, 웹 컨트롤러가 이 네트워크의 일부로서 잘 동작하는지 검증하기 때문에 이 테스트는 단위 테스트가 아니라 통합 테스트이다.
웹 컨트롤러는 스프링 프레임워크에 강하게 결합되어 있으므로 격리된 상태로 테스트하기 보다는 프레임워크와 통합된 상태로 테스트하는 것이 합리적이다.
웹 컨트롤러를 단위 테스트로 테스트하게 되면 모든 매핑, 유효성 검증, HTTP 항목에 대한 커버리지가 낮아지고, 프레임워크를 구성하는 이런 요소들이 프로덕션 환경에서 정상적으로 작동할 지 확신할 수 없게 된다.
5. 통합 테스트로 영속성 어댑터 테스트: @DataJpaTest, @Import, @Sql
위와 비슷한 이유로 영속성 어댑터의 테스트도 단위 테스트보다는 통합 테스트를 적용하는 것이 합리적이다.
단순히 어댑터의 로직만 검증하는 것이 아니라 데이터베이스 매핑도 검증해야 하기 때문이다.
5. 스프링 JPA 에서 본 영속성 어댑터인 AccountPersistenceAdapter 를 테스트해보자.
해당 영속성 어댑터에는 Account 엔티티를 DB 로부터 가져오는 메서드와 새로운 계좌 활동을 DB 에 저장하는 메서드, 총 2개의 메서드가 있다.
AccountPersistenceAdapterTest.java
package com.assu.study.cleanme.account.adapter.out.persistence;

import static com.assu.study.cleanme.common.AccountTestData.defaultAccount;
import static com.assu.study.cleanme.common.ActivityTestData.defaultActivity;
import static org.assertj.core.api.Assertions.assertThat;

import com.assu.study.cleanme.account.domain.Account;
import com.assu.study.cleanme.account.domain.ActivityWindow;
import com.assu.study.cleanme.account.domain.Money;
import java.time.LocalDateTime;
import org.junit.jupiter.api.DisplayName;
import org.junit.jupiter.api.Test;
import org.springframework.beans.factory.annotation.Autowired;
import org.springframework.boot.test.autoconfigure.orm.jpa.DataJpaTest;
import org.springframework.context.annotation.Import;
import org.springframework.test.context.jdbc.Sql;

@DataJpaTest
@Import({AccountPersistenceAdapter.class, AccountMapper.class})
class AccountPersistenceAdapterTest {
  @Autowired private AccountPersistenceAdapter accountPersistenceAdapter;

  @Autowired private ActivityRepository activityRepository;

  @DisplayName("계좌 조회")
  @Test
  @Sql("AccountPersistenceAdapterTest.sql") // DB 를 특정 상태로 만듦
  void loadAccount() {
    // When
    // 어댑터를 이용하여 계좌 조회
    Account account =
            accountPersistenceAdapter.loadAccount(
                    new Account.AccountId(1L), LocalDateTime.of(2023, 8, 10, 0, 0));

    // Then
    // Sql 스크립트에서 설정한 상태값을 가지고 있는지 검증
    assertThat(account.getActivityWindow().getActivities()).hasSize(2);
    assertThat(account.calculateBalance()).isEqualTo(Money.of(500));
  }

  @DisplayName("새로운 계좌 활동 DB 에 저장")
  @Test
  void updateActivities() {
    // Given
    // 새로운 계좌 활동을 가진 Account 를 만듦
    Account account =
            defaultAccount()
                    .withBaselineBalance(Money.of(555L))
                    .withActivityWindow(
                            new ActivityWindow(defaultActivity().withId(null).withMoney(Money.of(1L)).build()))
                    .build();

    // When
    // 위에서 만든 Account 를 어댑터로 전달
    accountPersistenceAdapter.updateActivities(account);

    // Then
    // DB 에 잘 저장되었는지 확인
    assertThat(activityRepository.count()).isEqualTo(1);

    ActivityJpaEntity savedActivity = activityRepository.findAll().get(0);
    assertThat(savedActivity.getAmount()).isEqualTo(1L);
  }
}
test/resource/com/assu/study/cleanme/account/adapter/out/persistence/AccountPersistenceAdapterTest.sql
insert into account (id)
values (1);
insert into account (id)
values (2);

insert into activity (id, timestamp, owner_account_id, source_account_id, target_account_id, amount)
values (1, '2023-08-08 08:00:00.0', 1, 1, 2, 500);

insert into activity (id, timestamp, owner_account_id, source_account_id, target_account_id, amount)
values (2, '2023-08-08 08:00:00.0', 2, 1, 2, 500);

insert into activity (id, timestamp, owner_account_id, source_account_id, target_account_id, amount)
values (3, '2023-08-09 10:00:00.0', 1, 2, 1, 1000);

insert into activity (id, timestamp, owner_account_id, source_account_id, target_account_id, amount)
values (4, '2023-08-09 10:00:00.0', 2, 2, 1, 1000);

insert into activity (id, timestamp, owner_account_id, source_account_id, target_account_id, amount)
values (5, '2024-08-09 09:00:00.0', 1, 1, 2, 1000);

insert into activity (id, timestamp, owner_account_id, source_account_id, target_account_id, amount)
values (6, '2024-08-09 09:00:00.0', 2, 1, 2, 1000);

insert into activity (id, timestamp, owner_account_id, source_account_id, target_account_id, amount)
values (7, '2024-08-09 10:00:00.0', 1, 2, 1, 1000);

insert into activity (id, timestamp, owner_account_id, source_account_id, target_account_id, amount)
values (8, '2024-08-09 10:00:00.0', 2, 2, 1, 1000);
@DataJpaTest 애너테이션은 스프링 데이터 리포지터리들을 포함하여 DB 접근에 필요한 객체 네트워크를 인스턴스화해야 함을 스프링에 알려준다.
@DataJpaTest에 대한 좀 더 상세한 내용은
8. JPA 테스트: @DataJpaTest,
6. 테스트 슬라이스 애너테이션:@WebMvcTest,@DataJpaTest,@JsonTest,@RestClientTest,@DataMongoTest,
2.2.2. @DataJpaTest 를 사용한 테스트 케이스
를 참고하세요.
@Import 애너테이션을 이용하여 특정 객체가 이 네트워크에 추가되었다는 것을 명확하게 표현해준다.
이 특정 객체들은 테스트 상에서 어댑터가 도메인 객체를 DB 객체로 매핑하는 등의 작업에 필요하다.
@Import에 대한 좀 더 상세한 내용은 2.3.@Import을 참고하세요.
위 테스트에서는 DB 를 모킹하지 않고 스프링에서 테스트 시 기본적으로 사용하는 인메모리 DB (H2) 를 사용하였다.
아무런 설정 필요 없이 바로 테스트할 수 있기 때문에 실용적이다.
하지만 테스트 시 인메모리 DB 보다 실제 DB 를 대상으로 테스트해야 하는 2가지 이유가 있다.
- 프로덕션 환경에서는 인메모리 DB 를 사용하지 않는 경우가 많기 때문에 인메모리 DB 에서 테스트가 통과하더라도 실제 DB 에서는 문제가 생길 가능성이 높음
- DB 마다 다른 고유한 SQL 문법 등의 오류
- 실제 DB 를 대상으로 테스트를 하면 2개의 다른 DB 시스템을 신경쓸 필요가 없음
- 테스트에서는 인메모리 DB를 사용하면 특정 방식으로 DB 를 설정하거나 DB 별로 2가지 버전의 DB 마이그레이션 스크립트를 만들어두어야 함
이러한 이유로 영속성 어댑터 테스트는 실제 DB 를 대상으로 진행해야 한다.
Testcontainers 와 같은 라이브러리는 필요한 DB 를 도커 컨테이너에 띄울 수 있어서 이럴 때 매우 유용하다.
6. 시스템 테스트로 주요 경로 테스트: @SpringBootTest, TestRestTemplate, JGiven
시스템 테스트는 전체 애플리케이션을 띄우고 API 를 통해 요청을 보내 모든 계층이 잘 동작하는지 검증한다.
아래는 송금하기 유스케이스의 시스템 테스트 코드로 애플리케이션에 HTTP 요청을 보내고 계좌의 잔고를 확인하는 것을 포함하여 응답을 검증하는 예시이다.
SendMoneySystemTest.java
package com.assu.study.cleanme;

import static org.assertj.core.api.BDDAssertions.then;

import com.assu.study.cleanme.account.application.port.out.LoadAccountPort;
import com.assu.study.cleanme.account.domain.Account;
import com.assu.study.cleanme.account.domain.Money;
import java.time.LocalDateTime;
import org.junit.jupiter.api.DisplayName;
import org.junit.jupiter.api.Test;
import org.springframework.beans.factory.annotation.Autowired;
import org.springframework.boot.test.context.SpringBootTest;
import org.springframework.boot.test.web.client.TestRestTemplate;
import org.springframework.http.*;
import org.springframework.test.context.jdbc.Sql;

@SpringBootTest(webEnvironment = SpringBootTest.WebEnvironment.RANDOM_PORT)
public class SendMoneySystemTest {
  @Autowired private TestRestTemplate testRestTemplate;
  @Autowired private LoadAccountPort loadAccountPort;

  @DisplayName("송금하기 시스템 테스트")
  @Test
  @Sql("SendMoneySystemTest.sql")
  void sendMoney() {
    // Given (테스트 케이스가 동작하기 위해 갖춰져야 하는 선행 조건 준비)
    Money initialSourceBalance = sourceAccount().calculateBalance();
    Money initialTargetBalance = targetAccount().calculateBalance();

    // When (테스트하고자 하는 대상 코드 실행)
    ResponseEntity response =
        whenSendMoney(sourceAccountId(), targetAccountId(), transferredAmount());

    // Then (대상 코드의 수행 결과 판단)
    then(response.getStatusCode()).isEqualTo(HttpStatus.OK);

    then(sourceAccount().calculateBalance())
        .isEqualTo(initialSourceBalance.minus(transferredAmount()));

    then(targetAccount().calculateBalance())
        .isEqualTo(initialTargetBalance.plus(transferredAmount()));
  }

  // 여기서부터 헬퍼 메서드들 (DSL)
  private Account sourceAccount() {
    return loadAccount(sourceAccountId());
  }

  private Account targetAccount() {
    return loadAccount(targetAccountId());
  }

  private Account loadAccount(Account.AccountId accountId) {
    return loadAccountPort.loadAccount(accountId, LocalDateTime.now());
  }

  private Account.AccountId sourceAccountId() {
    return new Account.AccountId(1L);
  }

  private Account.AccountId targetAccountId() {
    return new Account.AccountId(2L);
  }

  private Money transferredAmount() {
    return Money.of(500L);
  }

  private ResponseEntity whenSendMoney(
      Account.AccountId sourceAccountId, Account.AccountId targetAccountId, Money amount) {
    HttpHeaders headers = new HttpHeaders();
    headers.add("Content-Type", MediaType.APPLICATION_JSON_VALUE);
    HttpEntity<Void> request = new HttpEntity<>(null, headers);

    return testRestTemplate.exchange(
        "/accounts/send/{sourceAccountId}/{targetAccountId}/{amount}",
        HttpMethod.POST,
        request,
        Object.class,
        sourceAccountId.getValue(),
        targetAccountId.getValue(),
        amount.getAmount());
  }
}
test/resource/com/assu/study/cleanme/SendMoneySystemTest.sql
insert into account (id)
values (1);
insert into account (id)
values (2);

insert into activity (id, timestamp, owner_account_id, source_account_id, target_account_id, amount)
values (1001, '2023-08-08 08:00:00.0', 1, 1, 2, 500);

insert into activity (id, timestamp, owner_account_id, source_account_id, target_account_id, amount)
values (1002, '2023-08-08 08:00:00.0', 2, 1, 2, 500);

insert into activity (id, timestamp, owner_account_id, source_account_id, target_account_id, amount)
values (1003, '2023-08-09 10:00:00.0', 1, 2, 1, 1000);

insert into activity (id, timestamp, owner_account_id, source_account_id, target_account_id, amount)
values (1004, '2023-08-09 10:00:00.0', 2, 2, 1, 1000);

insert into activity (id, timestamp, owner_account_id, source_account_id, target_account_id, amount)
values (1005, '2024-08-09 09:00:00.0', 1, 1, 2, 1000);

insert into activity (id, timestamp, owner_account_id, source_account_id, target_account_id, amount)
values (1006, '2024-08-09 09:00:00.0', 2, 1, 2, 1000);

insert into activity (id, timestamp, owner_account_id, source_account_id, target_account_id, amount)
values (1007, '2024-08-09 10:00:00.0', 1, 2, 1, 1000);

insert into activity (id, timestamp, owner_account_id, source_account_id, target_account_id, amount)
values (1008, '2024-08-09 10:00:00.0', 2, 2, 1, 1000);
@SpringBootTest 애너테이션은 스프링이 애플리케이션을 구성하는 모든 객체 네트워크를 띄우게 한다.
WebEnrivonment.RANDOM_PORT 는 서블릿을 랜덤 포트로 띄우는 설정이다.
@SpringBootTest애너테이션에 대한 좀 더 상세한 내용은
3.@SpringBootTest를 이용하여 스프링 부트 테스트,
2.2.1.@SpringBootTest를 사용한 테스트 케이스
를 참고하세요.
webEnvironment옵션에 대한 설명은 3.@SpringBootTest를 이용하여 스프링 부트 테스트 를 참고하세요.
여기서는 웹 어댑터처럼 MockMvc 를 이용하여 요청을 보내는 것이 아니라 TestRestTemplate 를 이용하여 요청을 보낸다.
테스트를 프로덕션 환경과 더 비슷하게 실제로 HTTP 통신을 한다.
TestRestTemplate 로 호출 시 controller, service 까지 모두 실행된다.
실제로 HTTP 통신을 하는 것처럼 출력 어댑터도 이용한다. 여기서 출력 어댑터는 애플리케이션과 DB 를 연결하는 영속성 어댑터 뿐이지만 다른 시스템을 이용하는 애플리케이션의 경우 다른 출력 어댑터들이 있을수도 있다.
시스템 테스트라고 하더라도 언제나 서드파티 시스템을 실행하여 테스트할 수 있는 건 아니기 때문에 결국 mocking 을 해야할 때가 있는데 육각형 아키텍처는 이러한 경우 출력 포트 인터페이스만 mocking 하면 되기 때문에 매우 쉽게 해결할 수 있다.
테스트의 가독성을 높이기 위해 중요하지 않은 로직들은 헬퍼 메서드로 구성하였다.
이 헬퍼 메서드들ㄹ은 여러 가지 상태를 검증할 때 사용할 수 있는 도메인 특화 언어(DSL, Domain-Specific Language) 를 형성한다.
도메인 특화 언어 (DSL, Domain-Specific Language)
어느 도메인에서나 적용 가능한 범용 언어(GPL, General-Purpose Language) 와 반대되는 개념으로 특정한 도메인을 적용하는데 특화된 언어
JGiven 과 같은 BDD 을 위한 라이브러리는 테스트용 어휘를 만드는데 도움을 준다.
단위 테스트와 통합 테스트를 만들었다면 시스템 테스트는 앞서 커버한 코드와 겹치는 부분이 많을 것이다.
하지만 시스템 테스트는 단위 테스트와 통합 테스트가 발견하는 버그와는 또 다르 종류의 버그를 발견할 수 있도록 해준다.
예) 단위 테스트나 통합 테스트 만으로는 알 수 없는 계층 간 매핑 버그 등..
시스템 테스트는 여러 개의 유스케이스를 결합하여 시나리오를 만들 때 더 유용하다.
시스템 테스트를 통해 중요한 시나리오들이 커버된다면 최신 변경사항들이 애플리케이션을 망가뜨리지 않았음을 가정할 수 있다.
7. 테스트 전략
라인 커버리지는 테스트 성공을 측정하는데 있어서 잘못된 지표이다.
코드의 중요한 부분이 전혀 커버되지 않았을 수 있기 때문에 100% 를 제외한 어떤 목표도 완전히 무의미하다.
라인 커버리지
테스트 실행 시 실행된 라인 수를 전체 라인 수 대비 퍼센티지로 나타낸 값
프로덕션 버그에 대하여 이에 대한 답변을 기록하고 그런 케이스를 커버할 수 있는 테스트를 추가해야 한다.
육각형 아키텍처에서 사용하는 테스트 전략은 아래와 같다.
- 도메인 엔티티를 구현할 때는 단위 테스트로 커버
- 유스케이스를 구현할 때는 단위 테스트로 커버
- 어댑터를 구현할 때는 통합 테스트로 커버
- 사용자가 취할 수 있는 중요 애플리케이션 경로는 시스템 테스트로 커버
정리하며…
육각형 아키텍처는 도메인 로직와 바깥으로 향한 어댑터를 깔끔하기 분리하기 때문에 핵심 도메인 로직은 단위 테스트로, 어댑터는 통합 테스트로 처리하는 명확한 테스트 전략을 정의할 수 있다.
입출력 포트는 테스트에서 아주 뚜렷한 mocking 지점이 된다.
각 포트에 대해 mocking 을 할지, 실제 구현을 이용할 지 선택할 수 있다.
포트가 아주 작고 핵심만 담고 있다면 mocking 하는 것이 아주 쉬울 것이다.
포트 인터페이스가 더 적은 메서드를 제공할수록 어떤 메서드를 mocking 해야할 지 명확해진다.
mocking 하는 것이 버겁거나 코드의 특정 부분을 커버하기 위해 어떤 종류의 테스트를 써야할 지 모르겠다면 이는 경고 신호이다.
테스트는 아키텍처의 문제에 대해 경고하는 역할도 한다고 할 수 있다.
참고 사이트 & 함께 보면 좋은 사이트
본 포스트는 톰 홈버그 저자의 만들면서 배우는 클린 아키텍처을 기반으로 스터디하며 정리한 내용들입니다.
