Spring Cloud - OAuth2, Security(1/2)
in DEV on MSA(Spring), Oauth2, Spring-cloud-security, Security-oauth2, Spring-security-jwt
이 포스트는 MSA 를 보다 편하게 도입할 수 있도록 해주는 Security OAuth2 와 Spring Cloud Security 에 대해 기술한다. 관련 소스는 github/assu10 를 참고 바란다.
애플리케이션 보안의 여러 가지 측면으로 바라볼 수 있다.
- 본인 인증(authenticate) 후 요청한 작업을 수행할 수 있는 권한(authorized) 여부 검증 -> 이 포스트에서 다룰 내용
- 인프라스트럭처의 꾸준한 패치
- 정의된 포트로만 접근 허용, 인가된 서버만 접근할 수 있도록 네트워크 접근 통제
이 포스트에선 아래의 내용을 다룰 예정이다.
- 스프링 기반 서비스의 보안을 위해
스프링 클라우드 보안(security)과OAuth2 표준을 사용하여 본인 인증과 권한을 확인 - OAuth2 를 이용하여 사용자가 호출할 수 있는 엔드포인트와 HTTP verb 정의
OAuth2 패스워드 그랜트 타입을 이용하여 인증 구현JWT를 사용하여 더 견고한 OAuth2 구현, OAuth2 토큰 정보를 인코딩하는 표준 수립
1. OAuth2
OAuth2 는 토큰 기반 보안 프레임워크로 사용자가 제 3자 (third-party) 서비스에서 자신을 인증할 수 있도록 해준다. OAuth2 의 주요 목적은 사용자 요청을 수행하기 위해 여러 서비스들을 호출할 때 이 요청을 처리할 서비스에 일일이 자격증명을 제시하지 않고도 사용자를 인증하는 것이다.
여기선 OAuth2 에 대해 간략하게만 설명하도록 한다.
(OAuth2 의 좀 더 자세한 내용은 Oauth2.0 를 참고해주세요)
OAuth2 는 아래 4가지로 구성된다.
- Resource Owner (이하 자원 소유자)
- User, 즉 사용자
- 이미 google, facebook 등에 가입된 유저로 Resource Server 의 Resource Owner
- 자원 소유자가 등록한 애플리케이션은 OAuth2 토큰을 인증할 때 전달되는 자격증명의 일부인 식별 가능한 애플리케이션 이름과 secret key 를 받음
- Resource Server (이하 보호 자원)
- 자원을 호스팅하는 서버
- google, facebook, Naver 등 OAuth 제공자
- 여기에서는 마이크로서비스에 해당
- Client (애플리케이션)
- 리소스 서버에서 제공하는 자원을 사용하는 애플리케이션
- Naver band, Notion 등등
- Authorization Server (이하 인증 서버)
- 사용자 동의를 받아서 권한을 부여 및 관리하는 서버
OAuth2 명세에는 4가지 Grant Type 이 있는데 여기선 OAuth2 패스워드 그랜트 타입을 구현할 것이다.
OAuth2 4가지 Grant Type
- 패스워드
- 클라이언트 자격 증명 (client credential)
- 인가 코드 (authorization code)
- 암시적 (implicit)
2. OAuth2 로 인증 구현
OAuth2 패스워드 그랜트 타입을 구현하기 위해 아래와 같은 절차로 진행한다.
- 스프링 클라우드 기반의 OAuth2 인증 서버 설정
- OAuth2 서비스와 사용자를 인증/인가할 수 있도록 인가된 애플리케이션 역할을 하는 임시 UI 애플리케이션 등록
(OAuth2 인증 서버에 클라이언트 애플리케이션 등록 (애플리케이션 단위의 시크릿 정의)) - 개별 사용자에 대한 자격 증명(인증)과 역할(인가) 설정
- OAuth2 패스워드 그랜트 타입을 사용하여 사용자 인증
(임시 UI 애플리케이션은 만들지 않고 REST API 호출 앱을 이용해 사용자 로그인 시뮬레이션) - OAuth2 를 이용하여 회원 서비스 보호 (인증된 사용자만 호출할 수 있도록)
2.1. OAuth2 인증 서버 설정
인증 서버의 역할
- 사용자 자격 증명을 인증
- 토큰 발행
- 인증 서버가 보호하는 서비스에 요청이 올 때마다 올바른 OAuth2 토큰인지 만료 전인지 확인
인증 서버 설정을 위해 스프링 부트 애플리케이션 모듈을 생성한 후 spring-cloud-security 와 spring-cloud-starter-oauth2 Dependency 설정 및 부트스트랩 클래스 설정을 해준다.
auth-service > pom.xml
<dependency>
    <groupId>org.springframework.cloud</groupId>
    <artifactId>spring-cloud-security</artifactId>
</dependency>
<dependency>
    <groupId>org.springframework.cloud</groupId>
    <artifactId>spring-cloud-starter-oauth2</artifactId>
</dependency>
spring-cloud-security 의존성은 일반적인 스프링과 스프링 클라우드 보안 라이브러리를 모두 가져온다.
auth-service > AuthServiceApplication.java
@SpringBootApplication
@RestController
@EnableEurekaClient
@EnableResourceServer
@EnableAuthorizationServer      // 이 서비스가 OAuth2 인증 서버가 될 것이라고 스프링 클라우드에 알림
public class AuthServiceApplication {
    /**
     * 사용자 정보 조회 시 사용
     *      OAuth2 로 보호되는 서비스에 접근하려고 할 때 사용
     *      보호 서비스로 호출되어 OAuth2 액세스 토큰의 유효성을 검증하고 보호 서비스에 접근하는 사용자 역할 조회
     */
    @RequestMapping(value = "/user")     // /auth/user 로 매핑
    public Map<String, Object> user(OAuth2Authentication user) {
        Map<String, Object> userInfo = new HashMap<>();
        userInfo.put("user", user.getUserAuthentication().getPrincipal());
        userInfo.put("authorities", AuthorityUtils.authorityListToSet(user.getUserAuthentication().getAuthorities()));
        return userInfo;
    }
    public static void main(String[] args) {
        SpringApplication.run(AuthServiceApplication.class, args);
    }
}
@EnableAuthorizationServer 는 해당 애플리케이션이 OAuth2 인증 서버라는 점과 OAuth2 인증 과정에서 사용될 여러 REST 엔드포인트를 추가할 것이라고 알린다.
/user(/auth/user로 매핑) 엔드포인트는 OAuth2 로 보호되는 서비스에 접근 시 사용된다. 이 엔드포인트는 보호 서비스로 호출되어 OAuth2 액세스 토큰 유효성을 검증하고, 사용자의 권한을 확인한다.
2.2. OAuth2 인증 서버에 클라이언트 애플리케이션 등록
이제 인증 서버가 준비되었으니 인증 서버에 애플리케이션을 등록하고 역할을 정의해보자. assuapp 애플리케이션을 인증 서버에 등록해보도록 하자.
OAuth2 서버에 등록된 애플리케이션과 자격 증명을 정의하는 클래스 OAuth2Config 를 생성한다.
아래 코드를 작성하다 보면 AuthenticationManager 가 인젝션이 안될텐데 바로 아래 설명이 있습니다.
아래 코드에서
@Qualifier("userDetailsServiceBean")이 부분은 바로 다음에 진행할 WebSecurityConfigurer 클래스 구현 후 사용 가능합니다.
auth-service > OAuth2Config.java
/**
 * OAuth2 인증 서버에 등록될 애플리케이션 정의
 *      AuthorizationServerConfigurerAdapter: 스프링 시큐리티 핵심부, 핵심 인증 및 인가 기능 수행하는 기본 메커니즘 제공
 */
@Configuration
public class OAuth2Config extends AuthorizationServerConfigurerAdapter {

    private final AuthenticationManager authenticationManager;
    private final UserDetailsService userDetailsService;

    public OAuth2Config(AuthenticationManager authenticationManager, @Qualifier("userDetailsServiceBean") UserDetailsService userDetailsService) {
        this.authenticationManager = authenticationManager;
        this.userDetailsService = userDetailsService;
    }

    /**
     * 인증 서버에 등록될 클라이언트 정의
     * 즉, OAuth2 서비스로 보호되는서비스에 접근할 수 있는 클라이언트 애플리케이션 등록
     */
    @Override
    public void configure(ClientDetailsServiceConfigurer clients) throws Exception {
        clients.inMemory()      // 애플리케이션 정보를 위한 저장소 (인메모리 / JDBC)
                .withClient("assuapp")      // assuapp 애플리케이션이 토큰을 받기 위해 인증 서버 호출 시 제시할 시크릿과 애플리케이션명
                .secret(PasswordEncoderFactories.createDelegatingPasswordEncoder().encode("12345"))
                .authorizedGrantTypes("refresh_token", "password", "client_credentials")    // OAuth2 에서 지원하는 인가 그랜트 타입, 여기선 패스워드/클라이언트 자격증명 그랜트타입
                .scopes("webclient", "mobileclient");       // 토큰 요청 시 애플리케이션의 수행 경계 정의
    }

    /**
     * AuthorizationServerConfigurerAdapter 안에서 사용될 여러 컴포넌트 정의
     * 여기선 스프링에 기본 인증 관리자와 사용자 상세 서비스를 이용한다고 선언
     */
    @Override
    public void configure(AuthorizationServerEndpointsConfigurer endpoints) throws Exception {
        endpoints.authenticationManager(authenticationManager)
                .userDetailsService(userDetailsService);
    }
}
여기서 아래 그림처럼 오류 문구를 내며 인젝션이 안될텐데 springboot 2.x 부터 security 내부 로직이 변경되었다고 한다.
Could not autowire. No beans of ‘AuthenticationManager’ type found.
Inspection info:Checks autowiring problems in a bean class.

springboot wiki를 보면 아래와 같이 설명되어 있다.
AuthenticationManager Bean

If you want to expose Spring Security’s AuthenticationManager as a bean,
override the authenticationManagerBean method on your WebSecurityConfigurerAdapter and annotate it with @Bean.
즉, AuthenticationManager 를 사용하고 싶으면 WebSecurityConfigurerAdapter 를 상속받는 클래스 생성 후 authenticationManagerBean 메서드를 오버라이드한 후 Bean 으로 등록 후 사용해야 한다고 설명되어 있다.
WebSecurityConfigurer 를 구현해보자.
auth-service > WebSecurityConfigurer.java
@Configuration
public class WebSecurityConfigurer extends WebSecurityConfigurerAdapter {
    @Bean
    @Override
    public AuthenticationManager authenticationManagerBean() throws Exception {
        return super.authenticationManagerBean();
    }
}
이제 정상적으로 AuthenticationManager 가 인젝션되는 것을 확인할 수 있다.
이제 OAuth2Config 클래스를 다시 살펴보도록 하자.
이 클래스는 AuthorizationServerConfigurerAdapter 를 상속받는데 AuthorizationServerConfigurerAdapter 는 스프링 시큐리티의 핵심 인증 및 인가 기능을 수행하는 기본 메커니즘을 제공한다.
인증(Authentication)
자격 증명을 제공하여 본인을 증명하는 것인가(Authorization)
수행하려는 작업의 허용 여부를 결정
위 클래스에서 오버라이드하는 함수 중 첫 번째 함수를 살펴보자.
auth-service > OAuth2Config.java
/**
 * 인증 서버에 등록될 클라이언트 정의
 * 즉, OAuth2 서비스로 보호되는 서비스에 접근할 수 있는 클라이언트 애플리케이션 등록
 */
@Override
public void configure(ClientDetailsServiceConfigurer clients) throws Exception {
    clients.inMemory()      // 애플리케이션 정보를 위한 저장소 (인메모리 / JDBC)
            .withClient("assuapp")      // assuapp 애플리케이션이 토큰을 받기 위해 인증 서버 호출 시 제시할 시크릿과 애플리케이션명
            .secret(PasswordEncoderFactories.createDelegatingPasswordEncoder().encode("12345"))
            .authorizedGrantTypes("refresh_token", "password", "client_credentials")    // OAuth2 에서 지원하는 인가 그랜트 타입, 여기선 패스워드/클라이언트 자격증명 그랜트타입
            .scopes("webclient", "mobileclient");       // 토큰 요청 시 애플리케이션의 수행 경계 정의
}
configure(ClientDetailsServiceConfigurer clients)- 인증 서버에 등록될 클라이언트 애플리케이션 정의
- 즉 OAuth2 서비스로 보호되는 서비스에 접근할 수 있는 클라이언트 애플리케이션 등록
ClientDetailsServiceConfigurer- 애플리케이션 정보를 위한 두 가지 타입의 저장소 지원 (인메모리 저장소와 JDBC 저장소)
- 여기선 인메모리 저장소 사용
withClient()와secret()- 클라이언트가 액세스 토큰을 받기 위해 인증 서버 호출 시 제시할 시크릿과 애플리케이션명 제공
authorizedGrantTypes()- OAuth2 가 지원하는 인가 그랜트 타입을 쉼표로 구분하여 전달
- 여기선 패스워드 그랜트와 클라이언트 자격 증명 그랜트타입 지원
scopes()- 애플리케이션이 인증 서버에 액세스 토큰 요청 시 애플리케이션의 수행 경계를 정의
- 스코프를 정의하면 애플리케이션이 작동할 범위에 대한 인가 규칙을 만들어서 사용자가 로그인하는 애플리케이션을 기반으로 애플리케이션이 취할 수 있는 행동 제한 가능
- 동일한 애플리케이션명과 시크릿 키로 접근하지만 웹 애플리케이션은 webclient 스코프만 사용하고,
모바일 애플리케이션은 mobileclient 스코프 사용
2.3. 개별 사용자에 대한 자격 증명(인증)과 역할(인가) 설정
스프링은 인메모리 데이터 저장소나 JDBC 가 지원되는 RDBMS, LDAP 서버에 사용자 정보를 저장하고 조회한다.
사용자 정보: 개발 사용자의 자격 증명과 속한 역할
이 포스트에선 가장 단순한 인메모리 데이터 저장소를 사용할 예정이다.
스프링 OAuth2 애플리케이션 정보 저장소
인메모리, RDBMS 에 데이터 저장스프링의 사용자 자격 증명과 보안 역할 저장소
인메모리 DB, RDBMS, LDAP 서버에 저장
아래 클래스는 인증 서버에 사용자를 인증하고, 인증 사용자에 대한 사용자 정보(역할)를 반환하는 기능을 구현한다.
이를 위해 WebSecurityConfigurerAdapter 를 상속받아 authenticationManagerBean() 와 userDetailsServiceBean(), 이 2개의 빈을 정의한다.
이 2개의 빈은 위에서 구현한 OAuth2Config 클래스의 configure(AuthorizationServerEndpointsConfigurer endpoints) 메서드에서 사용된다.
auth-service > WebSecurityManager.java
/**
 * 사용자 ID, 패스워드, 역할 정의
 */
@Configuration
public class WebSecurityConfigurer extends WebSecurityConfigurerAdapter {

    @Override
    @Bean       // 스프링 시큐리티가 인증 처리하는데 사용
    public AuthenticationManager authenticationManagerBean() throws Exception {
        return super.authenticationManagerBean();
    }

    @Override
    @Bean       // 스프링 시큐리티에서 반환될 사용자 정보 저장
    public UserDetailsService userDetailsServiceBean() throws Exception {
        return super.userDetailsServiceBean();
    }

    @Override
    protected void configure(AuthenticationManagerBuilder auth) throws Exception {
        PasswordEncoder passwordEncoder = PasswordEncoderFactories.createDelegatingPasswordEncoder();
        auth.inMemoryAuthentication()
                .passwordEncoder(passwordEncoder)
                .withUser("assuUser").password(passwordEncoder.encode("user1234")).roles("USER")
                .and()
                .withUser("assuAdmin").password(passwordEncoder.encode("admin1234")).roles("USER", "ADMIN");
    }
}
2.4. OAuth2 패스워드 그랜트 타입을 사용하여 사용자 인증
application.yaml 파일에 아래와 같이 설정한다. application.yaml
server:
  port: 8901
  servlet:
    contextPath:   /auth
이제 REST API 앱을 이용하여 액세스 토큰 획득 및 해당 토큰을 이용하여 사용자 정보를 조회해보도록 하자.
REST API 앱으로는 POST MAN 을 사용하였다.
토큰 획득과 사용자 정보 조회 URL 정보는 아래와 같다.
토큰 획득
POST - http://localhost:8901/auth/oauth/token
사용자 정보 조회
GET - http://localhost:8901/auth/user
2.4.1. 토큰 획득
POST MAN 을 켠 후 아래와 같이 셋팅한다.

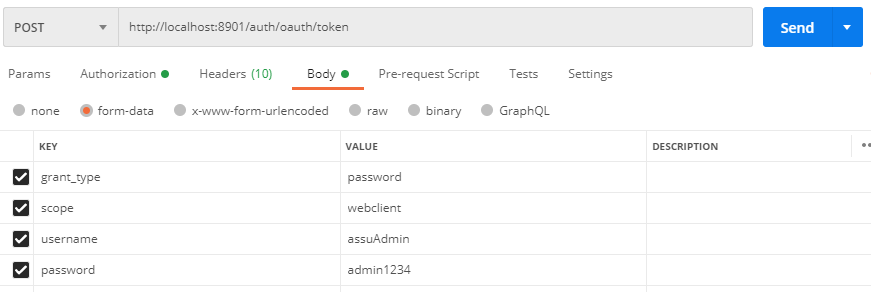
사용자 자격 증명 정보로 아래 4가지 정보를 전달해야 한다.
- 그랜트 타입(grant type)
- OAuth2 의 그랜트 타입
- 스코프(scope)
- 애플리케이션 수행 범위
- 사용자 이름(username)
- 패스워드(password)
위와 같이 설정 후 POST - http://localhost:8901/auth/oauth/token 호출 시 클라이언트 자격 증명이 유효한지 확인되면 아래와 같은 형식으로 페이로드가 반환된다.
{
    "access_token": "69fcbe51-5c5e-49f3-af8c-0dba9df27b37",
    "token_type": "bearer",
    "refresh_token": "6f9b0e40-e6e5-4198-a0c4-bd8263d5419b",
    "expires_in": 42157,
    "scope": "webclient"
}
- access_token
- 클라이언트가 보호 자원을 요청할 때마다 제시할 OAuth2 토큰
- token_type
- 토큰 타입
- OAuth2 표준 명세에 여러 토큰 타입을 정의할 수 있는데 가장 일반적인 토큰 타입은 베어러(bearer) 토큰
- refresh_token
- 토큰이 만료된 후 재발행하기 위해 인증 서버에 다시 제시하는 토큰
- expires_in
- 액세스 토큰이 만려되기까지 남은 시간(초)
- 기본 만료값은 12시간
- scope
- 액세스 토큰이 유효한 범위
2.4.2. 사용자 정보 조회
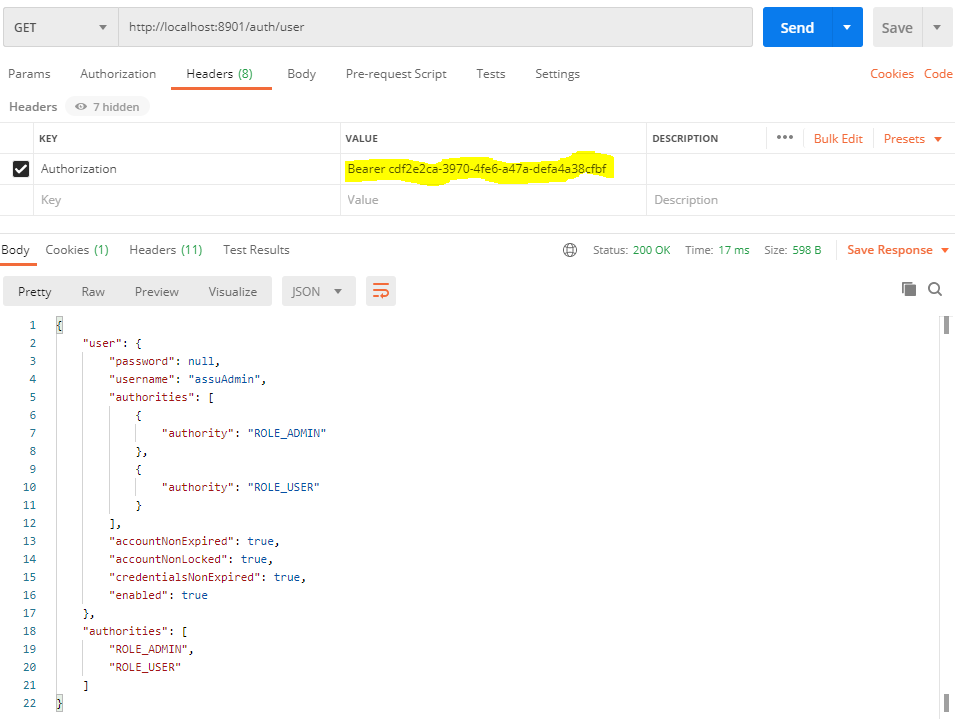
이제 액세스 토큰을 획득했으니 인증 서비스에서 만든 /auth/user 엔드포인트를 호출하여 사용자 정보를 조회할 수 있다.
GET - http://localhost:8901/auth/user
3. OAuth2 를 이용하여 회원 서비스 보호
이제 개별 사용자 계정의 역할을 설정했으니 실제로 OAuth2 를 이용하여 자원을 보호해보자. OAuth2 액세스 토큰의 생성과 관리는 OAuth2 인증 서버가 담당하지만, 사용자 역할 및 작업 수행의 권한 여부는 각 서비스에서 정의한다.
회원 서비스에 아래 의존성을 추가한다.
member-service > pom.xml
<dependency>
    <groupId>org.springframework.security.oauth.boot</groupId>
    <artifactId>spring-security-oauth2-autoconfigure</artifactId>
</dependency>
회원 서비스를 보호 자원으로 설정하면 회원 서비스를 호출할 때마다 엑세스 토큰을 Authorization HTTP 에 추가해야 한다.
회원 서비스의 Config Server 원격 저장소에 OAuth2 콜백 URL 을 설정해주자.
config-repo > member-service
security:
  oauth2:
    resource:
      user-info-uri: http://localhost:8901/auth/user    # OAuth2 콜백 URL
회원 서비스 부트스트랩 클래스에 @EnableResourceServer 를 추가하여 회원 서비스를 보호 자원으로 지정한다.
@EnableResourceServer 는 서비스로 유입되는 모든 호출을 가로채서 HTTP 헤더에 OAuth2 액세스 토큰 여부를 확인한 후 토큰의 유효성을 확인하기 위해 security.oauth2.resource.user-info-uri 에 정의된 콜백 URL 을 호출한다.
MemberServiceApplication.java
@SpringBootApplication
@EnableEurekaClient
@EnableResourceServer       // 보호 자원으로 설정
public class MemberServiceApplication {
...
이제 서비스 접근 대상을 정의해보도록 하자. 접근 제어 규칙 정의는 ResourceServerConfigurerAdapter 클래스를 상속받아 configure() 메서드를 재정의하여 설정할 수 있다.
접근 규칙
인증된 사용자는 모든 서비스에 접근할 수 있도록 설정할 수도 있고,
특정 역할을 가진 사용자만 PUT URL 로 접근할 수 있게 세세한 설정도 가능하다.
우선 인증된 사용자는 모든 서비스에 접근 가능하도록 설정해 본다.
member-service > security > ResourceServerConfig.java
/**
 * 접근 제어 규칙 정의
 *      인증된 사용자는 모든 서비스에 접근 가능하거나,
 *      특정 역할을 가진 애플리케이션만 PUT URL 로 접근하는 등 세밀하기 정의 가능
 */
@Configuration
public class ResourceServerConfig extends ResourceServerConfigurerAdapter {
    /**
     * 모든 접근 규칙을 재정의한 configure()
     * @param http
     * @throws Exception
     */
    @Override
    public void configure(HttpSecurity http) throws Exception {
        // 매서드로 전달된 HttpSecurity 객체로 모든 접근 규칙 구성

        // 회원 서비스의 모든 URL 에 대해 인증된 사용자만 접근하도록 제한
        http.authorizeRequests().anyRequest().authenticated();
    }
}
이제 회원 서비스의 모든 URL 은 인증된 사용자만 접근하도록 제한되었으니 확인해보도록 하자.
HTTP 헤더에 Authorization 액세스 토큰없이 회원 서비스의 API 를 호출하면 아래처럼 401 HTTP 응답 코드가 출력된다. http://localhost:8090/member/name/rinda

이제 액세스 토큰과 함께 호출해보면 아래와 같이 정상적으로 API 호출이 가능한 것을 확인할 수 있다.

좀 더 나가아서 특정 역할을 가진 사용자만 특정 서비스를 이용할 수 있도록 설정해보자. 여기서는 ADMIN 접근 권한이 있는 사용자만 회원 서비스의 PUT 메서드 API 를 호출할 수 있도록 제한해 볼 것이다.
사용자 역할은 위에서 설정했던 WebSecurityConfigurer.java 를 참고하면 된다.
auth-service > WebSecurityConfigurer.java
...
@Override
protected void configure(AuthenticationManagerBuilder auth) throws Exception {
    PasswordEncoder passwordEncoder = PasswordEncoderFactories.createDelegatingPasswordEncoder();
    auth.inMemoryAuthentication()
            .passwordEncoder(passwordEncoder)
            .withUser("assuUser").password(passwordEncoder.encode("user1234")).roles("USER")
            .and()
            .withUser("assuAdmin").password(passwordEncoder.encode("admin1234")).roles("USER", "ADMIN");
}
...
그리고 회원 서비스에 아래와 같은 PUT 메서드의 테스트 API 를 추가한다.
member-service > MemberController.java
/**
 * ADMIN 권한 소유자만 PUT METHOD API 호출 가능하도록 설정 후 테스트
 */
@PutMapping("{name}")
public String member(@PathVariable("name") String name) {
    return "[MEMBER-DELETE] " + name + " is deleted.";
}
위에서 생성한 ResourceServerConfig.java 를 수정하여 접근 규칙을 수정한다.
member-service > ResourceServerConfig.java
/**
 * 접근 제어 규칙 정의
 *      인증된 사용자는 모든 서비스에 접근 가능하거나,
 *      특정 역할을 가진 애플리케이션만 PUT URL 로 접근하는 등 세밀하기 정의 가능
 */
@Configuration
public class ResourceServerConfig extends ResourceServerConfigurerAdapter {
    /**
     * 모든 접근 규칙을 재정의한 configure()
     * @param http
     * @throws Exception
     */
    @Override
    public void configure(HttpSecurity http) throws Exception {
        // 매서드로 전달된 HttpSecurity 객체로 모든 접근 규칙 구성

        // 회원 서비스의 모든 URL 에 대해 인증된 사용자만 접근하도록 제한
        //http.authorizeRequests().anyRequest().authenticated();

        http.authorizeRequests()
                .antMatchers(HttpMethod.PUT, "/member/**")  // 쉼표로 구분하여 엔드 포인트 목록 받음
                .hasRole("ADMIN")   // ADMIN 권한을 가진 사용자만 PUT 호출 가능
                .anyRequest()       // 서비스의 모든 엔드포인트도 인증된 사용자만 접근 가능하도록 설정
                .authenticated();
    }
}
antMatchers() 에 엔드포인트 정의할 때 * 스타일 표기법을 사용할 수 있는데 아래와 같은 표기도 가능하다.
"/*/member/**
마지막 부분인 .anyRequest().authenticated() 을 통해서 서비스의 모든 엔드포인트도 인증된 사용자만 접근 가능하도록 설정한다.
이제 ADMIN 권한이 없는 사용자 assuUser 로 PUT 메서드 API 를 호출해보도록 하자. http://localhost:8090/member/rinda
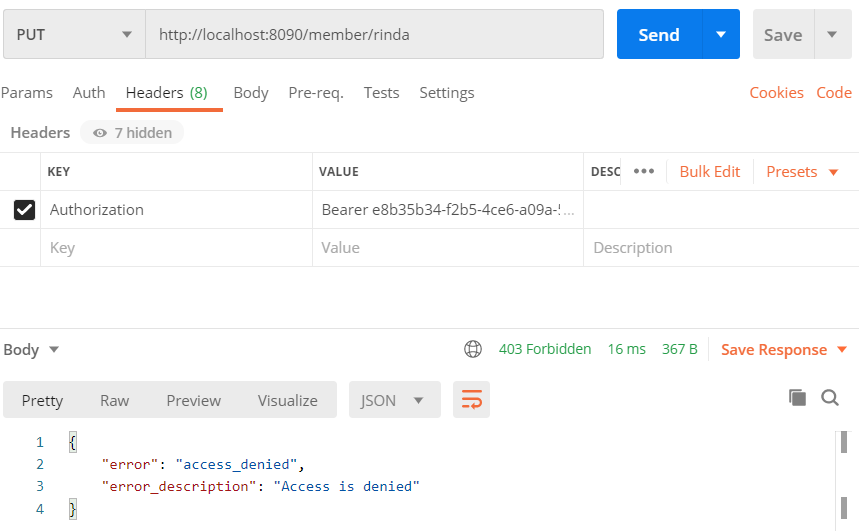
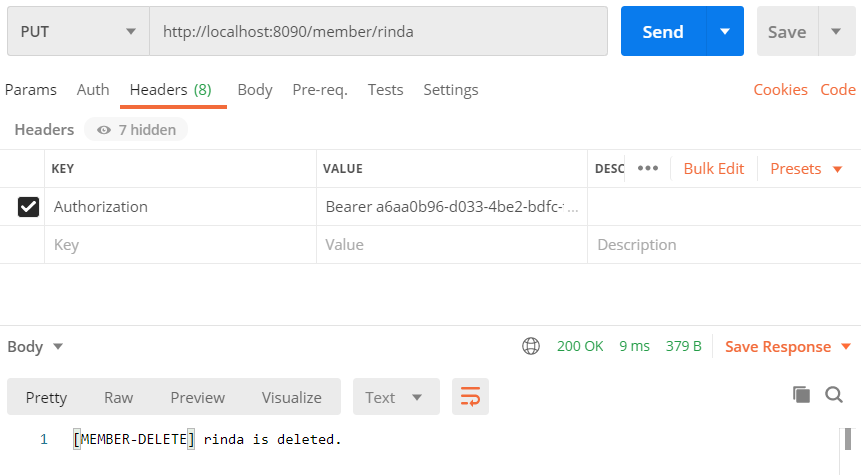
이제 다시 ADMIN 권한이 있는 사용자인 assuAdmin 으로 액세스 토큰을 구한 뒤 PUT 메서드 API 를 호출해보자.
4. OAuth2 액세스 토큰 전파
MSA 환경에서는 단일 트랜잭션을 수행하는데 여러 마이크로 서비스를 호출하는 경우가 많기 때문에 다른 마이크로서비스로 OAuth2 액세스 토큰을 전파할 수 있어야 한다.
다른 마이크로서비스로 액세스 토큰을 전달하는 흐름을 보면 아래와 같다.
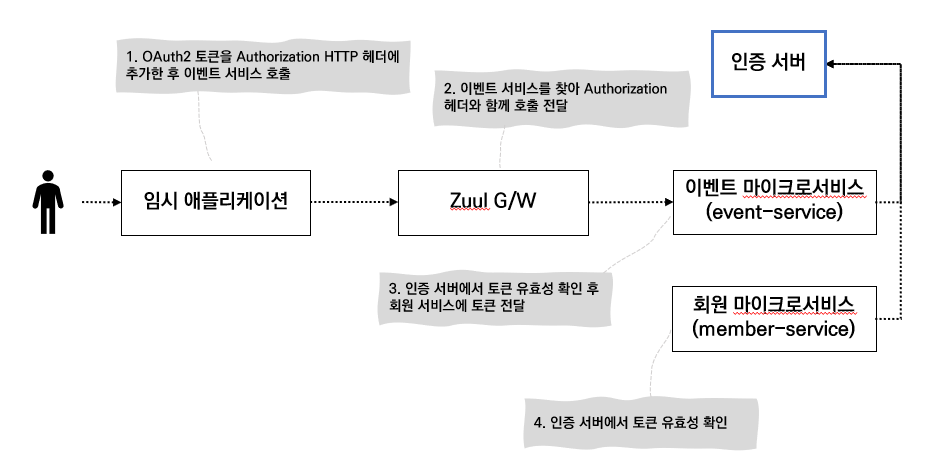
OAuth2 액세스 토큰은 사용자 세션에 저장되고, 이벤트 서비스를 호출할 때 HTTP Authorization 헤더에 OAuth2 액세스 토큰을 추가한다.
Zuul 은 유입되는 호출의 HTTP Authorization 헤더를 복사하여 회원 서비스의 엔드포인트로 전달한다.
이벤트 서비스는 보호 자원이기 때문에 OAuth2 서버에서 토큰의 유효성을 확인하고, 사용자의 권한을 확인한다.
회원 서비스는 호출을 받으면 HTTP Authorization 헤더에서 토큰을 가져와 토큰의 유효성을 검증한다.
우선 Zuul 이 OAuth2 토큰을 마이크로서비스에 전달하도록 수정해야 한다. 기본적으로 Zuul 은 Cookie, Set-Cookie, Authorization 과 같은 민감한 HTTP 헤더는 하위 서비스에 전달하지 않기 때문에 Zuul 에서 Authorization HTTP 헤더를 전파하게 하려면 application.yaml 에 아래 내용을 추가해야 한다.
아래 내용을 추가하지 않으면 Zuul 은 자동으로 세 가지 값 (Cookie, Set-Cookie, Authorization) 을 전달하지 않는다.
config-repo > zuulserver
zuul:
  sensitive-headers: Cookie,Set-Cookie    # Zuul 이 하위 서비스에 전파하지 않는 헤더 차단 목록 (디폴트는 Cookie, Set-Cookie, Authorization)
이제 이벤트 서비스가 OAuth2 자원 서비스가 되도록 구성한 후 인가 규칙을 설정해야 한다.
(바로 위에서 설정한 3. OAuth2 를 이용하여 회원 서비스 보호 를 그대로 이벤트 서비스에 적용하시면 됩니다.)
마지막으로 이벤트 서비스에서 회원 서비스를 호출할 때 HTTP Authorization 헤더가 회원 서비스에 주입되었는지 확인하도록 호출하는 방법을 수정해야 한다.
스프링 OAuth2 는 OAuth2 호출을 지원하는 새로운 RestTemplate 인 OAuth2RestTemplate 를 제공하는데, 이 OAuth2RestTemplate 를 사용하려면 다른 OAuth2 보호 서비스를 호출하는 서비스에 auto-wired 될 수 있도록 빈으로 노출해야 한다.
event-service > EventServiceApplication.java
@EnableEurekaClient
@SpringBootApplication
@EnableFeignClients
@EnableResourceServer       // 추가
public class EventServiceApplication {

    @Bean
    public OAuth2RestTemplate restTemplate(UserInfoRestTemplateFactory factory) {
        List interceptors = factory.getUserInfoRestTemplate().getInterceptors();

        if (interceptors == null) {
            factory.getUserInfoRestTemplate().setInterceptors(Collections.singletonList(new CustomContextInterceptor()));
        } else {
            interceptors.add(new CustomContextInterceptor());
            factory.getUserInfoRestTemplate().setInterceptors(interceptors);
        }
        return factory.getUserInfoRestTemplate();
    }

    public static void main(String[] args) {
        SpringApplication.run(EventServiceApplication.class, args);
    }
}
이제 빈으로 노출시켰으니 OAuth2RestTemplate Client 를 작성해보자.
event-service > security > MemberRestTemplate.java
@Component
public class MemberRestTemplateClient {

    private final OAuth2RestTemplate restTemplate;

    public MemberRestTemplateClient(OAuth2RestTemplate restTemplate) {
        this.restTemplate = restTemplate;
    }

    private static final Logger logger = LoggerFactory.getLogger(MemberRestTemplateClient.class);

    public String userInfo(String name) {
        logger.debug("===== In Member Service.userInfo: {}", CustomContext.getCorrelationId());

        ResponseEntity<String> restExchange =
                restTemplate.exchange(
                        //"http://" + customConfig.getServiceIdZuul() + URL_PREFIX + "userInfo/{name}",   // http://localhost:5555/api/mb/member/userInfo/rinda
                        "http://localhost:5555/api/mb/member/userInfo/{name}",   // http://localhost:5555/api/mb/member/userInfo/rinda
                        HttpMethod.GET,
                        null, String.class, name
                );

        return restExchange.getBody();
    }
}
Eureka Client 이니 서비스 ID 로 호출하고 싶은데 그건 아직 해결 전…
이제 회원 서비스와 이벤트 서비스에 테스트할 API 를 아래처럼 각각 만들어보자.
member-service > MemberController.java
/**
 * 이벤트 서비스에서 OAuth2 로 호출 테스트
 */
@GetMapping("userInfo/{name}")
public String userInfo(@PathVariable("name") String name) {
    return "[MEMBER] " + name;
}
event-service > EventController.java
private final MemberRestTemplateClient memberRestTemplateClient;

@GetMapping("userInfo/{name}")
public String userInfo(@PathVariable("name") String name) {
    return "[EVENT-MEMBER] " + memberRestTemplateClient.userInfo(name);
}
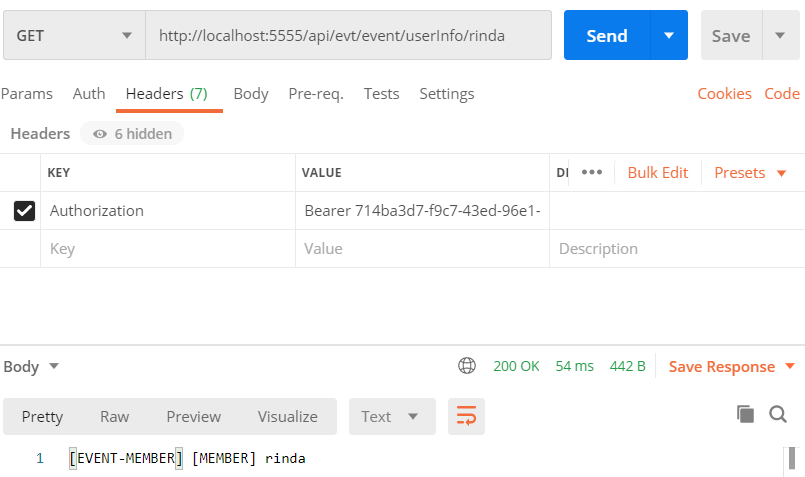
이제 http://localhost:5555/api/evt/event/userInfo/rinda 를 호출하여 이벤트 서비스에서 회원 서비스로 호출이 잘 되는지 확인해보자.
참고 사이트 & 함께 보면 좋은 사이트
- 스프링 마이크로서비스 코딩공작소
- SSO with OAuth2: Angular JS and Spring Security Part V
- Spring Security & OAuth 2.0 로그인
- SpringBoot 2.x 에서의 OAuth2
- SpringBoot 2.0 Migration Guide
- SpringBoot 2.x 에서 AuthenticationManage not @Autowired
- Default Password Encoder in Spring Security 5
- Spring Boot and OAuth2
- Spring Cloud Security
