AWS - VPC (2): Endpoint
in DEV on DevOps Aws Vpc-endpoint Gateway-endpoint Interface-endpoint Endpoint-service
이 포스트는 VPC Endpoint 에 대해 알아본다.
- 1. VPC Endpoint
- 2.
Gateway Endpoint와Interface Endpoint비교 테스트 - 3.
Endpoint Service로PrivateLink구성 테스트
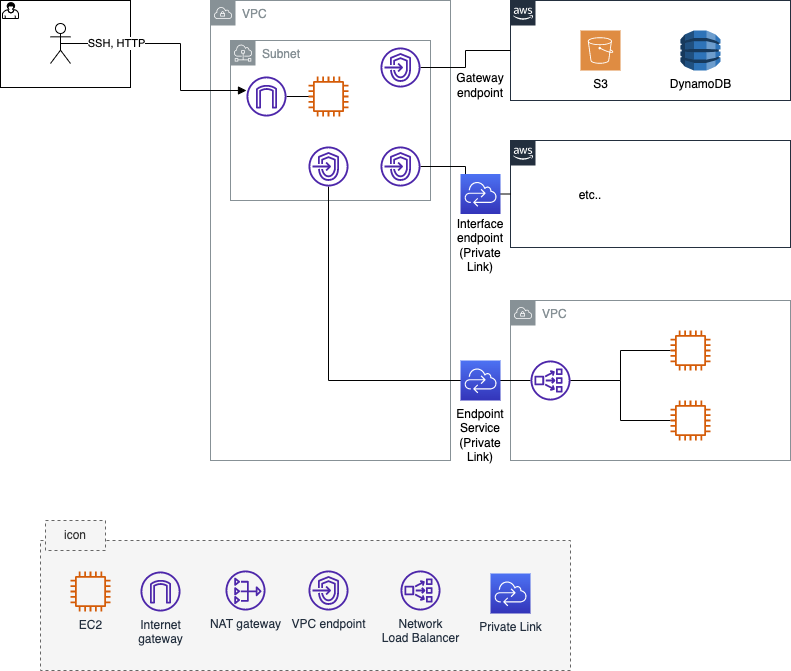
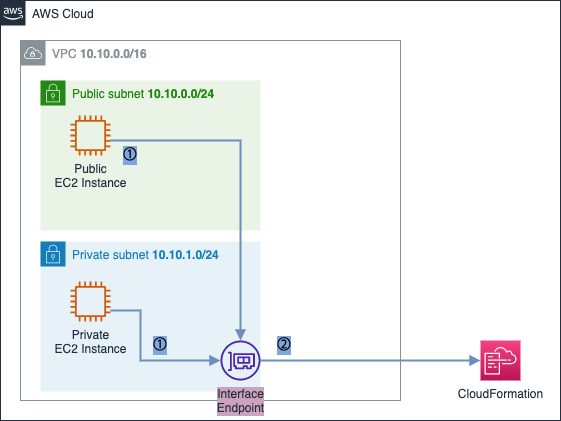
아래는 이번 포스트에서 다뤄볼 범위 도식화이다.
1. VPC Endpoint
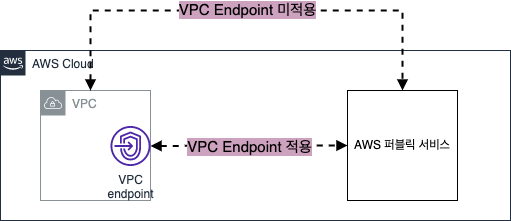
VPC Endpoint 는 AWS 퍼블릭 서비스나 직접 생성한 AWS 서비스에 대해 외부 인터넷 구간을 통한 접근이 아닌 직접 접근할 수 있는 프라이빗 액세스 기능이다.
VPC 에서 AWS 퍼블릭 서비스나 다른 VPC 로 통신할 때 일반적으로는 외부 인터넷 구간인 Public Network 를 통해 통신을 하는데 강력한 보안이 필요한 경우 격리된 Private Subnet 에 자원이 생성되어야 하고, 이 경우엔 Public Network 를 통한 통신이 불가함.
이 때, Private Subnet 에서도 AWS 퍼블릭 서비스와 Private Network 통신을 통해 안전한 통신을 제공하는 것이 VPC Endpoint 기능임.
VPC Endpoint e.g.)
S3 를 VPC 에서 접근할 때 IGW 나 NAT G/W 를 통해 외부 인터넷으로 접근하는 방식이 아닌 VPC Endpoint 기능을 통해 AWS 내부의 프라이빗 연결 가능
VPC Endpoint 를 사용한 경우 연결 대상 서비스는 동일 리전에 속한 서비스만 가능하여, VPC 하나에만 연결 가능하다. (=여러 개의 VPC 에 종속 불가)
또한, IAM 기능을 활용하여 VPC Endpoint 권한 여부가 가능하다.
VPC Endpoint 종류
VPC Endpoint 는 연결 대상 서비스에 따라 EndPoint 와 Endpoint Service 로 나뉜다.
- Endpoint: AWS 퍼블릭 서비스 대상에 대한 프라이빗 연결
Gateway Endpoint: AWS 퍼블릭 서비스 중 S3, DynamoDB 에 대한 연결Interface Endpoint: S3, DynamoDB 외 다수의 AWS 퍼블릭 서비스에 대한 연결
(AWS docs - 서비스 엔드포인트 대상 참고)
Endpoint Service: 사용자가 지정한 서비스 대상에 대한 프라이빗 연결
Interface Endpoint와Endpoint Service를 통한 연결을PrivateLink라고 함.
뒤의 3.Endpoint Service로PrivateLink구성 테스트 를 참고하세요.
2. Gateway Endpoint 와 Interface Endpoint 비교 테스트
Gateway Endpoint 와 Interface Endpoint 를 이용하여 AWS 퍼블릭 서비스에 대한 프라이빗 연결을 해본다.
- 기본 환경 구성
- CloudFormation 적용
- CloudFormation 을 통해 생성된 자원 확인
- 기본 통신 환경 검증
Gateway Endpoint생성/검증Interface Endpoint생성/검증- Resource 삭제
2.1. 기본 환경 구성
- CloudFormation 적용
- CloudFormation 을 통해 생성된 자원 확인
- 기본 통신 환경 검증
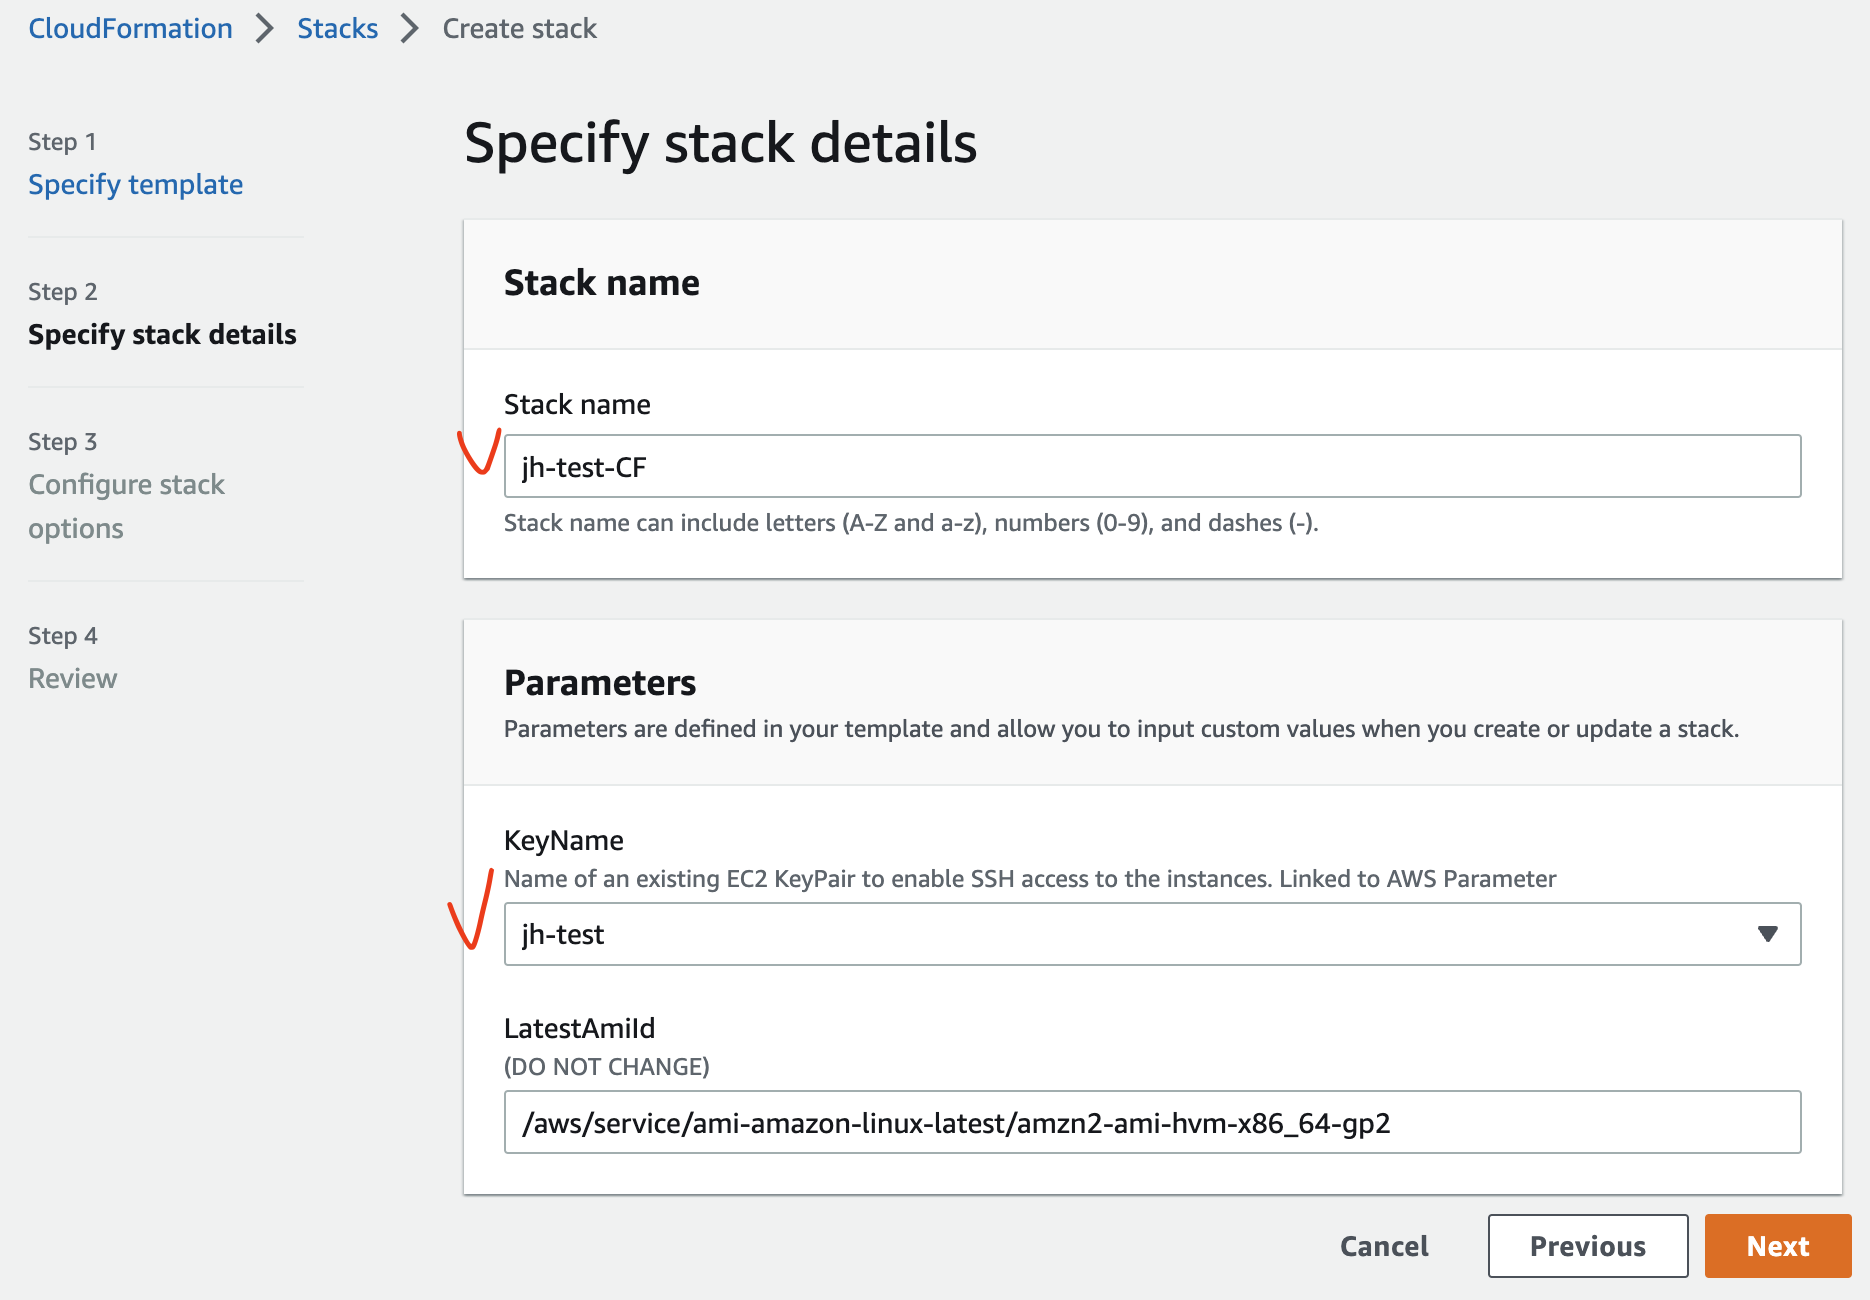
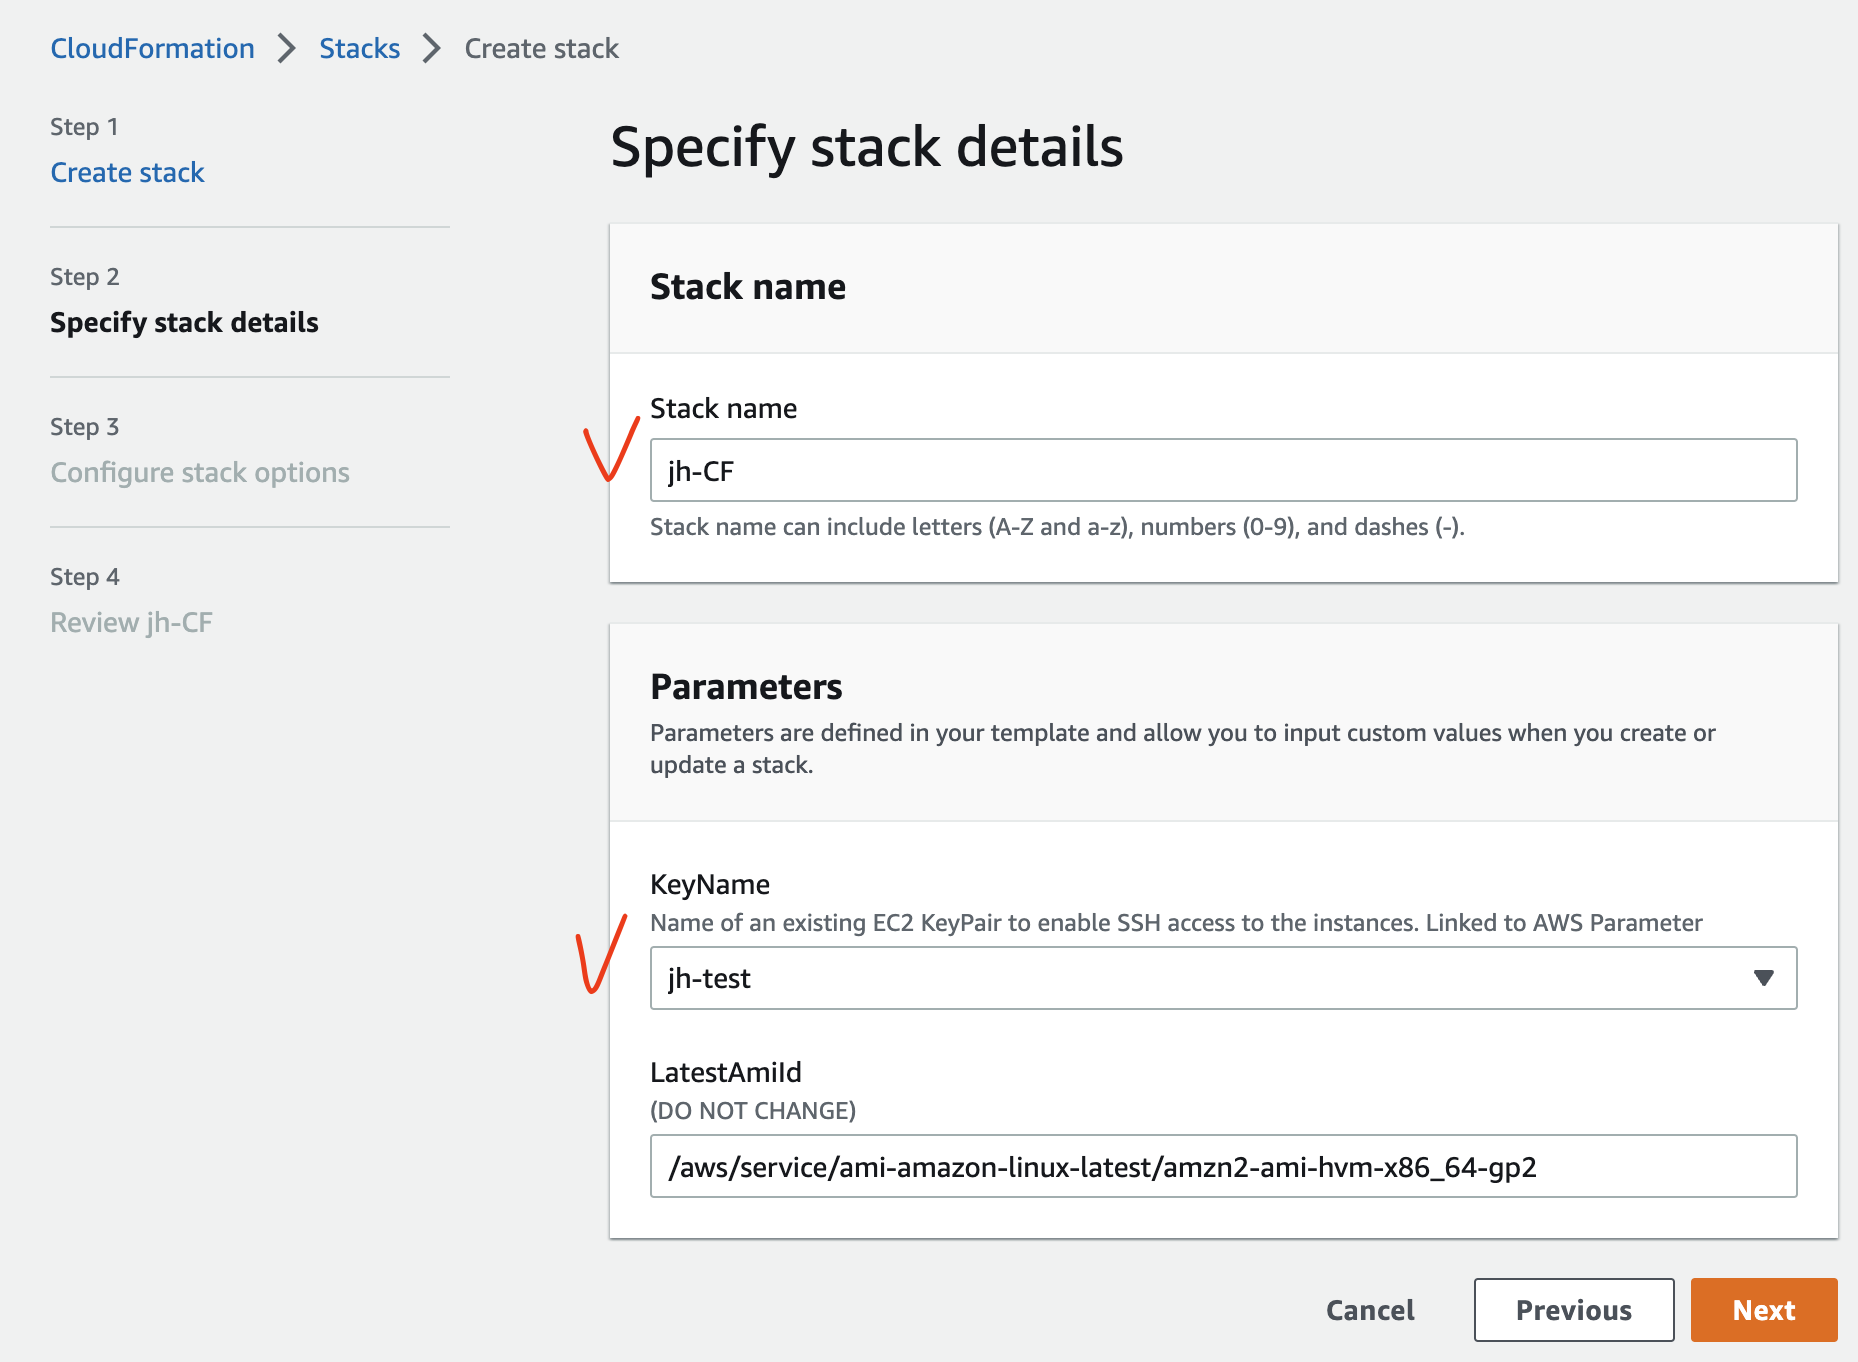
2.1.1. CloudFormation 적용
[CloudFormation] - [Stacks]
CloudFormation Template Download CloudFormation Template (펼쳐보기)
Parameters:
  KeyName:
    Description: Name of an existing EC2 KeyPair to enable SSH access to the instances. Linked to AWS Parameter
    Type: AWS::EC2::KeyPair::KeyName
    ConstraintDescription: must be the name of an existing EC2 KeyPair.
  LatestAmiId:
    Description: (DO NOT CHANGE)
    Type: 'AWS::SSM::Parameter::Value<AWS::EC2::Image::Id>'
    Default: '/aws/service/ami-amazon-linux-latest/amzn2-ami-hvm-x86_64-gp2'
    AllowedValues:
      - /aws/service/ami-amazon-linux-latest/amzn2-ami-hvm-x86_64-gp2

Resources:
  jhVPC:
    Type: AWS::EC2::VPC
    Properties:
      CidrBlock: 10.10.0.0/16
      Tags:
        - Key: Name
          Value: jh-test-VPC

  jhIGW:
    Type: AWS::EC2::InternetGateway
    Properties:
      Tags:
        - Key: Name
          Value: jh-test-IGW

  jhIGWAttachment:
    Type: AWS::EC2::VPCGatewayAttachment
    Properties:
      InternetGatewayId: !Ref jhIGW
      VpcId: !Ref jhVPC

  jhPublicRT:
    Type: AWS::EC2::RouteTable
    Properties:
      VpcId: !Ref jhVPC
      Tags:
        - Key: Name
          Value: jh-test-Public-RT

  DefaultPublicRoute:
    Type: AWS::EC2::Route
    DependsOn: jhIGWAttachment
    Properties:
      RouteTableId: !Ref jhPublicRT
      DestinationCidrBlock: 0.0.0.0/0
      GatewayId: !Ref jhIGW

  jhPrivateRT:
    Type: AWS::EC2::RouteTable
    Properties:
      VpcId: !Ref jhVPC
      Tags:
        - Key: Name
          Value: jh-test-Private-RT

  jhPublicSN:
    Type: AWS::EC2::Subnet
    Properties:
      VpcId: !Ref jhVPC
      AvailabilityZone: !Select [0, !GetAZs '']
      CidrBlock: 10.10.0.0/24
      Tags:
        - Key: Name
          Value: jh-test-Public-SN

  jhPrivateSN:
    Type: AWS::EC2::Subnet
    Properties:
      VpcId: !Ref jhVPC
      AvailabilityZone: !Select [2, !GetAZs '']
      CidrBlock: 10.10.1.0/24
      Tags:
        - Key: Name
          Value: jh-test-Private-SN

  jhPublicSNRouteTableAssociation:
    Type: AWS::EC2::SubnetRouteTableAssociation
    Properties:
      RouteTableId: !Ref jhPublicRT
      SubnetId: !Ref jhPublicSN

  jhPrivateSNRouteTableAssociation:
    Type: AWS::EC2::SubnetRouteTableAssociation
    Properties:
      RouteTableId: !Ref jhPrivateRT
      SubnetId: !Ref jhPrivateSN

  jhSecurityGroup:
    Type: AWS::EC2::SecurityGroup
    Properties:
      GroupDescription: Enable HTTP access via port 80 and SSH access via port 22
      VpcId: !Ref jhVPC
      SecurityGroupIngress:
        - IpProtocol: tcp
          FromPort: '80'
          ToPort: '80'
          CidrIp: 0.0.0.0/0
        - IpProtocol: tcp
          FromPort: '22'
          ToPort: '22'
          CidrIp: 0.0.0.0/0

  jhPublicEC2:
    Type: AWS::EC2::Instance
    Properties:
      InstanceType: t2.micro
      ImageId: !Ref LatestAmiId
      KeyName: !Ref KeyName
      Tags:
        - Key: Name
          Value: jh-test-Public-EC2
      NetworkInterfaces:
        - DeviceIndex: 0
          SubnetId: !Ref jhPublicSN
          GroupSet:
            - !Ref jhSecurityGroup
          AssociatePublicIpAddress: true

  jhPrivateEC2:
    Type: AWS::EC2::Instance
    Properties:
      InstanceType: t2.micro
      ImageId: !Ref LatestAmiId
      KeyName: !Ref KeyName
      Tags:
        - Key: Name
          Value: jh-test-Private-EC2
      NetworkInterfaces:
        - DeviceIndex: 0
          SubnetId: !Ref jhPrivateSN
          GroupSet:
            - !Ref jhSecurityGroup
      UserData:
        Fn::Base64: !Sub |
          #!/bin/bash
          (
          echo "qwe123"
          echo "qwe123"
          ) | passwd --stdin root
          sed -i "s/^PasswordAuthentication no/PasswordAuthentication yes/g" /etc/ssh/sshd_config
          sed -i "s/^#PermitRootLogin yes/PermitRootLogin yes/g" /etc/ssh/sshd_config
          service sshd restart
2.1.2. CloudFormation 을 통해 생성된 자원 확인
- VPC
- jh-test-VPC
- IP CIDR: 10.10.0.0/16
- jh-test-VPC
- Public Subnet
- jh-test-Public-SN
- IP CIDR: 10.10.0.0/24
- AZ: ap-northeast-2a
- jh-test-Public-SN
- Private Subnet
- jh-test-Private-SN
- IP CIDR: 10.10.1.0/24
- AZ: ap-northeast-2c
- jh-test-Private-SN
- Public Routing Table
- jh-test-Public-RT
- 연결: Public Subnet
- 0.0.0.0/0 → IGW
- jh-test-Public-RT
- Private Routing Table
- jh-test-Private-RT
- 연결: Private Subnet
- jh-test-Private-RT
- IGW
- jh-test-IGW
- 연결: jh-test-VPC
- jh-test-IGW
- Public EC2 Instance
- jh-test-Public-EC2
- 연결: Public Subnet
- Public IP 할당: 활성화
- jh-test-Public-EC2
- Private EC2 Instance
- jh-test-Private-EC2
- 연결: Private Subnet
- root / qwe123
- jh-test-Private-EC2
2.1.3. 기본 환경 통신 검증
Public EC2 → S3 접근 확인 (접근 가능)
$ ssh -i sandbox-jh.pem ec2-user@43.201.xx.xxx

# S3 의 DNS 주소로 접근 시도
[ec2-user@ip-10-10-0-xx ~] ping s3.ap-northeast-2.amazonaws.com

PING s3.ap-northeast-2.amazonaws.com (52.219.xx.xx) 56(84) bytes of data.
64 bytes from s3.ap-northeast-2.amazonaws.com (52.219.xx.xx): icmp_seq=1 ttl=57 time=0.235 ms
64 bytes from s3.ap-northeast-2.amazonaws.com (52.219.xx.xx): icmp_seq=2 ttl=57 time=0.280 ms
Public EC2 → Private EC2 → S3 접근 확인 (접근 불가)
$ ssh -i sandbox-jh.pem ec2-user@43.201.xx.xxx

[ec2-user@ip-10-10-0-xx ~]$ ssh root@10.10.1.xx  # Private EC2 로 접속

[root@ip-10-10-1-xx ~] ping s3.ap-northeast-2.amazonaws.com
PING s3.ap-northeast-2.amazonaws.com (52.219.xx.xx) 56(84) bytes of data.
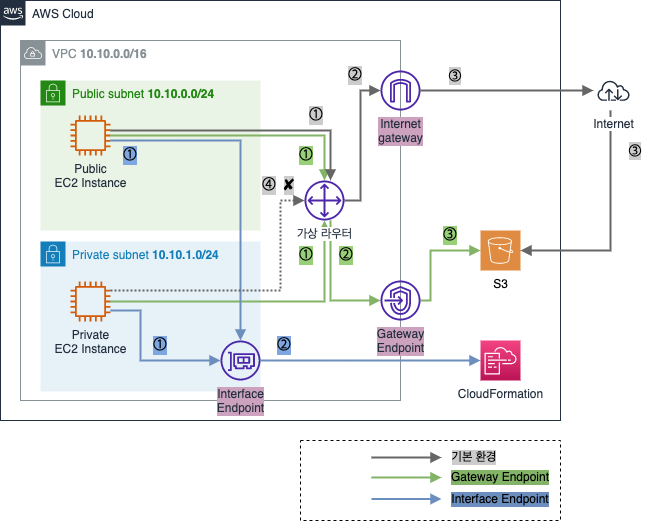
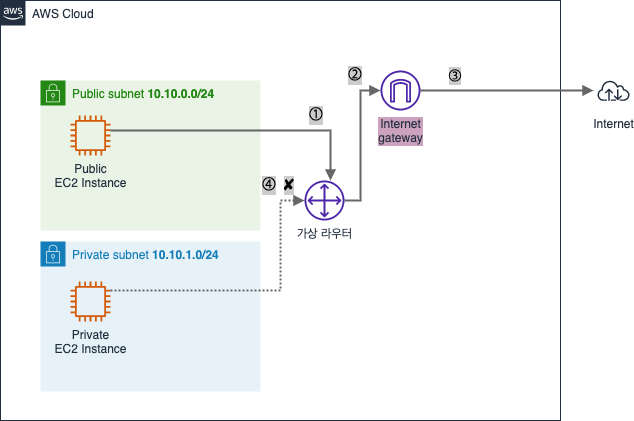
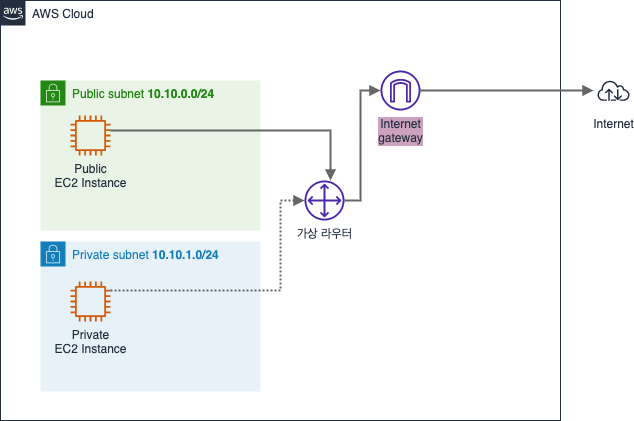
2.1.4. 기본 환경 통신 흐름
① Public Subnet 의 Public EC2 instance 가 S3 와 통신하기 위해 Public IP 를 사용하여 데이터를 가상 라우터로 보냄
② 가상 라우터는 Public Routing Table 을 참고하여 IGW 로 향하는 라우팅 경로 확인 후 전달
③ 가상 라우터는 IGW 로 데이터를 전달하고, 인터넷 구간으로 넘어가서 정상 통신 가능
④ Private EC2 Instance 가 S3 와 통신하기 위해 데이터를 가상 라우터로 전달하지만 Private Routing Table 에 경로가 없어 통신 불가
2.2. Gateway Endpoint 생성/검증
Gateway Endpoint생성Gateway Endpoint통신 검증Gateway Endpoint통신 흐름
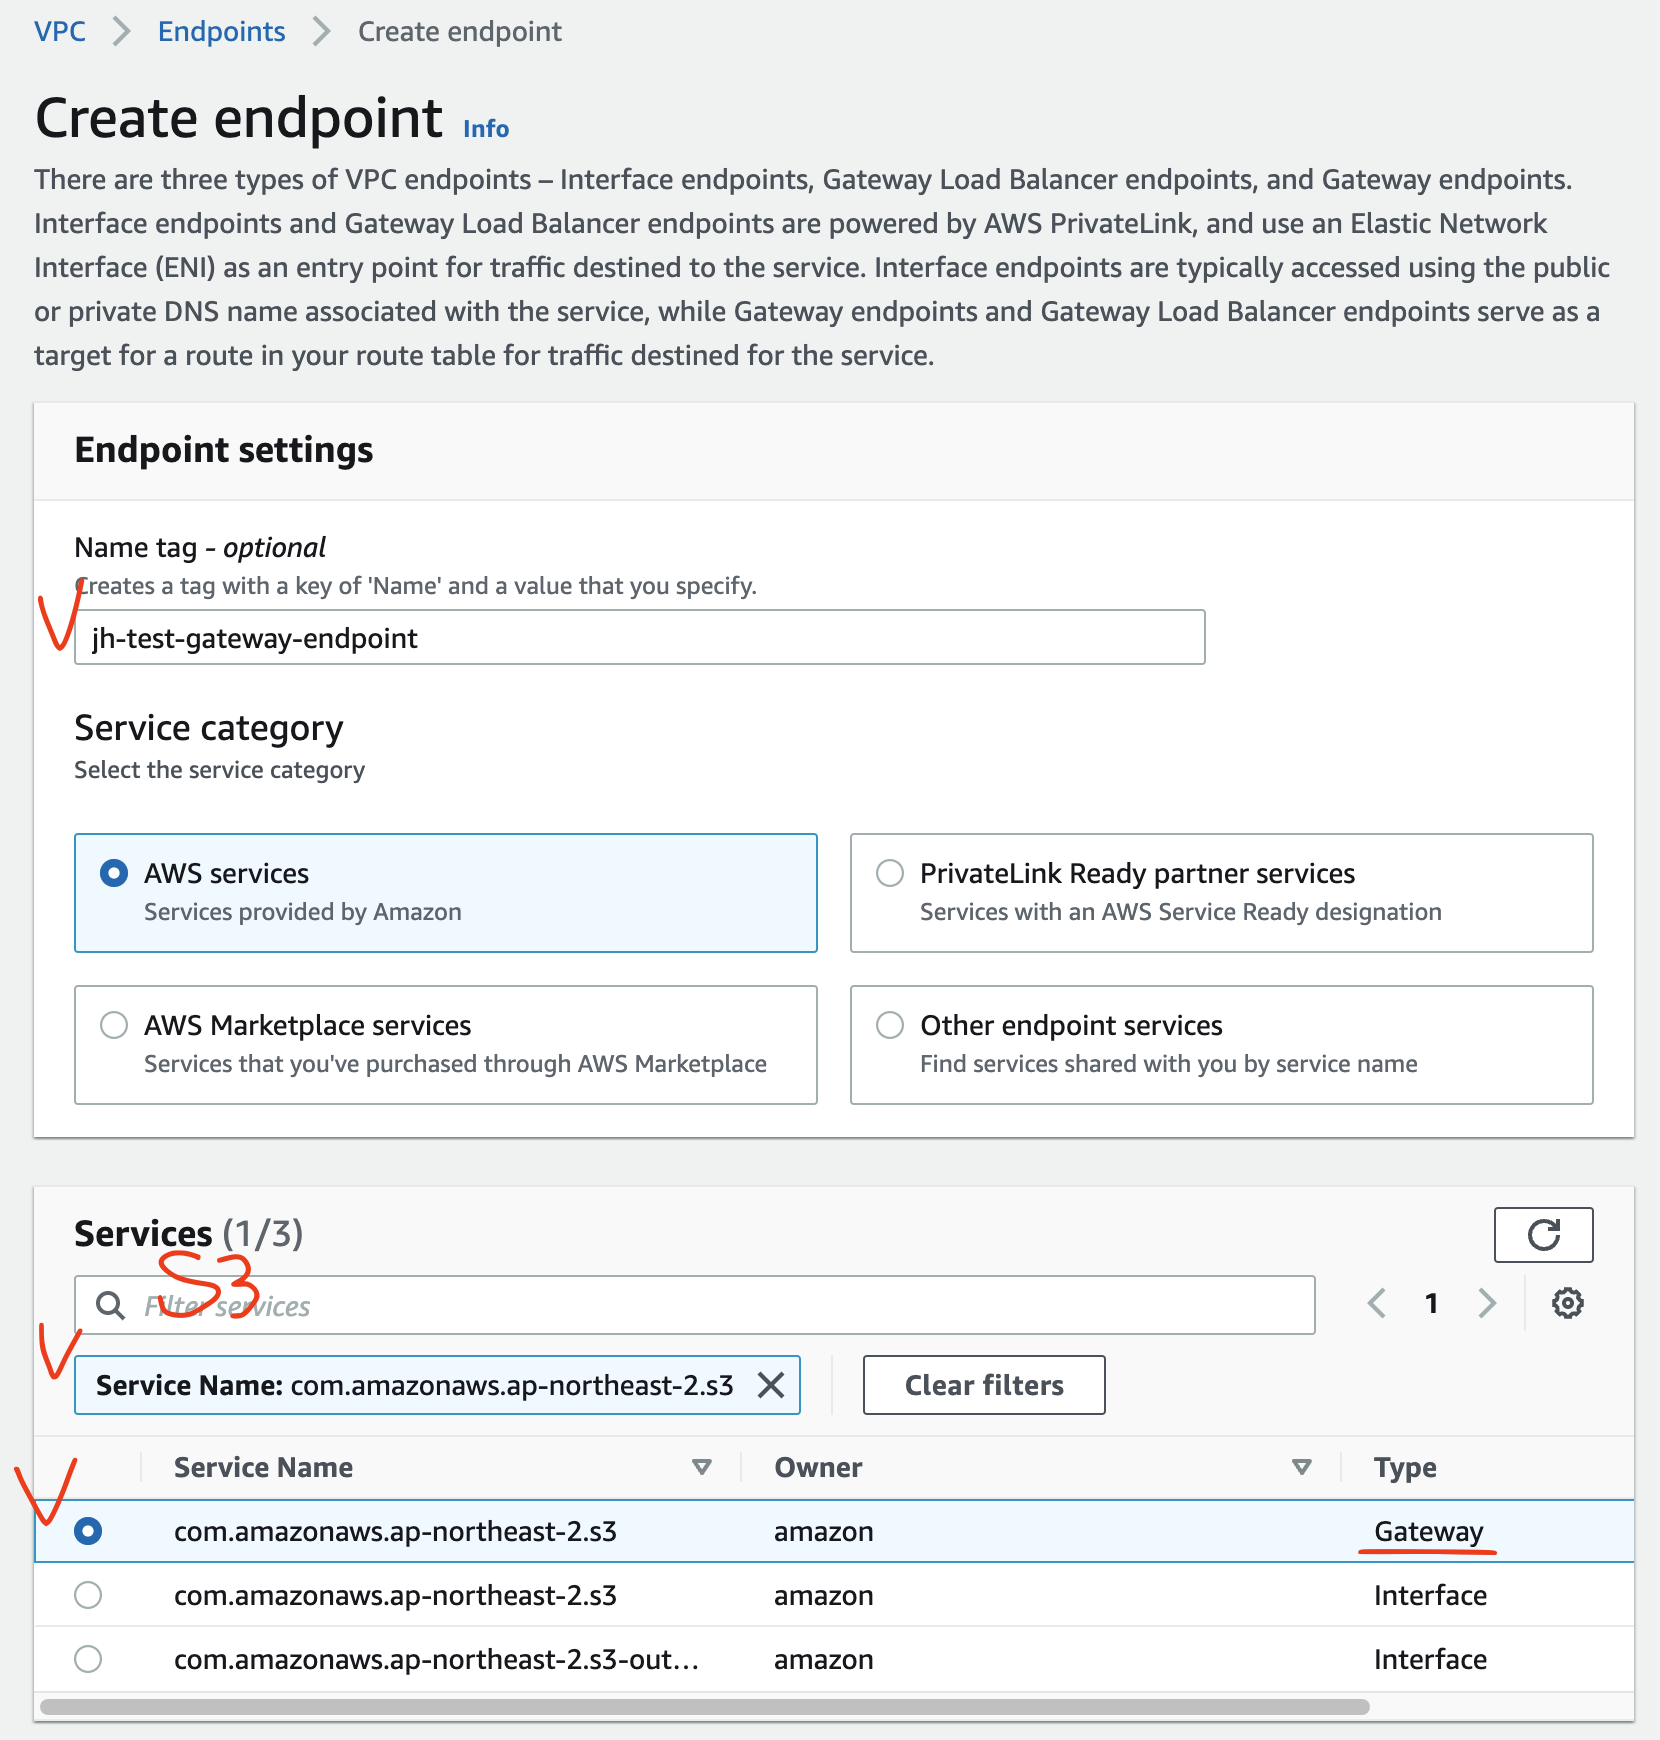
2.2.1. Gateway Endpoint 생성
[VPC] - [Endpoints]
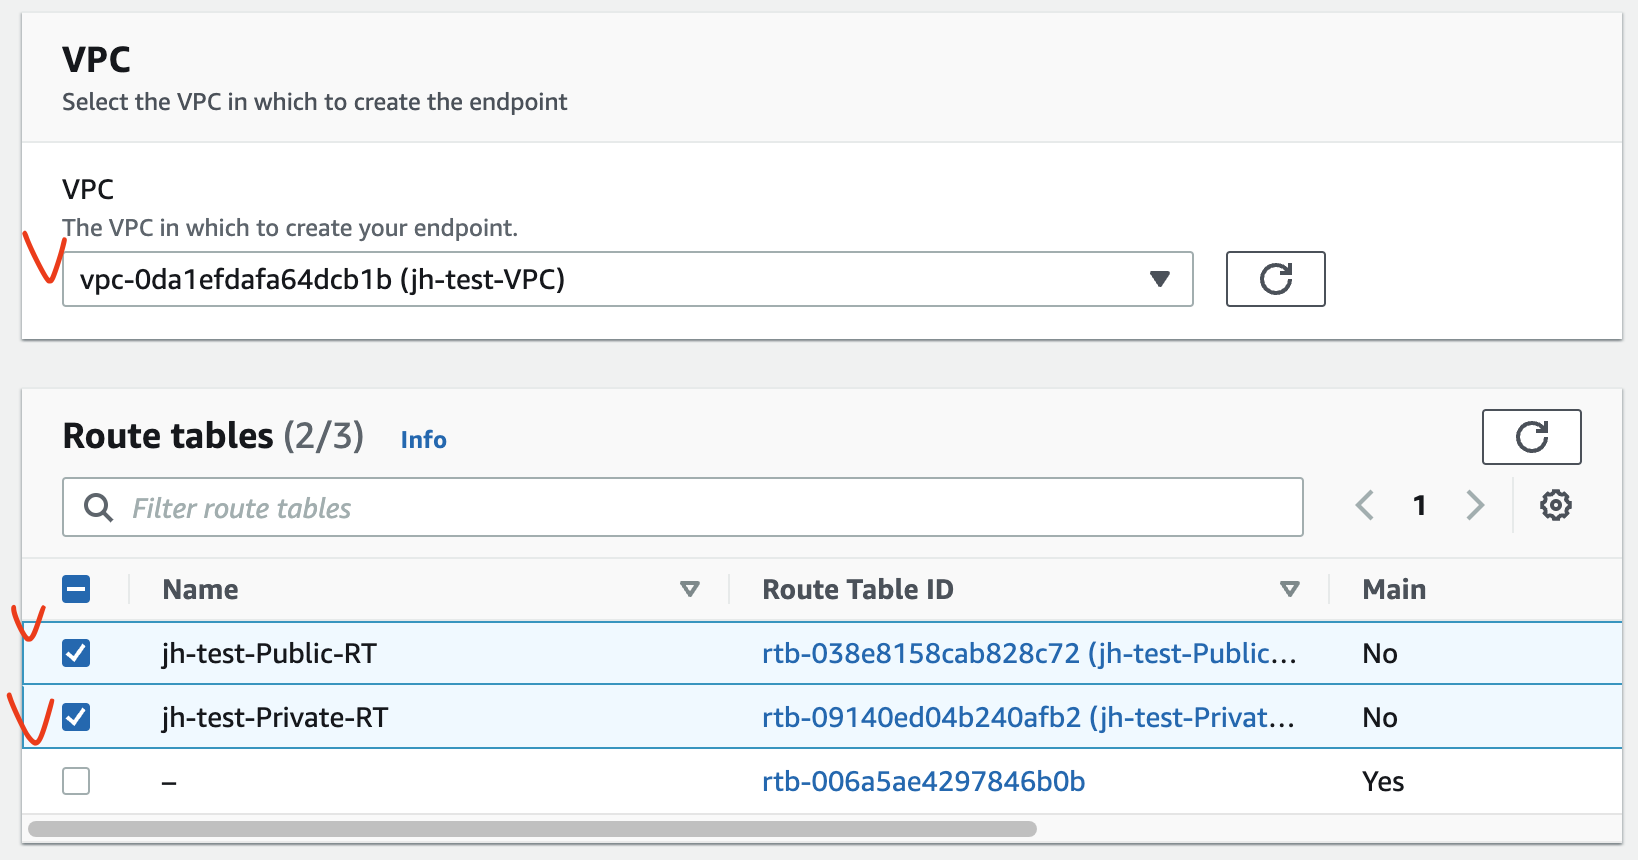
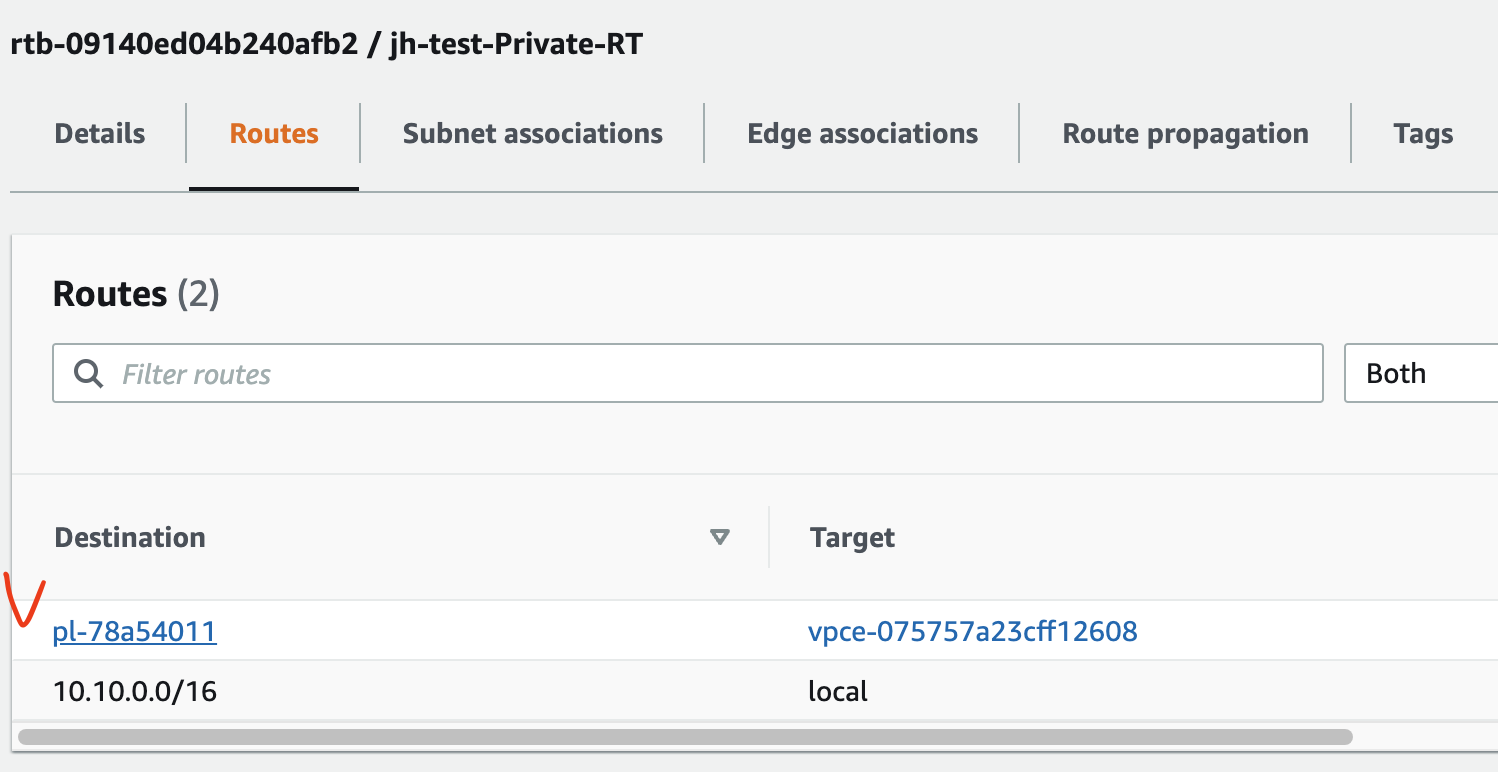
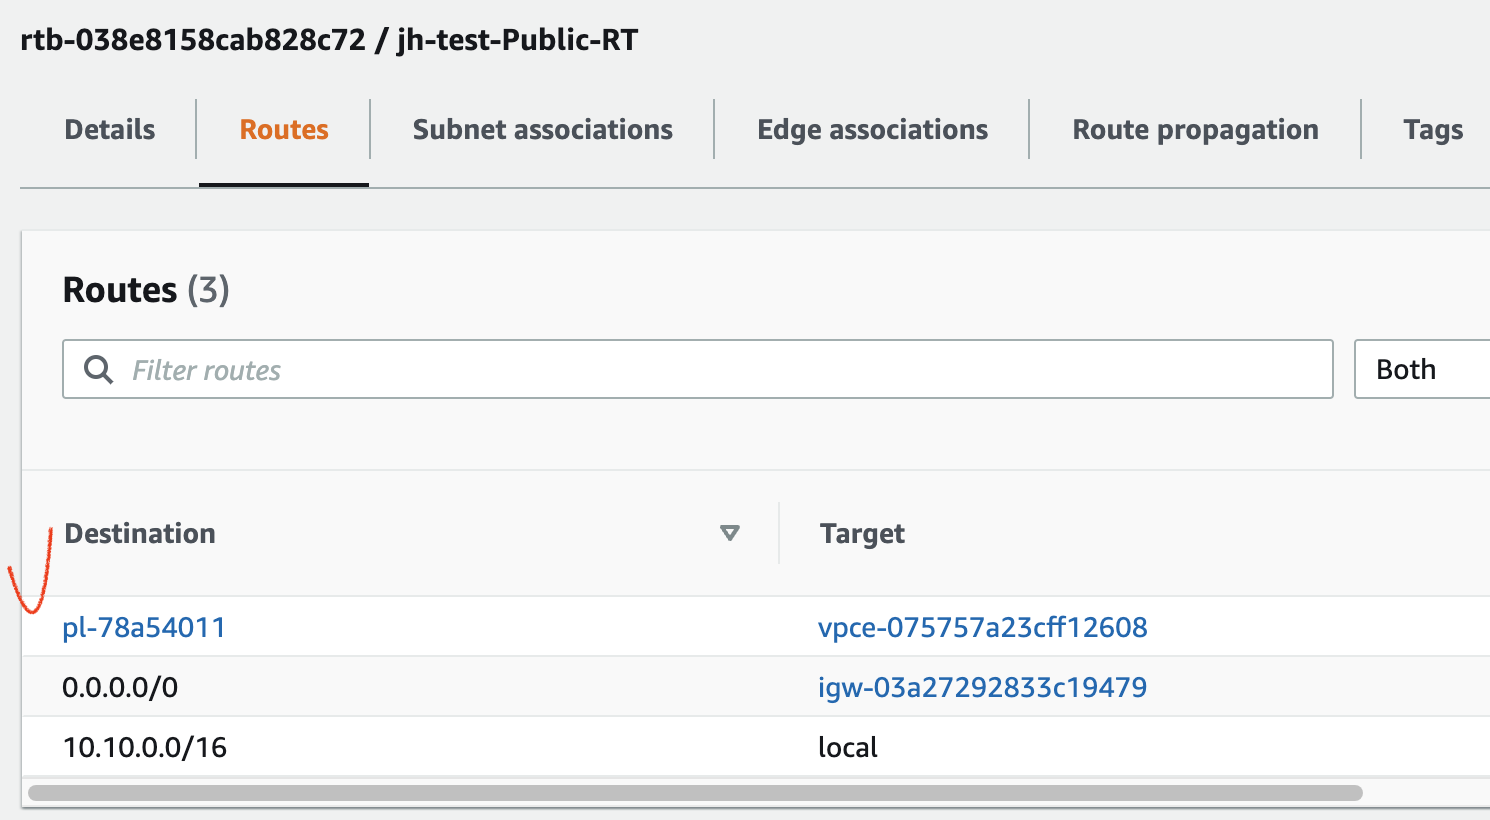
위 그림에서 Destination 의 pl~ 이 S3 이고, Target 의 vpce~ 가 Gateway Endpoint 이다.
2.2.2. Gateway Endpoint 통신 검증
S3 서비스 연결을 위한 VPC Gateway Endpoint 를 생성하였으니, EC2 Instance 에 접속하여 통신을 확인해보자.
Public EC2 → S3 접근 확인 (접근 가능)
$ ssh -i sandbox-jh.pem ec2-user@43.201.xx.xxx

# S3 의 DNS 주소로 접근 시도
[ec2-user@ip-10-10-0-xx ~] ping s3.ap-northeast-2.amazonaws.com

PING s3.ap-northeast-2.amazonaws.com (52.219.xx.xx) 56(84) bytes of data.
64 bytes from s3.ap-northeast-2.amazonaws.com (52.219.xx.xx): icmp_seq=1 ttl=57 time=0.235 ms
64 bytes from s3.ap-northeast-2.amazonaws.com (52.219.xx.xx): icmp_seq=2 ttl=57 time=0.280 ms
Public EC2 → Private EC2 → S3 접근 확인 (접근 가능)
$ ssh -i sandbox-jh.pem ec2-user@43.201.xx.xxx

[ec2-user@ip-10-10-0-xx ~]$ ssh root@10.10.1.xx  # Private EC2 로 접속

[root@ip-10-10-1-xx ~] ping s3.ap-northeast-2.amazonaws.com

PING s3.ap-northeast-2.amazonaws.com (52.219.xx.xx) 56(84) bytes of data.
64 bytes from s3.ap-northeast-2.amazonaws.com (52.219.xx.xx): icmp_seq=1 ttl=57 time=0.192 ms
64 bytes from s3.ap-northeast-2.amazonaws.com (52.219.xx.xx): icmp_seq=2 ttl=57 time=0.213 ms
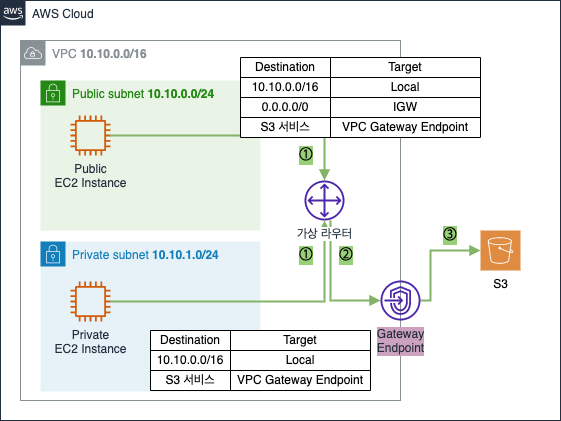
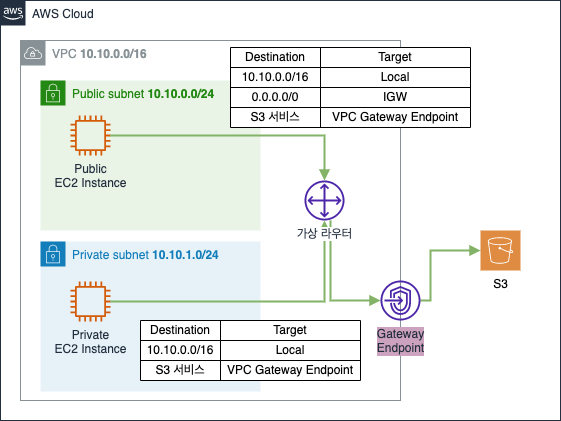
2.2.3. Gateway Endpoint 통신 흐름
① Public/Private Subnet 의 Public/Private EC2 instance 가 S3 와 통신하기 위해 데이터를 가상 라우터로 보냄
② 가상 라우터는 Public/Private Routing Table 을 참고하여 Gateway Endpoint 로 향하는 라우팅 경로 확인 후 전달
③ Gateway Endpoint 를 통해 S3 로 데이터가 전달되고, 정상 통신 가능
2.3. Interface Endpoint 생성/검증
Interface Endpoint생성Interface Endpoint통신 검증Interface Endpoint통신 흐름
이번엔 Interface Endpoint 통신을 확인하기 위해 통신 대상을 S3 가 아닌 CloudFormation 으로 변경하여 테스트해본다.
Interface Endpoint 생성 전 기본 환경에서 CloudFormation 으로의 매핑 정보를 먼저 확인한다.
Public EC2 → CloudFormation 매핑 정보 확인 (Public IP 대역)
$ ssh -i sandbox-jh.pem ec2-user@43.201.xx.xxx

# CloudFormation 의 DNS 호스트 주소 확인
[ec2-user@ip-10-10-0-xx ~] dig +short cloudformation.ap-northeast-2.amazonaws.com
52.95.xx.xx

[ec2-user@ip-10-10-0-xx ~]$ ping cloudformation.ap-northeast-2.amazonaws.com
PING cloudformation.ap-northeast-2.amazonaws.com (52.95.xx.xx) 56(84) bytes of data.
64 bytes from 52.95.xx.xx (52.95.xx.xx): icmp_seq=1 ttl=248 time=0.228 ms
64 bytes from 52.95.xx.xx (52.95.xx.xx): icmp_seq=2 ttl=248 time=0.293 ms
Public EC2 → Private EC2 → CloudFormation 매핑 정보 확인 (Public IP 대역)
$ ssh -i sandbox-jh.pem ec2-user@43.201.xx.xxx

[ec2-user@ip-10-10-0-xx ~]$ ssh root@10.10.1.xx  # Private EC2 로 접속

[root@ip-10-10-1-xx ~]# dig +short cloudformation.ap-northeast-2.amazonaws.com
52.95.193.155
[root@ip-10-10-1-xx ~]# ping cloudformation.ap-northeast-2.amazonaws.com
PING cloudformation.ap-northeast-2.amazonaws.com (52.95.xx.xx) 56(84) bytes of data.
dig명령어를 통해 CloudFormation DNS 주소에 대한 IP 주소 정보 확인 가능.
위의 아이피를 보면 현재 CloudFormation DNS 주소는 Public IP 로 되어있어 외부 인터넷 구간을 통하는 통신 환경임을 알 수 있음
위를 보면 Private EC2 에서는 CloudFormation 으로의 통신이 불가능한데 이는 VPC Endpoint 를 통해 해결할 수 있다.
(연결 대상 AWS S3 or DynamoDB 가 아니므로 Interface Endpoint 로 해결)
기본적으로 AWS 서비스는 리전별로 기본 DNS 호스트 주소를 갖고 있음.
여기에 VPCInterface Endpoint를 생성하면 Endpoint 전용 DNS 호스트가 생성됨.DNS A: 기본 DNS 호스트
DNS B: Endpoint 전용 DNS 호스트
Interface Endpoint 설정값 중 Private DNS Enable 설정 여부에 따라 DNS 주소의 통신 흐름이 아래와 같이 달라진다.
- Private DNS Disable
- 기본 DNS 호스트: 인터넷 구간을 통한 Public 통신
- Endpoint 전용 DNS 호스트:
Interface Endpoint를 통한 Private 통신
- Private DNS Enable
- 기본 DNS 호스트:
Interface Endpoint를 통한 Private 통신 - Endpoint 전용 DNS 호스트:
Interface Endpoint를 통한 Private 통신
- 기본 DNS 호스트:
이번 테스트에서는 Private DNS Enable 로 하여 모든 DNS 호스트가 Interface Endpoint 를 통해 Private 통신을 하도록 한다.
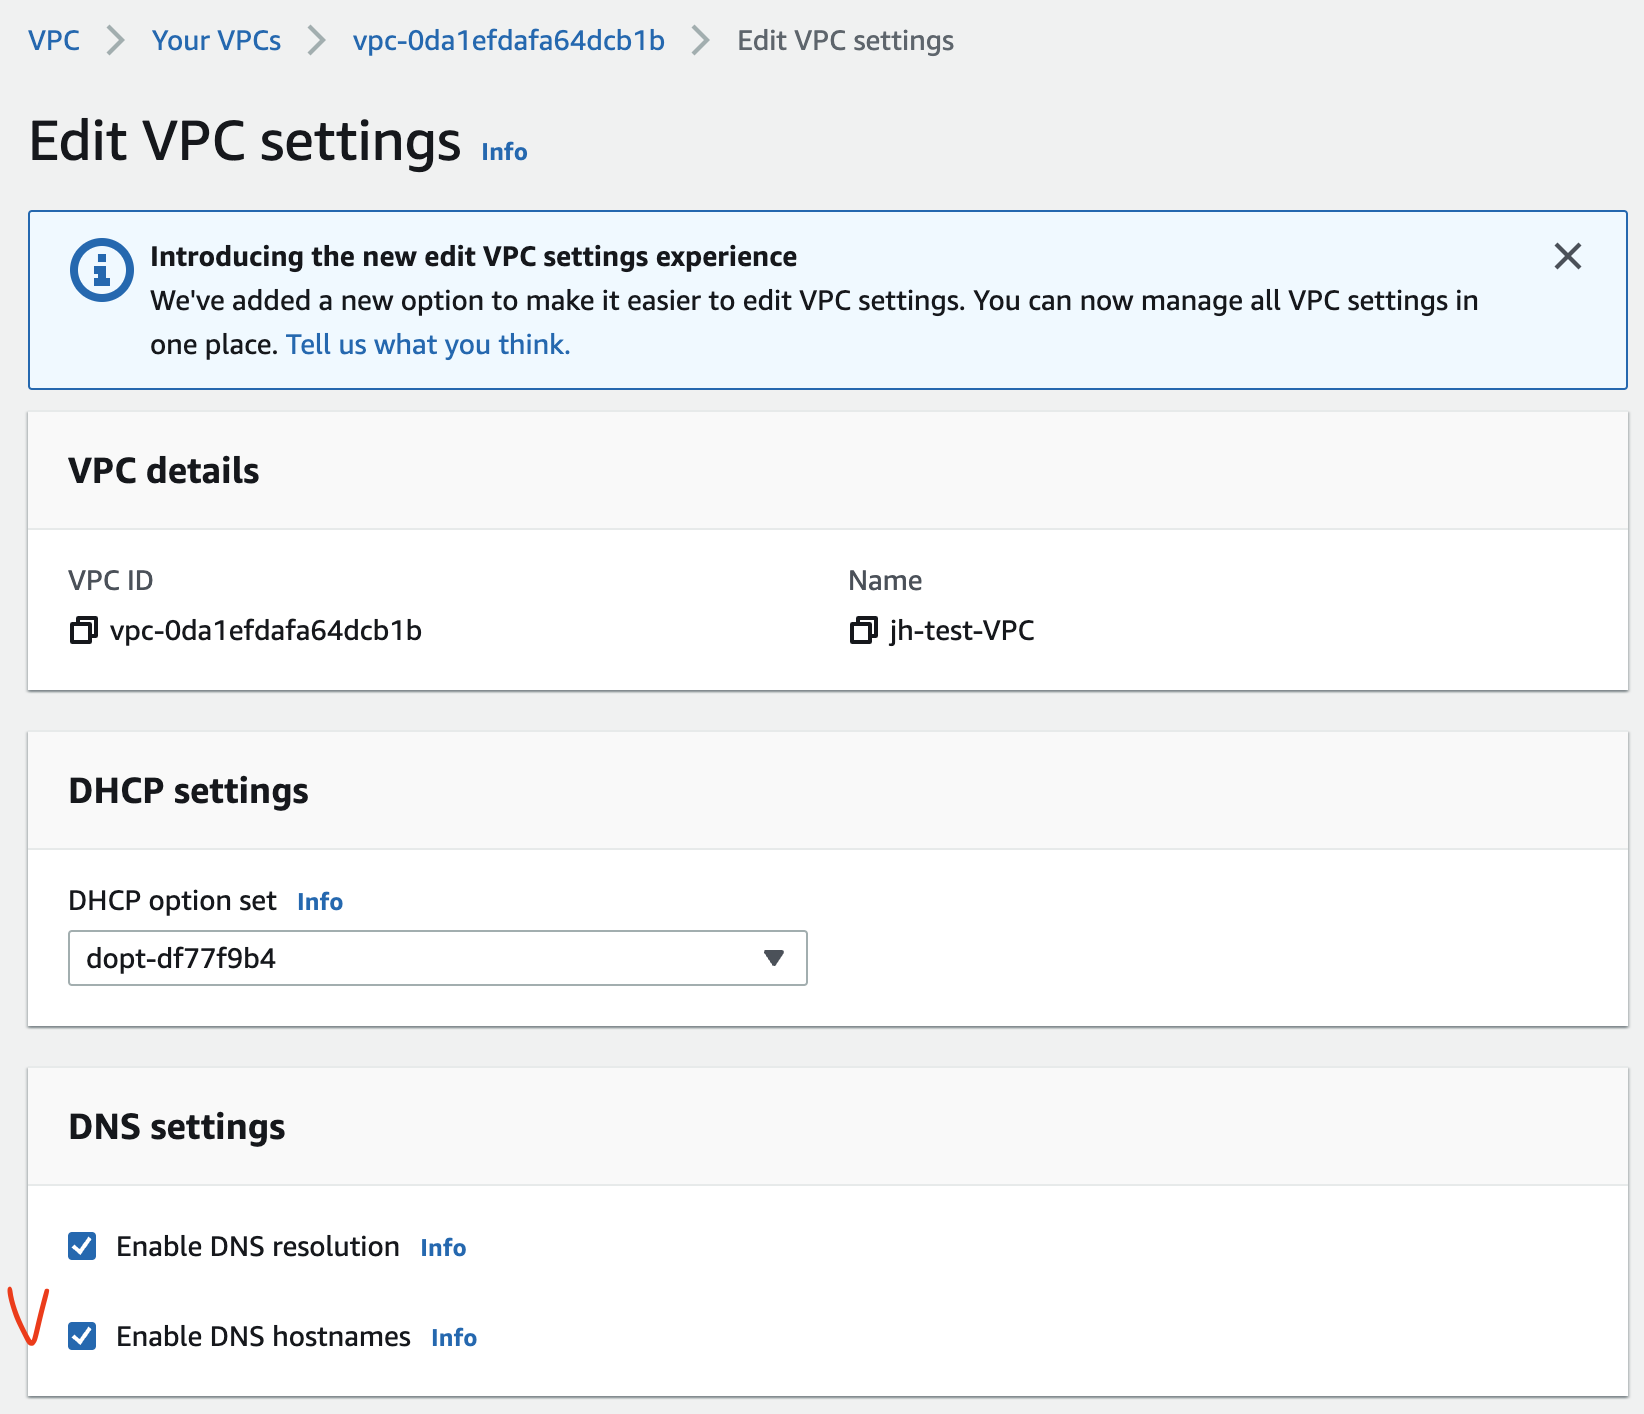
Interface Endpoint 에서 Private DNS Enable 을 하려면 생성했던 VPC 에서 Enable DNS hostnames 를 체크한다.
[VPC] - [Actions] - [Edit DNS hostnames] or [VPC] - [Actions] - [Edit VPC settings]
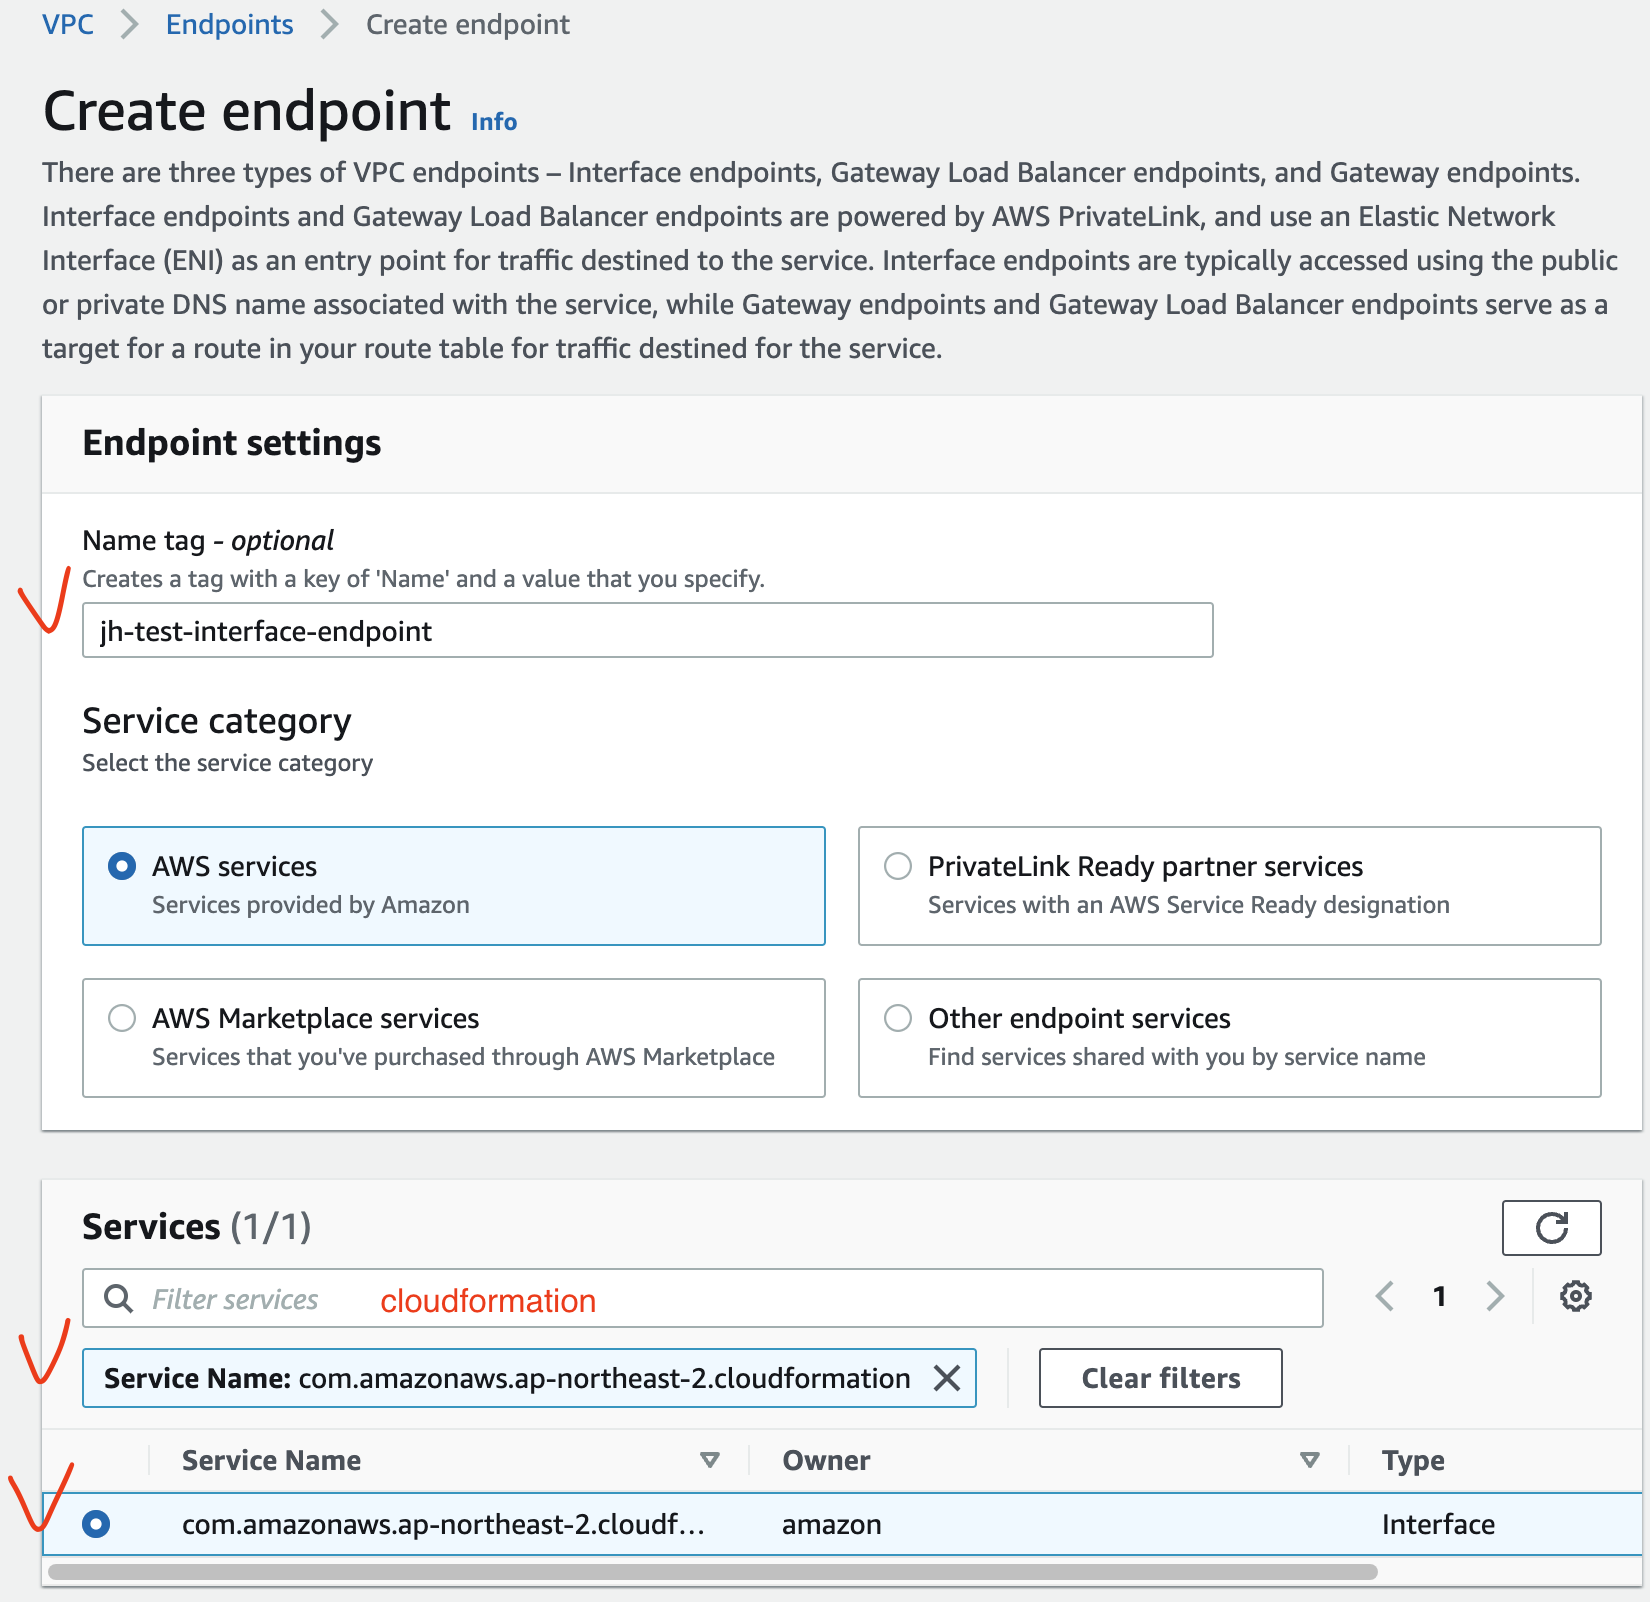
2.3.1. Interface Endpoint 생성
[VPC] - [Endpoints]


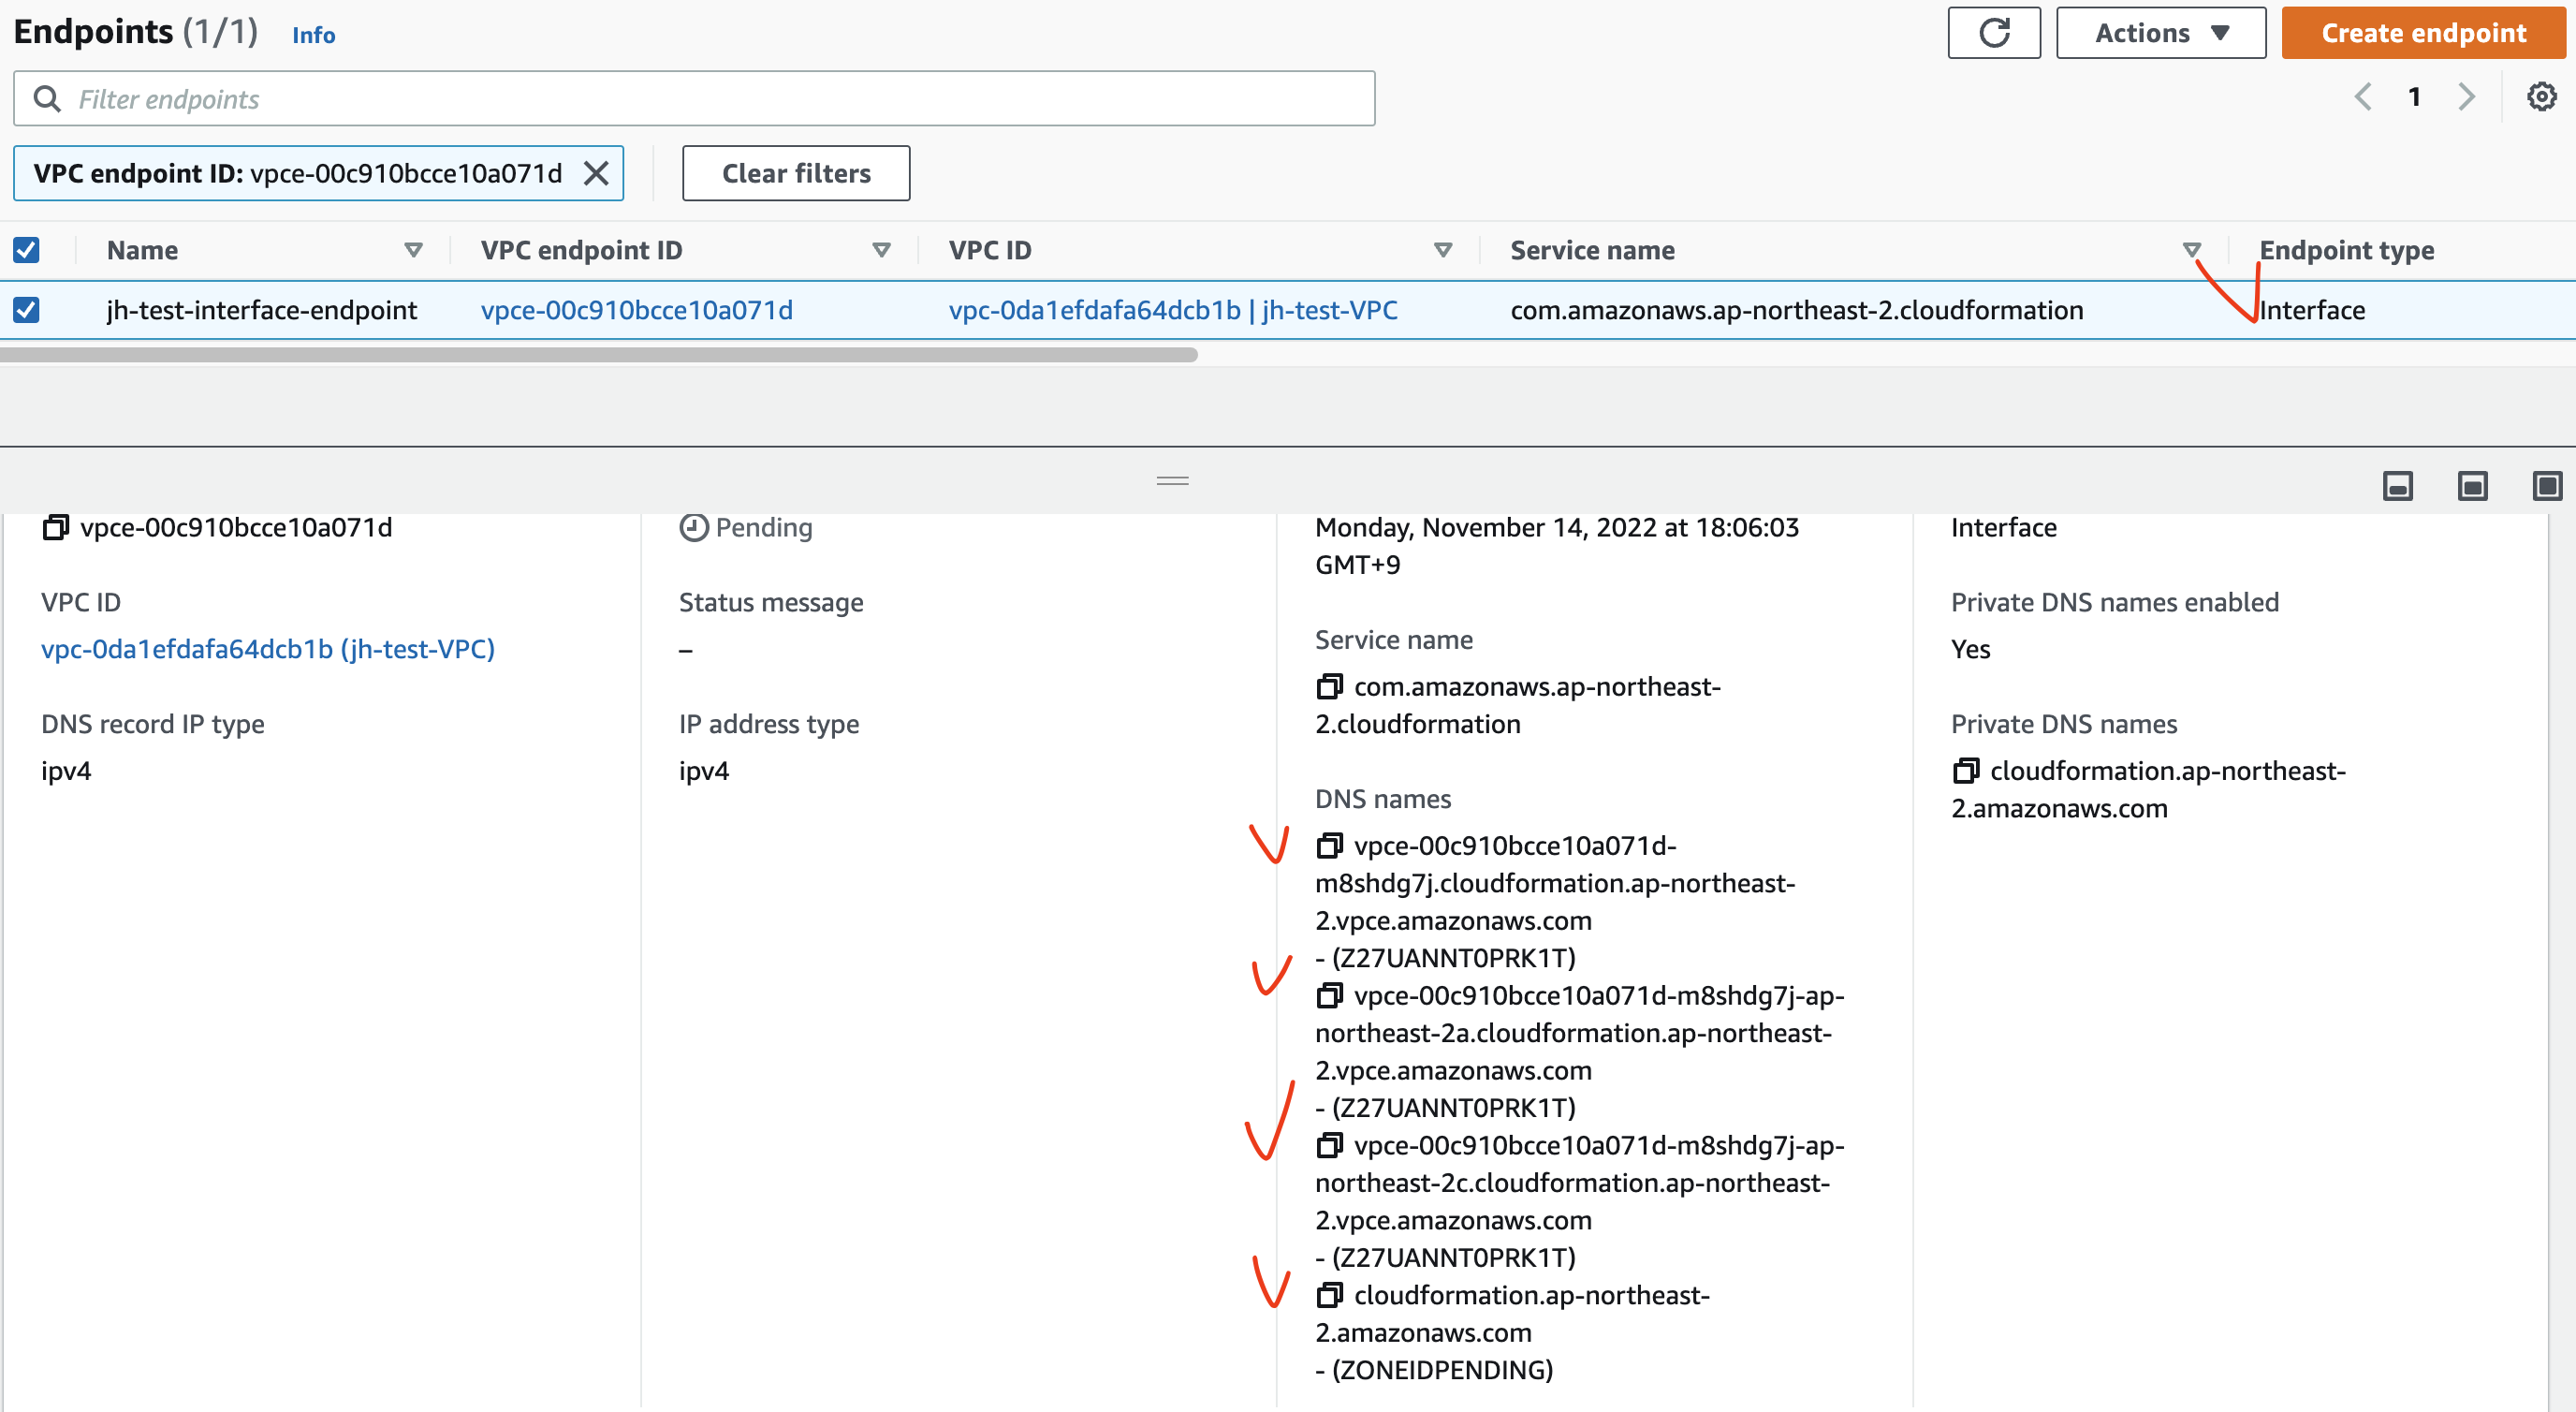
생성된 Interface Endpoint 의 Details 에서 DNS 호스트를 확인할 수 있다.
- 기본 DNS 호스트
- cloudformation.ap-northeast-2.amazonaws.com
- Endpoint 전용 DNS 호스트
- vpce-00c910bcce10a071d-m8shdg7j.cloudformation.ap-northeast-2.vpce.amazonaws.com
- vpce-00c910bcce10a071d-m8shdg7j-ap-northeast-2a.cloudformation.ap-northeast-2.vpce.amazonaws.com
- vpce-00c910bcce10a071d-m8shdg7j-ap-northeast-2c.cloudformation.ap-northeast-2.vpce.amazonaws.com
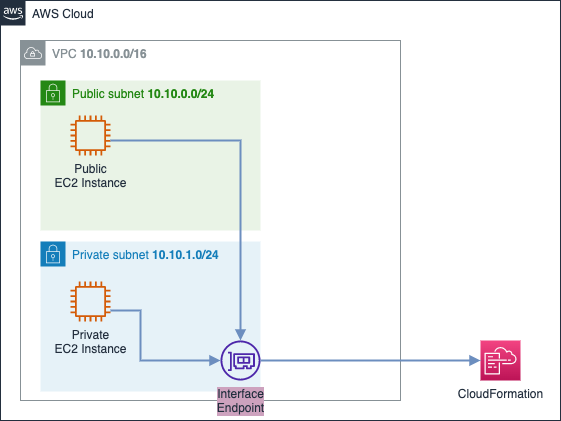
아래 그림처럼 Interface Endpoint 는 Private Subnet 에 배치되어 있다.
2.3.2. Interface Endpoint 통신 검증
CloudFormation 서비스 연결을 위한 VPC Interface Endpoint 를 생성하였으니, EC2 Instance 에 접속하여 CloudFormation 의 DNS 주소에 대한 매핑 정보 검증과 기본 환경과의 통신 흐름을 비교해보자.
<기본 환경>
Public EC2 → CloudFormation 매핑 정보 확인 (Public IP 대역)
$ ssh -i sandbox-jh.pem ec2-user@43.201.xx.xxx

# CloudFormation 의 DNS 호스트 주소 확인
[ec2-user@ip-10-10-0-xx ~] dig +short cloudformation.ap-northeast-2.amazonaws.com
52.95.xx.xx

[ec2-user@ip-10-10-0-xx ~]$ ping cloudformation.ap-northeast-2.amazonaws.com
PING cloudformation.ap-northeast-2.amazonaws.com (52.95.xx.xx) 56(84) bytes of data.
64 bytes from 52.95.xx.xx (52.95.xx.xx): icmp_seq=1 ttl=248 time=0.228 ms
64 bytes from 52.95.xx.xx (52.95.xx.xx): icmp_seq=2 ttl=248 time=0.293 ms
Public EC2 → Private EC2 → CloudFormation 매핑 정보 확인 (Public IP 대역)
$ ssh -i sandbox-jh.pem ec2-user@43.201.xx.xxx

[ec2-user@ip-10-10-0-xx ~]$ ssh root@10.10.1.xx  # Private EC2 로 접속

[root@ip-10-10-1-xx ~]# dig +short cloudformation.ap-northeast-2.amazonaws.com
52.95.193.155
[root@ip-10-10-1-xx ~]# ping cloudformation.ap-northeast-2.amazonaws.com
PING cloudformation.ap-northeast-2.amazonaws.com (52.95.xx.xx) 56(84) bytes of data.
<Interface Endpoint 환경>
Public EC2 → CloudFormation 매핑 정보 확인 (Private IP 대역)
$ ssh -i sandbox-jh.pem ec2-user@43.201.xx.xxx

# 기본 DNS 호스트
[ec2-user@ip-10-10-0-xx ~]$ dig +short cloudformation.ap-northeast-2.amazonaws.com
10.10.0.xx
10.10.1.xx

# Endpoint 전용 호스트
[ec2-user@ip-10-10-0-xx ~]$ dig +short vpce-00c910bcce10a071d-m8shdg7j.cloudformation.ap-northeast-2.vpce.amazonaws.com
10.10.0.xx
10.10.1.xx
[ec2-user@ip-10-10-0-xx ~]$ dig +short vpce-00c910bcce10a071d-m8shdg7j-ap-northeast-2a.cloudformation.ap-northeast-2.vpce.amazonaws.com
10.10.0.xx
[ec2-user@ip-10-10-0-xx ~]$ dig +short vpce-00c910bcce10a071d-m8shdg7j-ap-northeast-2c.cloudformation.ap-northeast-2.vpce.amazonaws.com
10.10.1.xx
Public EC2 → Private EC2 → CloudFormation 매핑 정보 확인 (Private IP 대역)
$ ssh -i sandbox-jh.pem ec2-user@43.201.xx.xxx

[ec2-user@ip-10-10-0-xx ~]$ ssh root@10.10.1.xx  # Private EC2 로 접속

# 기본 DNS 호스트
[root@ip-10-10-1-xx ~]# dig +short cloudformation.ap-northeast-2.amazonaws.com
10.10.1.xx
10.10.0.xx

# Endpoint 전용 호스트
[root@ip-10-10-1-xx ~]# dig +short vpce-00c910bcce10a071d-m8shdg7j.cloudformation.ap-northeast-2.vpce.amazonaws.com
10.10.1.xx
10.10.0.xx
[root@ip-10-10-1-xx ~]# dig +short vpce-00c910bcce10a071d-m8shdg7j-ap-northeast-2a.cloudformation.ap-northeast-2.vpce.amazonaws.com
10.10.0.xx
[root@ip-10-10-1-xx ~]# dig +short vpce-00c910bcce10a071d-m8shdg7j-ap-northeast-2c.cloudformation.ap-northeast-2.vpce.amazonaws.com
10.10.1.xx
기본 환경과는 다르게 CloudFormation 서비스의 DNS 주소가 10.10.0.xx, 10.10.1.xx Private IP 대역인 것을 확인할 수 있다.
(해당 IP 주소는 Interface Endpoint 주소)
2.3.3. Interface Endpoint 통신 흐름
① Public/Private Subnet 의 Public/Private EC2 instance 가 CloudFormation 와 통신하기 위해 데이터를 Interface Endpoint 로 보냄
② Interface Endpoint 를 통해 CloudFormation 으로 전달
만일 Interface Endpoint 생성 시 Private DNS hostname 을 비활성화하면 기본 DNS 호스트는 Public IP 로 Public 통신을 하고, Endpoint 전용 호스트는 Private IP 로 Private 통신을 한다.
# 기본 DNS 호스트
[ec2-user@ip-10-10-0-xx ~]$ dig +short cloudformation.ap-northeast-2.amazonaws.com
52.95.xx.xx

# Endpoint 전용 호스트
[ec2-user@ip-10-10-0-xx ~]$ dig +short vpce-0f9f5cd0599e97634-nofr99pf.cloudformation.ap-northeast-2.vpce.amazonaws.com
10.10.0.xx
10.10.1.xx
[ec2-user@ip-10-10-0-xx ~]$ dig +short vpce-0f9f5cd0599e97634-nofr99pf-ap-northeast-2a.cloudformation.ap-northeast-2.vpce.amazonaws.com
10.10.0.xx
[ec2-user@ip-10-10-0-xx ~]$ dig +short vpce-0f9f5cd0599e97634-nofr99pf-ap-northeast-2c.cloudformation.ap-northeast-2.vpce.amazonaws.com
10.10.1.xx
만일 기존에 Private DNS hostname 을 비활성화했던 Interface Endpoint 를 삭제하지 않은 채로 기본 DNS 호스트를 확인하면 아래와 같이 확인된다.
# 기본 DNS 호스트
[ec2-user@ip-10-10-0-xx ~]$ dig +short cloudformation.ap-northeast-2.amazonaws.com
10.10.0.xx
10.10.1.xx
2.4. Resource 삭제
아래의 순서대로 Resource 를 삭제한다.
- EndPoint 삭제 ([VPC] - [Endpoints] - [Actions] - [Delete VPC endpoints])
- CloudFormation Stack 삭제 ([CloudFormation] - [Stacks] - [Delete])
CloudFormation Stack 이 삭제되면 위의 2.1.2. CloudFormation 을 통해 생성된 자원 확인 의 자원이 모두 삭제되었는지 확인한다.
3. Endpoint Service 로 PrivateLink 구성 테스트
Endpoint Service 를 이용하여 사용자가 생성한 VPC 와 Private 연결을 확인해본다.
- 기본 환경 구성
- CloudFormation 적용
- CloudFormation 을 통해 생성된 자원 확인
- 기본 통신 환경 검증
Endpoint Service생성/연결Endpoint Service생성Interface Endpoint생성/연결 (PrivateLink생성)Endpoint Service검증
- Resource 삭제
3.1. 기본 환경 구성
- CloudFormation 적용
- CloudFormation 을 통해 생성된 자원 확인
- 기본 통신 환경 검증
3.1.1. CloudFormation 적용
[CloudFormation] - [Stacks]
CloudFormation Template Download
Parameters:
  KeyName:
    Description: Name of an existing EC2 KeyPair to enable SSH access to the instances. Linked to AWS Parameter
    Type: AWS::EC2::KeyPair::KeyName
    ConstraintDescription: must be the name of an existing EC2 KeyPair.
  LatestAmiId:
    Description: (DO NOT CHANGE)
    Type: 'AWS::SSM::Parameter::Value<AWS::EC2::Image::Id>'
    Default: '/aws/service/ami-amazon-linux-latest/amzn2-ami-hvm-x86_64-gp2'
    AllowedValues:
      - /aws/service/ami-amazon-linux-latest/amzn2-ami-hvm-x86_64-gp2

Resources:
  jhVPC:
    Type: AWS::EC2::VPC
    Properties:
      CidrBlock: 10.10.0.0/16
      Tags:
        - Key: Name
          Value: jhVPC

  jhCustomVPC:
    Type: AWS::EC2::VPC
    Properties:
      CidrBlock: 20.20.0.0/16
      Tags:
        - Key: Name
          Value: jhCustomVPC

  jhIGW:
    Type: AWS::EC2::InternetGateway
    Properties:
      Tags:
        - Key: Name
          Value: jh-IGW

  jhCustomIGW:
    Type: AWS::EC2::InternetGateway
    Properties:
      Tags:
        - Key: Name
          Value: jh-custom-IGW

  jhIGWAttachment:
    Type: AWS::EC2::VPCGatewayAttachment
    Properties:
      InternetGatewayId: !Ref jhIGW
      VpcId: !Ref jhVPC

  jhCustomIGWAttachment:
    Type: AWS::EC2::VPCGatewayAttachment
    Properties:
      InternetGatewayId: !Ref jhCustomIGW
      VpcId: !Ref jhCustomVPC

  jhPublicRT:
    Type: AWS::EC2::RouteTable
    Properties:
      VpcId: !Ref jhVPC
      Tags:
        - Key: Name
          Value: jh-Public-RT

  jhDefaultPublicRoute:
    Type: AWS::EC2::Route
    DependsOn: jhIGWAttachment
    Properties:
      RouteTableId: !Ref jhPublicRT
      DestinationCidrBlock: 0.0.0.0/0
      GatewayId: !Ref jhIGW

  jhCustomPublicRT:
    Type: AWS::EC2::RouteTable
    Properties:
      VpcId: !Ref jhCustomVPC
      Tags:
        - Key: Name
          Value: jh-Custom-Public-RT

  jhCustomDefaultPublicRoute:
    Type: AWS::EC2::Route
    DependsOn: jhCustomIGWAttachment
    Properties:
      RouteTableId: !Ref jhCustomPublicRT
      DestinationCidrBlock: 0.0.0.0/0
      GatewayId: !Ref jhCustomIGW

  jhPublicSN:
    Type: AWS::EC2::Subnet
    Properties:
      VpcId: !Ref jhVPC
      AvailabilityZone: !Select [0, !GetAZs '']
      CidrBlock: 10.10.0.0/24
      Tags:
        - Key: Name
          Value: jh-Public-SN

  jhCustomPublicSN:
    Type: AWS::EC2::Subnet
    Properties:
      VpcId: !Ref jhCustomVPC
      AvailabilityZone: !Select [0, !GetAZs '']
      CidrBlock: 20.20.0.0/24
      Tags:
        - Key: Name
          Value: jh-Custom-Public-SN

  jhPublicSNRouteTableAssociation:
    Type: AWS::EC2::SubnetRouteTableAssociation
    Properties:
      RouteTableId: !Ref jhPublicRT
      SubnetId: !Ref jhPublicSN

  jhCustomPublicSNRouteTableAssociation:
    Type: AWS::EC2::SubnetRouteTableAssociation
    Properties:
      RouteTableId: !Ref jhCustomPublicRT
      SubnetId: !Ref jhCustomPublicSN

  jhWebSG:
    Type: AWS::EC2::SecurityGroup
    Properties:
      GroupDescription: jhWebSG
      VpcId: !Ref jhVPC
      GroupName: jhWebSG
      Tags:
        - Key: Name
          Value: jhWebSG
      SecurityGroupIngress:
        - IpProtocol: tcp
          FromPort: '80'
          ToPort: '80'
          CidrIp: 0.0.0.0/0
        - IpProtocol: tcp
          FromPort: '22'
          ToPort: '22'
          CidrIp: 0.0.0.0/0

  jhCustomWebSG:
    Type: AWS::EC2::SecurityGroup
    Properties:
      GroupDescription: jhCustomSG
      VpcId: !Ref jhCustomVPC
      GroupName: jhCustomSG
      Tags:
        - Key: Name
          Value: jh-Custom-WebSG
      SecurityGroupIngress:
        - IpProtocol: tcp
          FromPort: '80'
          ToPort: '80'
          CidrIp: 0.0.0.0/0
        - IpProtocol: tcp
          FromPort: '22'
          ToPort: '22'
          CidrIp: 0.0.0.0/0

  jhEC2:
    Type: AWS::EC2::Instance
    Properties:
      InstanceType: t2.micro
      ImageId: !Ref LatestAmiId
      KeyName: !Ref KeyName
      Tags:
        - Key: Name
          Value: jh-EC2
      NetworkInterfaces:
        - DeviceIndex: 0
          SubnetId: !Ref jhPublicSN
          GroupSet:
            - !Ref jhWebSG
          AssociatePublicIpAddress: true

  jhCustomWeb1EC2:
    Type: AWS::EC2::Instance
    Properties:
      InstanceType: t2.micro
      ImageId: !Ref LatestAmiId
      KeyName: !Ref KeyName
      Tags:
        - Key: Name
          Value: jh-Custom-WEB-1
      NetworkInterfaces:
        - DeviceIndex: 0
          SubnetId: !Ref jhCustomPublicSN
          GroupSet:
            - !Ref jhCustomWebSG
          AssociatePublicIpAddress: true
      UserData:
        Fn::Base64: !Sub |
          #!/bin/bash
          (
          echo "qwe123"
          echo "qwe123"
          ) | passwd --stdin root
          sed -i "s/^PasswordAuthentication no/PasswordAuthentication yes/g" /etc/ssh/sshd_config
          sed -i "s/^#PermitRootLogin yes/PermitRootLogin yes/g" /etc/ssh/sshd_config
          service sshd restart
          yum install -y httpd
          systemctl start httpd && systemctl enable httpd
          echo "<html><h1>Endpoint Service Lab - CloudNeta Web Server 1</h1></html>" > /var/www/html/index.html

  jhCustomWeb2EC2:
    Type: AWS::EC2::Instance
    Properties:
      InstanceType: t2.micro
      ImageId: !Ref LatestAmiId
      KeyName: !Ref KeyName
      Tags:
        - Key: Name
          Value: jh-Custom-WEB-2
      NetworkInterfaces:
        - DeviceIndex: 0
          SubnetId: !Ref jhCustomPublicSN
          GroupSet:
            - !Ref jhCustomWebSG
          AssociatePublicIpAddress: true
      UserData:
        Fn::Base64: !Sub |
          #!/bin/bash
          (
          echo "qwe123"
          echo "qwe123"
          ) | passwd --stdin root
          sed -i "s/^PasswordAuthentication no/PasswordAuthentication yes/g" /etc/ssh/sshd_config
          sed -i "s/^#PermitRootLogin yes/PermitRootLogin yes/g" /etc/ssh/sshd_config
          service sshd restart
          yum install -y httpd
          systemctl start httpd && systemctl enable httpd
          echo "<html><h1>Endpoint Service Lab - CloudNeta Web Server 2</h1></html>" > /var/www/html/index.html

  jhCustomNLBTG:
    Type: AWS::ElasticLoadBalancingV2::TargetGroup
    Properties:
      Name: jh-Custom-NLB-TG
      Port: 80
      Protocol: TCP
      VpcId: !Ref jhCustomVPC
      Targets:
        - Id: !Ref jhCustomWeb1EC2
          Port: 80
        - Id: !Ref jhCustomWeb2EC2
          Port: 80

  jhCustomNLB:
    Type: AWS::ElasticLoadBalancingV2::LoadBalancer
    Properties:
      Type: network
      Scheme: internet-facing
      Subnets:
        - !Ref jhCustomPublicSN
      Tags:
        - Key: Name
          Value: jh-Custom-NLB

  jhNLBListener:
    Type: AWS::ElasticLoadBalancingV2::Listener
    Properties:
      DefaultActions:
        - Type: forward
          TargetGroupArn: !Ref jhCustomNLBTG
      LoadBalancerArn: !Ref jhCustomNLB
      Port: 80
      Protocol: TCP
key pair 생성은 AWS - Infra 의 3. 사전 준비 를 참고하세요.
3.1.2. CloudFormation 을 통해 생성된 자원 확인
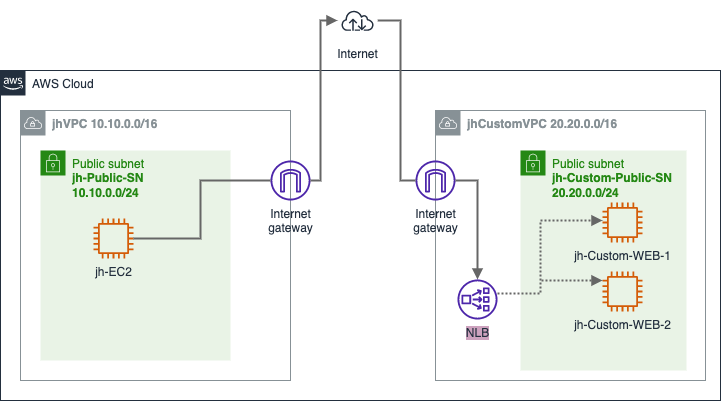
- VPC
- jhVPC
- IP CIDR: 10.10.0.0/16
- jhCustomVPC
- IP CIDR: 20.20.0.0/16
- jhVPC
- Public Subnet
- jh-Public-SN
- IP CIDR: 10.10.0.0/24
- AZ: ap-northeast-2a
- jh-Custom-Public-SN
- IP CIDR: 20.20.0.0/24
- AZ: ap-northeast-2a
- jh-Public-SN
- Public Routing Table
- jh-Public-RT
- 연결: jh-Public-SN
- jh-Custom-Public-RT
- 연결: jh-Custom-Public-SN
- jh-Public-RT
- IGW
- jh-IGW
- 연결: jhVPC
- jh-custom-IGW
- 연결: jhCustomVPC
- jh-IGW
- Public EC2 Instance
- jh-EC2
- 연결: jh-Public-SN
- Public IP 할당: 활성화
- jh-Custom-WEB-1
- 연결: jh-Custom-Public-SN
- Public IP 할당: 활성화
- jh-Custom-WEB-2
- 연결: jh-Custom-Public-SN
- Public IP 할당: 활성화
- jh-EC2
- Network Load Balancer
- jh-Custom-NLB
- 타겟 그룹: jh-Custom-WEB-1, jh-Custom-WEB-2
- jh-Custom-NLB
NLB 에 대한 내용은 AWS - Load Balancing (1): ELB 을 참고하세요.
3.1.3. 기본 통신 환경 검증
jhVPC 내의 jh-EC2 에서 jhCustomVPC 에 있는 웹 서버 인스턴스로 통신을 확인해본다.
NLB 에 연결된 EC2 의 상태가 healthy 인지 확인한다. 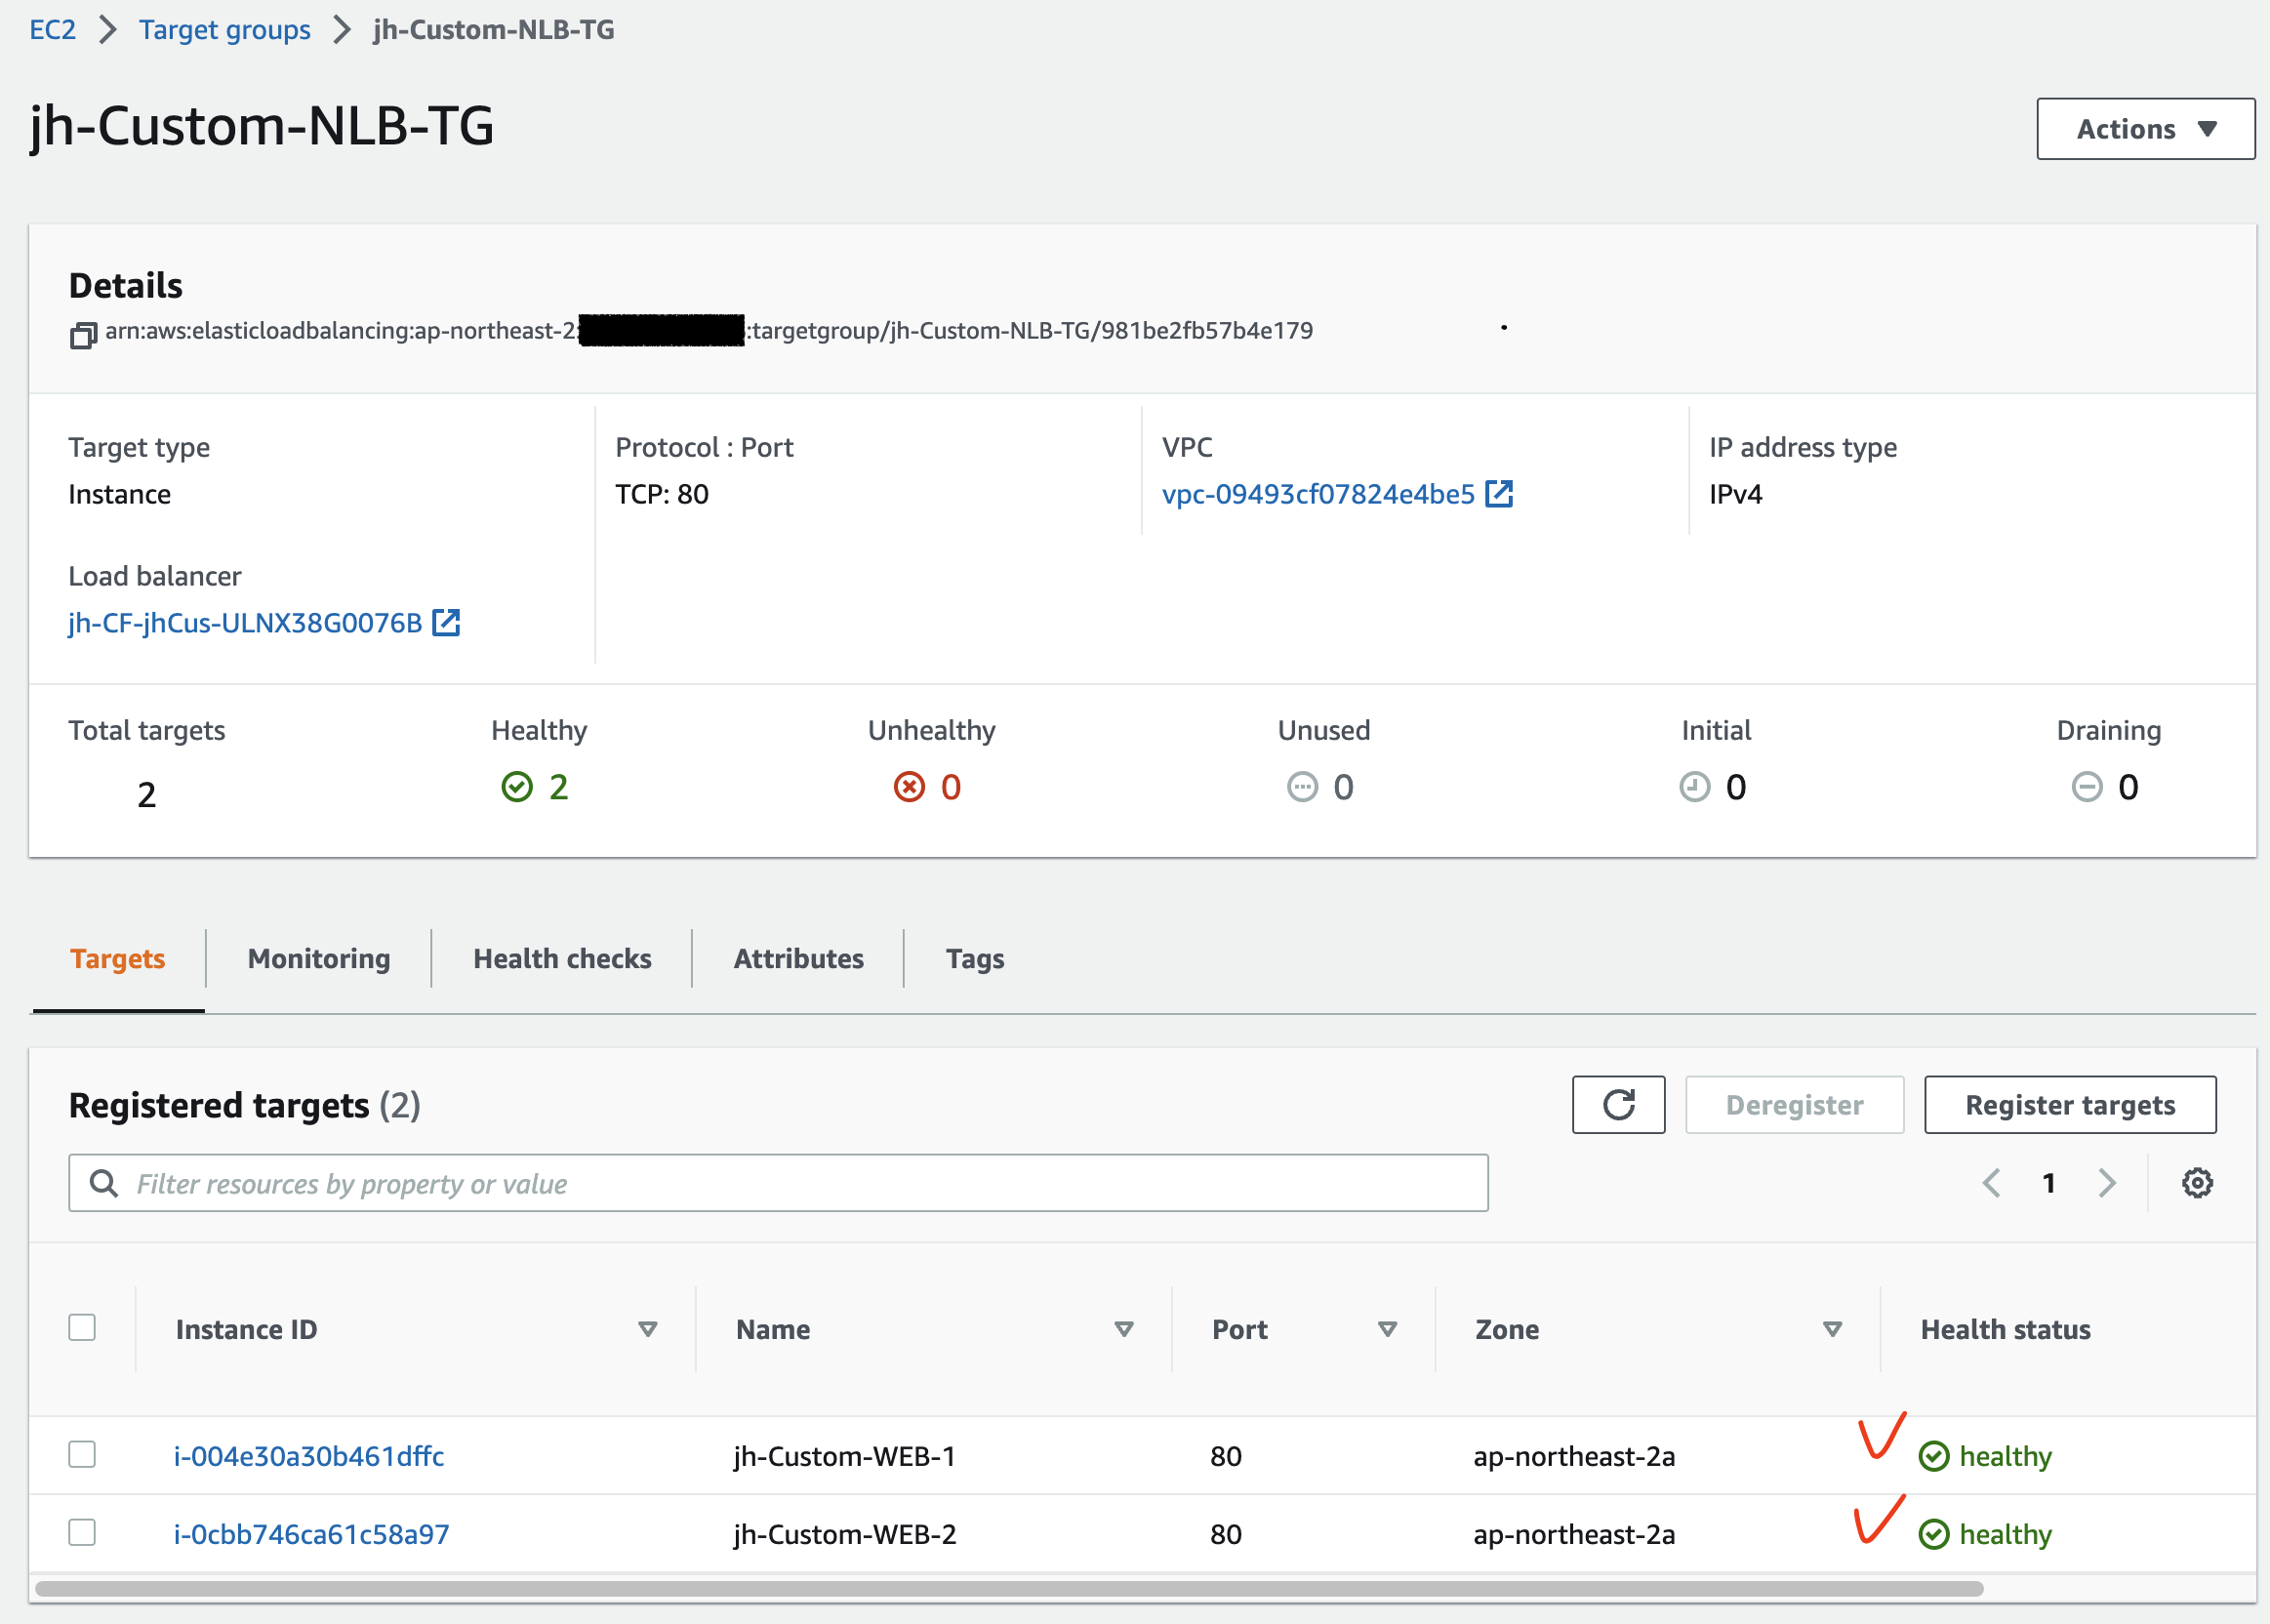
[EC2] - [Load Balancing] - [Load Balancers] 로 이동하여 jh-Custom-NLB 의 DNS name 을 확인한 후 jhVPC 내의 EC2 인스턴스에서 dig 명령어를 통해 jh-Custom-NLB DNS 주소에 대한 IP 주소를 확인해본다.
이후 curl 을 통해 해당 웹서버의 HTML 코드를 출력하여 웹접근이 가능한지 확인해본다.
jhVPC 내의 EC2 → jhCustomVPC 내의 NLB (Public IP 대역)
$ ssh -i sandbox-jh.pem ec2-user@3.38.xx.xx

[ec2-user@ip-10-10-0-xx ~]$ dig +short jh-CF-jhCus-ULNX38G0076B-1d22a84a855222d6.elb.ap-northeast-2.amazonaws.com
3.37.50.xx

[ec2-user@ip-10-10-0-xx ~]$ curl jh-CF-jhCus-ULNX38G0076B-1d22a84a855222d6.elb.ap-northeast-2.amazonaws.com
<html><h1>Endpoint Service Lab - CloudNeta Web Server 1</h1></html>
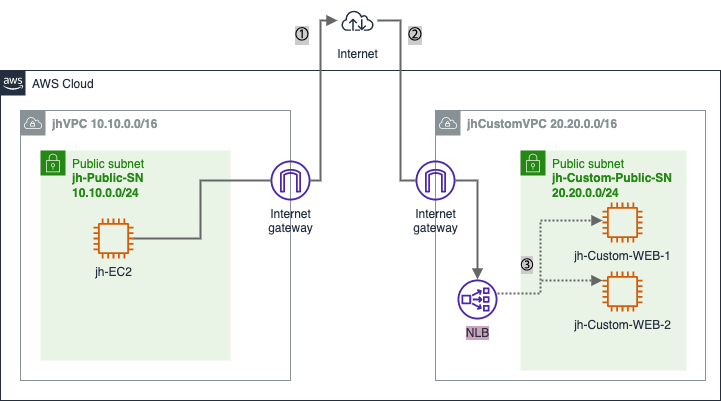
jhVPC 내의 EC2 Instance 에서 jhCustomVPC 내의 웹서버로 접근 시 모두 Public Subnet 에 있기 때문에 외부 인터넷 구간을 통해 VPC 간 통신이 이루어진다.
만일 보안상 외부 인터넷 구간이 아닌 Private 네트워크를 통해 VPC 간 통신을 해야 한다면 Endpoint Service 를 이용하여 PrivateLink 구성 후 통신이 가능하다.
3.2. Endpoint Service 생성/연결
Endpoint Service 를 생성하여 VPC 간 PrivateLink 연결 구성을 한다.
Endpoint Service생성Interface Endpoint생성/연결 (PrivateLink생성)Endpoint Service검증
3.2.1. Endpoint Service 생성
Endpoint Service 생성 시 jhCustomVPC 내의 NLB 를 연결한다.
[VPC] - [Virtual private cloud] - [Endpoint services]
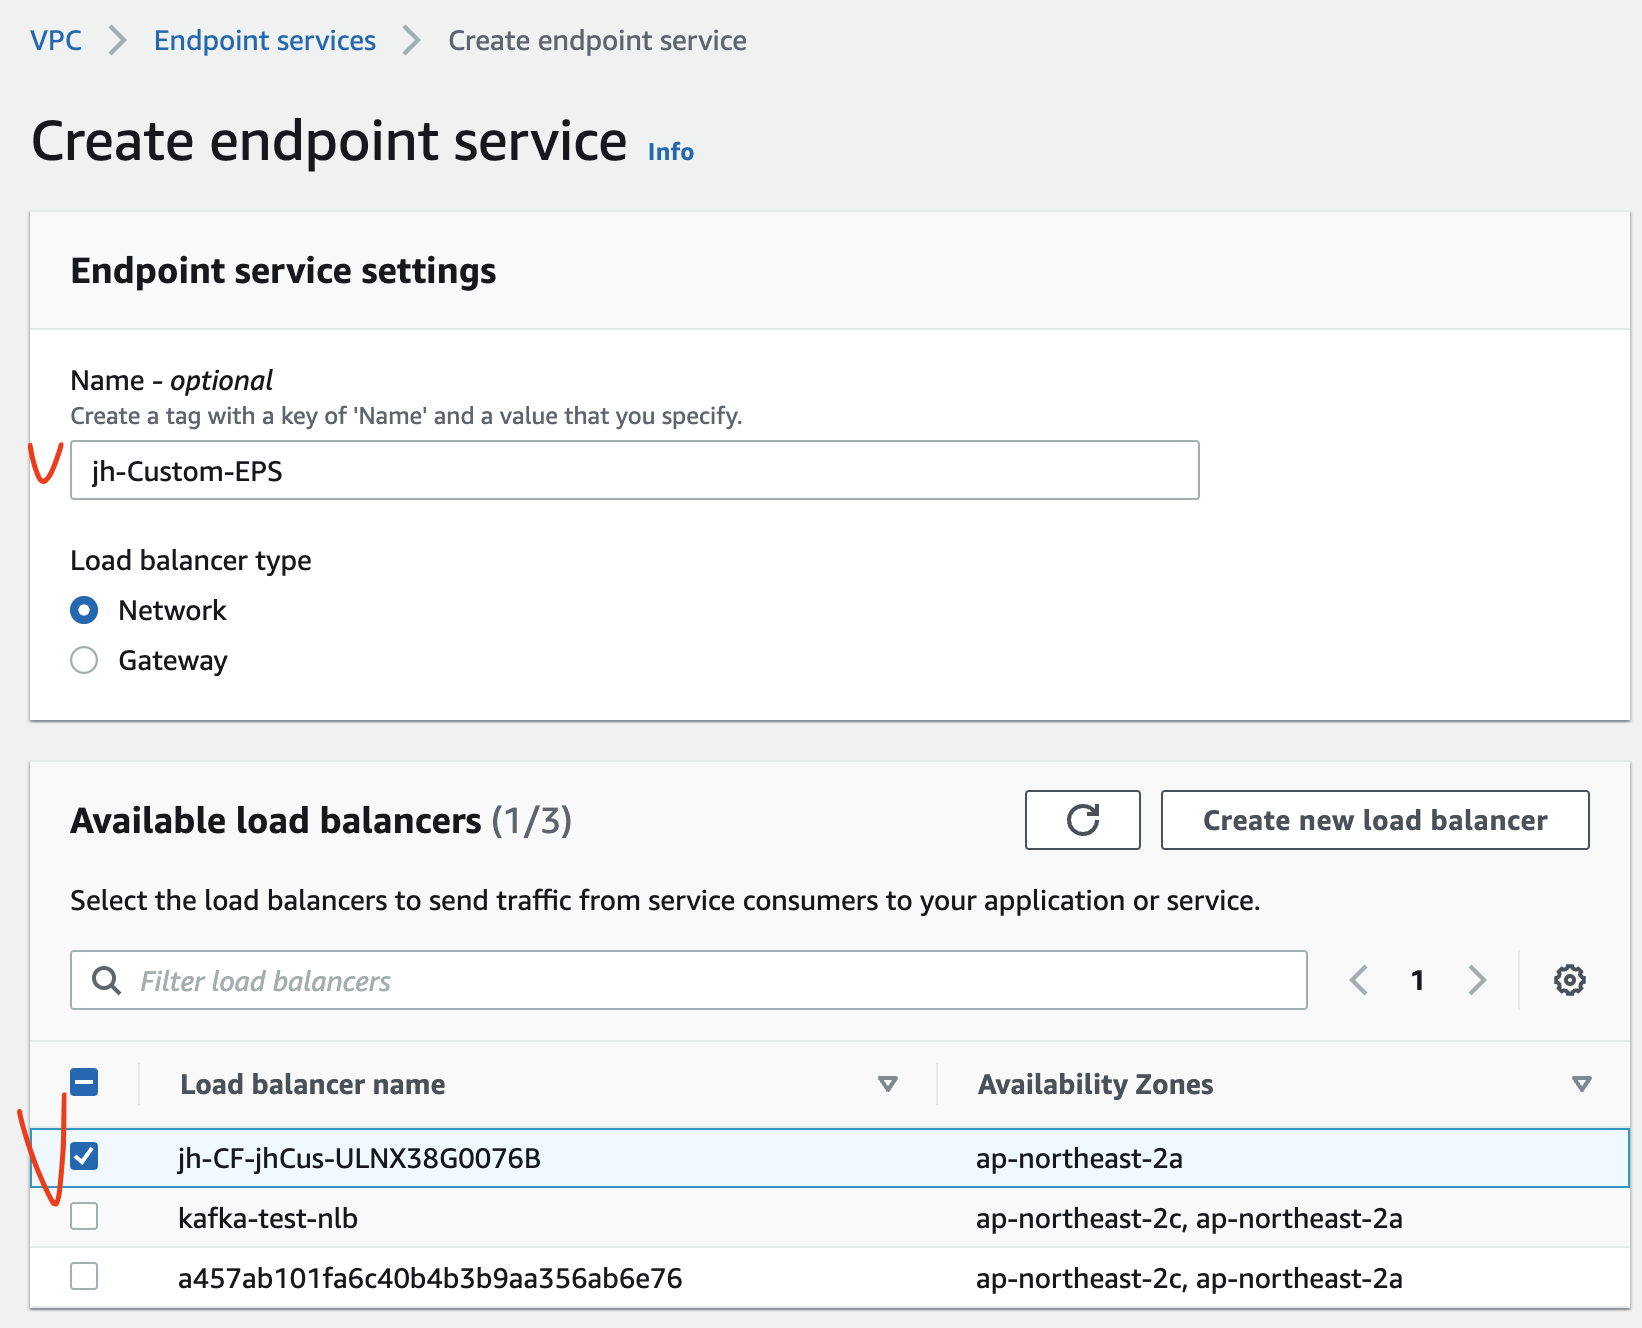
Endpoint Service 를 생성하여 jhCustomVPC 내의 NLB 와 연결하였다.
이제 Interface Endpoint 와 PrivateLink 를 연결할 수 있다.
생성된 Endpoint Service 의 Service name 을 복사해두자.
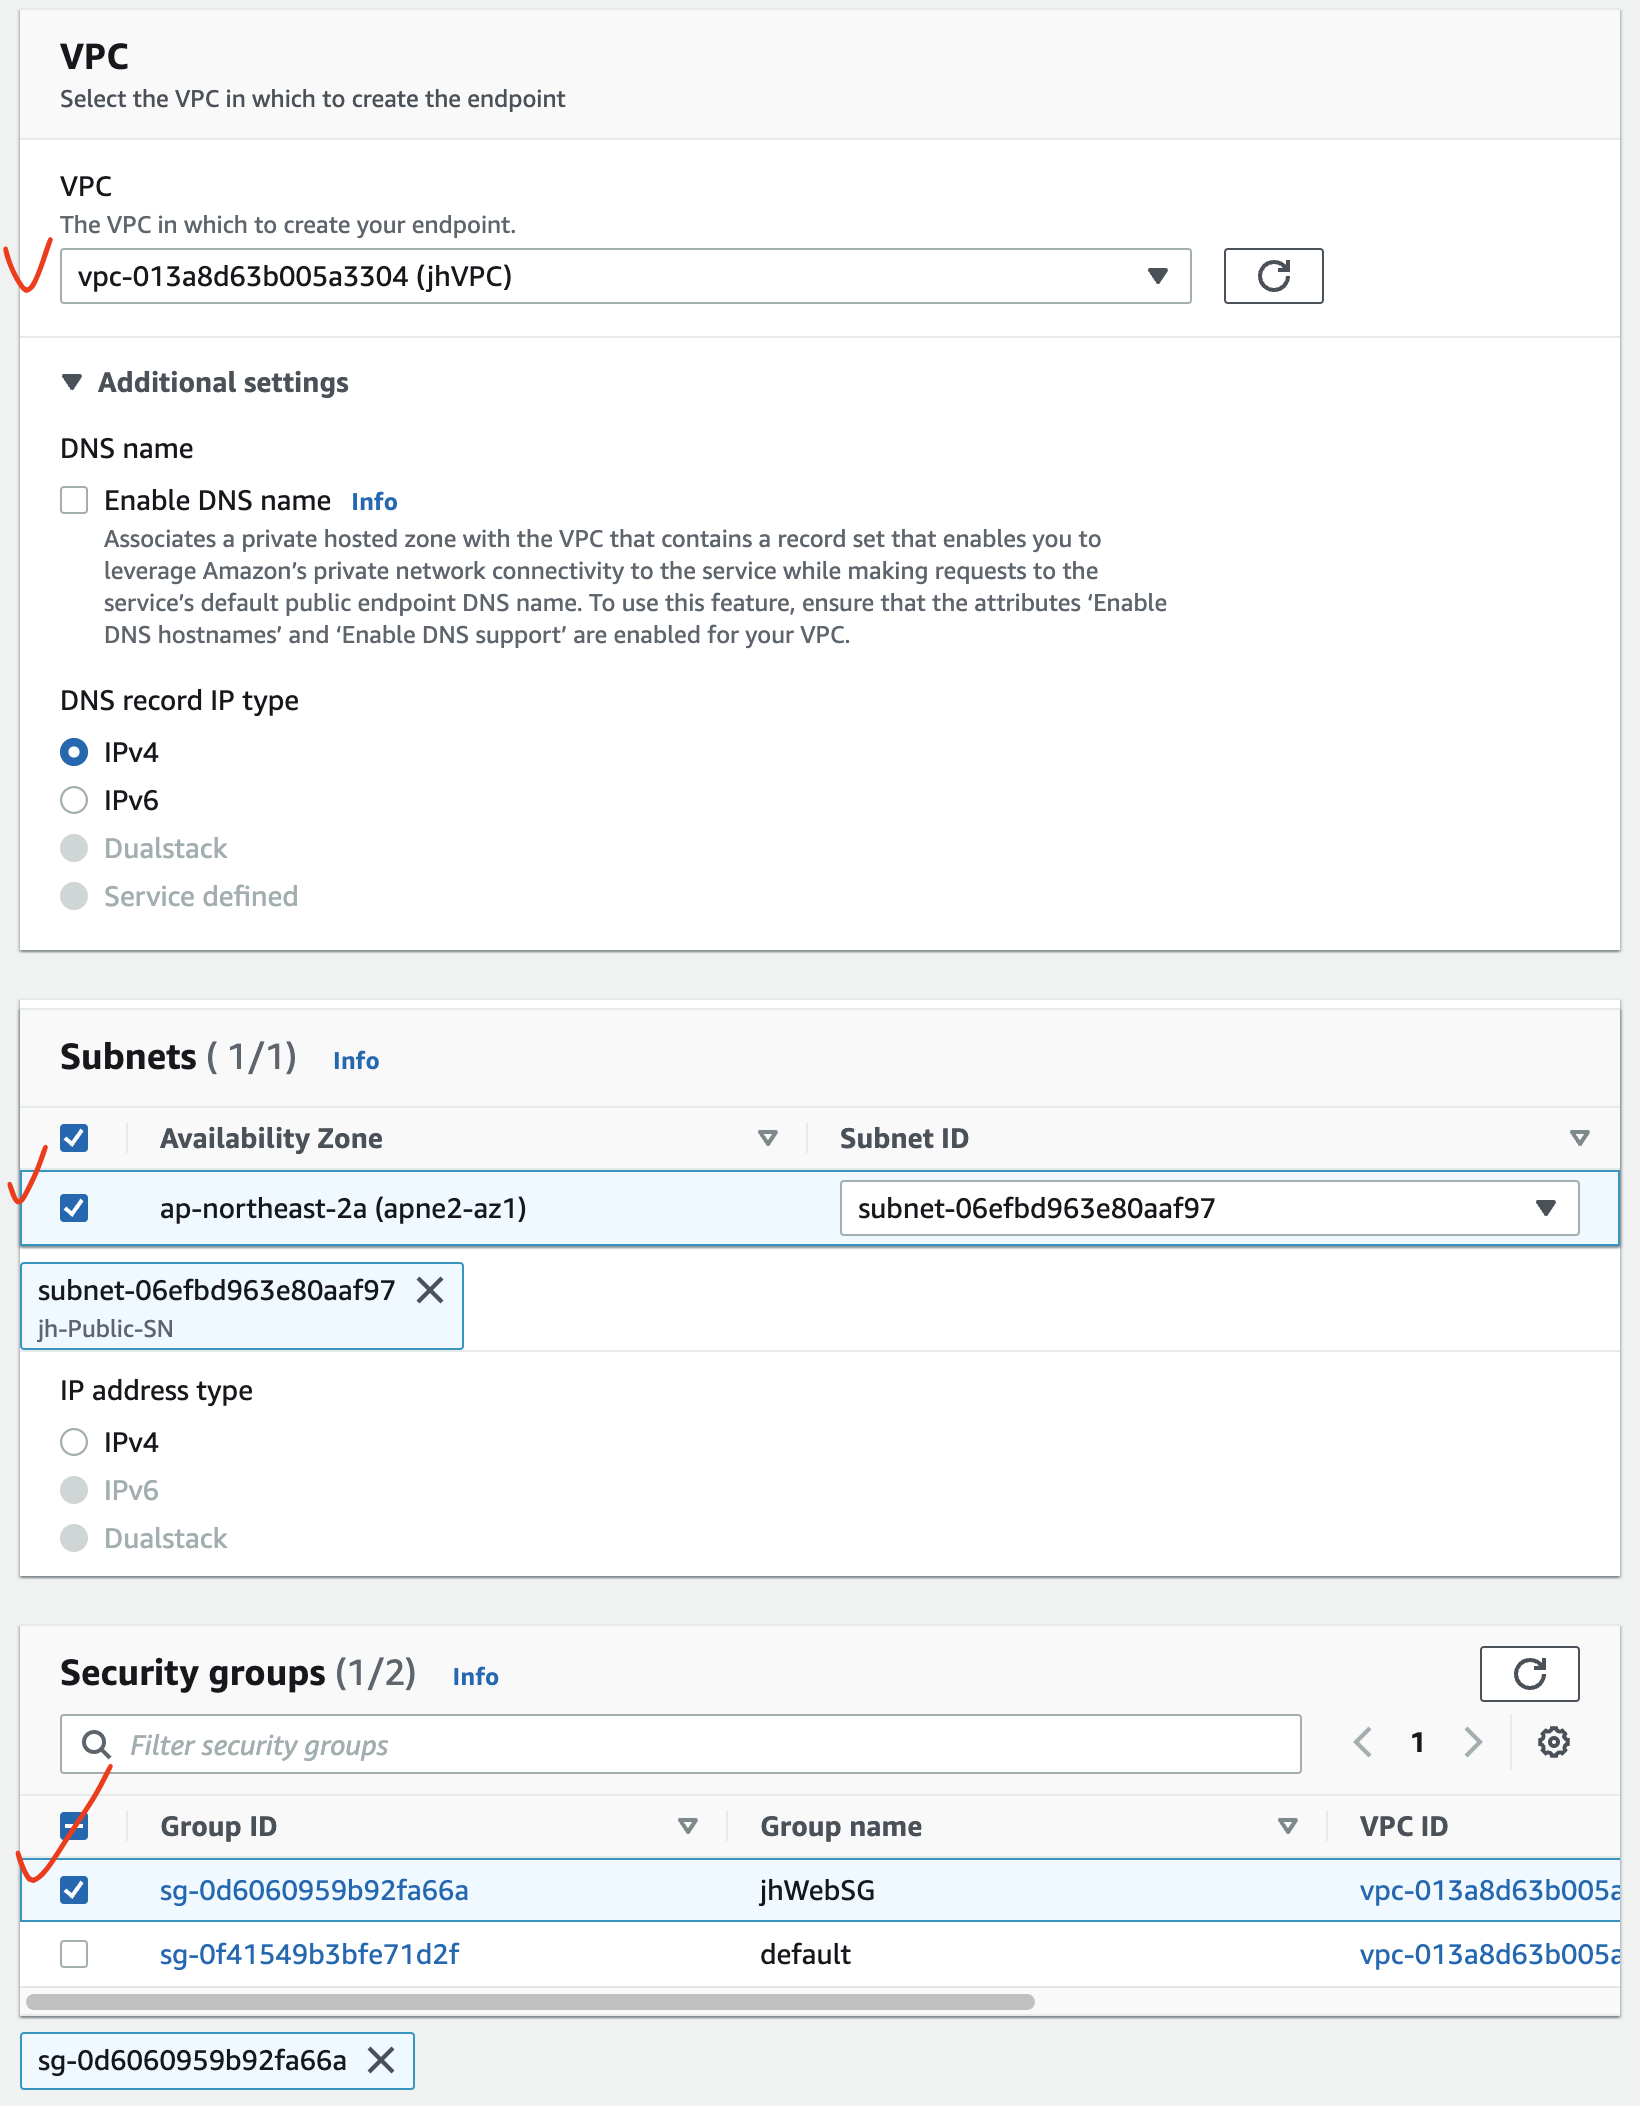
3.2.2. Interface Endpoint 생성/연결 (PrivateLink 생성)
Endpoint Service 를 생성하여 jhCustomVPC 의 NLB 에 연결했으니, jhVPC 에 Interface Endpoint 를 생성하여 연결한다.
[VPC] - [Virtual private cloud] - [Endpoints]
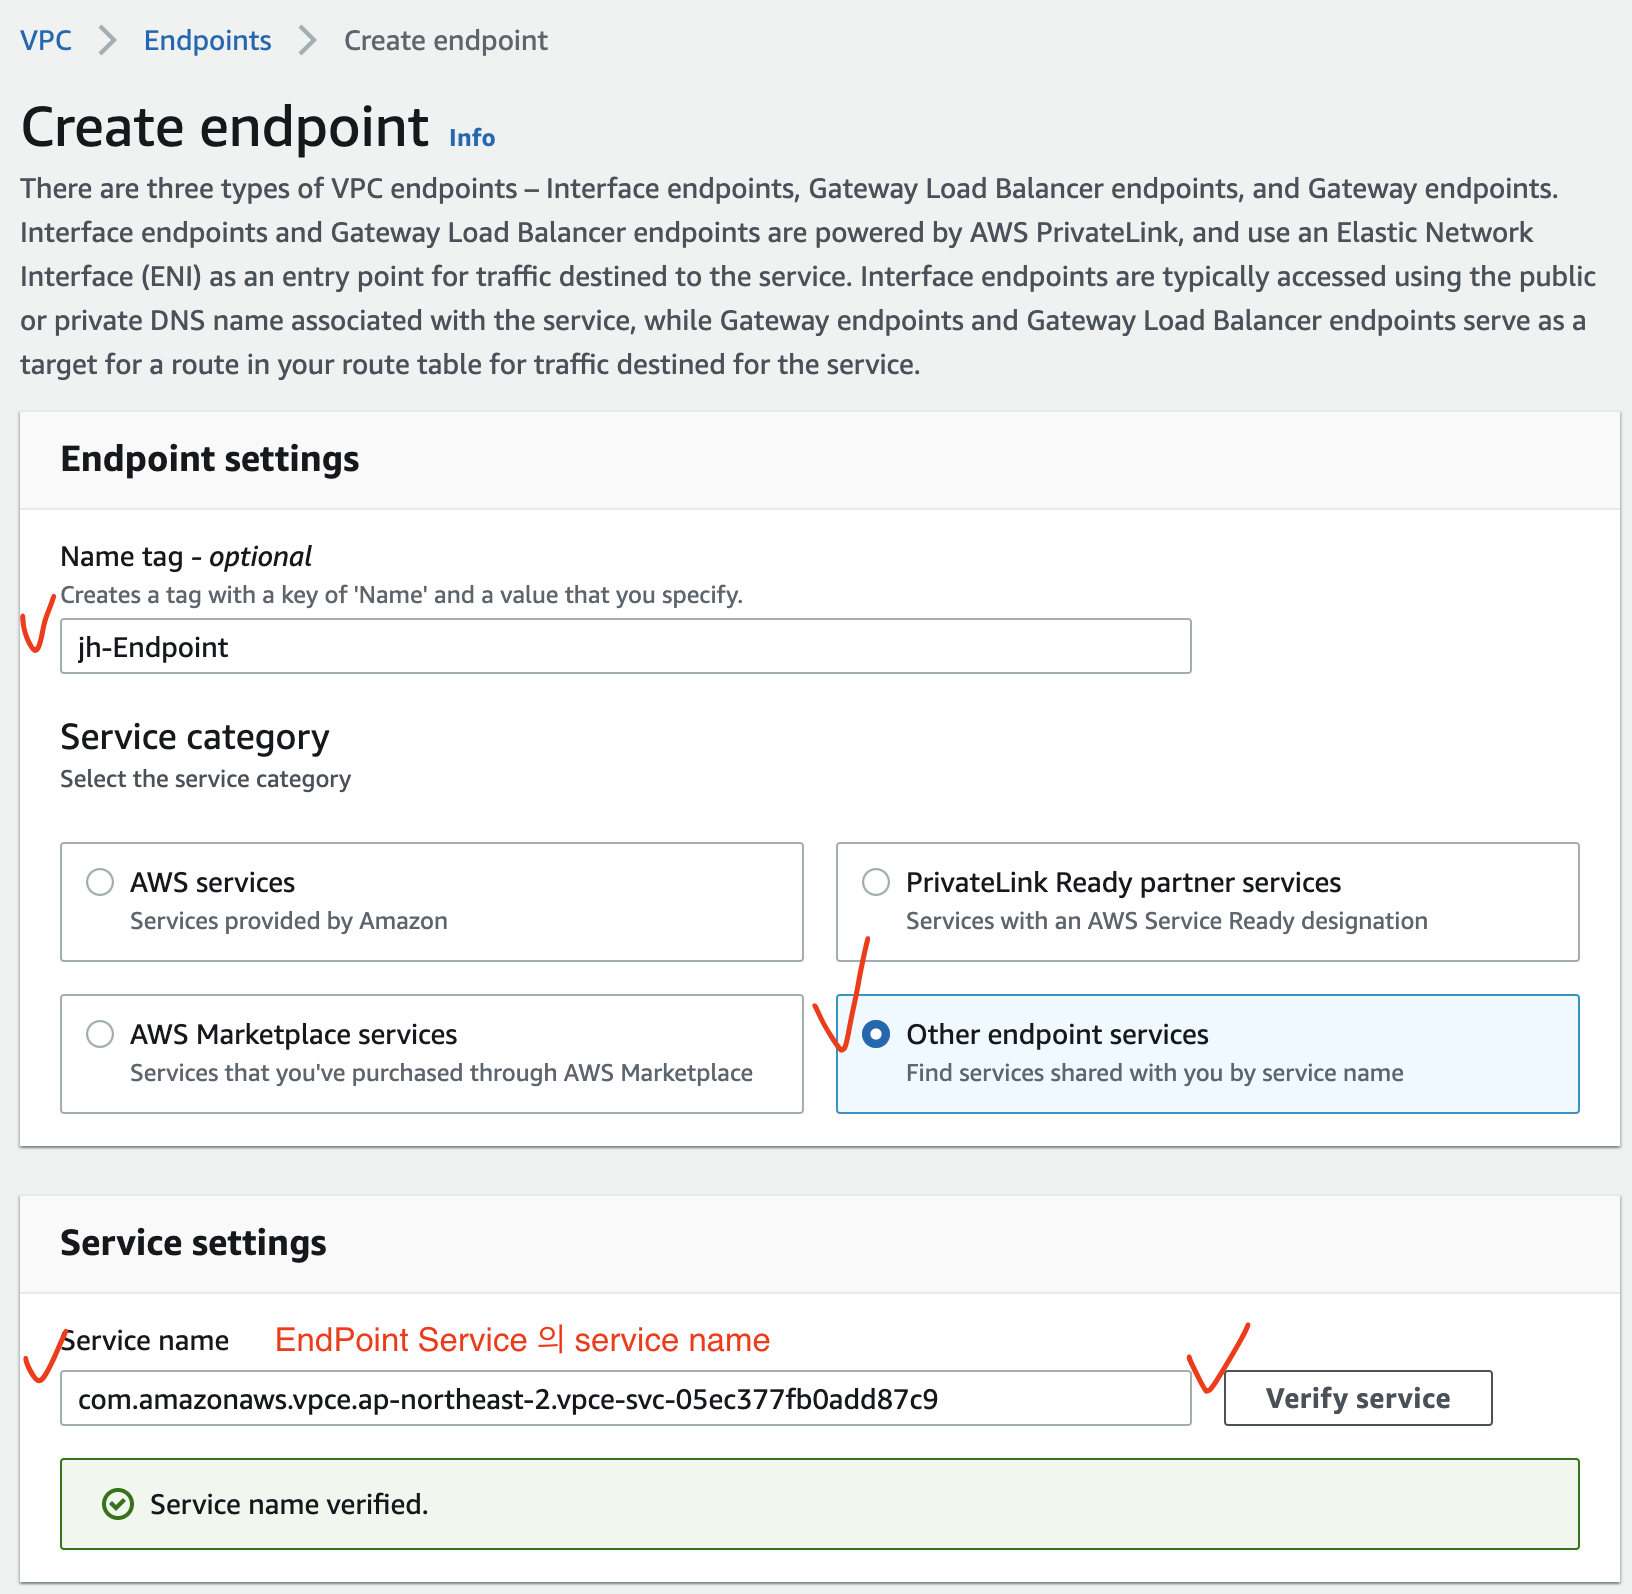
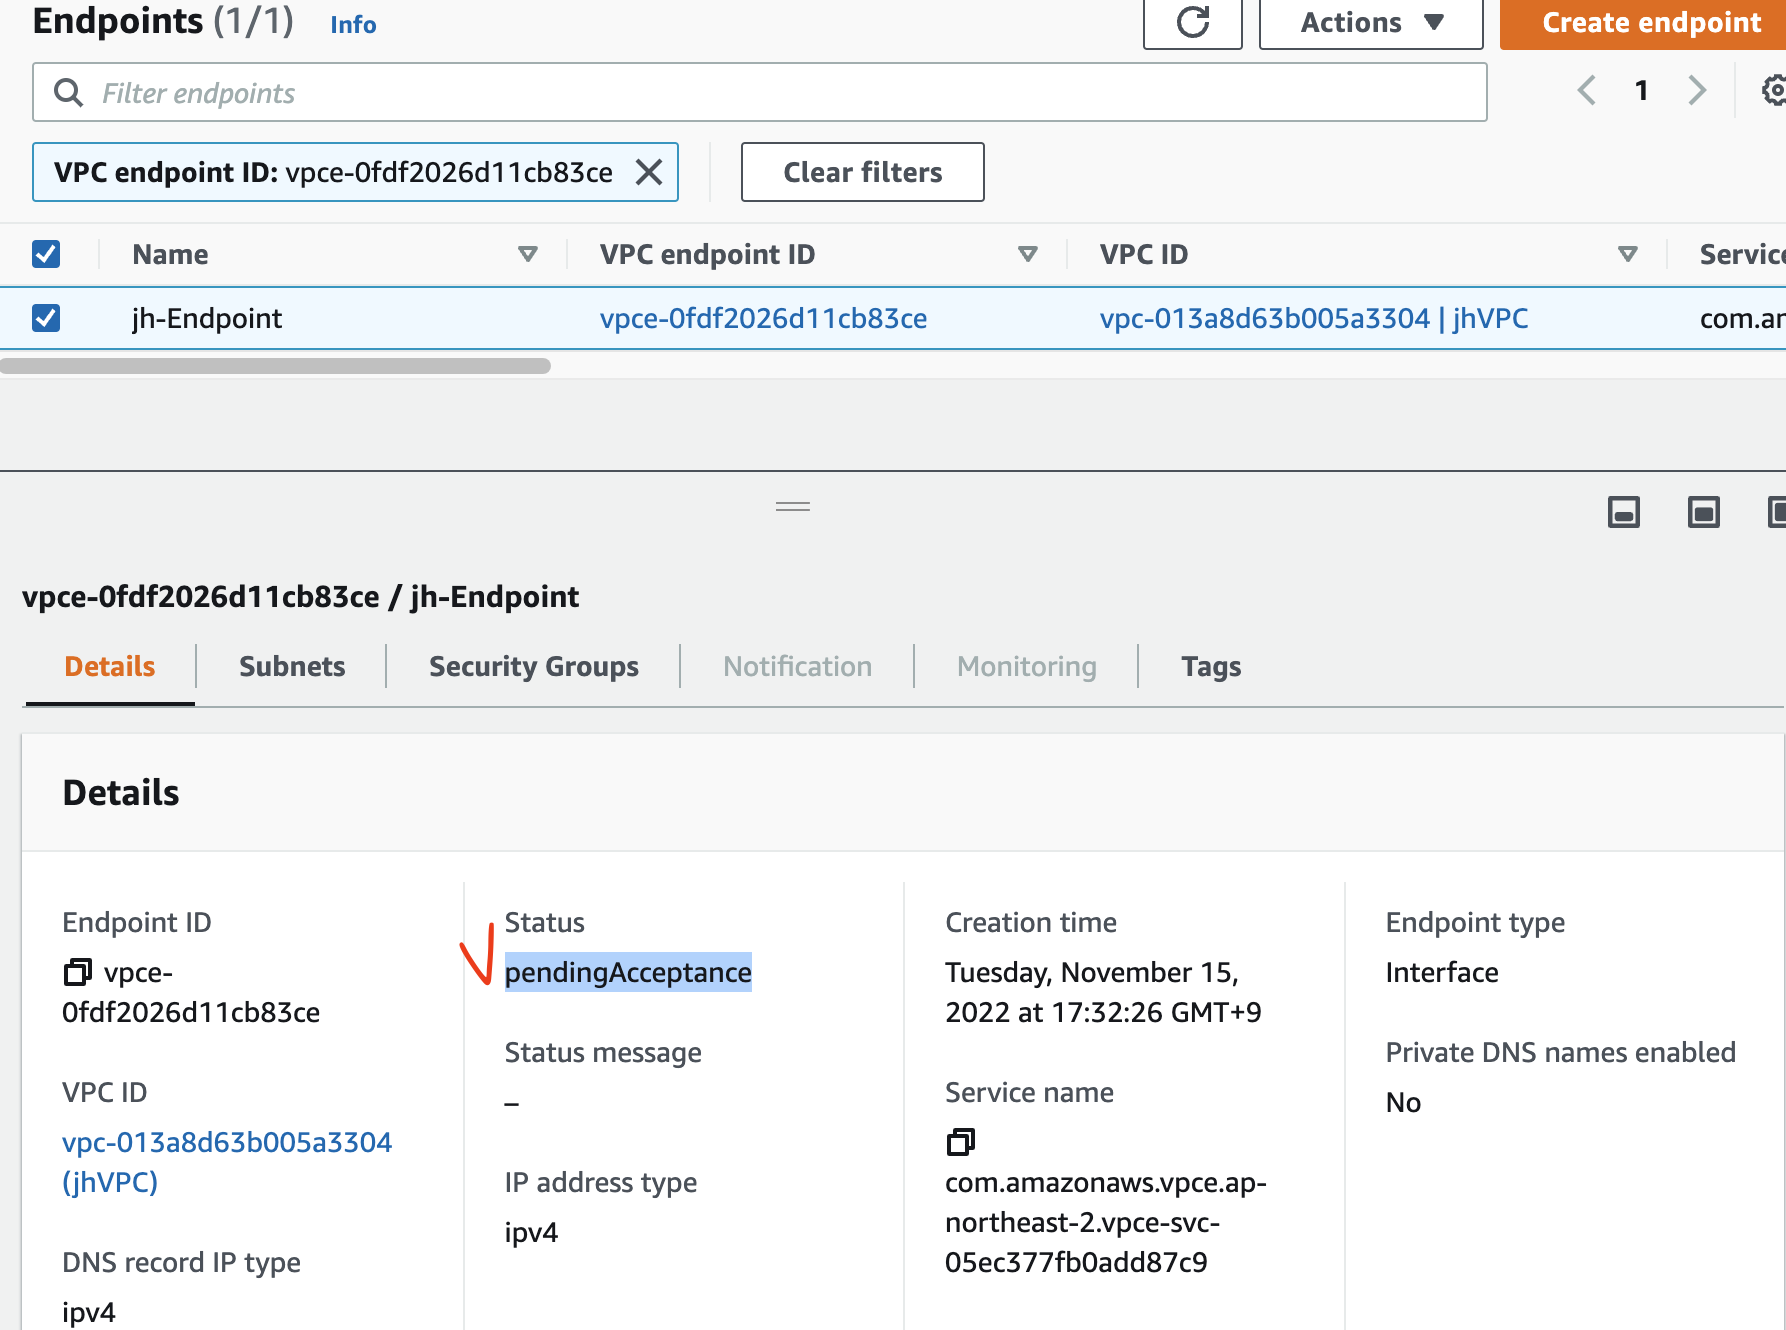
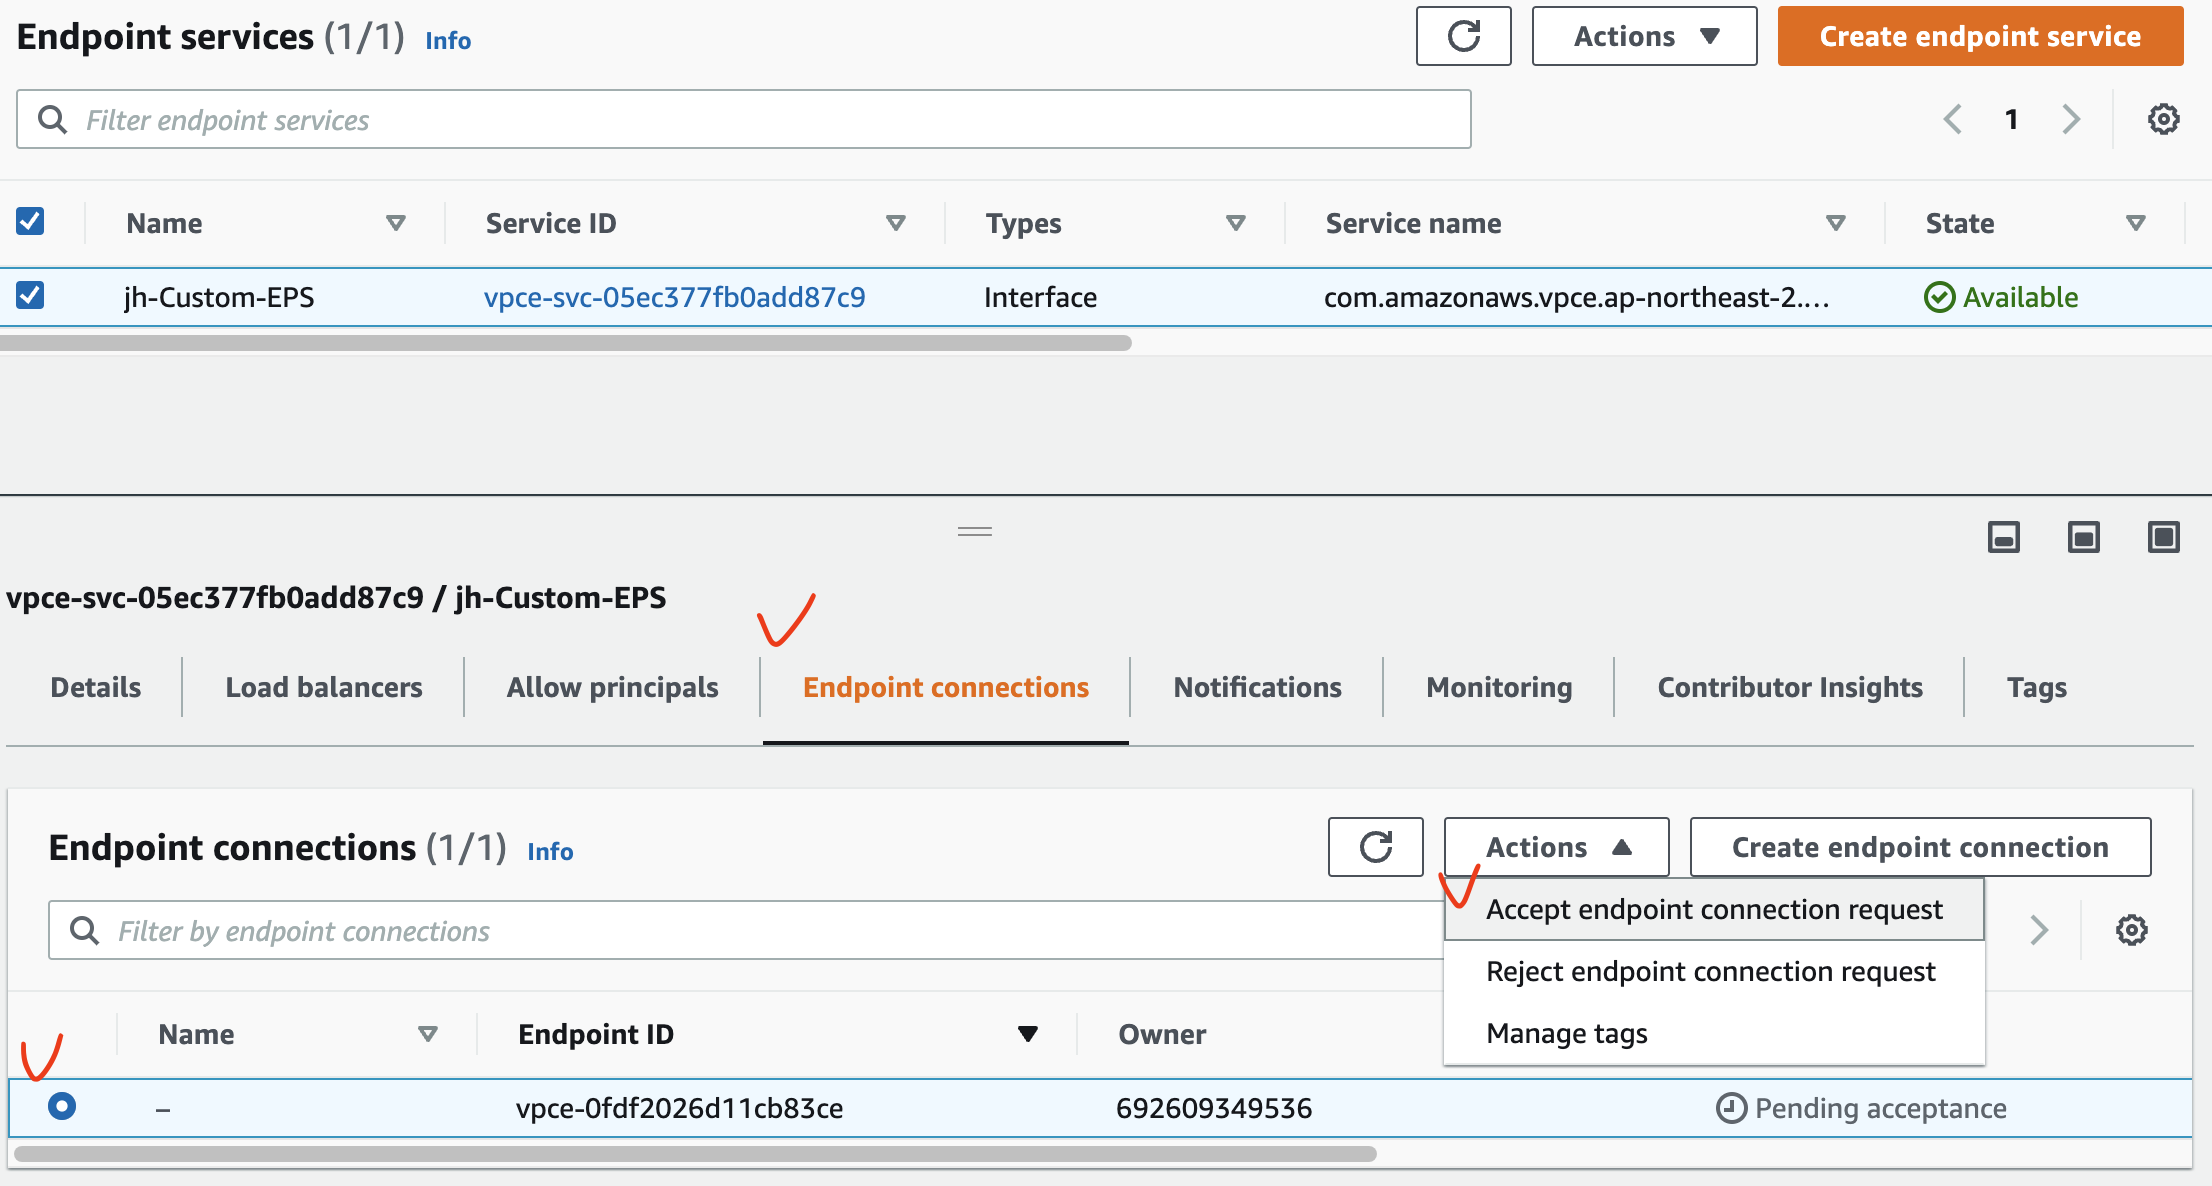
Interface Endpoint 생성 후 Status 를 보면 pendingAcceptance 상태이다.
Endpoint Service 와 연결을 수락해야 정상적인 연결이 가능하다.
3.2.3. Endpoint Service 검증
이제 jhVPC 내의 EC2 에서 jhCustomVPC 내의 웹서버로 통신을 확인해본다.
위에서 생성한 Endpoint 의 DNS 이름 2개 중 아무거나 하나 복사하여 확인한다.
<Endpoint Service 환경>
jhVPC 내의 EC2 → jhCustomVPC 내의 Endpoint (Private IP 대역)
$ ssh -i sandbox-jh.pem ec2-user@3.38.xx.xx
[ec2-user@ip-10-10-0-xx ~]$ dig +short vpce-0fdf2....ap-northeast-2.vpce.amazonaws.com
10.10.0.xx
[ec2-user@ip-10-10-0-xx ~]$ curl vpce-0fdf2....ap-northeast-2.vpce.amazonaws.com
<html><h1>Endpoint Service Lab - CloudNeta Web Server 1</h1></html>
Endpoint 의 DNS 에 대한 IP 주소를 보면 10.10.x.x 로 jhVPC 의 Public Subnet 대역임을 확인할 수 있다.
기본 통신 환경에는 NLB 의 DNS 주소에 대한 IP 주소 확인 및 curl 로 통신 여부를 확인했었다.
<기본 환경>
jhVPC 내의 EC2 → jhCustomVPC 내의 NLB (Public IP 대역)
$ ssh -i sandbox-jh.pem ec2-user@3.38.xx.xx

[ec2-user@ip-10-10-0-xx ~]$ dig +short jh-CF-jhCus-ULNX38G0076B-1d22a84a855222d6.elb.ap-northeast-2.amazonaws.com
3.37.50.xx

[ec2-user@ip-10-10-0-xx ~]$ curl jh-CF-jhCus-ULNX38G0076B-1d22a84a855222d6.elb.ap-northeast-2.amazonaws.com
<html><h1>Endpoint Service Lab - CloudNeta Web Server 1</h1></html>
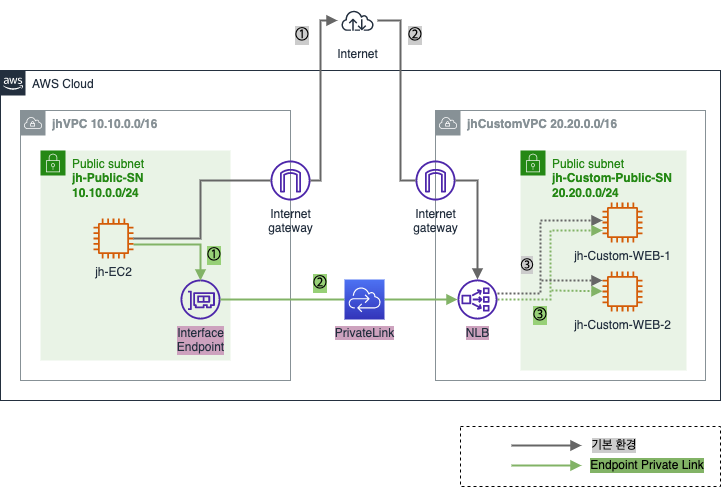
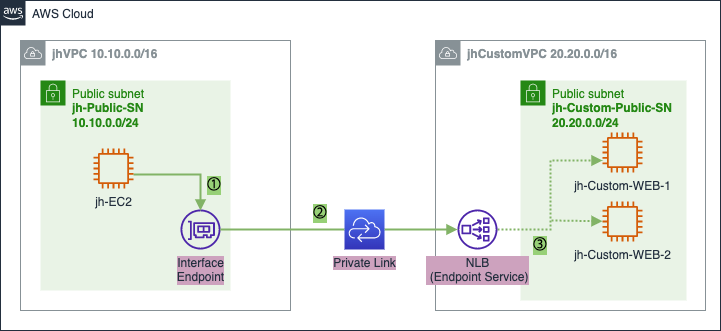
① jhVPC 내의 EC2 Instance 에서 jhCustomVPC 의 웹서버로 서비스 요청 시 Interface Endpoint 로 데이터 전달
② PrivateLink 를 통해 Endpoint Service 가 생성된 jhCustomVPC 내의 NLB 로 전달
③ NLB 를 통해 부하 분산되어 웹 서버로 전달
즉, Endpoint Service 를 통해 Private 연결을 하여 외부 인터넷이 아닌 Private 네트워크로 통신된다.
3.3. Resource 삭제
아래의 순서대로 Resource 를 삭제한다.
- Endpoint 삭제 ([VPC] - [Endpoints] - [Actions] - [Delete VPC endpoints])
Endpoint Service삭제 ([VPC] - [Endpoint services] - [Actions] - [Delete VPC endpoint services])- CloudFormation Stack 삭제 ([CloudFormation] - [Stacks] - [Delete])
CloudFormation Stack 이 삭제되면 위의 3.1.2. CloudFormation 을 통해 생성된 자원 확인 의 자원이 모두 삭제되었는지 확인한다.
참고 사이트 & 함께 보면 좋은 사이트
본 포스트는 김원일, 서종호 저자의 따라하며 배우는 AWS 네트워크 입문를 기반으로 스터디하며 정리한 내용들입니다.
