AWS - Network 연결 옵션 (1): VPC Peering
이 포스트는 서로 다른 두 VPC 간에 Private IP 로 통신을 가능하게 해주는 VPC Peering 에 대해 알아본다.
- 1. Network 연결 옵션
- 2.
VPC Peering - 3. 서로 다른 두 VPC 간 Peering 연결 테스트
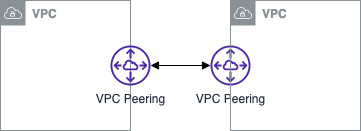
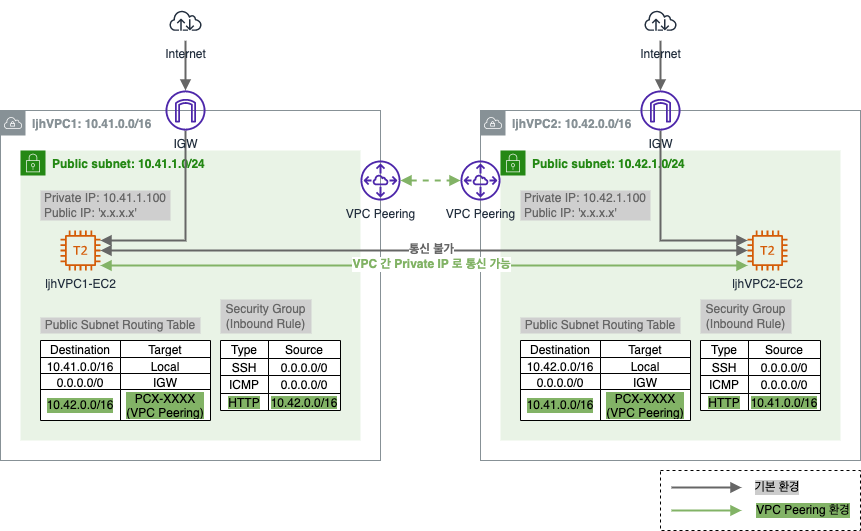
아래는 이번 포스트에서 다뤄볼 범위 도식화이다.
1. Network 연결 옵션
클라우드를 사용하다 보면 온프레미스에 위치한 데이터베이스를 클라우드 리소스 간 연결을 하거나, 보안을 위해 Private Subnet 에 배포한 리소스 관리를 위해 접근하는 등 다른 네트워크와의 연결을 필요로 한다.
AWS 에서는 다양한 Network 연결 옵션을 통해 다른 VPC 와의 연동 및 하이브리드 클라우드 구성(VPN or Direct Connect 로 연결)을 지원한다.
- Network 연결 옵션
VPC Peering- 서로 다른 두 VPC 간 연결을 구성하여 Private IP 를 통해 통신할 수 있도록 지원 (마치 동일한 네트워크에 있는 것처럼 통신)
VPN (Virtual Private N/W)- 공공 인터넷을 통해 가상의 사설 네크워크를 구성하여 Private 통신을 제공하여 데이터 암호화, 전용 연결 등 보안 요구사항 충족
Site-to-Stie VPN와클라이언트 VPN가 있음VPN 에 대한 더 상세한 내용은 AWS - Network 연결 옵션 (2): VPN 를 참고하세요.
Transit G/W (전송 게이트웨이)- VPC 나 온프레미스 등의 네트워크를 단일 지점으로 연결할 수 있는 라우팅 서비스
- 다른 네크워크의 연결없이 Transit G/W 로만 연결하면 되므로 관리가 간소화되고 운영 비용도 줄어듦
Transit G/W 에 대한 더 상세한 내용은 AWS - Network 연결 옵션 (3): Transit Gateway (전송 게이트웨이) 를 참고하세요.
Route 53 Resolver- 하이브리드 환경(VPN or Direct Connect 로 연결) 에서 온프레미스와 VPC 간 도메인 질의는 불가능한데 Route 53 Resolver 와 Forwarding Rules(전달 규칙) 을 이용하여 서로 도메인 질의가 가능하도록 함
Direct Connect- 데이터 센터, 본사 등과 같은 장소에서 AWS 와의 전용 네트워크 연결을 제공하는 전용선 서비스
위 5가지 연결 옵션에 대해 알아보도록 하자.
2. VPC Peering
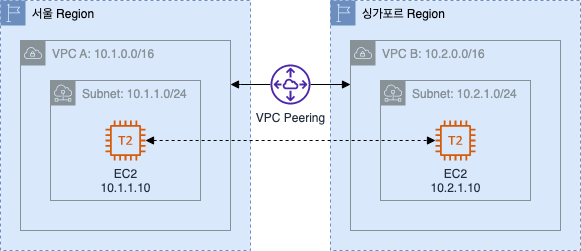
VPC Peering 은 서로 다른 두 VPC 간 연결을 구성하여 Private IP 를 통해 통신할 수 있도록 지원한다. (마치 동일한 네트워크에 있는 것처럼 통신)
동일한 리전 내의 두 VPC 간의 피어링도 지원하고, 다른 리전 간의 VPC 피어링도 지원한다.
VPC Endpoint와 비교
VPC Endpoint는 AWS Public 서비스나 직접 생성한 AWS 서비스에 대해 외부 인터넷 구간을 통한 접근이 아닌 직접 접근할 수 있는 Private 액세스 기능
자세한 내용은 AWS - VPC (2): Endpoint 를 참고하세요.
VPC Peering 기능
- 고속 네크워크, 트래픽 암호화, 비용 절감
- 발생하는 트래픽이 AWS 백본 네크워크를 경유하여 고속의 통신 가능
VPC Peering을 통한 트래픽에 대해서 암호화 및 전송 비용 절감
- 리전 간
VPC Peering- 중국 리전을 제외하고 리전 간
VPC Peering지원 
- 중국 리전을 제외하고 리전 간
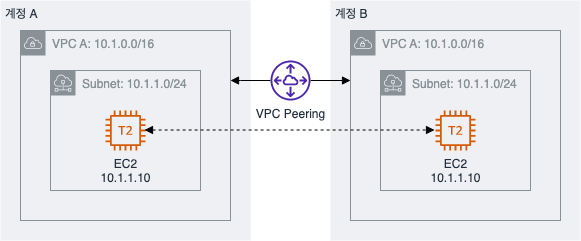
- 타 계정 간
VPC Peering지원- 이를 통해 리소스 중복 사용을 최소화하여 비용 절감 효과
VPC Peering 제약 사항
- 서로 다른 VPC CIDR (네트워크 대역) 사용 필요
- 각 VPC 에 할당된 IP CIDR 이 동일하거나 겹치면
VPC Peering구성 불가 - e.g.) 각 다른 리전에 있는 VPC A 와 B 의 CIDR 이 10.1.0.0/16 로 동일하면
VPC Peering연결 불가
- 각 VPC 에 할당된 IP CIDR 이 동일하거나 겹치면
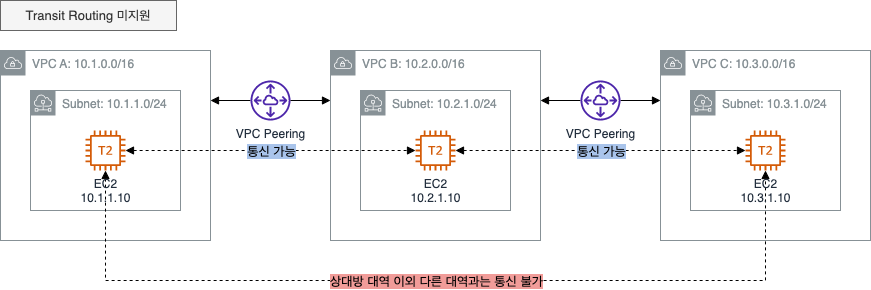
- Transit Routing 미지원
VPC Peering연결 구성 시 상대방 VPC 의 IP CIDR 대역 외 다른 대역과는 통신 불가- 상대방 VPC 에 구성된 IGW, NAT G/W, VPN 과 Direct Connect 로 연결되는 온프레미스와 통신 불가
VPC Peering최대 연결 제한- 동일한 VPC 간의 연결은 하나의 연결만 가능
- VPC 당
VPC Peering연결 가능한 기본 한도는 최대 50 개의 연결 (AWS 에 추가 요청하여 최대 125 개까지 연결 가능) VPC Peering의 최대 한도 증가 시 Routing Table 의 최대 한도도 높이는 것이 좋음
Routing Table 의 기본 한도가 50 개 이므로 모든 연결을 구성하는 것이 어려울 수 있음
여러 개의 VPC 를 연결하는 경우 복잡성이 높아질 수 있으니Transit G/W(전송 게이트웨이)사용 권장
3. 서로 다른 두 VPC 간 Peering 연결 테스트
VPC Peering 을 통해 2 개의 VPC 간 Private IP 통신을 설정하여 Instance 간 Private IP 로 웹 서버 접속이 가능하게 설정해본다.
- 기본 환경 구성
- CloudFormation 적용
- CloudFormation 을 통해 생성된 자원 확인
- 기본 통신 환경 검증
VPC Peering설정VPC Peering설정- 라우팅 대상 추가
- Security Group 추가
- 통신 확인
- Resource 삭제
3.1. 기본 환경 구성
- CloudFormation 적용
- CloudFormation 을 통해 생성된 자원 확인
- 기본 통신 환경 검증
3.1.1. CloudFormation 적용
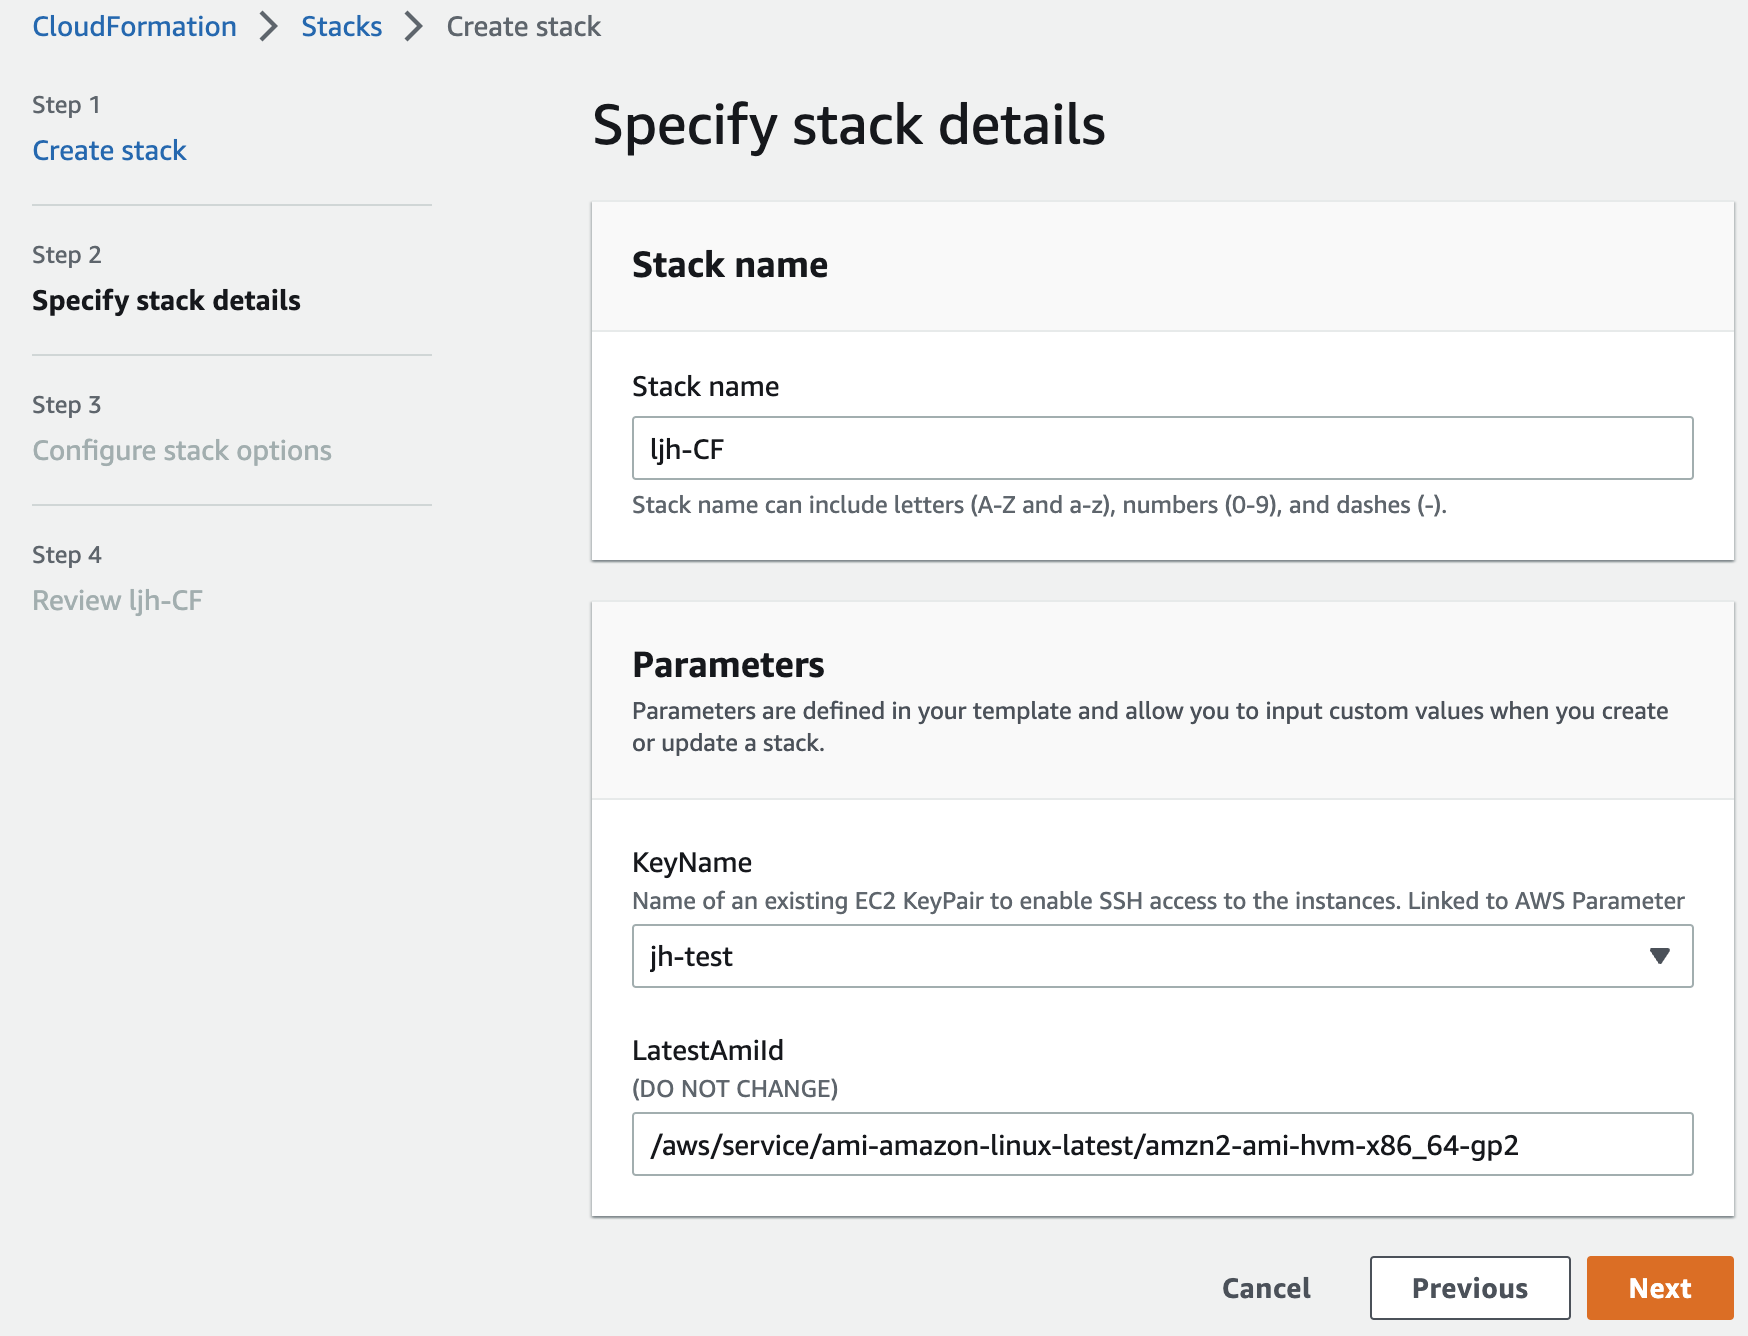
[CloudFormation] - [Stacks]
CloudFormation Template Download CloudFormation Template (펼쳐보기)
Parameters:
  KeyName:
    Description: Name of an existing EC2 KeyPair to enable SSH access to the instances. Linked to AWS Parameter
    Type: AWS::EC2::KeyPair::KeyName
    ConstraintDescription: must be the name of an existing EC2 KeyPair.
  LatestAmiId:
    Description: (DO NOT CHANGE)
    Type: 'AWS::SSM::Parameter::Value<AWS::EC2::Image::Id>'
    Default: '/aws/service/ami-amazon-linux-latest/amzn2-ami-hvm-x86_64-gp2'
    AllowedValues:
      - /aws/service/ami-amazon-linux-latest/amzn2-ami-hvm-x86_64-gp2

Resources:
  VPC01:
    Type: AWS::EC2::VPC
    Properties:
      CidrBlock: 10.41.0.0/16
      EnableDnsSupport: true
      EnableDnsHostnames: true
      Tags:
        - Key: Name
          Value: ljhVPC1
  InternetGateway0101:
    Type: AWS::EC2::InternetGateway
    Properties:
      Tags:
        - Key: Name
          Value: ljhVPCPeering-IGW1
  InternetGatewayAttachment0101:
    Type: AWS::EC2::VPCGatewayAttachment
    Properties:
      InternetGatewayId: !Ref InternetGateway0101
      VpcId: !Ref VPC01

  VPC02:
    Type: AWS::EC2::VPC
    Properties:
      CidrBlock: 10.42.0.0/16
      EnableDnsSupport: true
      EnableDnsHostnames: true
      Tags:
        - Key: Name
          Value: ljhVPC2
  InternetGateway0102:
    Type: AWS::EC2::InternetGateway
    Properties:
      Tags:
        - Key: Name
          Value: ljhVPCPeering-IGW2
  InternetGatewayAttachment0102:
    Type: AWS::EC2::VPCGatewayAttachment
    Properties:
      InternetGatewayId: !Ref InternetGateway0102
      VpcId: !Ref VPC02

  PublicRouteTable0101:
    Type: AWS::EC2::RouteTable
    Properties:
      VpcId: !Ref VPC01
      Tags:
        - Key: Name
          Value: ljhVPCPeering-RT1
  DefaultPublicRoute0101:
    Type: AWS::EC2::Route
    DependsOn: InternetGatewayAttachment0101
    Properties:
      RouteTableId: !Ref PublicRouteTable0101
      DestinationCidrBlock: 0.0.0.0/0
      GatewayId: !Ref InternetGateway0101
  Subnet0101:
    Type: AWS::EC2::Subnet
    Properties:
      VpcId: !Ref VPC01
      AvailabilityZone: !Select [0, !GetAZs '']
      MapPublicIpOnLaunch: true
      CidrBlock: 10.41.1.0/24
      Tags:
        - Key: Name
          Value: ljhVPCPeering-VPC1-Subnet1
  Subnet0101RouteTableAssociation:
    Type: AWS::EC2::SubnetRouteTableAssociation
    Properties:
      RouteTableId: !Ref PublicRouteTable0101
      SubnetId: !Ref Subnet0101

  PublicRouteTable0102:
    Type: AWS::EC2::RouteTable
    Properties:
      VpcId: !Ref VPC02
      Tags:
        - Key: Name
          Value: ljhVPCPeering-RT2
  DefaultPublicRoute0102:
    Type: AWS::EC2::Route
    DependsOn: InternetGatewayAttachment0102
    Properties:
      RouteTableId: !Ref PublicRouteTable0102
      DestinationCidrBlock: 0.0.0.0/0
      GatewayId: !Ref InternetGateway0102
  Subnet0102:
    Type: AWS::EC2::Subnet
    Properties:
      VpcId: !Ref VPC02
      AvailabilityZone: !Select [0, !GetAZs '']
      MapPublicIpOnLaunch: true
      CidrBlock: 10.42.1.0/24
      Tags:
        - Key: Name
          Value: ljhVPCPeering-VPC2-Subnet1
  Subnet0102RouteTableAssociation:
    Type: AWS::EC2::SubnetRouteTableAssociation
    Properties:
      RouteTableId: !Ref PublicRouteTable0102
      SubnetId: !Ref Subnet0102

  Instance0101:
    Type: AWS::EC2::Instance
    Properties:
      ImageId: !Ref LatestAmiId
      InstanceType: t2.micro
      KeyName: !Ref KeyName
      Tags:
        - Key: Name
          Value: ljhVPC1-EC2
      NetworkInterfaces:
        - DeviceIndex: 0
          SubnetId: !Ref Subnet0101
          GroupSet:
            - !Ref SG0101
          AssociatePublicIpAddress: true
          PrivateIpAddress: 10.41.1.100
      UserData:
        Fn::Base64: |
          #!/bin/bash
          hostnamectl --static set-hostname ljhVPC1-EC2
          yum -y install tcpdump httpd
          service httpd start
          chkconfig httpd on
          echo "<html><h1>VPC Peering Lab - VPC1 Web Server</h1></html>" > /var/www/html/index.html

  Instance0102:
    Type: AWS::EC2::Instance
    Properties:
      ImageId: !Ref LatestAmiId
      InstanceType: t2.micro
      KeyName: !Ref KeyName
      Tags:
        - Key: Name
          Value: ljhVPC2-EC2
      NetworkInterfaces:
        - DeviceIndex: 0
          SubnetId: !Ref Subnet0102
          GroupSet:
            - !Ref SG0102
          AssociatePublicIpAddress: true
          PrivateIpAddress: 10.42.1.100
      UserData:
        Fn::Base64: |
          #!/bin/bash
          hostnamectl --static set-hostname ljhVPC2-EC2
          yum -y install tcpdump httpd
          service httpd start
          chkconfig httpd on
          echo "<html><h1>VPC Peering Lab - VPC2 Web Server</h1></html>" > /var/www/html/index.html

  SG0101:
    Type: AWS::EC2::SecurityGroup
    Properties:
      VpcId: !Ref VPC01
      GroupDescription: VPC1-EC2-SecurityGroup
      Tags:
        - Key: Name
          Value: ljhVPC1-EC2-SecurityGroup
      SecurityGroupIngress:
        - IpProtocol: tcp
          FromPort: '22'
          ToPort: '22'
          CidrIp: 0.0.0.0/0
        - IpProtocol: icmp
          FromPort: -1
          ToPort: -1
          CidrIp: 0.0.0.0/0

  SG0102:
    Type: AWS::EC2::SecurityGroup
    Properties:
      VpcId: !Ref VPC02
      GroupDescription: VPC2-EC2-SecurityGroup
      Tags:
        - Key: Name
          Value: ljhVPC2-EC2-SecurityGroup
      SecurityGroupIngress:
        - IpProtocol: tcp
          FromPort: '22'
          ToPort: '22'
          CidrIp: 0.0.0.0/0
        - IpProtocol: icmp
          FromPort: -1
          ToPort: -1
          CidrIp: 0.0.0.0/0
key pair 생성은 AWS - Infra 의 3. 사전 준비 를 참고하세요.
ICMP (Internet Group Management Protocol)
ICMP 는 TCP/IP 에서 IP 패킷 처리 시 발생되는 문제를 알려주는 프로토콜임.
IP 에는 오로지 패킷을 목적지에 도달시키지 위한 내용들로만 구성이 되어 있기 때문에 정상적으로 목적지 도달 시 IP 에서 통신 성공 후 종료되므로 아무런 문제가 없지만, 목적지가 꺼져있거나 비정상인 경우 패킷 전달을 의뢰한 출발지에 이 사실을 알릴 수가 없음. (IP 에는 이러한 에러에 대한 처리 방법이 명시되지 있지 않으므로)이러한 IP 의 부족한 점을 보완하는 것이
ICMP프로토콜임.예를 들어
ping같은 경우도ICMP프로토콜을 이용한 방법임.
3.1.2. CloudFormation 을 통해 생성된 자원 확인
- VPC
- ljhVPC1
- IP CIDR: 10.41.0.0/16
- ljhVPC2
- IP CIDR: 10.42.0.0/16
- ljhVPC1
- Public Subnet
- ljhVPCPeering-VPC1-Subnet1
- IP CIDR: 10.41.1.0/24
- AZ: ap-northeast-2a
- ljhVPCPeering-VPC2-Subnet1
- IP CIDR: 10.42.1.0/24
- AZ: ap-northeast-2a
- ljhVPCPeering-VPC1-Subnet1
- Public Routing Table
- ljhVPCPeering-RT1
- 연결: ljhVPCPeering-VPC1-Subnet1
- 라우팅 정보: 대상 0.0.0.0/0, 타깃: ljhVPCPeering-IGW1
- ljhVPCPeering-RT2
- 연결: ljhVPCPeering-VPC2-Subnet1
- 라우팅 정보: 대상 0.0.0.0/0, 타깃: ljhVPCPeering-IGW2
- ljhVPCPeering-RT1
- IGW
- ljhVPCPeering-IGW1
- 연결: ljhVPC1
- ljhVPCPeering-IGW2
- 연결: ljhVPC2
- ljhVPCPeering-IGW1
- EC2 Instance
- ljhVPC1-EC2
- 연결: ljhVPCPeering-VPC1-Subnet1
- Private IP: 10.41.1.100 (Public IP 할당)
- 서비스: HTTP 구성
- ljhVPC2-EC2
- 연결: ljhVPCPeering-VPC2-Subnet1
- Private IP: 10.42.1.100 (Public IP 할당)
- 서비스: HTTP 구성
- ljhVPC1-EC2
- Security Group
- ljhVPC1-EC2-SecurityGroup
- inbound rule
- SSH/ICMP(Source) - 0.0.0.0/0
- inbound rule
- ljhVPC2-EC2-SecurityGroup
- inbound rule
- SSH/ICMP(Source) - 0.0.0.0/0
- inbound rule
- ljhVPC1-EC2-SecurityGroup
3.1.3. 기본 통신 환경 검증
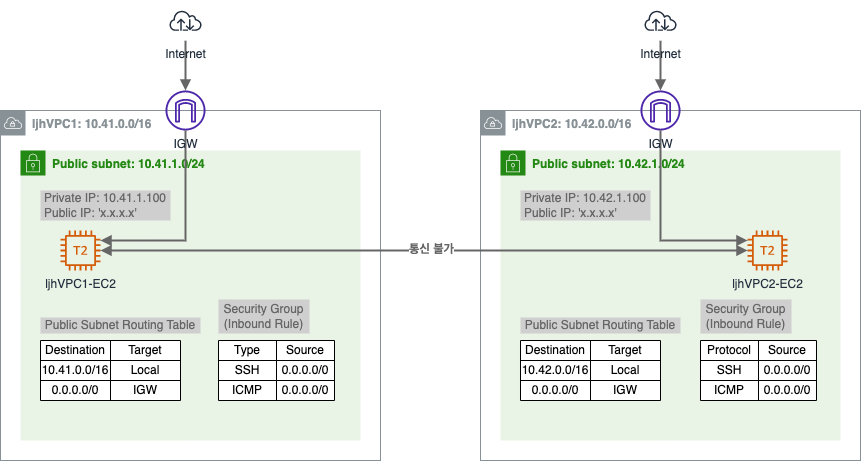
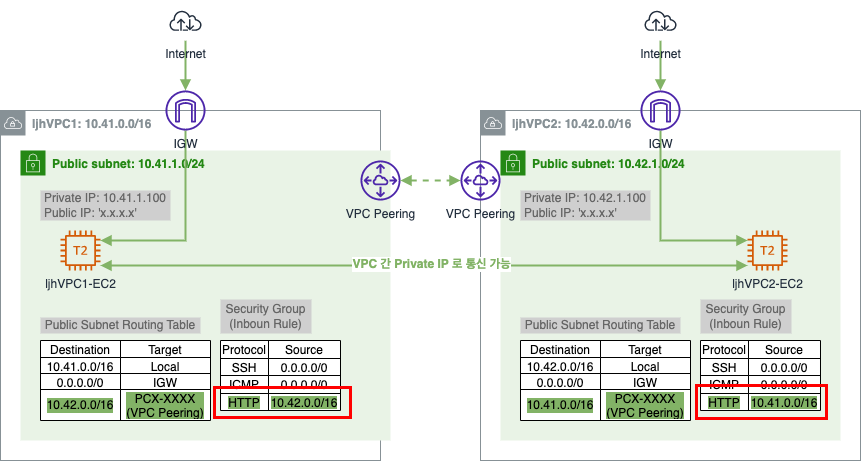
VPC1 에 있는 EC2 와 VPC2 에 있는 EC2 가 서로 Private IP 로 통신이 되는지 확인해보자.
VPC1 의 EC2 인스턴스로 SSH 접속 후 VPC2 의 EC2 의 Private IP 로 통신 확인 (통신 불가)
# VPC1 의 EC2 로 SSH 접속
$ ssh -i sandbox-jh.pem ec2-user@3.38.xx.xx

# VPC2 의 EC2 로 ping 테스트 (통신 불가)
[ec2-user@ljhVPC1-EC2 ~]$ ping 10.42.1.100 -c 1
PING 10.42.1.100 (10.42.1.100) 56(84) bytes of data.

--- 10.42.1.100 ping statistics ---
4 packets transmitted, 0 received, 100% packet loss, time 3072ms
VPC2 의 EC2 인스턴스로 SSH 접속 후 VPC2 의 EC2 의 Private IP 로 통신 확인 (통신 불가)
# VPC2 의 EC2 로 SSH 접속
$ ssh -i sandbox-jh.pem ec2-user@43.201.xx.xx

# VPC1 의 EC2 로 ping 테스트 (통신 불가)
[ec2-user@ljhVPC2-EC2 ~]$ ping 10.41.1.100 -c 1
PING 10.41.1.100 (10.41.1.100) 56(84) bytes of data.

--- 10.41.1.100 ping statistics ---
1 packets transmitted, 0 received, 100% packet loss, time 0ms
3.2. VPC Peering 구성
VPC Peering설정- 라우팅 대상 추가
- Security Group 추가
- 통신 확인
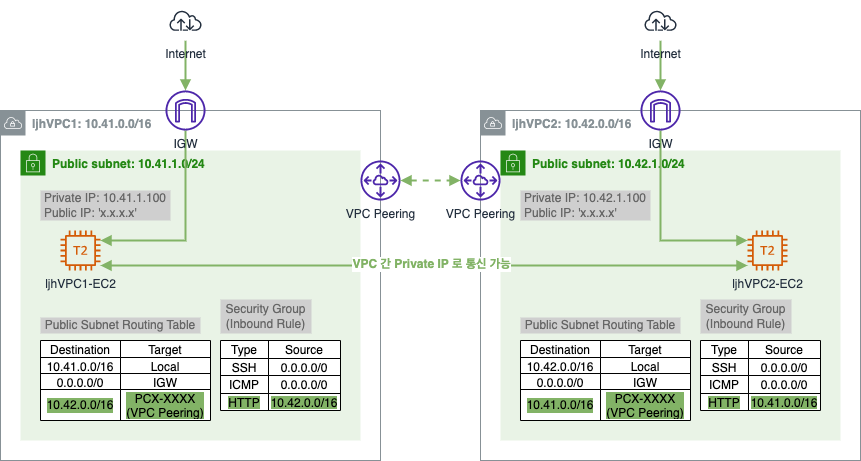
3.2.1. VPC Peering 설정
[VPC] - [Virtual private cloud] - [Peering connections] - [Create peering connection]
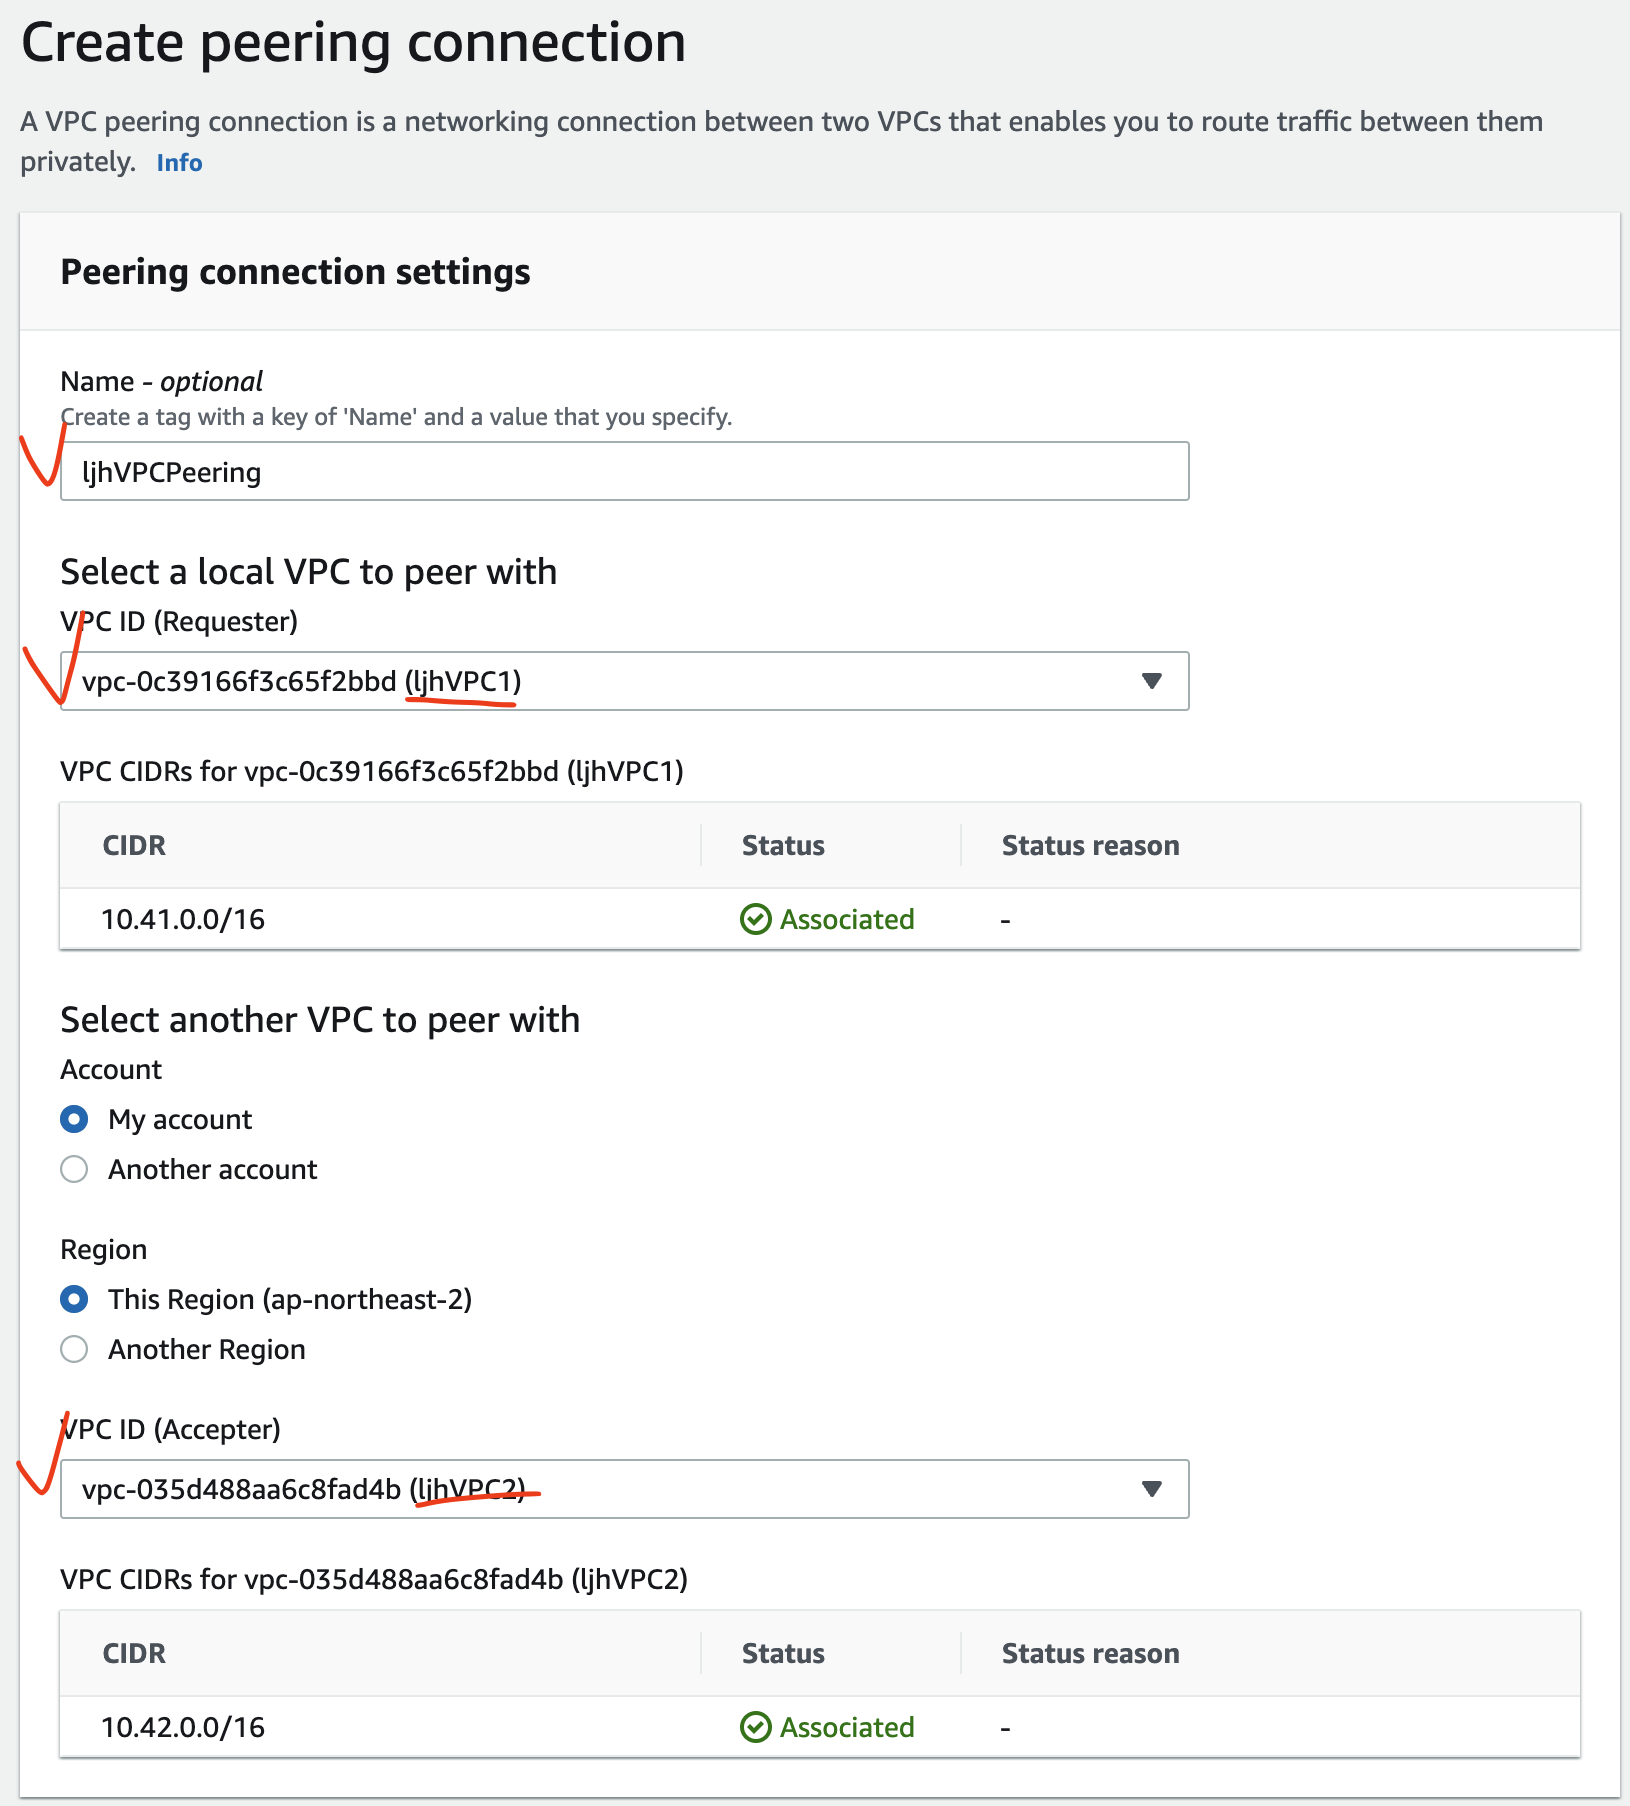
VPN Peering 생성 후 status 는 Pending acceptance 이다.
타 계정과의 연결을 할 경우 서로 간의 운영 관리가 다르기 때문에 수락 절차가 필요하다.
[Actions] - [Accept request] 을 통해 Peering 요청을 수락하면 status 가 Active 로 변경된다.
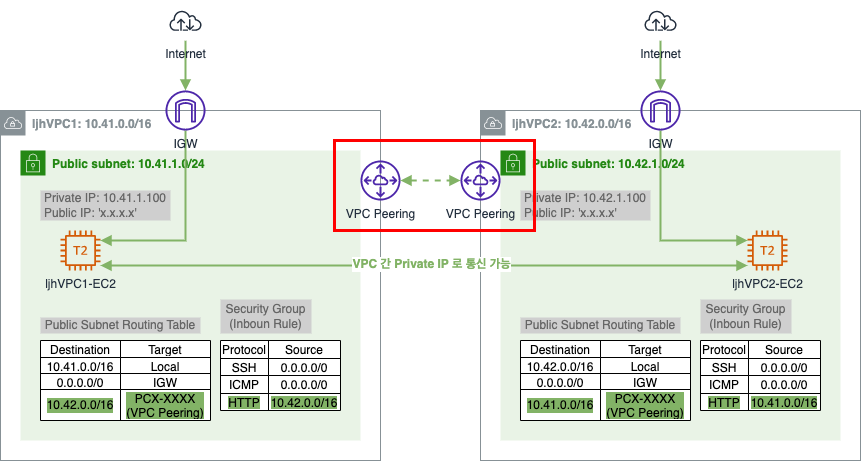
3.2.2. 라우팅 대상 추가
3.2.1.1. VPC1 의 Public Subnet Routing Table 설정
VPC1 Subnet Routing Table 에서 VPC2 Subnet 대역과 Private 통신을 하기 위한 라우팅 정보를 추가한다.
[VPC] - [Virtual private cloud] - [Route tables] - [ljhVPCPeering-RT1 선택] - [Routes 탭] - [Edit routes]
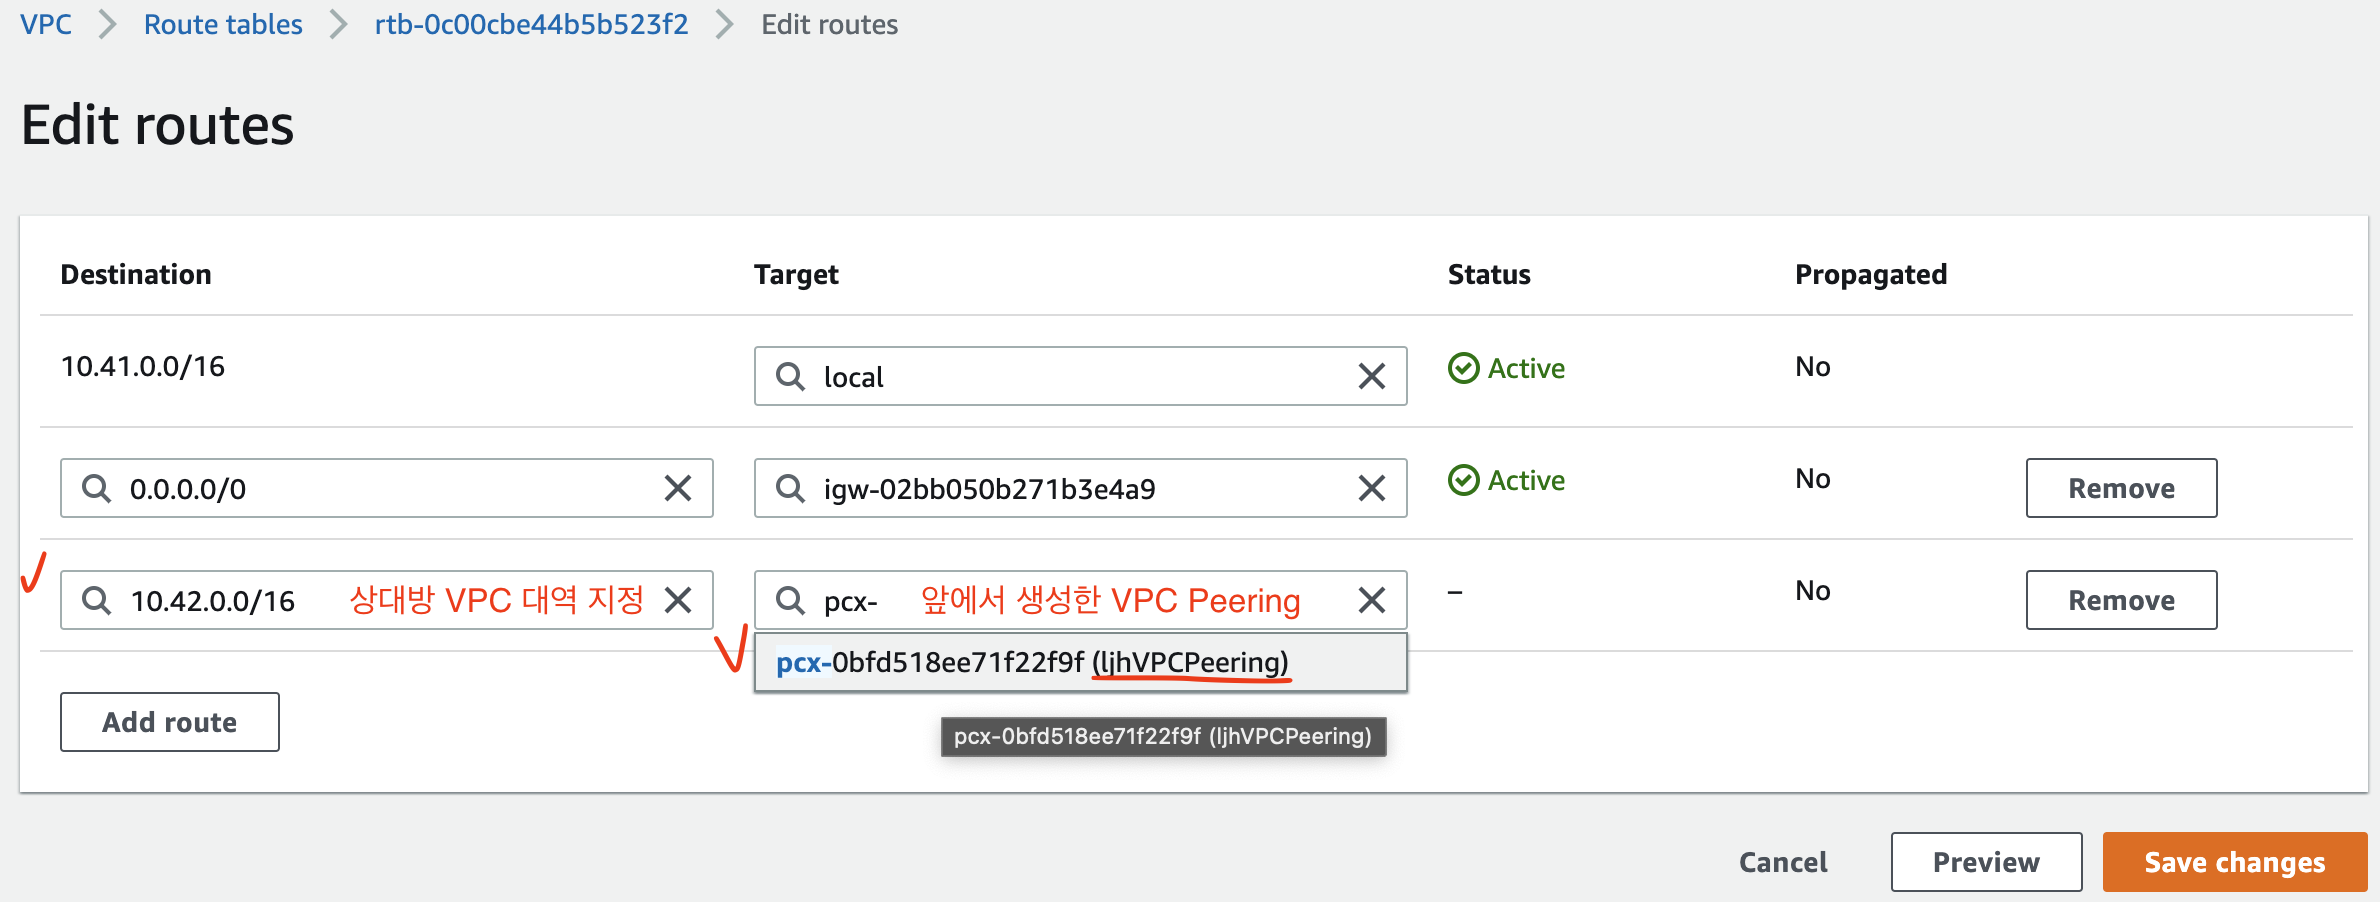
3.2.1.2. VPC2 의 Public Subnet Routing Table 설정
위와 동일한 방식으로 VPC2 Subnet Routing Table 에서 VPC1 Subnet 대역과 Private 통신을 하기 위한 라우팅 정보를 추가한다.
3.2.3. Security Group 추가
이제 Private IP 로 웹 서버 접속이 가능하도록 하기 위해 Instance 의 Security Group(Inbound rule) 에 HTTP 허용을 추가한다.
3.2.3.1. VPC1-EC2 의 Security Group 설정
[EC2] - [Network & Security] - [Security Groups] - [ljhVPC1-EC2-SecurityGroup 선택] - [Inbound rules 탭] - [Edit inbound rules]
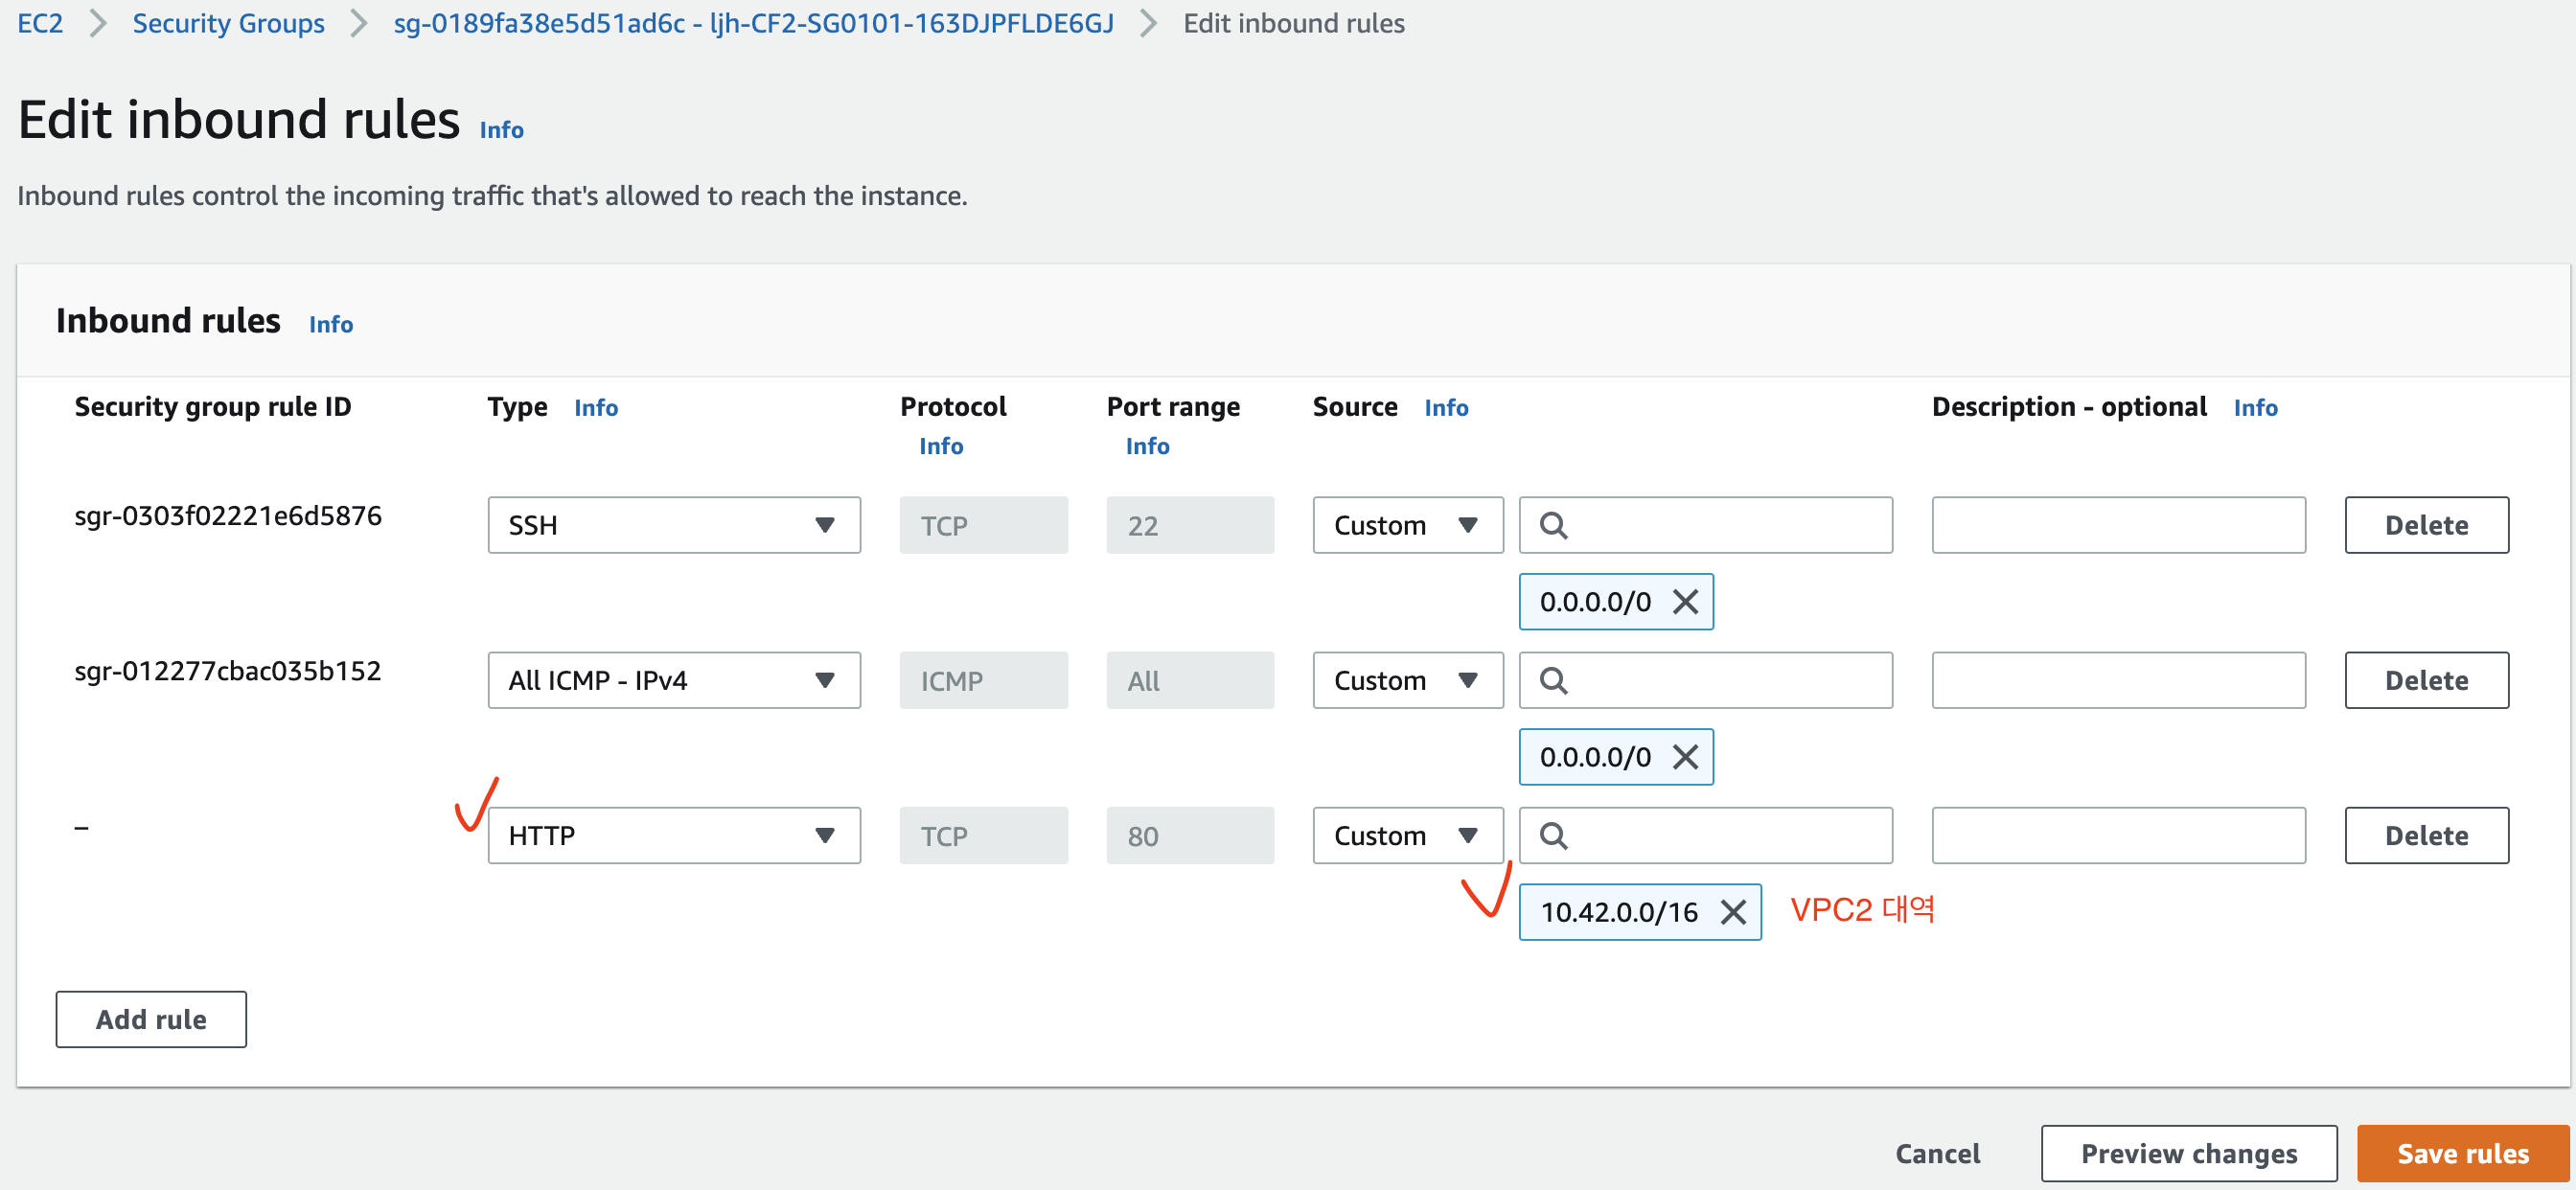
3.2.3.2. VPC2-EC2 의 Security Group 설정
위와 동일한 방식으로 VPC2-EC2 의 inbound rule 도 추가한다.
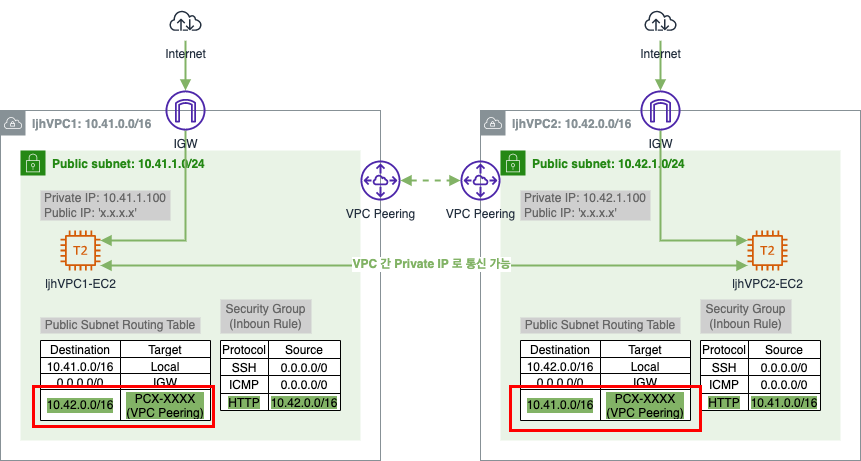
3.2.4. 통신 확인
이제 VPC1 의 EC2 와 VPC2 EC2 가 서로 Private IP 로 통신이 가능한 지 확인해보자.
VPC1 의 EC2 인스턴스로 SSH 접속 후 VPC2 의 EC2 의 Private IP 로 통신 확인 (통신 가능)
# VPC1 의 EC2 로 SSH 접속
$ ssh -i sandbox-jh.pem ec2-user@3.38.xx.xx

# VPC2 의 EC2 로 ping 테스트 (통신 가능)
[ec2-user@ljhVPC1-EC2 ~]$ ping 10.42.1.100 -c 1
PING 10.42.1.100 (10.42.1.100) 56(84) bytes of data.
64 bytes from 10.42.1.100: icmp_seq=1 ttl=255 time=0.840 ms

--- 10.42.1.100 ping statistics ---
1 packets transmitted, 1 received, 0% packet loss, time 0ms
rtt min/avg/max/mdev = 0.840/0.840/0.840/0.000 ms

# VPC2 의 EC2 로 HTTP 접속 테스트 (통신 가능)
[ec2-user@ljhVPC1-EC2 ~]$ curl 10.42.1.100
<html><h1>VPC Peering Lab - VPC2 Web Server</h1></html>
VPC2 의 EC2 인스턴스로 SSH 접속 후 VPC1 의 EC2 의 Private IP 로 통신 확인 (통신 가능)
# VPC2 의 EC2 로 SSH 접속
$ ssh -i sandbox-jh.pem ec2-user@43.201.xx.xx

# VPC1 의 EC2 로 ping 테스트 (통신 가능)
[ec2-user@ljhVPC2-EC2 ~]$ ping 10.41.1.100 -c 1
PING 10.41.1.100 (10.41.1.100) 56(84) bytes of data.
64 bytes from 10.41.1.100: icmp_seq=1 ttl=255 time=0.491 ms

--- 10.41.1.100 ping statistics ---
1 packets transmitted, 1 received, 0% packet loss, time 0ms
rtt min/avg/max/mdev = 0.491/0.491/0.491/0.000 ms

# VPC1 의 EC2 로 HTTP 접속 테스트 (통신 가능)
[ec2-user@ljhVPC2-EC2 ~]$ curl 10.41.1.100
<html><h1>VPC Peering Lab - VPC1 Web Server</h1></html>
VPC Peering속성 중Requester & Accepter DNS resolution(요청자 & 수락자 DNS 확인)
- 미허용 시: 서로 다른 VPC 의 Instance 간에 VPC DNS(e.g. Instance Public IPv4 DNS) 와 통신 시 Public IP 로 접근
- 허용 시: 서로 다른 VPC 의 Instance 간에 VPC DNS 와 통신 시 Private IP 로 접근
3.3. Resource 삭제
아래의 순서대로 Resource 를 삭제한다.
VPC Peering삭제 ([VPC Peering 선택] - [Actions] - [Delete peering connection] - [Delete related route table entries])- CloudFormation Stack 삭제 ([CloudFormation] - [Stacks] - [Delete])
CloudFormation Stack 이 삭제되면 위의 3.1.2. CloudFormation 을 통해 생성된 자원 확인 의 자원이 모두 삭제되었는지 확인한다.
참고 사이트 & 함께 보면 좋은 사이트
본 포스트는 김원일, 서종호 저자의 따라하며 배우는 AWS 네트워크 입문를 기반으로 스터디하며 정리한 내용들입니다.
