AWS - Network 연결 옵션 (3): Transit Gateway (전송 게이트웨이)
이 포스트는 VPC 나 온프레미스 등의 네트워크를 단일 지점으로 연결할 수 있는 라우팅 서비스인 Transit Gateway 대해 알아본다.
- 1.
Transit Gateway(TGW, 전송 게이트웨이) - 2.
Transit Gateway를 통한 연결 테스트
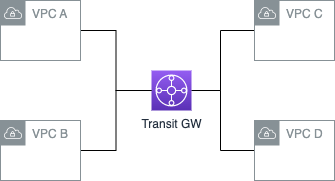
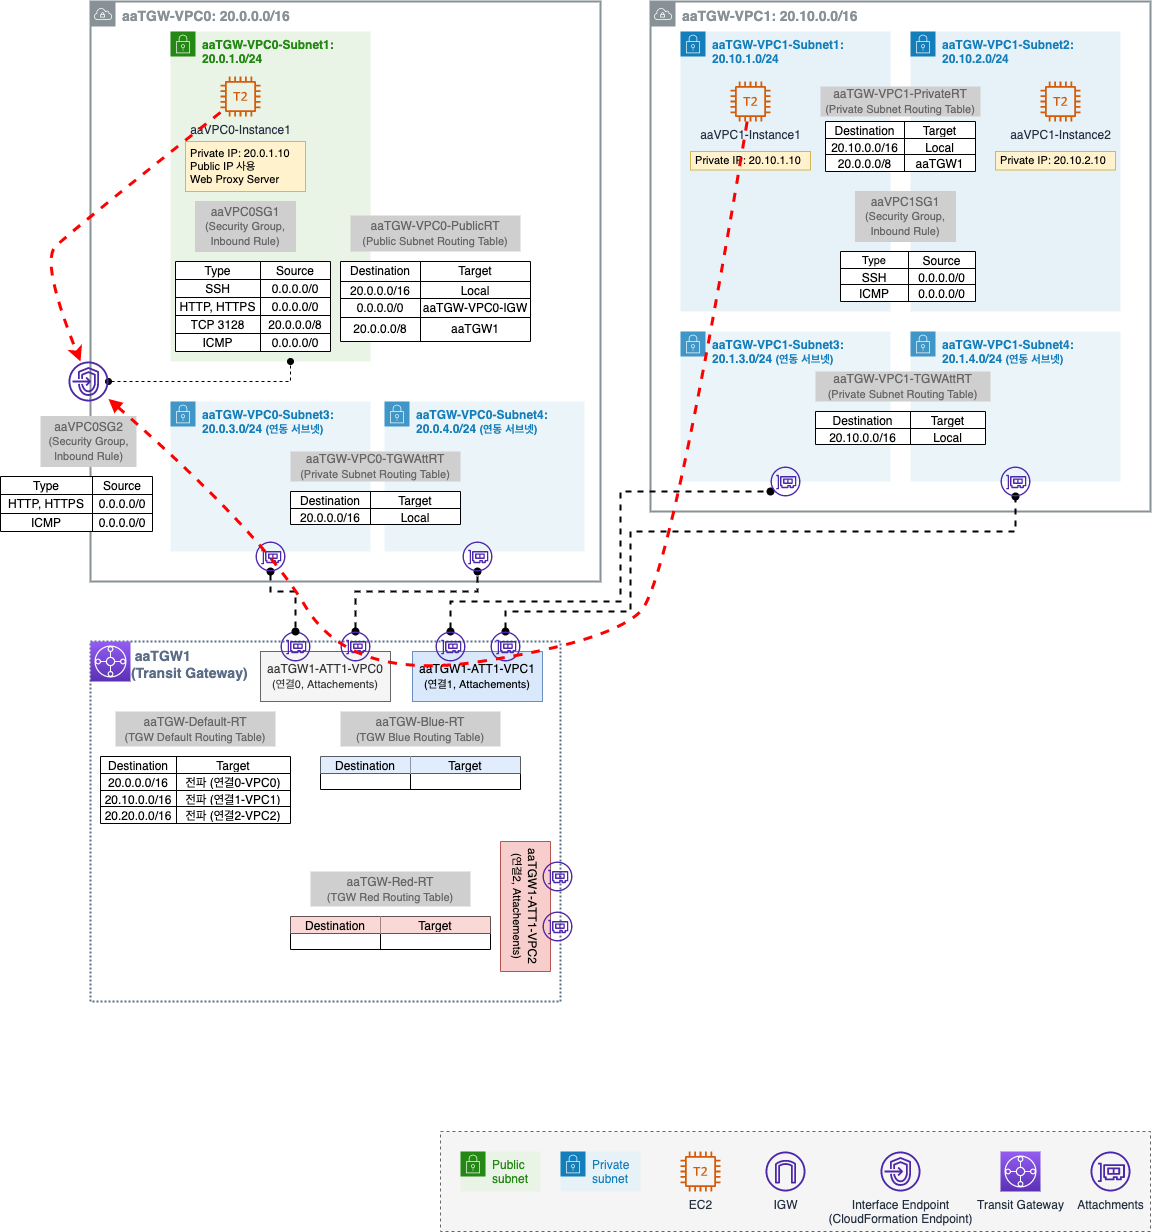
아래는 이번 포스트에서 다뤄볼 범위 도식화이다.
1. Transit Gateway (TGW, 전송 게이트웨이)
- VPC 나 온프레미스 등의 네트워크를 단일 지점으로 연결할 수 있는 라우팅 서비스
- 연결된 네트워크는 다른 네크워크의 연결없이 Transit G/W 로만 연결하면 되므로 관리가 간소화되고 운영 비용도 줄어듦
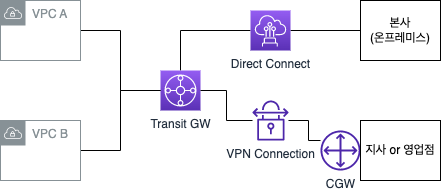
1.1. Transit Gateway 관련 용어
전송 게이트웨이 (TGW, Transit Gateway)
연결의 접점이 되는 중앙 집중형 단일 게이트 웨이 로 Hub & Spoke 환경참고에서 Hub 역할을 한다.
Hub & Spoke ↩
물류 또는 항공 노선을 구성하는 한 형태로 각각의 출발지(Spoke) 에서 발생하는 물량을 중심 거점(Hub) 로 모으고, 중심 거점에서 물류를 분류하여 다시 각각의 도착지(Spoke) 로 배송하는 형태가 마치 바퀴의 중심축(Hub) 와 바퀴살(Spoke) 의 모습을 연상케하여 Hub & Spoke 라고 함
전송 게이트웨이 연결 (TGW Attachment)
TGW 에 연결되는 방식은 현재 아래 3가지 방식이 있다.
- VPC 연결 (VPC Attachment)
- TGW 와 동일 리전의 VPC 를 직접 연결 (다른 계정에 생성한 VPC 도 연결 가능)
- VPN 연결 (VPN Attachment)
- TGW 와 Site-to-Site VPN 연결
- 전송 게이트웨이 피어링 (TGW Peering, =Inter Region TGW Peering)
- TGW 와 다른 리전의 TGW 연결
전송 게이트웨이 라우팅 테이블
TGW 에서 관리하는 라우팅 테이블이다.
전송 게이트웨이 공유
TGW 를 공유하여 다른 AWS 계정에 전달하여 연결 가능하다. (AWS Resource Access Manager 활용)
전송 게이트웨이 멀티캐스트
TGW 를 통해 Multicast 트래픽 전달이 가능하다.
전송 게이트웨이 네트워크 매니저
지리적 맵과 중앙 대시보드에서 글로벌 네트워크를 시각화한다.참고
1.2. Transit Gateway 주요 기능
- 라우팅
- Static Routing 과 Dynamic Routing 모두 지원
- Edge 연결
- VPN 을 사용하여 AWS TGW 와 온프레미스 장비 간에 VPN 연결 생성
- VPC 기능 상호 운용
- VPC 에 있는 Instance 가 TGW 에 연결된 다른 VPC 에 있는 NAT G/W, AWS Endpoint Service, Amazon EFS (Elastic File System) 등에 액세스 가능
- 모니터링
- CloudWatch, AWS VPC Flow Logs 에서 통계와 로그 제공
- 리전 간 VPC Peering
- TGW 리전 간 VPC Peering 은 AWS 글로벌 네트워크를 사용하여 AWS 리전을 통해 트래픽을 라우팅할 수 있도록 지원
- 멀티캐스트
- 유저가 클라우드에서 Multicast 애플리케이션을 쉽게 구축, 모니터링, 관리, 확장할 수 있도록 지원
- 보안
- TGW 는 IAM (Identity and Access Management) 와 통합되어 TGW 에 대한 액세스를 안전하게 관리 가능
- Metrics
- 성능, 송수신된 바이트, 패킷 등 트래픽 지표 통해 글로벌 네트워크 모니터링
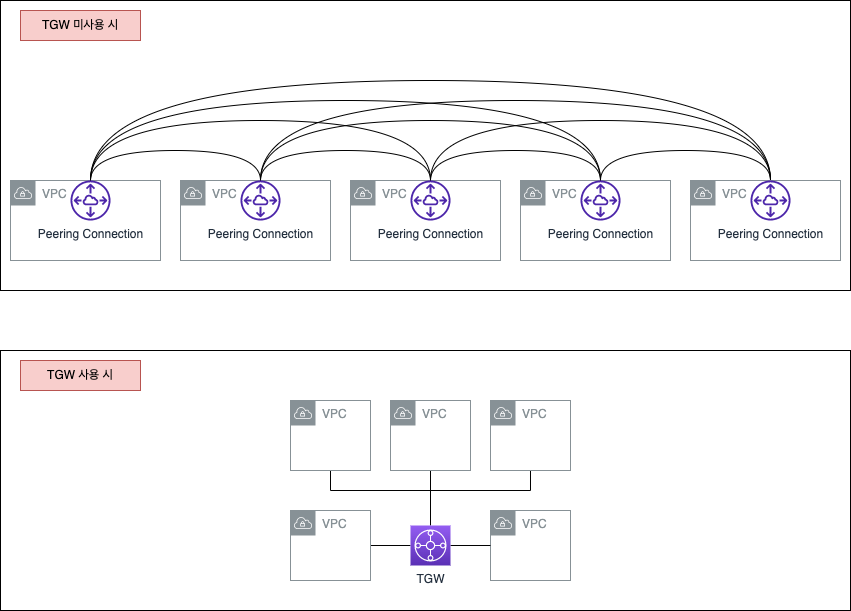
1.3. Transit Gateway 미사용 시와 사용 시 비교
다수의 VPC, VPN, Direct Connect Gateway 가 있는 환경에서는 복잡한 개별 연결이 이루어지는데 이 때 TGW 를 사용하면 중앙 집중현 연결 환경을 만들 수 있다.
1.4. VGW (Virtual Private Gateway) vs TGW (Transit Gateway)
VGW 는 각 VPC 에 연결되지만 TGW 는 VPC 에 연결되는 것이 아니라 라우팅 테이블을 통해 여러 VPC 로 라우팅하는 개념이다. TGW 는 여러 라우팅 테이블을 추가하여 더 향상된 라우팅이 가능하고, 멀티 리전/여러 계정에서 사용이 가능하다.후

VGW의 상세한 내용은 AWS - Network 연결 옵션 (2) : VPN 을 참고하세요.
DGW (Direct Connection Gateway)의 상세한 내용은 AWS - Network 연결 옵션 (5): AWS Direct Connect 를 참고하세요.
2. Transit Gateway 를 통한 연결 테스트
TGW 를 통한 네트워크 구성을 해본다.
서울 리전에서 TGW 에 연결 (VPC, VPN 등) 당 1시간에 $0.07 비용 발생!!
- 기본 환경 구성
- CloudFormation 적용
- CloudFormation 을 통해 생성된 자원 확인
- 기본 통신 환경 검증
- VPC0-Instance1 을 기준으로 기본 환경 검증
- VPC1-Instance1 을 기준으로 기본 환경 검증
- VPC Endpoint 환경 검증
Transit GatewayRouting Table 을 이용한 트래픽 제어- TGW 기본 Routing Table 현황
- Blue/Red
Transit GatewayRouting Table 설정- TGW 기본 Routing Table 설정
- TGW Blue Routing Table 설정
- TGW Red Routing Table 설정
- 동작 확인
- TGW 기본 Routing Table 을 사용하는 VPC0-Instance1 확인
- TGW Blue Routing Table 을 사용하는 VPC1-Instance1 확인
- TGW Red Routing Table 을 사용하는 VPC2-Instance1 확인
- 블랙홀 라우팅을 이용한 통신 차단
- 블랙홀 라우팅 설정
- 블랙홀 라우팅 동작 확인
- Resource 삭제
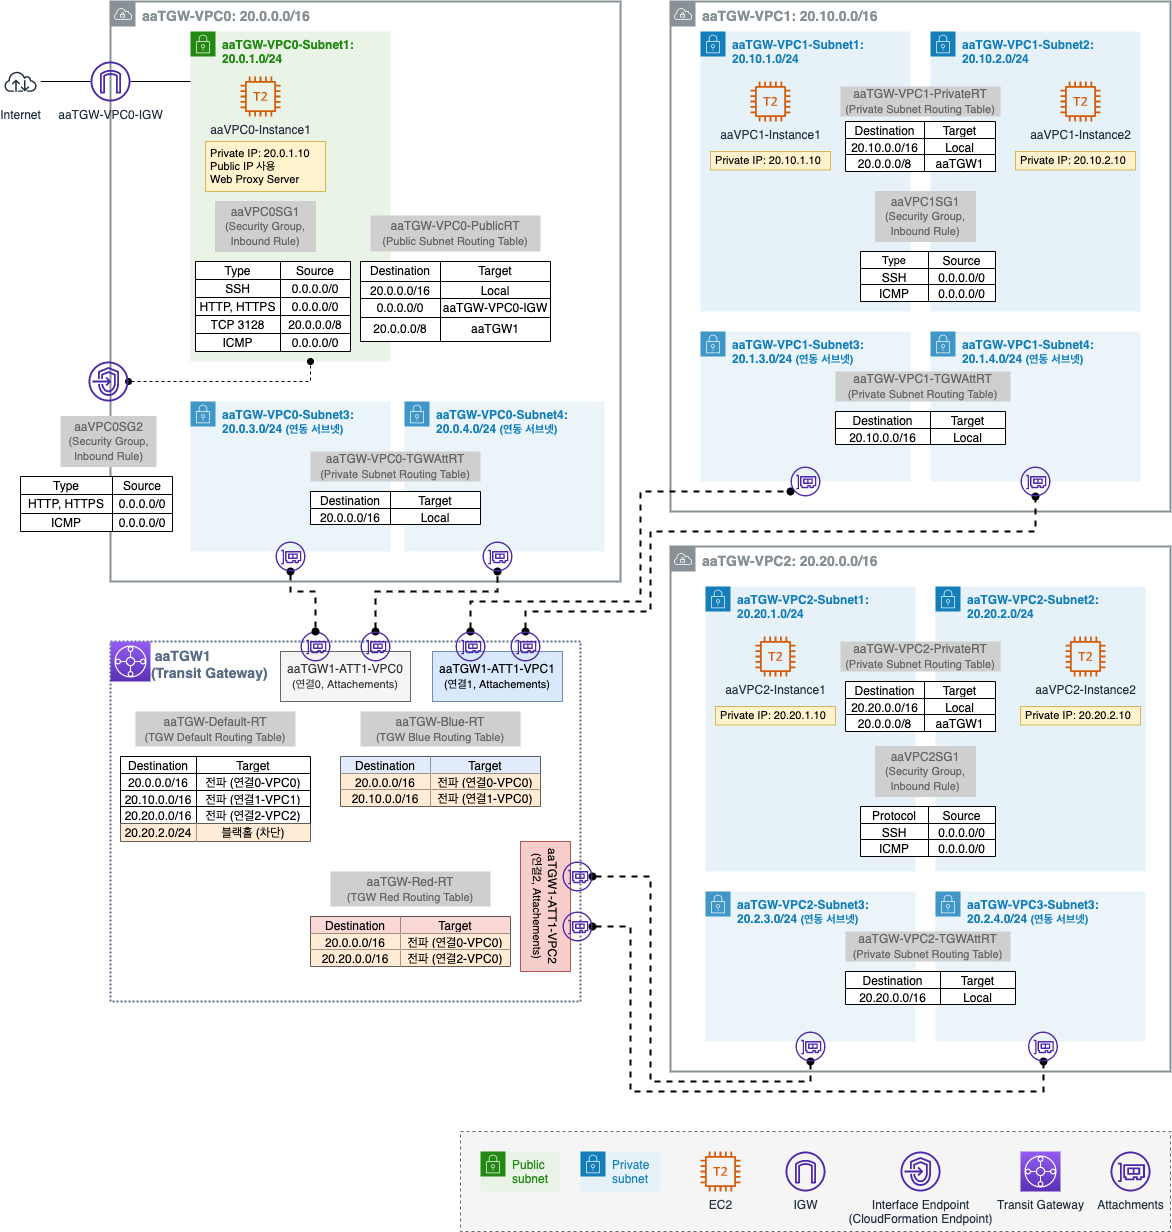
2.1. 기본 환경 구성
- CloudFormation 적용
- CloudFormation 을 통해 생성된 자원 확인
- 기본 통신 환경 검증
- VPC0-Instance1 을 기준으로 기본 환경 검증
- VPC1-Instance1 을 기준으로 기본 환경 검증
- VPC Endpoint 환경 검증
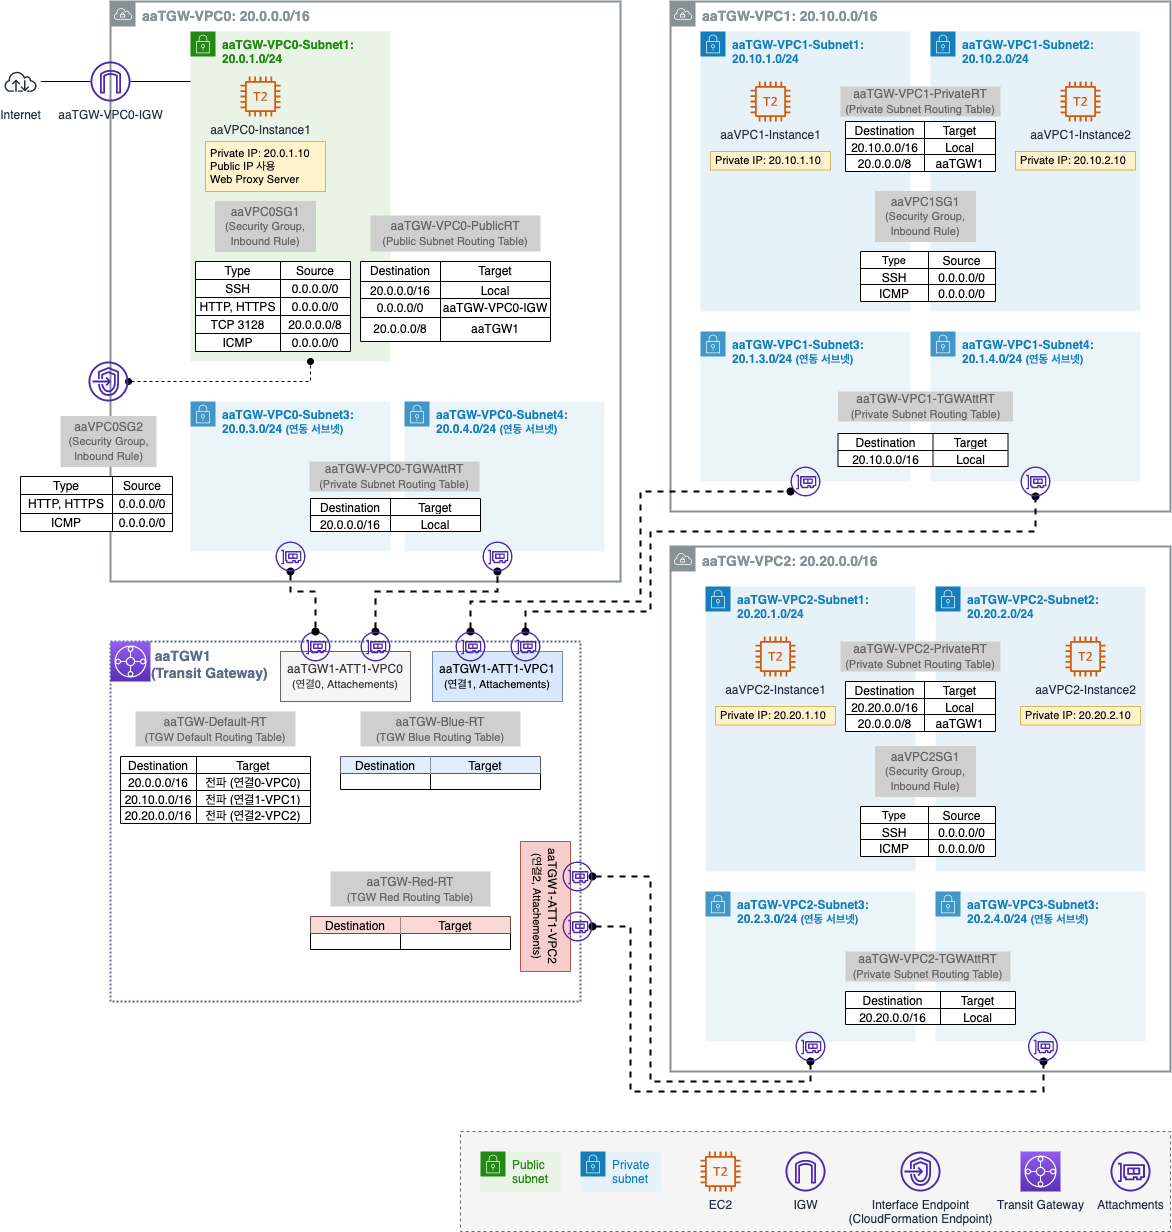
2.1.1. CloudFormation 적용
[CloudFormation] - [Stacks]
CloudFormation Template Download CloudFormation Template (펼쳐보기)
Parameters:
  KeyName:
    Description: Name of an existing EC2 KeyPair to enable SSH access to the instances. Linked to AWS Parameter
    Type: AWS::EC2::KeyPair::KeyName
    ConstraintDescription: must be the name of an existing EC2 KeyPair.
  LatestAmiId:
    Description: (DO NOT CHANGE)
    Type: 'AWS::SSM::Parameter::Value<AWS::EC2::Image::Id>'
    Default: '/aws/service/ami-amazon-linux-latest/amzn2-ami-hvm-x86_64-gp2'
    AllowedValues:
      - /aws/service/ami-amazon-linux-latest/amzn2-ami-hvm-x86_64-gp2

Resources:
  # VPC0 Resource
  VPC0:
    Type: AWS::EC2::VPC
    Properties:
      CidrBlock: 20.0.0.0/16
      EnableDnsSupport: true
      EnableDnsHostnames: true
      Tags:
        - Key: Name
          Value: aaTGW-VPC0
  VPC0InternetGateway:
    Type: AWS::EC2::InternetGateway
    Properties:
      Tags:
        - Key: Name
          Value: aaTGW-VPC0-IGW
  VPC0InternetGatewayAttachment:
    Type: AWS::EC2::VPCGatewayAttachment
    Properties:
      InternetGatewayId: !Ref VPC0InternetGateway
      VpcId: !Ref VPC0

  VPC0RouteTable1:
    Type: AWS::EC2::RouteTable
    Properties:
      VpcId: !Ref VPC0
      Tags:
        - Key: Name
          Value: aaTGW-VPC0-PublicRT
  VPC0RouteTable2:
    Type: AWS::EC2::RouteTable
    Properties:
      VpcId: !Ref VPC0
      Tags:
        - Key: Name
          Value: aaTGW-VPC0-TGWAttRT

  VPC0Route1:
    Type: AWS::EC2::Route
    DependsOn: VPC0InternetGatewayAttachment
    Properties:
      RouteTableId: !Ref VPC0RouteTable1
      DestinationCidrBlock: 0.0.0.0/0
      GatewayId: !Ref VPC0InternetGateway

  VPC0Subnet1:
    Type: AWS::EC2::Subnet
    Properties:
      VpcId: !Ref VPC0
      AvailabilityZone: !Select [0, !GetAZs '']
      MapPublicIpOnLaunch: true
      CidrBlock: 20.0.1.0/24
      Tags:
        - Key: Name
          Value: aaTGW-VPC0-Subnet1
  VPC0Subnet1RouteTableAssociation:
    Type: AWS::EC2::SubnetRouteTableAssociation
    Properties:
      RouteTableId: !Ref VPC0RouteTable1
      SubnetId: !Ref VPC0Subnet1

  VPC0Subnet3:
    Type: AWS::EC2::Subnet
    Properties:
      VpcId: !Ref VPC0
      AvailabilityZone: !Select [0, !GetAZs '']
      CidrBlock: 20.0.3.0/24
      Tags:
        - Key: Name
          Value: aaTGW-VPC0-Subnet3
  VPC0Subnet3RouteTableAssociation:
    Type: AWS::EC2::SubnetRouteTableAssociation
    Properties:
      RouteTableId: !Ref VPC0RouteTable2
      SubnetId: !Ref VPC0Subnet3
  VPC0Subnet4:
    Type: AWS::EC2::Subnet
    Properties:
      VpcId: !Ref VPC0
      AvailabilityZone: !Select [2, !GetAZs '']
      CidrBlock: 20.0.4.0/24
      Tags:
        - Key: Name
          Value: aaTGW-VPC0-Subnet4
  VPC0Subnet4RouteTableAssociation:
    Type: AWS::EC2::SubnetRouteTableAssociation
    Properties:
      RouteTableId: !Ref VPC0RouteTable2
      SubnetId: !Ref VPC0Subnet4

  VPC0Instance1:
    Type: AWS::EC2::Instance
    Properties:
      ImageId: !Ref LatestAmiId
      InstanceType: t2.micro
      KeyName: !Ref KeyName
      Tags:
        - Key: Name
          Value: aaVPC0-Instance1
      NetworkInterfaces:
        - DeviceIndex: 0
          SubnetId: !Ref VPC0Subnet1
          GroupSet:
            - !Ref VPC0SG1
          PrivateIpAddress: 20.0.1.10
      UserData:
        Fn::Base64: |
          #!/bin/bash
          hostnamectl --static set-hostname aaVPC0-Instance1
          yum install -y tcpdump squid
          cat <<EOT> /etc/squid/squid.conf
          http_port 3128
          acl all src 0.0.0.0/0
          http_access allow all
          http_access deny all
          EOT
          systemctl start squid && systemctl enable squid
          cat <<EOT> /home/ec2-user/list.txt
          20.0.1.10
          20.10.1.10
          20.10.2.10
          20.20.1.10
          20.20.2.10
          EOT
          yum install httpd -y
          systemctl start httpd && systemctl enable httpd
          echo "<h1>TGW Lab - MgMt Server1</h1>" > /var/www/html/index.html
          curl -o /home/ec2-user/pingall.sh https://cloudneta-book.s3.ap-northeast-2.amazonaws.com/chapter6/pingall.sh --silent
          cp /home/ec2-user/pingall.sh /var/www/html/pingall.sh
          cp /home/ec2-user/list.txt /var/www/html/list.txt
          chmod +x /home/ec2-user/pingall.sh

  VPC0SG1:
    Type: AWS::EC2::SecurityGroup
    Properties:
      VpcId: !Ref VPC0
      GroupDescription: VPC0SG1
      Tags:
        - Key: Name
          Value: aaVPC0SG1
      SecurityGroupIngress:
        - IpProtocol: tcp
          FromPort: '22'
          ToPort: '22'
          CidrIp: 0.0.0.0/0
        - IpProtocol: tcp
          FromPort: '80'
          ToPort: '80'
          CidrIp: 0.0.0.0/0
        - IpProtocol: tcp
          FromPort: '443'
          ToPort: '443'
          CidrIp: 0.0.0.0/0
        - IpProtocol: tcp
          FromPort: '3128'
          ToPort: '3128'
          CidrIp: 20.0.0.0/8
        - IpProtocol: icmp
          FromPort: -1
          ToPort: -1
          CidrIp: 0.0.0.0/0

  VPC0SG2:
    Type: AWS::EC2::SecurityGroup
    Properties:
      VpcId: !Ref VPC0
      GroupDescription: VPC0SG2
      Tags:
        - Key: Name
          Value: aaVPC0SG2
      SecurityGroupIngress:
        - IpProtocol: tcp
          FromPort: '80'
          ToPort: '80'
          CidrIp: 0.0.0.0/0
        - IpProtocol: tcp
          FromPort: '443'
          ToPort: '443'
          CidrIp: 0.0.0.0/0
        - IpProtocol: icmp
          FromPort: -1
          ToPort: -1
          CidrIp: 0.0.0.0/0

  VPC0Endpoint1:
    Type: AWS::EC2::VPCEndpoint
    Properties:
      PrivateDnsEnabled: true
      SecurityGroupIds:
        - !Ref VPC0SG2
      ServiceName: !Sub com.amazonaws.${AWS::Region}.cloudformation
      SubnetIds:
        - !Ref VPC0Subnet1
      VpcId: !Ref VPC0
      VpcEndpointType: Interface

  # VPC1 Resource
  VPC1:
    Type: AWS::EC2::VPC
    Properties:
      CidrBlock: 20.10.0.0/16
      EnableDnsSupport: true
      EnableDnsHostnames: true
      Tags:
        - Key: Name
          Value: aaTGW-VPC1

  VPC1RouteTable1:
    Type: AWS::EC2::RouteTable
    Properties:
      VpcId: !Ref VPC1
      Tags:
        - Key: Name
          Value: aaTGW-VPC1-PrivateRT
  VPC1RouteTable2:
    Type: AWS::EC2::RouteTable
    Properties:
      VpcId: !Ref VPC1
      Tags:
        - Key: Name
          Value: aaTGW-VPC1-TGWAttRT

  VPC1Subnet1:
    Type: AWS::EC2::Subnet
    Properties:
      VpcId: !Ref VPC1
      AvailabilityZone: !Select [0, !GetAZs '']
      CidrBlock: 20.10.1.0/24
      Tags:
        - Key: Name
          Value: aaTGW-VPC1-Subnet1
  VPC1Subnet1RouteTableAssociation:
    Type: AWS::EC2::SubnetRouteTableAssociation
    Properties:
      RouteTableId: !Ref VPC1RouteTable1
      SubnetId: !Ref VPC1Subnet1
  VPC1Subnet2:
    Type: AWS::EC2::Subnet
    Properties:
      VpcId: !Ref VPC1
      AvailabilityZone: !Select [2, !GetAZs '']
      CidrBlock: 20.10.2.0/24
      Tags:
        - Key: Name
          Value: aaTGW-VPC1-Subnet2
  VPC1Subnet2RouteTableAssociation:
    Type: AWS::EC2::SubnetRouteTableAssociation
    Properties:
      RouteTableId: !Ref VPC1RouteTable1
      SubnetId: !Ref VPC1Subnet2

  VPC1Subnet3:
    Type: AWS::EC2::Subnet
    Properties:
      VpcId: !Ref VPC1
      AvailabilityZone: !Select [0, !GetAZs '']
      CidrBlock: 20.10.3.0/24
      Tags:
        - Key: Name
          Value: aaTGW-VPC1-Subnet3
  VPC1Subnet3RouteTableAssociation:
    Type: AWS::EC2::SubnetRouteTableAssociation
    Properties:
      RouteTableId: !Ref VPC1RouteTable2
      SubnetId: !Ref VPC1Subnet3
  VPC1Subnet4:
    Type: AWS::EC2::Subnet
    Properties:
      VpcId: !Ref VPC1
      AvailabilityZone: !Select [2, !GetAZs '']
      CidrBlock: 20.10.4.0/24
      Tags:
        - Key: Name
          Value: aaTGW-VPC1-Subnet4
  VPC1Subnet4RouteTableAssociation:
    Type: AWS::EC2::SubnetRouteTableAssociation
    Properties:
      RouteTableId: !Ref VPC1RouteTable2
      SubnetId: !Ref VPC1Subnet4

  VPC1Instance1:
    Type: AWS::EC2::Instance
    Properties:
      ImageId: !Ref LatestAmiId
      InstanceType: t2.micro
      KeyName: !Ref KeyName
      Tags:
        - Key: Name
          Value: aaVPC1-Instance1
      NetworkInterfaces:
        - DeviceIndex: 0
          SubnetId: !Ref VPC1Subnet1
          GroupSet:
            - !Ref VPC1SG1
          PrivateIpAddress: 20.10.1.10
      UserData:
        Fn::Base64: |
          #!/bin/bash
          (
          echo "qwe123"
          echo "qwe123"
          ) | passwd --stdin root
          sed -i "s/^PasswordAuthentication no/PasswordAuthentication yes/g" /etc/ssh/sshd_config
          sed -i "s/^#PermitRootLogin yes/PermitRootLogin yes/g" /etc/ssh/sshd_config
          service sshd restart
          hostnamectl --static set-hostname aaVPC1Instance1
          cat <<EOT>> /etc/bashrc
          export http_proxy=http://20.0.1.10:3128
          export https_proxy=http://20.0.1.10:3128
          no_proxy=127.0.0.1,localhost,169.254.169.254,20.0.0.0/8,.internal
          EOT

  VPC1Instance2:
    Type: AWS::EC2::Instance
    Properties:
      ImageId: !Ref LatestAmiId
      InstanceType: t2.micro
      KeyName: !Ref KeyName
      Tags:
        - Key: Name
          Value: aaVPC1-Instance2
      NetworkInterfaces:
        - DeviceIndex: 0
          SubnetId: !Ref VPC1Subnet2
          GroupSet:
            - !Ref VPC1SG1
          PrivateIpAddress: 20.10.2.10
      UserData:
        Fn::Base64: |
          #!/bin/bash
          (
          echo "qwe123"
          echo "qwe123"
          ) | passwd --stdin root
          sed -i "s/^PasswordAuthentication no/PasswordAuthentication yes/g" /etc/ssh/sshd_config
          sed -i "s/^#PermitRootLogin yes/PermitRootLogin yes/g" /etc/ssh/sshd_config
          service sshd restart
          hostnamectl --static set-hostname aaVPC1Instance2
          cat <<EOT>> /etc/bashrc
          export http_proxy=http://20.0.1.10:3128
          export https_proxy=http://20.0.1.10:3128
          no_proxy=127.0.0.1,localhost,169.254.169.254,20.0.0.0/8,.internal
          EOT

  VPC1SG1:
    Type: AWS::EC2::SecurityGroup
    Properties:
      VpcId: !Ref VPC1
      GroupDescription: VPC1SG1
      Tags:
        - Key: Name
          Value: aaVPC1SG1
      SecurityGroupIngress:
        - IpProtocol: tcp
          FromPort: '22'
          ToPort: '22'
          CidrIp: 0.0.0.0/0
        - IpProtocol: icmp
          FromPort: -1
          ToPort: -1
          CidrIp: 0.0.0.0/0

  # VPC2 Resource
  VPC2:
    Type: AWS::EC2::VPC
    Properties:
      CidrBlock: 20.20.0.0/16
      EnableDnsSupport: true
      EnableDnsHostnames: true
      Tags:
        - Key: Name
          Value: aaTGW-VPC2

  VPC2RouteTable1:
    Type: AWS::EC2::RouteTable
    Properties:
      VpcId: !Ref VPC2
      Tags:
        - Key: Name
          Value: aaTGW-VPC2-PrivateRT
  VPC2RouteTable2:
    Type: AWS::EC2::RouteTable
    Properties:
      VpcId: !Ref VPC2
      Tags:
        - Key: Name
          Value: aaTGW-VPC2-TGWAttRT

  VPC2Subnet1:
    Type: AWS::EC2::Subnet
    Properties:
      VpcId: !Ref VPC2
      AvailabilityZone: !Select [0, !GetAZs '']
      CidrBlock: 20.20.1.0/24
      Tags:
        - Key: Name
          Value: aaTGW-VPC2-Subnet1
  VPC2Subnet1RouteTableAssociation:
    Type: AWS::EC2::SubnetRouteTableAssociation
    Properties:
      RouteTableId: !Ref VPC2RouteTable1
      SubnetId: !Ref VPC2Subnet1
  VPC2Subnet2:
    Type: AWS::EC2::Subnet
    Properties:
      VpcId: !Ref VPC2
      AvailabilityZone: !Select [2, !GetAZs '']
      CidrBlock: 20.20.2.0/24
      Tags:
        - Key: Name
          Value: aaTGW-VPC2-Subnet2
  VPC2Subnet2RouteTableAssociation:
    Type: AWS::EC2::SubnetRouteTableAssociation
    Properties:
      RouteTableId: !Ref VPC2RouteTable1
      SubnetId: !Ref VPC2Subnet2

  VPC2Subnet3:
    Type: AWS::EC2::Subnet
    Properties:
      VpcId: !Ref VPC2
      AvailabilityZone: !Select [0, !GetAZs '']
      CidrBlock: 20.20.3.0/24
      Tags:
        - Key: Name
          Value: aaTGW-VPC2-Subnet3
  VPC2Subnet3RouteTableAssociation:
    Type: AWS::EC2::SubnetRouteTableAssociation
    Properties:
      RouteTableId: !Ref VPC2RouteTable2
      SubnetId: !Ref VPC2Subnet3
  VPC2Subnet4:
    Type: AWS::EC2::Subnet
    Properties:
      VpcId: !Ref VPC2
      AvailabilityZone: !Select [2, !GetAZs '']
      CidrBlock: 20.20.4.0/24
      Tags:
        - Key: Name
          Value: aaTGW-VPC2-Subnet4
  VPC2Subnet4RouteTableAssociation:
    Type: AWS::EC2::SubnetRouteTableAssociation
    Properties:
      RouteTableId: !Ref VPC2RouteTable2
      SubnetId: !Ref VPC2Subnet4

  VPC2Instance1:
    Type: AWS::EC2::Instance
    Properties:
      ImageId: !Ref LatestAmiId
      InstanceType: t2.micro
      KeyName: !Ref KeyName
      Tags:
        - Key: Name
          Value: aaVPC2-Instance1
      NetworkInterfaces:
        - DeviceIndex: 0
          SubnetId: !Ref VPC2Subnet1
          GroupSet:
            - !Ref VPC2SG1
          PrivateIpAddress: 20.20.1.10
      UserData:
        Fn::Base64: |
          #!/bin/bash
          (
          echo "qwe123"
          echo "qwe123"
          ) | passwd --stdin root
          sed -i "s/^PasswordAuthentication no/PasswordAuthentication yes/g" /etc/ssh/sshd_config
          sed -i "s/^#PermitRootLogin yes/PermitRootLogin yes/g" /etc/ssh/sshd_config
          service sshd restart
          hostnamectl --static set-hostname aaVPC2Instance1
          cat <<EOT>> /etc/bashrc
          export http_proxy=http://20.0.1.10:3128
          export https_proxy=http://20.0.1.10:3128
          no_proxy=127.0.0.1,localhost,169.254.169.254,20.0.0.0/8,.internal
          EOT

  VPC2Instance2:
    Type: AWS::EC2::Instance
    Properties:
      ImageId: !Ref LatestAmiId
      InstanceType: t2.micro
      KeyName: !Ref KeyName
      Tags:
        - Key: Name
          Value: aaVPC2-Instance2
      NetworkInterfaces:
        - DeviceIndex: 0
          SubnetId: !Ref VPC2Subnet2
          GroupSet:
            - !Ref VPC2SG1
          PrivateIpAddress: 20.20.2.10
      UserData:
        Fn::Base64: |
          #!/bin/bash
          (
          echo "qwe123"
          echo "qwe123"
          ) | passwd --stdin root
          sed -i "s/^PasswordAuthentication no/PasswordAuthentication yes/g" /etc/ssh/sshd_config
          sed -i "s/^#PermitRootLogin yes/PermitRootLogin yes/g" /etc/ssh/sshd_config
          service sshd restart
          hostnamectl --static set-hostname aaVPC2Instance2
          cat <<EOT>> /etc/bashrc
          export http_proxy=http://20.0.1.10:3128
          export https_proxy=http://20.0.1.10:3128
          no_proxy=127.0.0.1,localhost,169.254.169.254,20.0.0.0/8,.internal
          EOT

  VPC2SG1:
    Type: AWS::EC2::SecurityGroup
    Properties:
      VpcId: !Ref VPC2
      GroupDescription: aaVPC2SG1
      Tags:
        - Key: Name
          Value: aaVPC2SG1
      SecurityGroupIngress:
        - IpProtocol: tcp
          FromPort: '22'
          ToPort: '22'
          CidrIp: 0.0.0.0/0
        - IpProtocol: icmp
          FromPort: -1
          ToPort: -1
          CidrIp: 0.0.0.0/0

  # TGW Resource
  TransitGateway1:
    Type: AWS::EC2::TransitGateway
    Properties:
      Tags:
        - Key: Name
          Value: aaTGW1

  TransitGatewayAtt1:
    Type: AWS::EC2::TransitGatewayAttachment
    DependsOn: VPC0
    Properties:
      VpcId: !Ref VPC0
      SubnetIds:
        - !Ref VPC0Subnet3
        - !Ref VPC0Subnet4
      TransitGatewayId: !Ref TransitGateway1
      Tags:
        - Key: Name
          Value: aaTGW1-ATT1-VPC0

  TransitGatewayAtt2:
    Type: AWS::EC2::TransitGatewayAttachment
    DependsOn: VPC1
    Properties:
      VpcId: !Ref VPC1
      SubnetIds:
        - !Ref VPC1Subnet3
        - !Ref VPC1Subnet4
      TransitGatewayId: !Ref TransitGateway1
      Tags:
        - Key: Name
          Value: aaTGW1-ATT1-VPC1

  TransitGatewayAtt3:
    Type: AWS::EC2::TransitGatewayAttachment
    DependsOn: VPC2
    Properties:
      VpcId: !Ref VPC2
      SubnetIds:
        - !Ref VPC2Subnet3
        - !Ref VPC2Subnet4
      TransitGatewayId: !Ref TransitGateway1
      Tags:
        - Key: Name
          Value: aaTGW1-ATT1-VPC2

  VPC0Route2:
    Type: AWS::EC2::Route
    DependsOn: TransitGatewayAtt1
    Properties:
      RouteTableId: !Ref VPC0RouteTable1
      DestinationCidrBlock: 20.0.0.0/8
      TransitGatewayId: !Ref TransitGateway1

  VPC1Route2:
    Type: AWS::EC2::Route
    DependsOn: TransitGatewayAtt2
    Properties:
      RouteTableId: !Ref VPC1RouteTable1
      DestinationCidrBlock: 20.0.0.0/8
      TransitGatewayId: !Ref TransitGateway1

  VPC2Route2:
    Type: AWS::EC2::Route
    DependsOn: TransitGatewayAtt3
    Properties:
      RouteTableId: !Ref VPC2RouteTable1
      DestinationCidrBlock: 20.0.0.0/8
      TransitGatewayId: !Ref TransitGateway1

  TransitGatewayRT2:
    Type: AWS::EC2::TransitGatewayRouteTable
    Properties:
      Tags:
        - Key: Name
          Value: aaTGW-Blue-RT
      TransitGatewayId: !Ref TransitGateway1

  TransitGatewayRT3:
    Type: AWS::EC2::TransitGatewayRouteTable
    Properties:
      Tags:
        - Key: Name
          Value: aaTGW-Red-RT
      TransitGatewayId: !Ref TransitGateway1
VPC0-Instance1 /home/ec2-user/pingall.sh Download pingall.sh (펼쳐보기)
#!/bin/bash
date
cat list.txt |  while read output
do
    ping -c 1 -W 1 "$output" > /dev/null
    if [ $? -eq 0 ]; then
    echo "host $output is up"
    else
    echo "host $output is down"
    fi
done
/home/ec2-user/list.txt (펼쳐보기)
20.0.1.10
20.10.1.10
20.10.2.10
20.20.1.10
20.20.2.10
key pair 생성은 AWS - Infra 의 3. 사전 준비 를 참고하세요.
ICMP (Internet Group Management Protocol)
ICMP 는 TCP/IP 에서 IP 패킷 처리 시 발생되는 문제를 알려주는 프로토콜임.
IP 에는 오로지 패킷을 목적지에 도달시키지 위한 내용들로만 구성이 되어 있기 때문에 정상적으로 목적지 도달 시 IP 에서 통신 성공 후 종료되므로 아무런 문제가 없지만, 목적지가 꺼져있거나 비정상인 경우 패킷 전달을 의뢰한 출발지에 이 사실을 알릴 수가 없음. (IP 에는 이러한 에러에 대한 처리 방법이 명시되지 있지 않으므로)이러한 IP 의 부족한 점을 보완하는 것이
ICMP프로토콜임.예를 들어
ping같은 경우도ICMP프로토콜을 이용한 방법임.
2.1.2. CloudFormation 을 통해 생성된 자원 확인
- VPC
- aaTGW-VPC0
- IP CIDR: 20.0.0.0/16
- aaTGW-VPC1
- IP CIDR: 20.10.0.0/16
- aaTGW-VPC2
- IP CIDR: 20.20.0.0/16
- aaTGW-VPC0
- IGW
- aaTGW-VPC0-IGW
- 연결: aaTGW-VPC0
- aaTGW-VPC0-IGW
- Public Subnet
- aaTGW-VPC0-Subnet1
- IP CIDR: 20.0.1.0/24
- AZ: ap-northeast-2a
- aaTGW-VPC0-Subnet1
- Private Subnet
- aaTGW-VPC1-Subnet1 (aaTGW-VPC1-Subnet2)
- IP CIDR: 20.10.1.0/24 (20.10.2.0/24)
- AZ: ap-northeast-2a (ap-northeast-2c)
- aaTGW-VPC2-Subnet1 (aaTGW-VPC2-Subnet2)
- IP CIDR: 20.20.1.0/24 (20.20.2.0/24)
- AZ: ap-northeast-2a (ap-northeast-2c)
- aaTGW-VPC0-Subnet3 (aaTGW-VPC0-Subnet4)
- VPC0 과 TGW 간의 연결 용도
- IP CIDR: 20.0.3.0/24 (20.0.4.0/24)
- AZ: ap-northeast-2a (ap-northeast-2c)
- aaTGW-VPC1-Subnet3 (aaTGW-VPC1-Subnet4)
- VPC1 과 TGW 간의 연결 용도
- IP CIDR: 20.10.3.0/24 (20.10.4.0/24)
- AZ: ap-northeast-2a (ap-northeast-2c)
- aaTGW-VPC2-Subnet3 (aaTGW-VPC2-Subnet4)
- VPC2 와 TGW 간의 연결 용도
- IP CIDR: 20.20.3.0/24 (20.20.4.0/24)
- AZ: ap-northeast-2a (ap-northeast-2c)
- aaTGW-VPC1-Subnet1 (aaTGW-VPC1-Subnet2)
- Public Routing Table
- aaTGW-VPC0-PublicRT
- 연결: aaTGW-VPC0-Subnet1
- 라우팅 정보
- 대상: 0.0.0.0/0, 타깃: aaTGW-VPC0-IGW
- 대상: 20.0.0.0/0, 타깃: aaTGW1
- aaTGW-VPC0-PublicRT
- Private Routing Table
- aaTGW-VPC1-PrivateRT
- 연결: aaTGW-VPC1-Subnet1, aaTGW-VPC1-Subnet2
- 라우팅 정보: 대상: 20.0.0.0/8, 타깃: aaTGW1
- aaTGW-VPC2-PrivateRT
- 연결: aaTGW-VPC2-Subnet1, aaTGW-VPC2-Subnet2
- 라우팅 정보: 대상: 20.0.0.0/8, 타깃: aaTGW1
- aaTGW-VPC0-TGWAttRT
- 연결: aaTGW-VPC0-Subnet3, aaTGW-VPC0-Subnet4
- 라우팅 정보: 없음 (default 인 20.0.0.0/16 local 만 있음)
- aaTGW-VPC1-TGWAttRT
- 연결: aaTGW-VPC1-Subnet3, aaTGW-VPC1-Subnet4
- 라우팅 정보: 없음 (default 인 20.10.0.0/16 local 만 있음)
- aaTGW-VPC2-TGWAttRT
- 연결: aaTGW-VPC2-Subnet3, aaTGW-VPC2-Subnet4
- 라우팅 정보: 없음 (default 인 20.20.0.0/16 local 만 있음)
- aaTGW-VPC1-PrivateRT
- EC2 Instance
- aaVPC0-Instance1
- 연결: aaTGW-VPC0-Subnet1
- 웹 프록시 서버 동작
- Private IP: 20.0.1.10 (Public IP 사용)
- aaVPC1-Instance1
- 연결: aaTGW-VPC1-Subnet1
- Private IP: 20.10.1.10
- aaVPC1-Instance2
- 연결: aaTGW-VPC1-Subnet2
- Private IP: 20.10.2.10
- aaVPC2-Instance1
- 연결: aaTGW-VPC2-Subnet1
- Private IP: 20.20.1.10
- aaVPC2-Instance2
- 연결: aaTGW-VPC2-Subnet2
- Private IP: 20.20.2.10
- aaVPC0-Instance1
- TGW
- aaTGW1
- TGW Attachments
- aaTGW1-ATT1-VPC0
- 연결: aaTGW-VPC0-Subnet3,4 를 aaTGW1 에 연결
- aaTGW1-ATT1-VPC1
- 연결: aaTGW-VPC1-Subnet3,4 를 aaTGW1 에 연결
- aaTGW1-ATT1-VPC2
- 연결: aaTGW-VPC2-Subnet3,4 를 aaTGW1 에 연결
- aaTGW1-ATT1-VPC0
- TGW Routing Table
- (Default)
- 전파
- aaTGW1-ATT1-VPC0 에서 aaTGW-VPC0 로
- aaTGW1-ATT1-VPC1 에서 aaTGW-VPC1 로
- aaTGW1-ATT1-VPC2 에서 aaTGW-VPC2 로
- 최초에는 모든 TGW 연결이 기본 라우팅 테이블에 연동
- 최초에는 이름이 없음, 진행 중 aaTGW-Default-RT 로 변경 예정
- 전파
- aaTGW-Blue-RT, aaTGW-Red-RT
- 최초에는 아무런 연동 없음
- (Default)
- VPC Endpoint
- (-)
- 최초에는 이름 없음
- aaTGW-VPC0-Subnet1 에 CloudFormation 에 대한 VPC Endpoint 생성
- (-)
- Security Group
- aaVPC0SG1
- inbound rule
- SSH/HTTP/HTTPS/ICMP(Source) - 0.0.0.0/0
- TCP(Source) 3128 - 20.0.0.0/8
- inbound rule
- aaVPC0SG2
- inbound rule
- HTTP/HTTPS/ICMP(Source) - 0.0.0.0/0
- inbound rule
- aaVPC1SG1
- inbound rule
- SSH/ICMP(Source) - 0.0.0.0/0
- inbound rule
- aaVPC2SG1
- inbound rule
- SSH/ICMP(Source) - 0.0.0.0/0
- inbound rule
- aaVPC0SG1
VPC 영역별로 내용을 보자.

VPC0 영역
외부와 연결된 영역이며, 내부 Instance 접속 및 통신을 확인하는 용도이다.
- Public Instance (aaVPC0-Instance1)
- Public IP 사용 (외부에서 접속하는 Instance)
- VPC1, VPC2 내부에 있는 Instance 가 외부 인터넷 웹 접속을 하기 위한 웹 프록시 서버 역할
- 웹 프록시는
Squid사용참고
- Public Routing Table
- VPC1,2 와 통신을 위해 목적지 20.0.0.0/8 트래픽을 TGW 로 전달
- 연동 Subnet
- TGW 와 연동을 위한 전용 Subnet
- VPC Endpoint
- 중앙 공유 VPC Endpoint 확인을 위해 CloudFormation Endpoint 서비스 생성
- TGW 연결된 다른 네트워크에서 VPC Endpoint DNS 쿼리 시 Private IP 가 아닌 Public IP 반환
VPC1 영역
- Private Instance (aaVPC1-Instance1, aaVPC1-Instance2)
- Private IP 만 사용
- 외부 인터넷 웹 접속을 위한 웹 프록시 서버 설정
- Private Routing Table
- VPC0,2 와 통신을 위해 목적지 20.0.0.0/8 트래픽을 TGW 로 전달
- 연동 Subnet
- TGW 와 연동을 위한 전용 Subnet
VPC2 영역
- Private Instance (aaVPC2-Instance1, aaVPC2-Instance2)
- Private IP 만 사용
- 외부 인터넷 웹 접속을 위한 웹 프록시 서버 설정
- Private Routing Table
- VPC0,1 과 통신을 위해 목적지 20.0.0.0/8 트래픽을 TGW 로 전달
- 연동 Subnet
- TGW 와 연동을 위한 전용 Subnet
TGW 영역
TGW 를 생성한 후 VPC 0,1,2 를 연결한다.
TGW Routing Table 2개를 추가로 생성한다.
2.1.3. 기본 통신 환경 검증
- aaVPC0-Instance1 을 기준으로 기본 환경 검증
- aaVPC1-Instance1 을 기준으로 기본 환경 검증
- VPC Endpoint 환경 검증
2.1.3.1. aaVPC0-Instance1 을 기준으로 기본 환경 검증
- aaVPC0-Instance1 Instance 확인
- aaVPC0-Instance1 과 aaVPC1-Instance1 통신 확인
aaVPC0-Instance1 Instance 확인
aaVPC0-Instance1 Instance 의 Public IP 를 확인 후 SSH 접속한다.
# aaVPC0-Instance1 의 Public IP
$ ssh -i sandbox-jh.pem ec2-user@52.79.xxx.xxx

# 웹 프록시 서비스 동작 확인
[ec2-user@aaVPC0-Instance1 ~]$ systemctl status squid
● squid.service - Squid caching proxy
   Loaded: loaded (/usr/lib/systemd/system/squid.service; enabled; vendor preset: disabled)
   Active: active (running) since 수 2022-01-25 04:07:38 UTC; 2h 23min ago

# VPC1,2 의 Instance 과 ping 통신 확인 (pingall.sh: 5개의 대상 IP 로 순차적으로 ping 날림)
[ec2-user@aaVPC0-Instance1 ~]$ ./pingall.sh
2022. 01. 25. (수) 06:37:46 UTC
host 20.0.1.10 is up
host 20.10.1.10 is up
host 20.10.2.10 is up
host 20.20.1.10 is up
host 20.20.2.10 is up
aaVPC0-Instance1 과 aaVPC1-Instance1 통신 확인
위에서 VPC1,2 의 모든 Instance 와 ping 통신이 이루어진 것을 확인하였다.
아래는 aaVPC0-Instance (20.0.1.10) 에서 aaVPC1-Instance1 (20.10.1.10) 으로 ping 요청에 대한 통신 과정을 살펴본다.
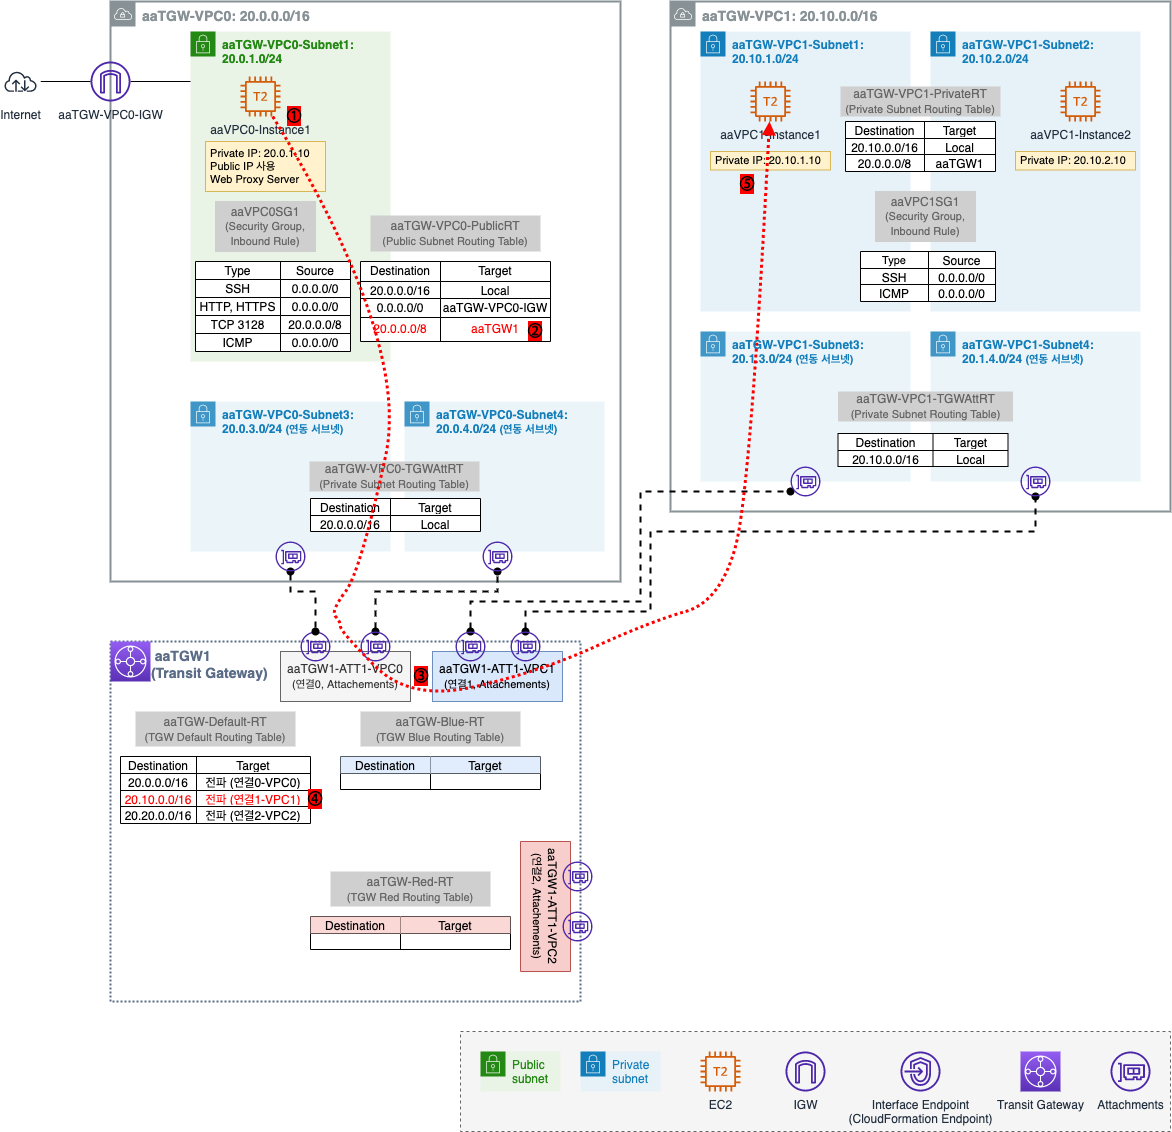
① aaVPC0-Instance1 (20.0.1.10) 에서 aaVPC1-Instance1 (20.10.1.10) 으로 ping 요청 시도
② Public Routing Table 을 확인하여 20.0.0.0/8 대역참고은 aaTGW1 로 보냄
③ TGW 에 연결된 네트워크를 확인하면 3개의 VPC 가 연결된 것을 알 수 있음
[VPC] - [Transit gateways] - [Transit gateway attachments] 
④ aaTGW1 의 기본 Routing Table 정보를 확인하여 목적지 20.10.1.10 을 VPC1 로 보냄
⑤ ping 요청 트래픽이 aaVPC1-Instance1 (20.10.1.10) 로 정상적으로 수신됨
IP CIDR 에 대한 내용은 AWS - VPC (1): 기초 의 2.2. IP, Subnet Mask 를 참고하세요. ↩
연동 서브넷을 2개씩이 아닌 1개씩으로 해도 될 듯 하다.
이제 aaVPC1-Instance1 에서 aaVPC0-Instance1 로 ping 응답에 대한 통신 과정을 살펴본다.
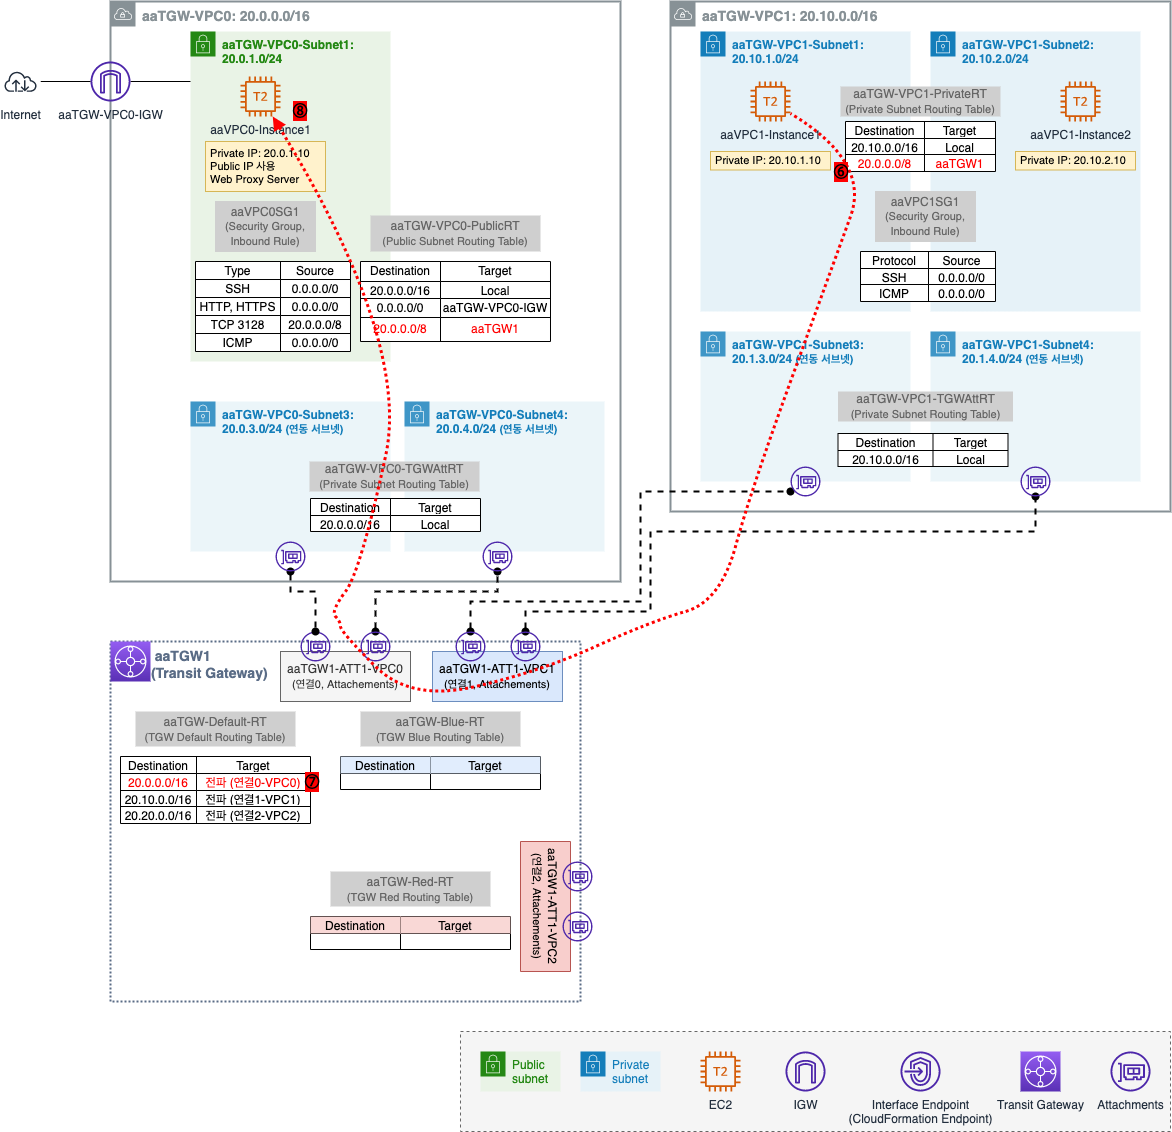
⑥ 목적지 주소 (20.0.1.10) 은 Private Routing Table 20.0.0.0/8 에 매칭되어 aaTGW1 로 보내짐
⑦ TGW 의 기본 Routing Table 정보를 확인하여 목적지 20.0.1.10 은 VPC0 으로 보내짐
⑧ 최종적으로 ping 응답이 도달하여 정상 통신됨
2.1.3.2. aaVPC1-Instance1 을 기준으로 기본 환경 검증
- aaVPC1-Instance1 Instance 확인
- aaVPC1-Instance1 외부(인터넷) 통신 확인
aaVPC1-Instance1 Instance 확인
aaVPC0-Instance1 의 Public IP 를 확인 후 SSH 접속 후 aaVPC1-Instance1 로 SSH 접속한다.
# aaVPC0-Instance1 의 Public IP
$ ssh -i sandbox-jh.pem ec2-user@52.79.xxx.xxx

# aaVPC1-Instance1 의 Private IP
[ec2-user@aaVPC0-Instance1 ~]$ ssh root@20.10.1.10
root@20.10.1.10's password: (qwe123)
[root@aaVPC1Instance1 ~]#

# list.txt, pingall.sh 다운로드
[root@aaVPC1Instance1 ~]# curl -o /root/list.txt http://20.0.1.10/list.txt --silent
[root@aaVPC1Instance1 ~]# curl -o /root/pingall.sh http://20.0.1.10/pingall.sh --silent
[root@aaVPC1Instance1 ~]# ll
합계 8
-rw-r--r-- 1 root root  54  1월 25 08:12 list.txt
-rw-r--r-- 1 root root 204  1월 25 08:13 pingall.sh

[root@aaVPC1Instance1 ~]# chmod +x /root/pingall.sh
[root@aaVPC1Instance1 ~]# ll
합계 8
-rw-r--r-- 1 root root  54  1월 25 08:12 list.txt
-rwxr-xr-x 1 root root 204  1월 25 08:14 pingall.sh

# 다른 Instance 들과 ping 통신 확인
[root@aaVPC1Instance1 ~]# ./pingall.sh
2022. 01. 25. (수) 08:15:44 UTC
host 20.0.1.10 is up
host 20.10.1.10 is up
host 20.10.2.10 is up
host 20.20.1.10 is up
host 20.20.2.10 is up

# 웹 프록시 설정 정보 확인: aaVPC0-Instance1 (20.0.1.10) 으로 웹 프록시 설정되어 있음
[root@aaVPC1Instance1 ~]# tail -3 /etc/bashrc
export http_proxy=http://20.0.1.10:3128
export https_proxy=http://20.0.1.10:3128
no_proxy=127.0.0.1,localhost,169.254.169.254,20.0.0.0/8,.internal

# 외부(인터넷) 연결 테스트: Private Subnet 에 있기 때문에 원래는 안되는 게 맞지만 TGW 연결을 통해 외부 인터넷 통신 가능
[root@aaVPC1Instance1 ~]# curl http://checkip.amazonaws.com --connect-timeout 3
20.10.1.10 # aaVPC1-Instance1 의 Private IP 임
[root@aaVPC1Instance1 ~]# curl https://checkip.amazonaws.com --connect-timeout 3
52.79.248.119 # aaVPC0-Instance1 의 Public IP 임
aaVPC1-Instance1 외부(인터넷) 통신 확인
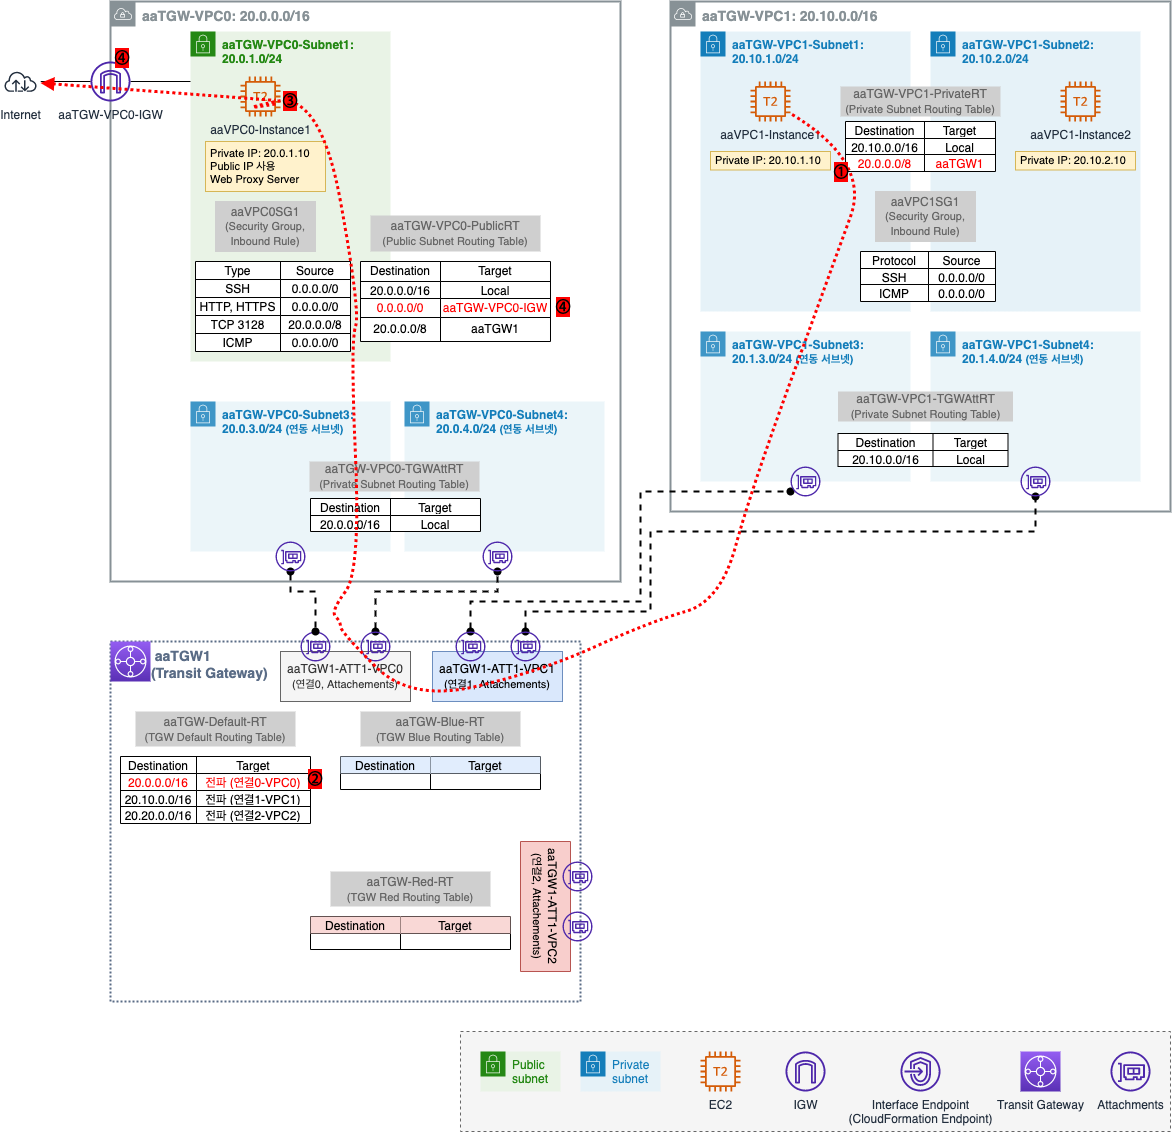
① aaVPC1-Instance1 (20.10.1.10) 에서 외부로 웹 접속을 시도하면 라우팅 테이블의 웹 프록시 (20.0.1.10) 를 목적지로 하는 정보와 매칭되어 aaTGW1 로 보내짐
② TGW 의 기본 Routing Table 을 보고 목적지 (20.0.1.10) 는 aaVPC0 으로 보내짐
③ 웹 프록시 (20.0.1.10) 은 해당 트래픽을 받아서 자신이 대신 외부 웹 서버에 접속 요청
④ 외부와 통신하기 위해 Public Routing Table 의 0.0.0.0/0 은 IGW 로 보내짐
2.1.3.3. VPC Endpoint 환경 검증
- VPC Endpoint 생성 확인
- VPC Endpoint 정보 확인
일반적으로 VPC Endpoint참고 는 VPC 별로 생성해야 하지만 TGW 로 내부 간 통신이 되는 환경이기 때문에 aaTWG-VPC0 (공용 자원 배치) 에만 VPC Endpoint 를 생성한다.
이 후 해당 주소를 다른 네트워크 (aaTWG-VPC 1,2) 에서 접속하여 사용할 수 있다.
VPC Endpoint 에 대한 내용은 AWS - VPC (2): Endpoint 를 참고하세요. ↩
VPC Endpoint 생성 확인
[VPC] - [Virtual private cloud] - [Endpoints]
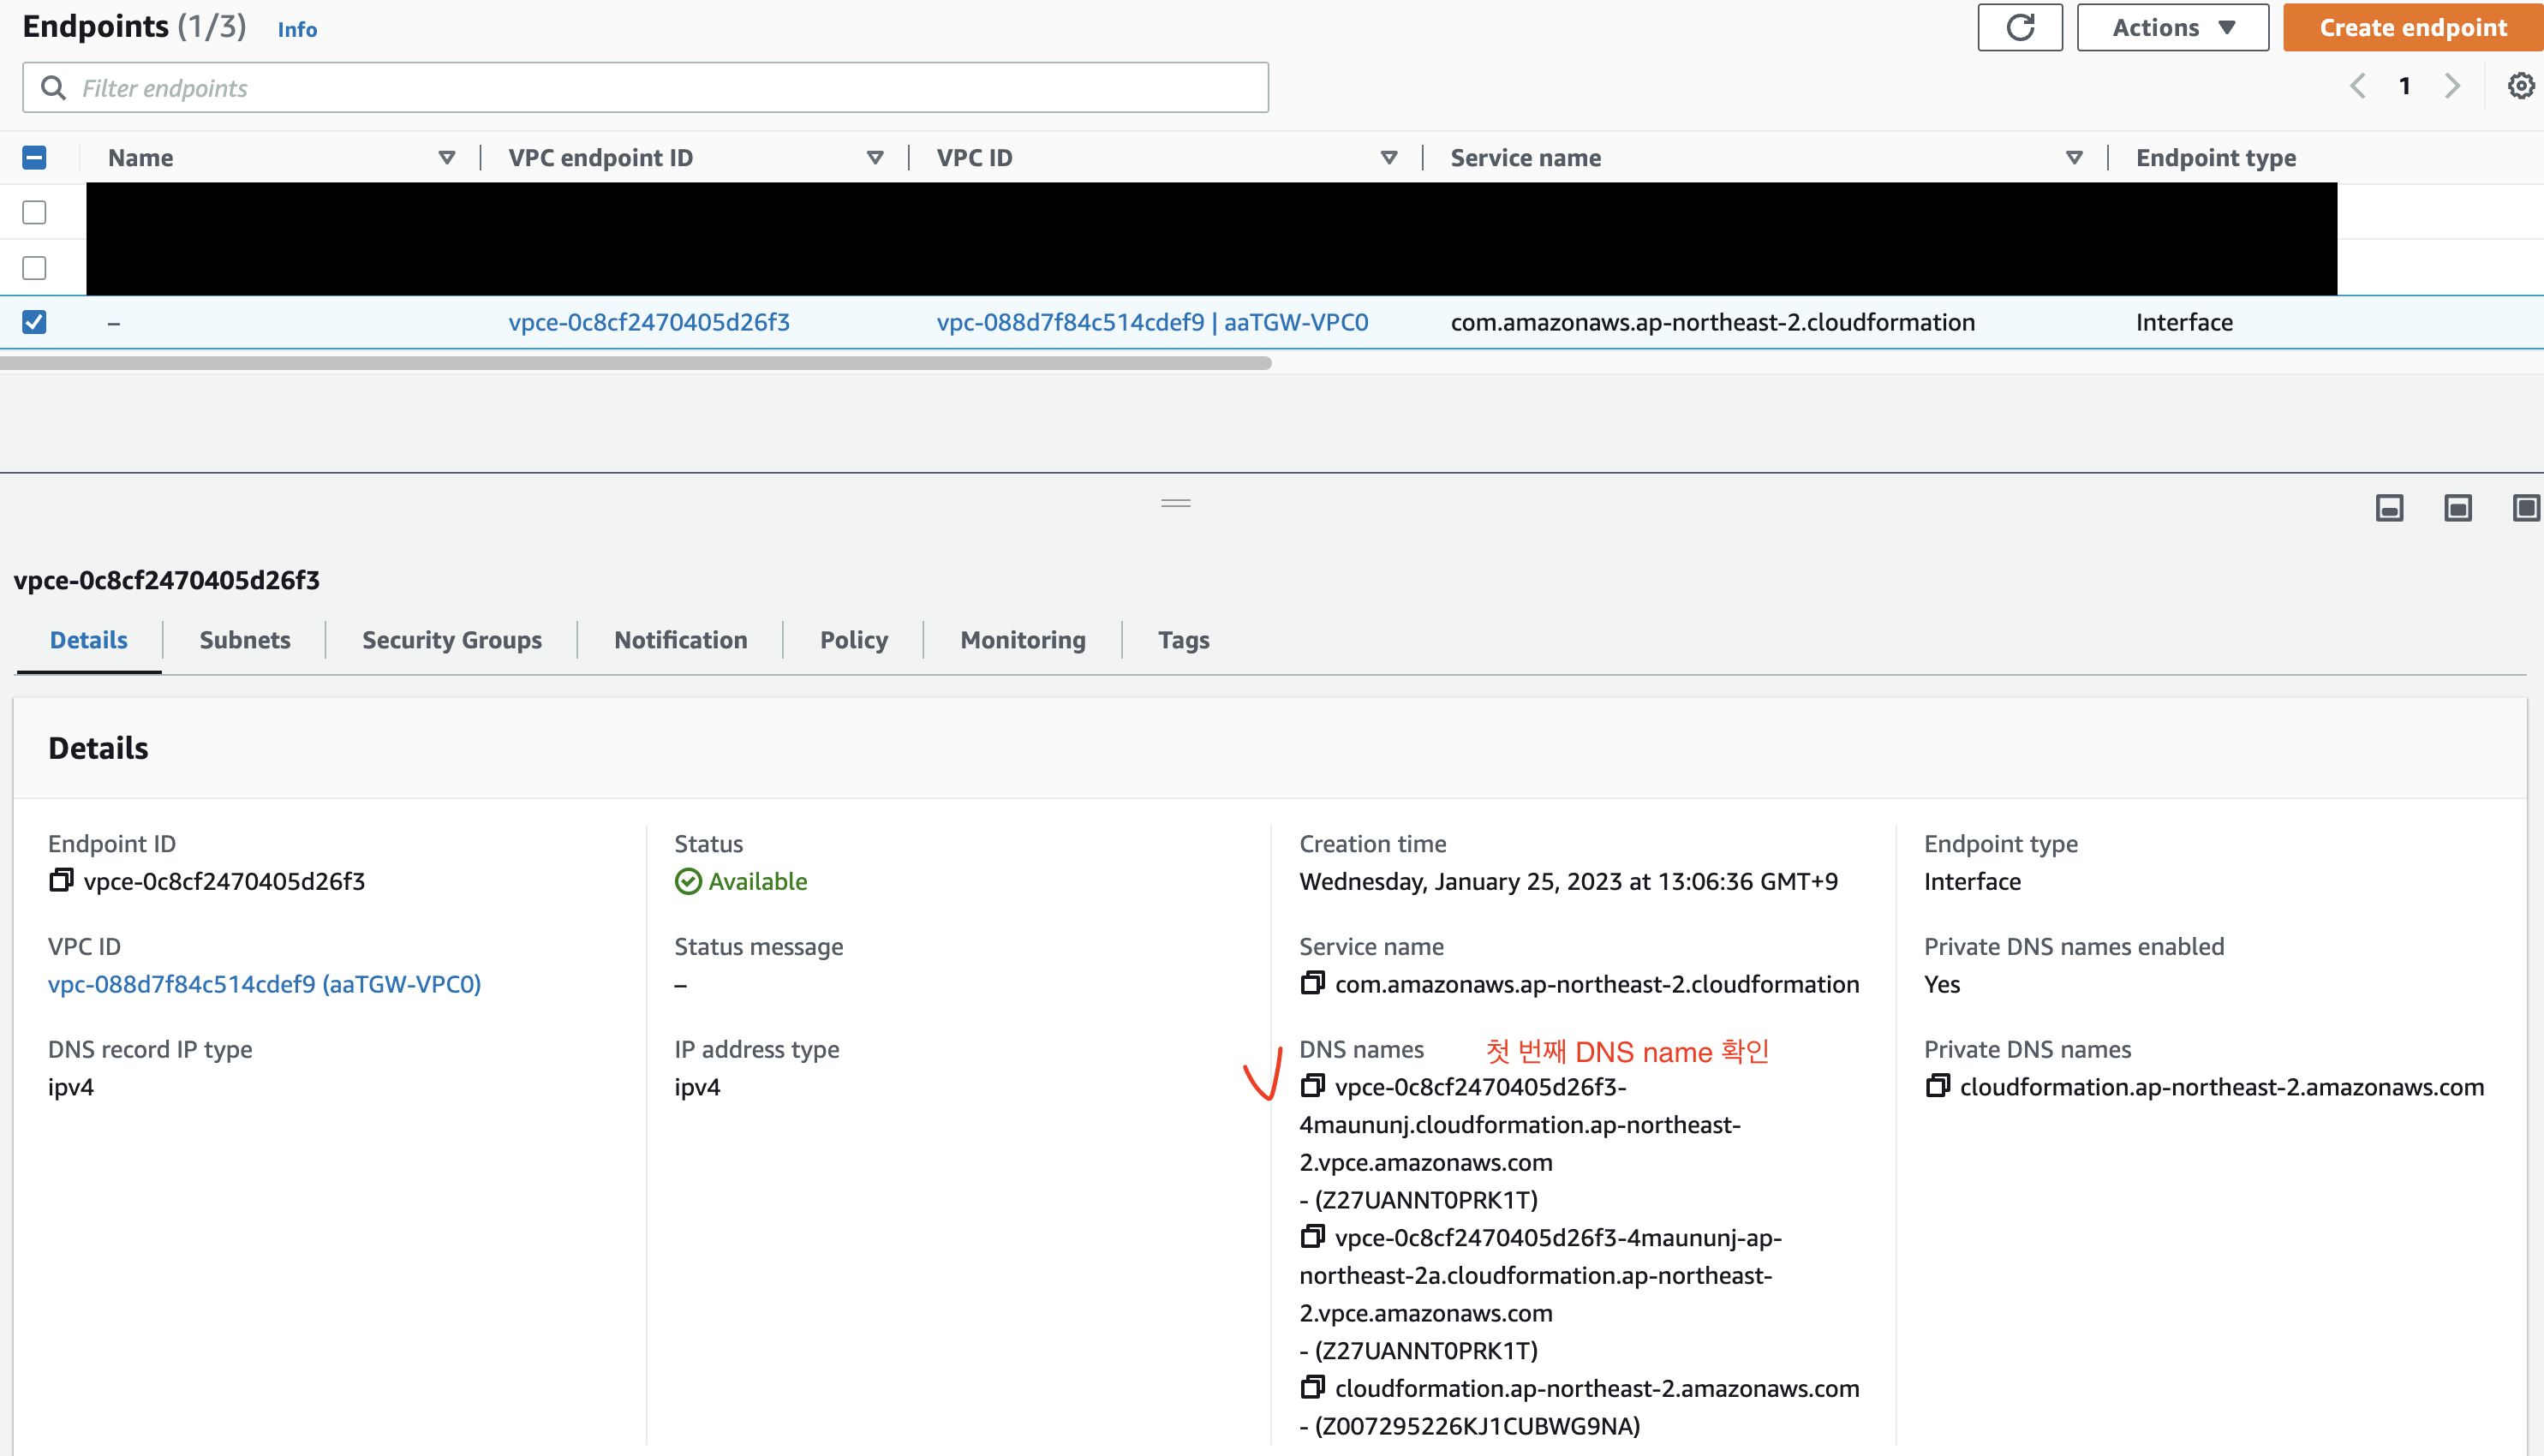
DNS name 중 첫 번째 DNS name (엔드포인트 전용 DNS host) 를 확인한다.
VPC Endpoint 정보 확인
이제 aaVPC0-Instance1 과 aaVPC1-Instance1 에서 VPC Endpoint 정보 (엔드포인트 전용 DNS host) 를 확인한다.
먼저 aaVPC0-Instance1 의 Public IP 로 SSH 접속한다.
# aaVPC0-Instance1 Public IP
$ ssh -i sandbox-jh.pem ec2-user@52.79.xxx.xxx

# VPC Endpoint 정보 확인
[ec2-user@aaVPC0-Instance1 ~]$ dig +short vpce-0c8cf2470405d26f3-4maununj.cloudformation.ap-northeast-2.vpce.amazonaws.com
20.0.1.139
dig명령어를 통해 CloudFormation DNS 주소에 대한 IP 주소 정보 확인 가능
이제 aaVPC0-Instance1 의 Public IP 로 SSH 접속 후 aaVPC1-Instance1 로 SSH 접속한다.
# aaVPC0-Instance1 Public IP
$ ssh -i sandbox-jh.pem ec2-user@52.79.xxx.xxx

# aaVPC1-Instance1 의 Private IP
[ec2-user@aaVPC0-Instance1 ~]$ ssh root@20.10.1.10
root@20.10.1.10's password: (qwe123)
Last login: Wed Jan 25 08:11:33 2022 from 20.0.1.10

# VPC Endpoint 정보 확인
[root@aaVPC1Instance1 ~]# dig +short vpce-0c8cf2470405d26f3-4maununj.cloudformation.ap-northeast-2.vpce.amazonaws.com
20.0.1.139
2.2. Transit Gateway Routing Table 을 이용한 트래픽 제어
TGW Routing Table 을 이용하여 트래픽 제어를 해본다.
- TGW 기본 Routing Table 현황
- Blue/Red
Transit GatewayRouting Table 설정- TGW 기본 Routing Table 설정
- TGW Blue Routing Table 설정
- TGW Red Routing Table 설정
- 동작 확인
- TGW 기본 Routing Table 을 사용하는 aaVPC0-Instance1 확인
- TGW Blue Routing Table 을 사용하는 aaVPC1-Instance1 확인
- TGW Red Routing Table 을 사용하는 VPC2-Instance1 확인
2.2.1. TGW 기본 Routing Table 현황
현재 기본 환경에서는 TGW 기본 Routing Table 에 의해 모든 VPC 구간으로 통신이 가능하다.
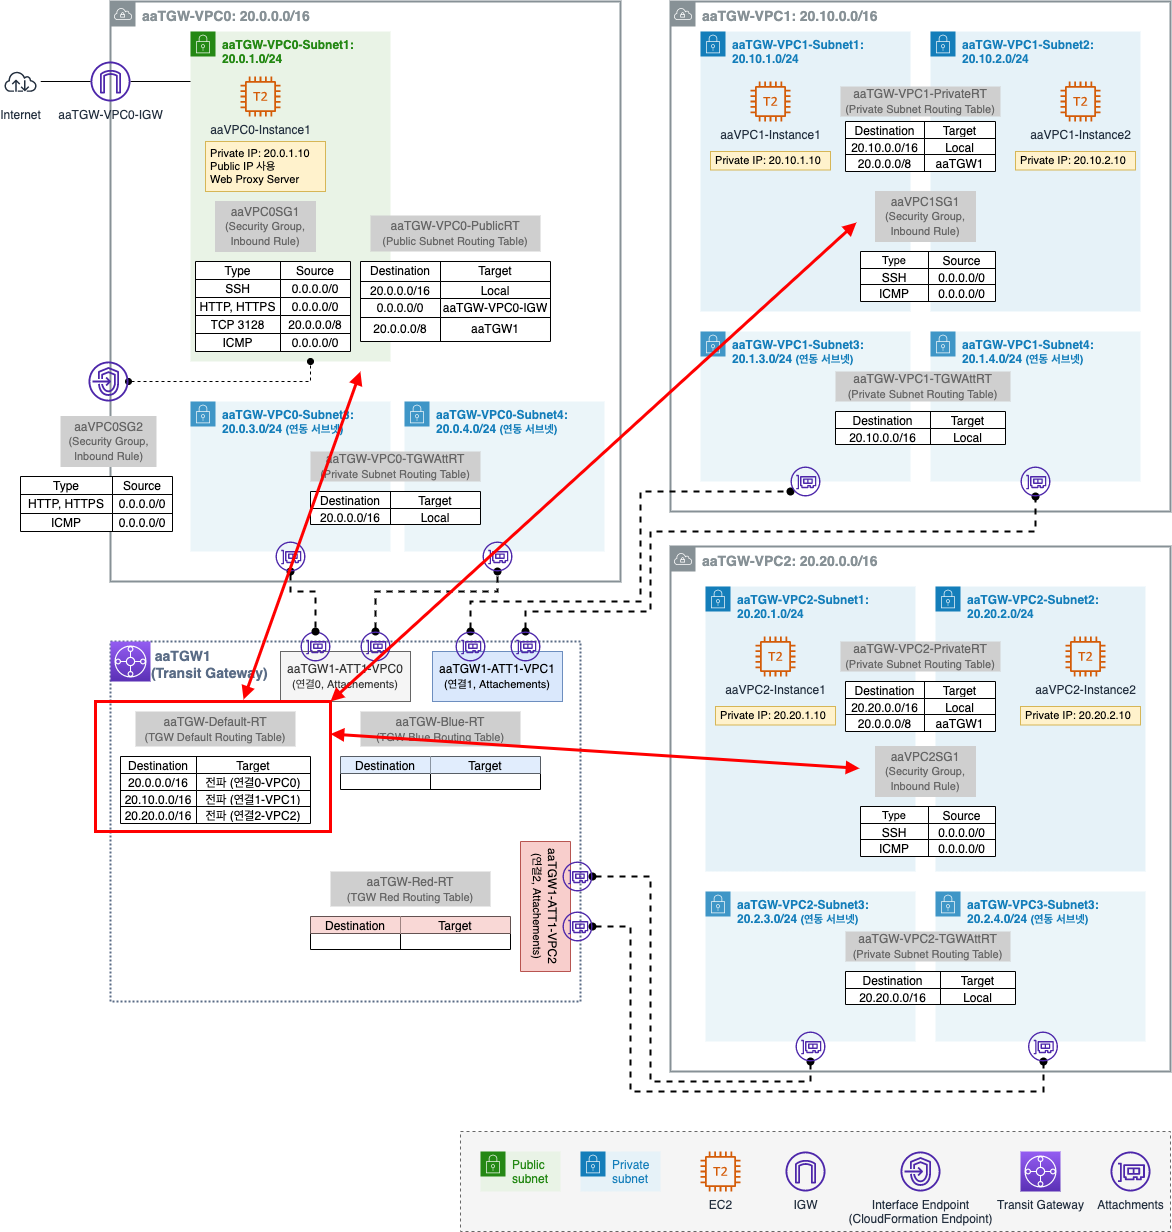
[VPC] - [Transit gateways] - [Transit gateway route tables] - [Name 공백 선택] - [Routes 탭]

Name 은 aaTGW-Default-RT 로 변경해두자.
2.2.2. Blue/Red Transit Gateway Routing Table 설정
TGW 의 기본 Routing Table 외 Blue/Red Routing Table 을 설정하여 트래픽 제어를 해본다.
- TGW 기본 Routing Table 설정
- TGW Blue Routing Table 설정
- TGW Red Routing Table 설정
2.2.2.1. TGW 기본 Routing Table 설정
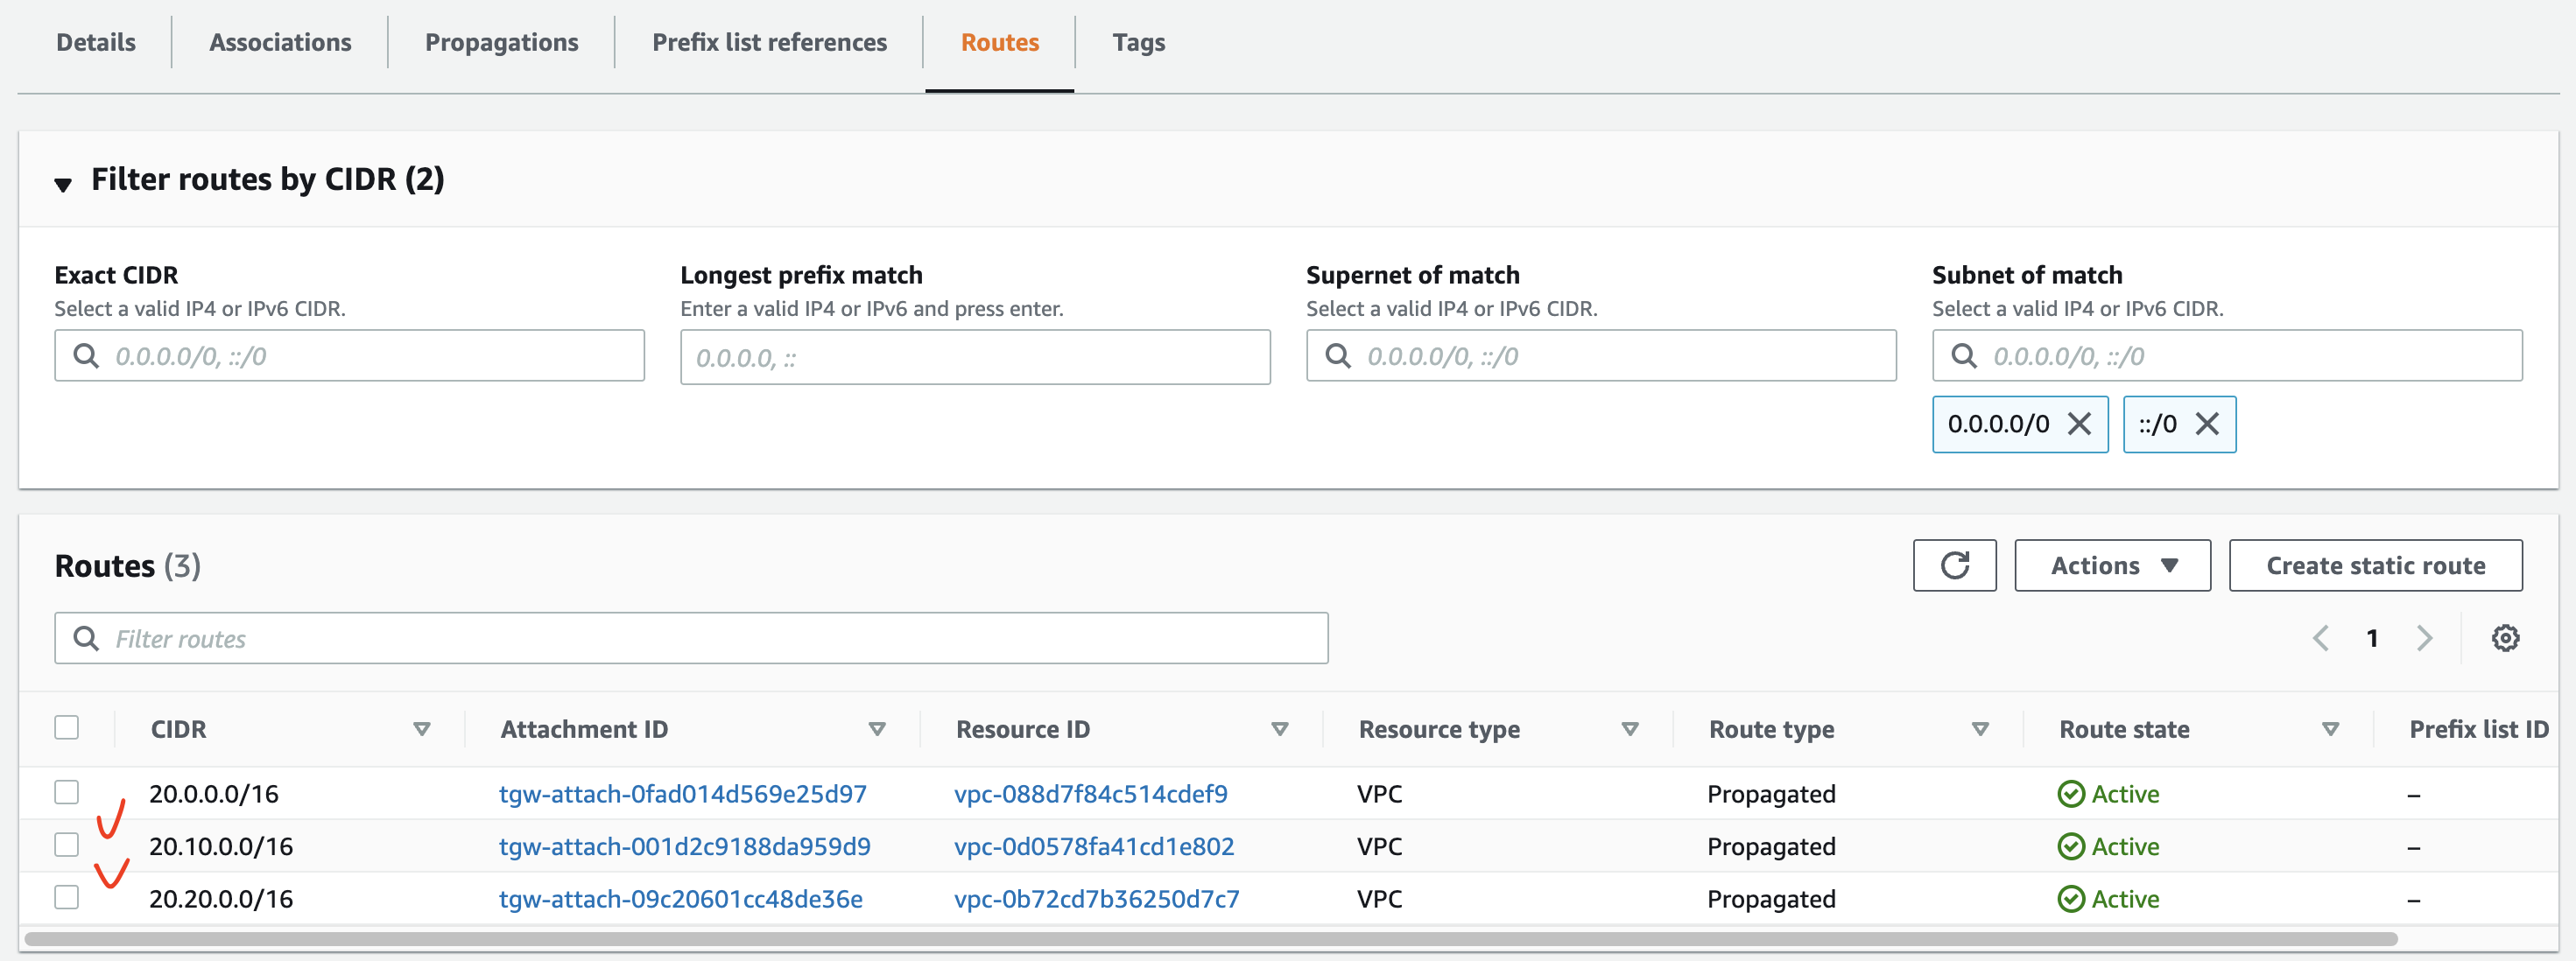
Routing Table 분리를 위해 기본 Routing Table 에서 VPC1,2 의 Associations 를 삭제한다.
[VPC] - [Transit gateways] - [Transit gateway route tables] - [aaTGW-Default-RT 선택] - [Associations 탭] 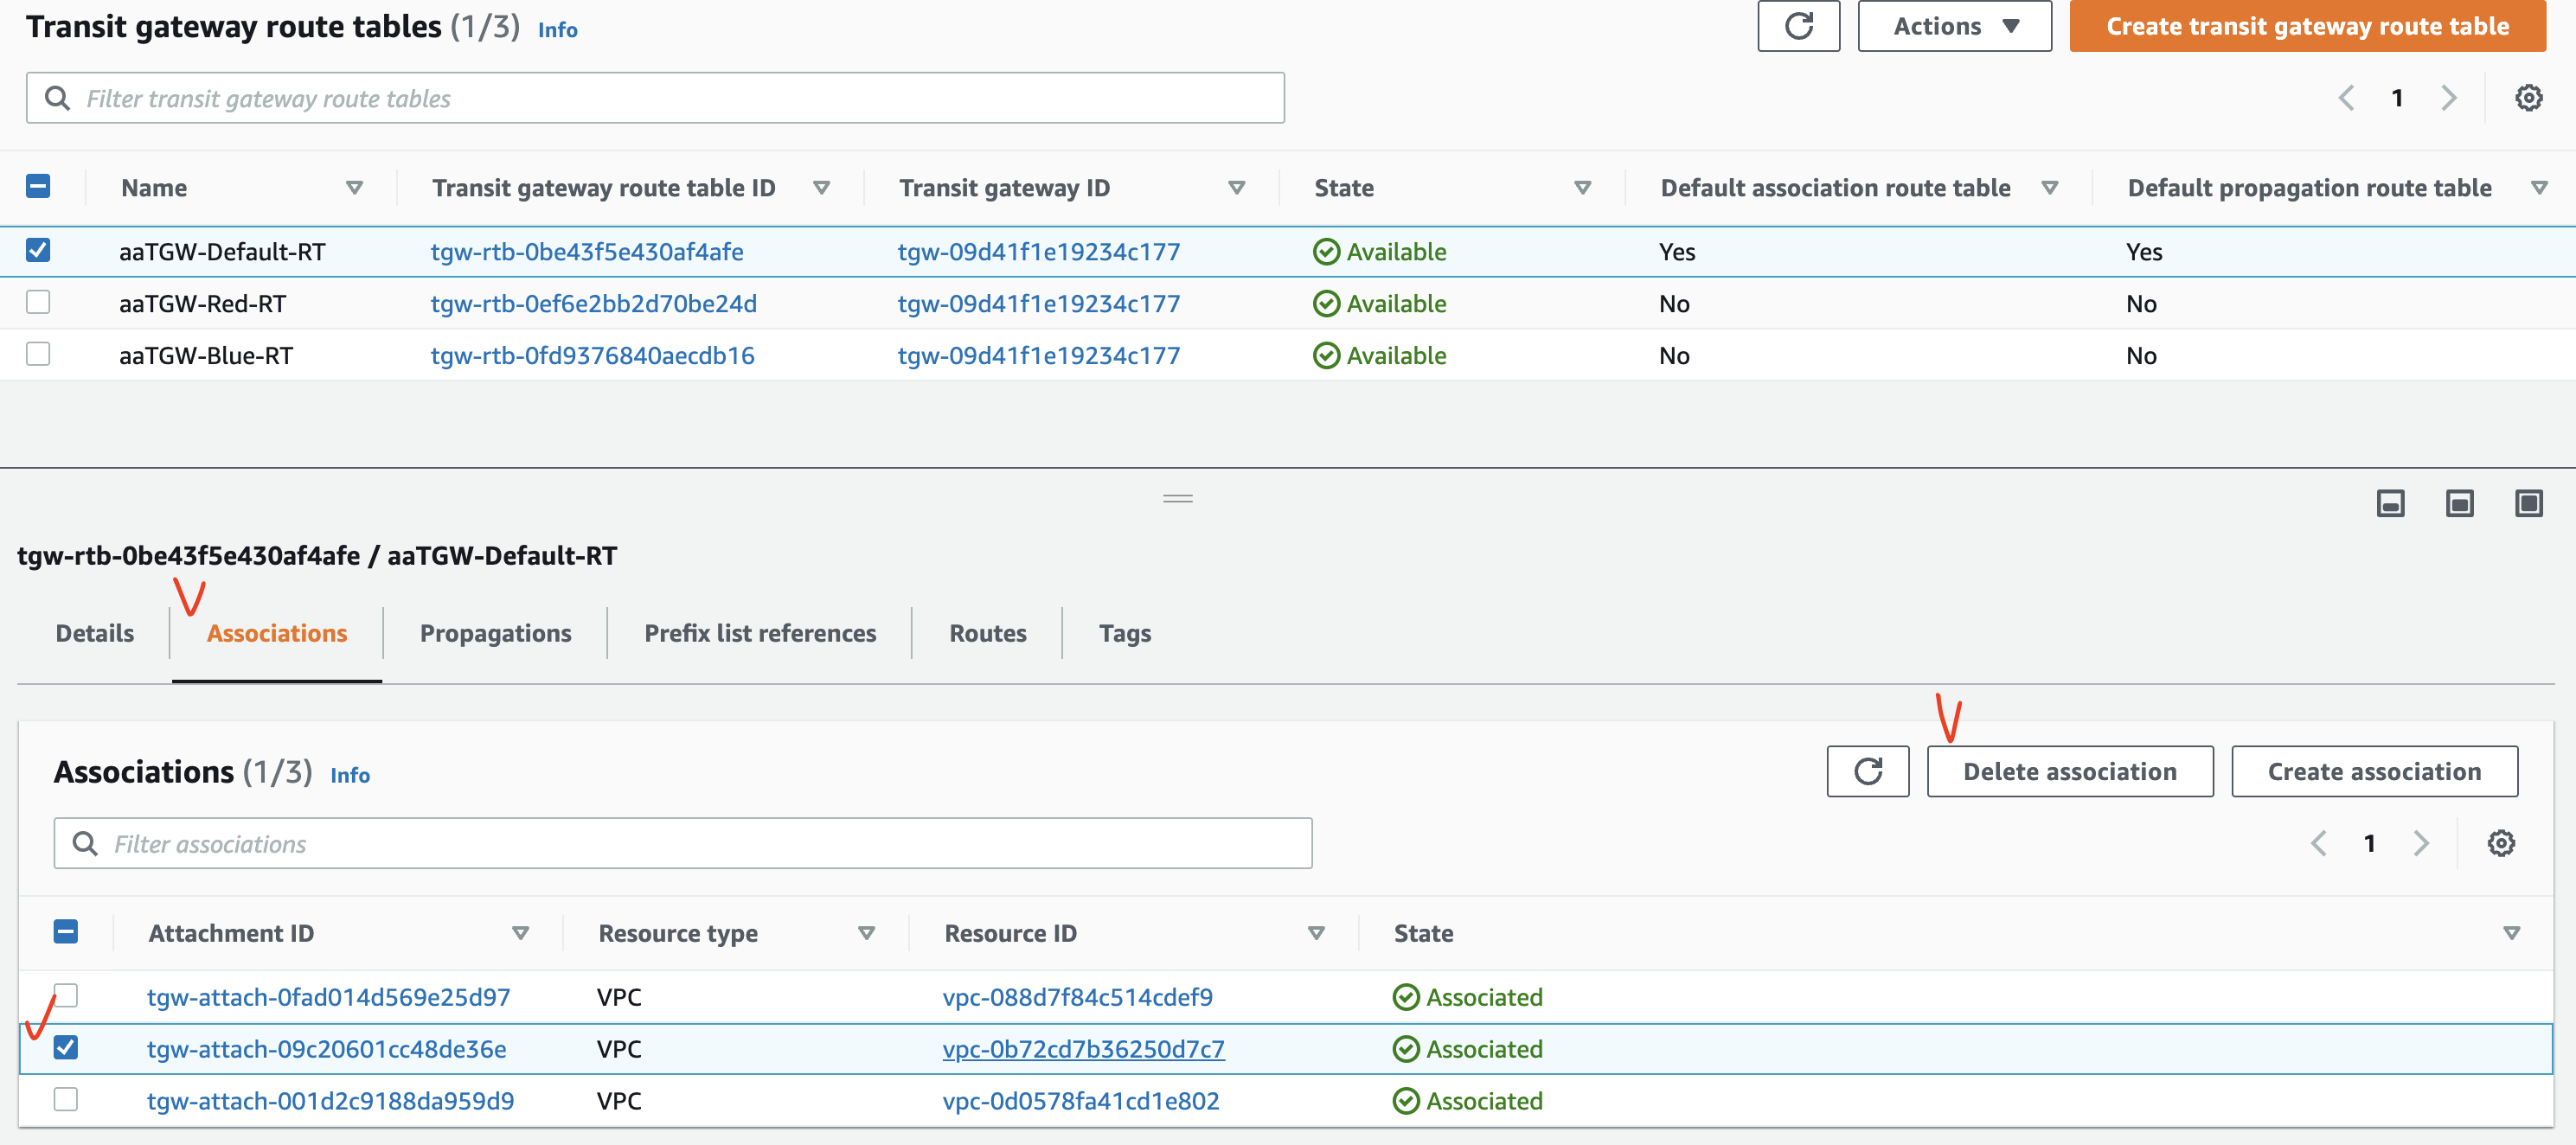
Associations 는 삭제되었지만 기본으로 Routing 정보는 남아있다.
2.2.2.2. TGW Blue Routing Table 설정
CloudFormation 에 의해 생성된 aaTGW-Blue-RT 에 aaTGW-VPC1 을 위한 라우팅 정보를 설정한다.
[VPC] - [Transit gateways] - [Transit gateway route tables] - [aaTGW-Blue-RT 선택] - [Associations 탭] - [Create association] - [aaTGW-ATT1-VPC1 선택]
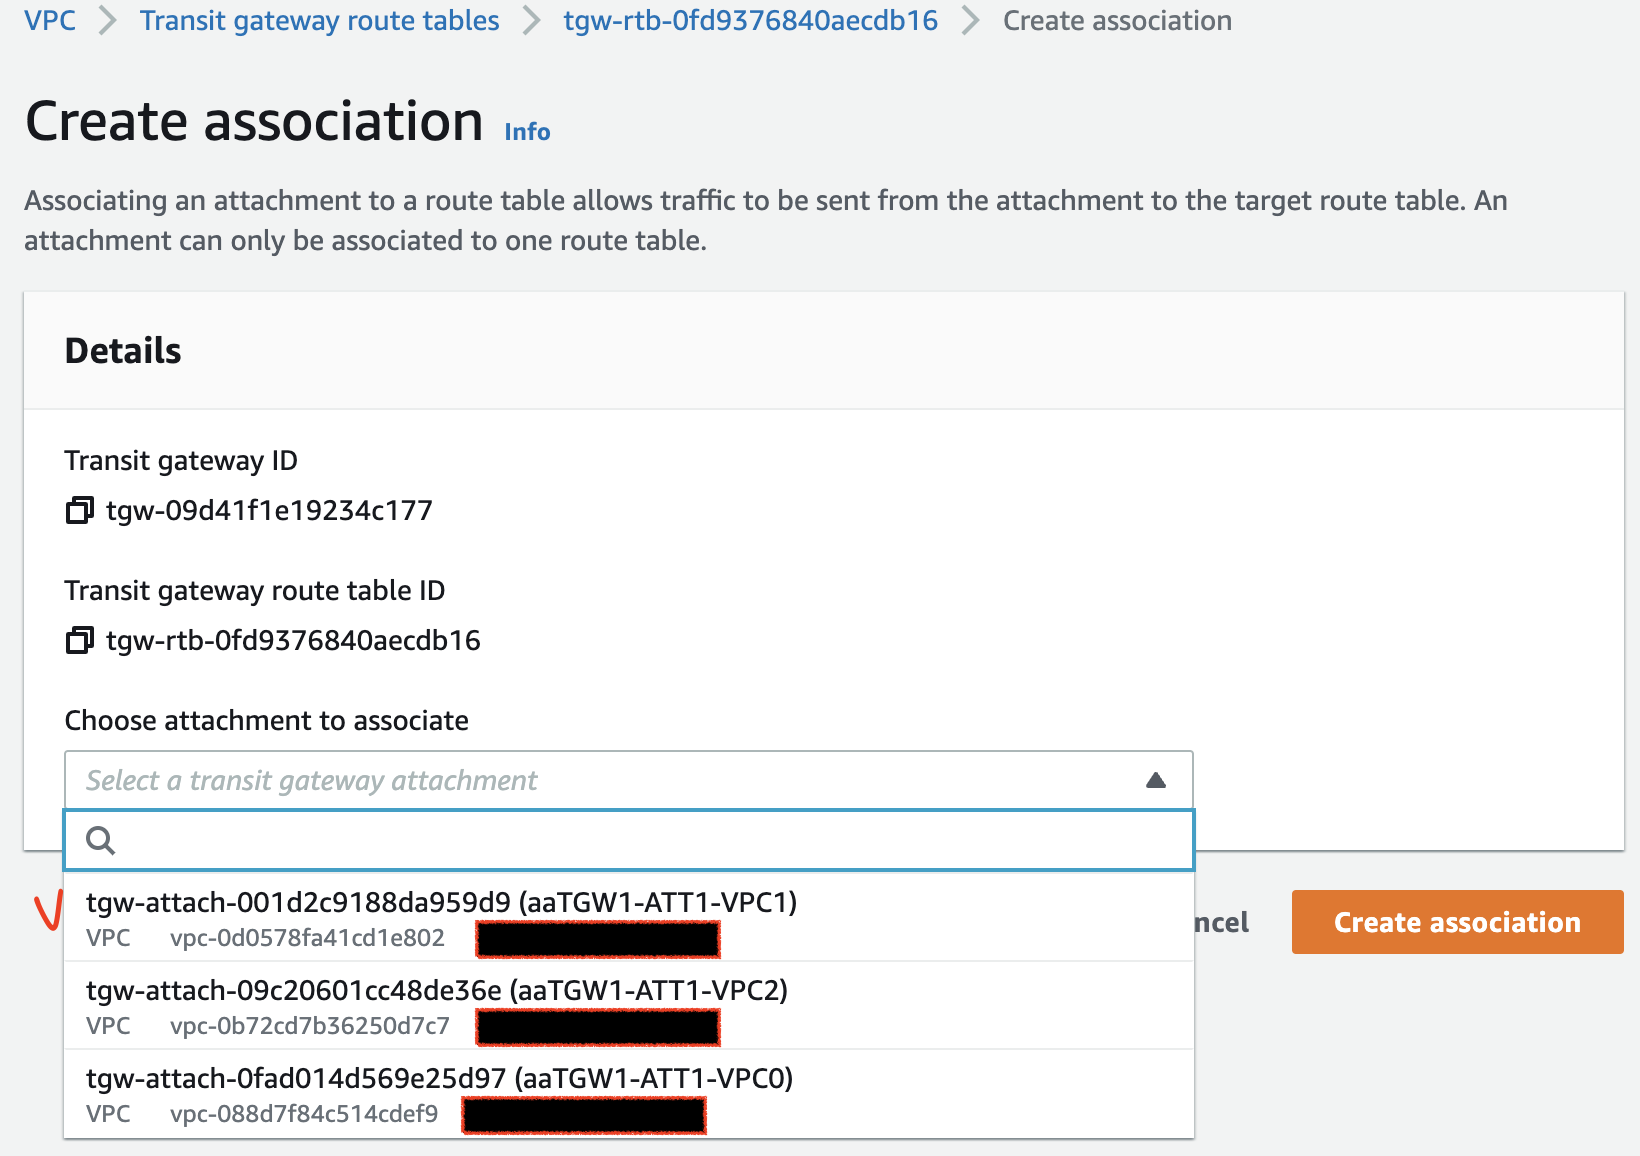
Association 설정 후 Propagation 을 설정한다.
설정 Attachments: aaTGW-ATT1-VPC0, aaTGW-ATT1-VPC1 [VPC] - [Transit gateways] - [Transit gateway route tables] - [aaTGW-Blue-RT 선택] - [Propagations 탭] - [Create propagation]
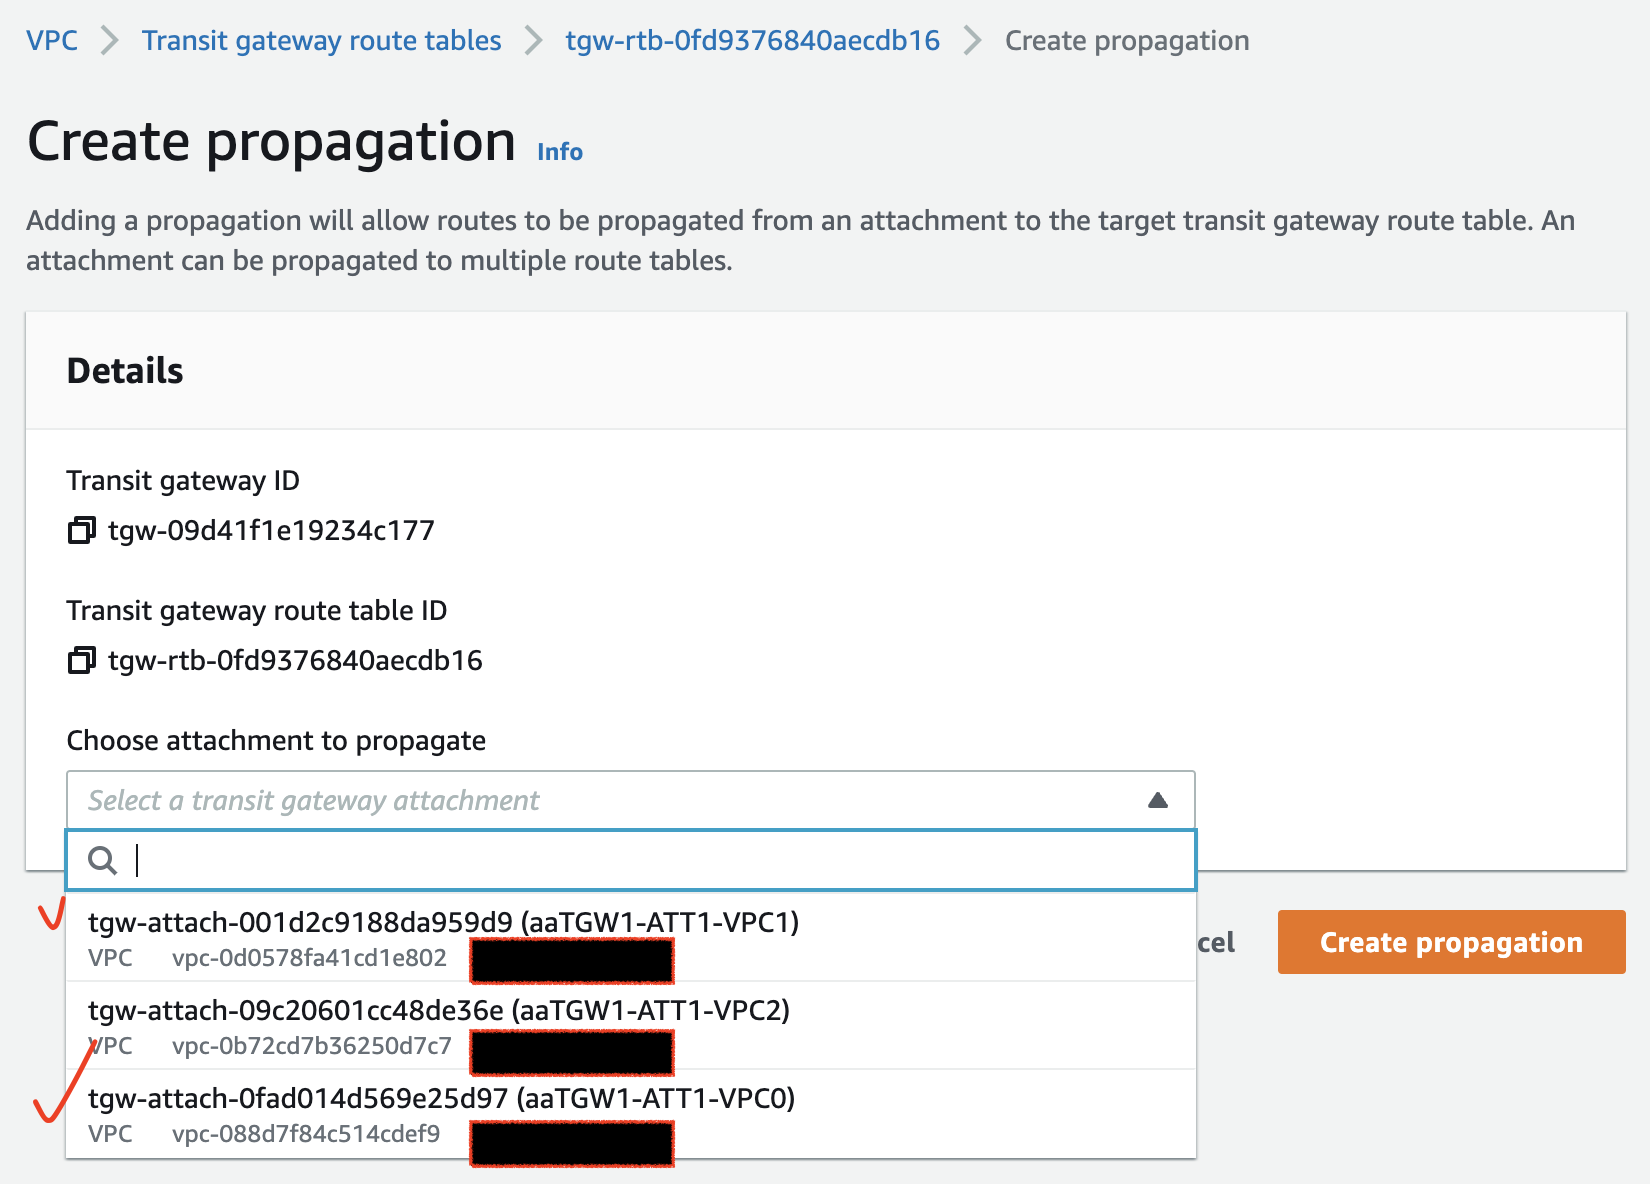
aaTGW-Blue-RT 의 Routes 정보를 보면 VPC0 과 VPC1 이 추가되어 있는 것을 확인할 수 있다. 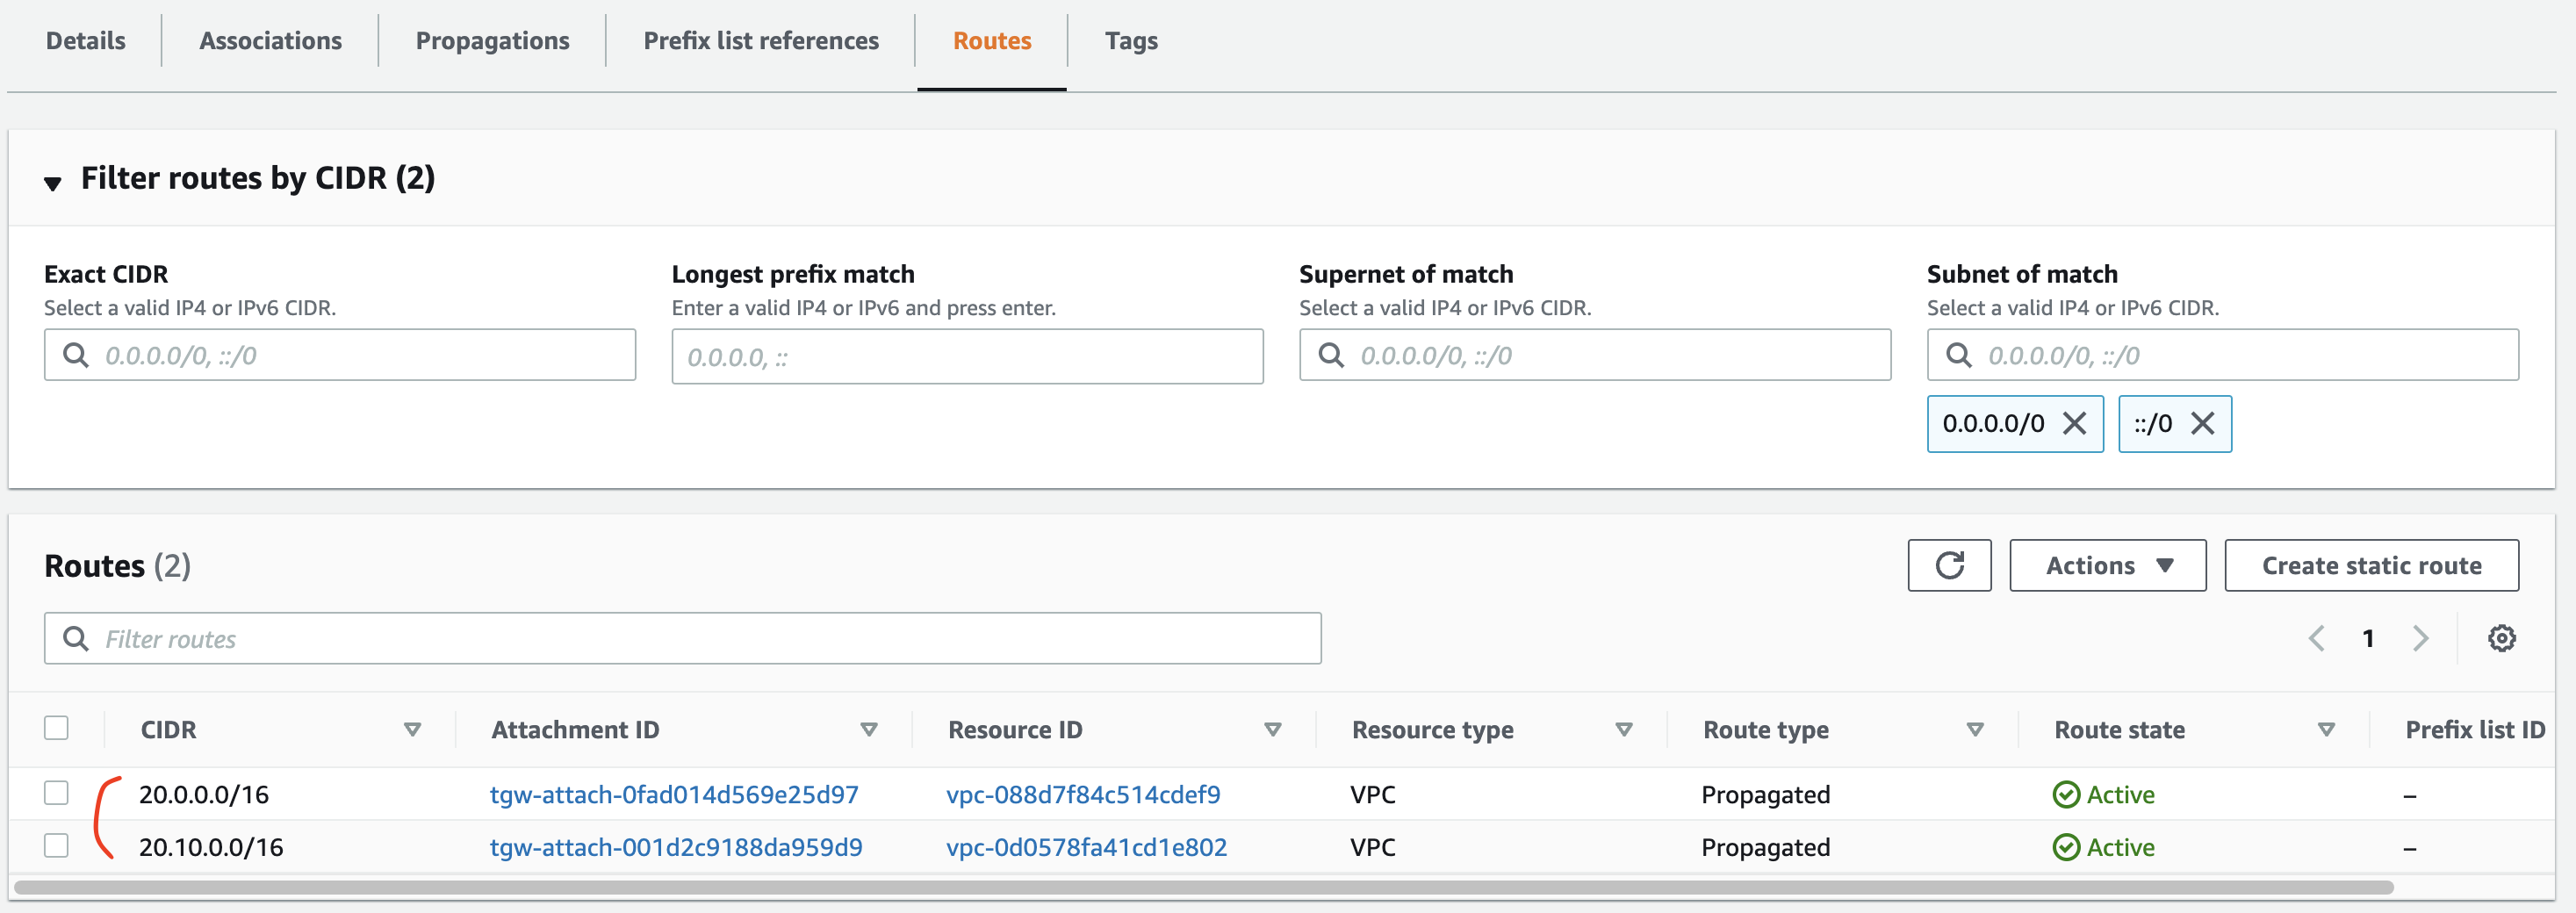
2.2.2.3. TGW Red Routing Table 설정
CloudFormation 에 의해 생성된 aaTGW-Red-RT 에 aaTGW-VPC2 를 위한 라우팅 정보를 설정한다.
[VPC] - [Transit gateways] - [Transit gateway route tables] - [aaTGW-Blue-RT 선택] - [Associations 탭] - [Create association] - [aaTGW-ATT1-VPC2 선택]
Association 설정 후 Propagation 을 설정한다.
설정 Attachments: aaTGW-ATT1-VPC0, aaTGW-ATT1-VPC2 [VPC] - [Transit gateways] - [Transit gateway route tables] - [aaTGW-Blue-RT 선택] - [Propagations 탭] - [Create propagation]
aaTGW-Blue-RT 의 Routes 정보를 보면 VPC0 과 VPC2 이 추가되어 있는 것을 확인할 수 있다.
2.2.3. 동작 확인
- TGW 기본 Routing Table 을 사용하는 aaVPC0-Instance1 확인
- TGW Blue Routing Table 을 사용하는 aaVPC1-Instance1 확인
- TGW Red Routing Table 을 사용하는 VPC2-Instance1 확인
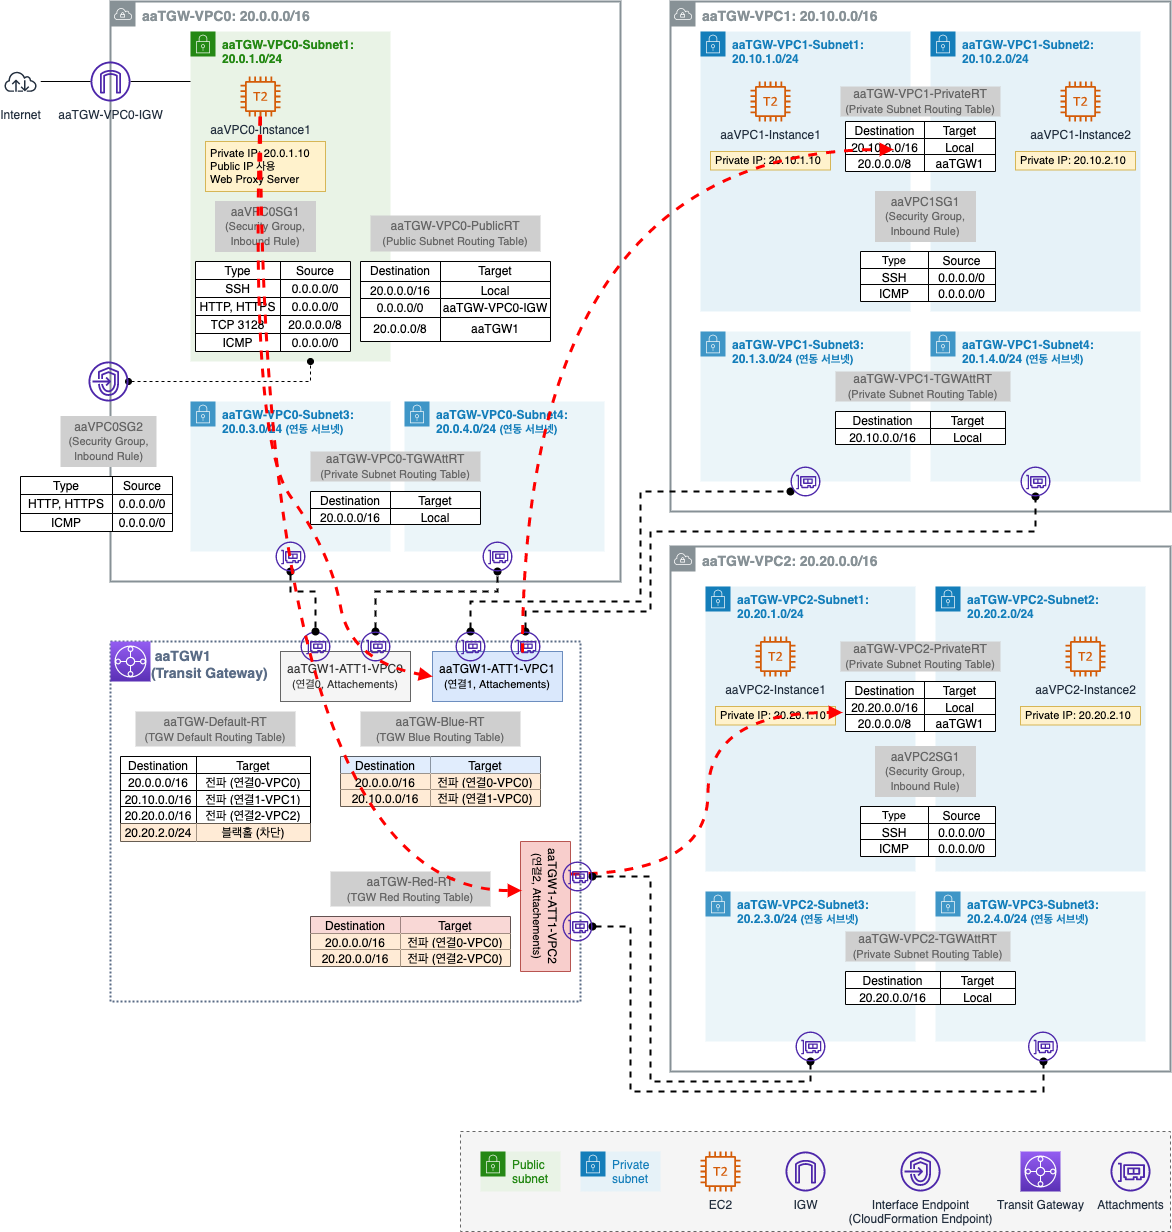
2.2.3.1. TGW 기본 Routing Table 을 사용하는 aaVPC0-Instance1 확인
TGW 기본 Routing Table 에 라우팅은 VPC0,1,2 모든 경로 정보가 있다.
따라서 aaVPC0-Instance1 은 VPC1,2 대역 모두 통신이 가능하다.
VPC1,2 대역의 Instance 들과 ping 통신 확인 (정상 통신)
# aaVPC0-Instance1 Public IP
$ ssh -i sandbox-jh.pem ec2-user@52.79.xxx.xxx

# VPC0,1,2 대역의 Instance 들과 ping 통신 확인 (정상 통신)
[ec2-user@aaVPC0-Instance1 ~]$ ./pingall.sh
2022. 01. 25. (수) 11:37:46 UTC
host 20.0.1.10 is up
host 20.10.1.10 is up
host 20.10.2.10 is up
host 20.20.1.10 is up
host 20.20.2.10 is up
2.2.3.2. TGW Blue Routing Table 을 사용하는 aaVPC1-Instance1 확인
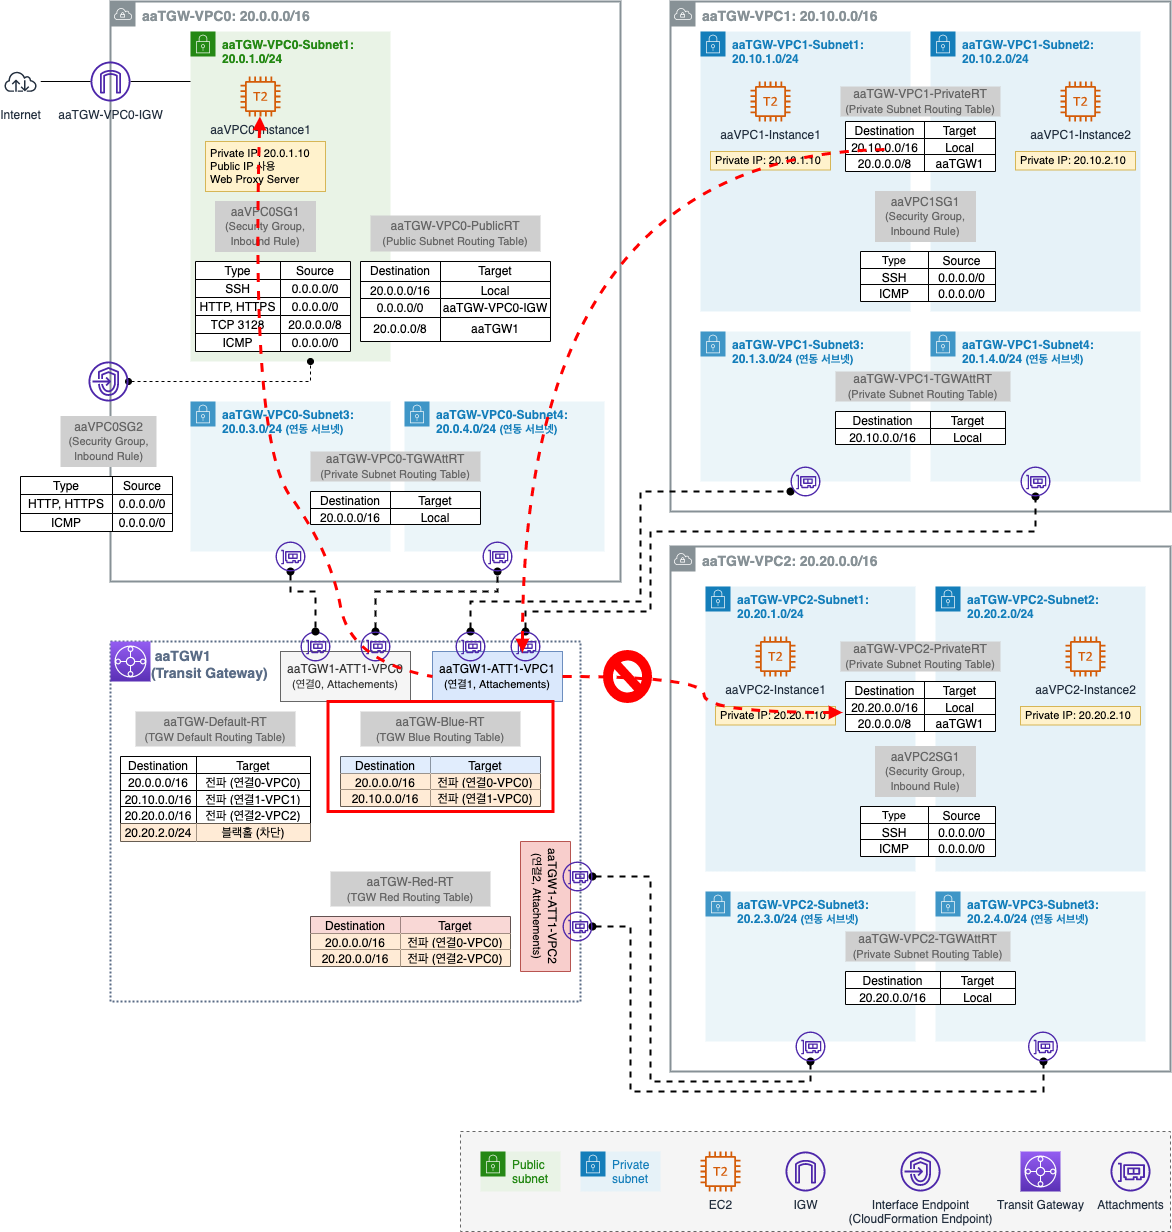
TGW Blue Routing Table 에 라우팅은 VPC0,1 경로 정보가 있다.
따라서 aaVPC1-Instance1 은 VPC0,1 대역과는 통신이 가능하지만 VPC2 대역과는 통신이 불가능하다.
VPC0,1,2 대역의 Instance 들과 ping 통신 확인 (VPC0 정상 통신, VPC2 통신 불가)
# aaVPC0-Instance1 Public IP
$ ssh -i sandbox-jh.pem ec2-user@52.79.xxx.xxx

# aaVPC1-Instance1 Private IP
[ec2-user@aaVPC0-Instance1 ~]$ ssh root@20.10.1.10
root@20.10.1.10's password: (qwe123)
Last login: Wed Jan 25 09:07:23 2022 from 20.0.1.10

# VPC0,1,2 대역의 Instance 들과 ping 통신 확인 (VPC0 정상 통신, VPC2 통신 불가)
[root@aaVPC1Instance1 ~]# ./pingall.sh
2022. 01. 25. (수) 11:56:55 UTC
host 20.0.1.10 is up
host 20.10.1.10 is up
host 20.10.2.10 is up
host 20.20.1.10 is down
host 20.20.2.10 is down
2.2.3.3. TGW Red Routing Table 을 사용하는 VPC2-Instance1 확인
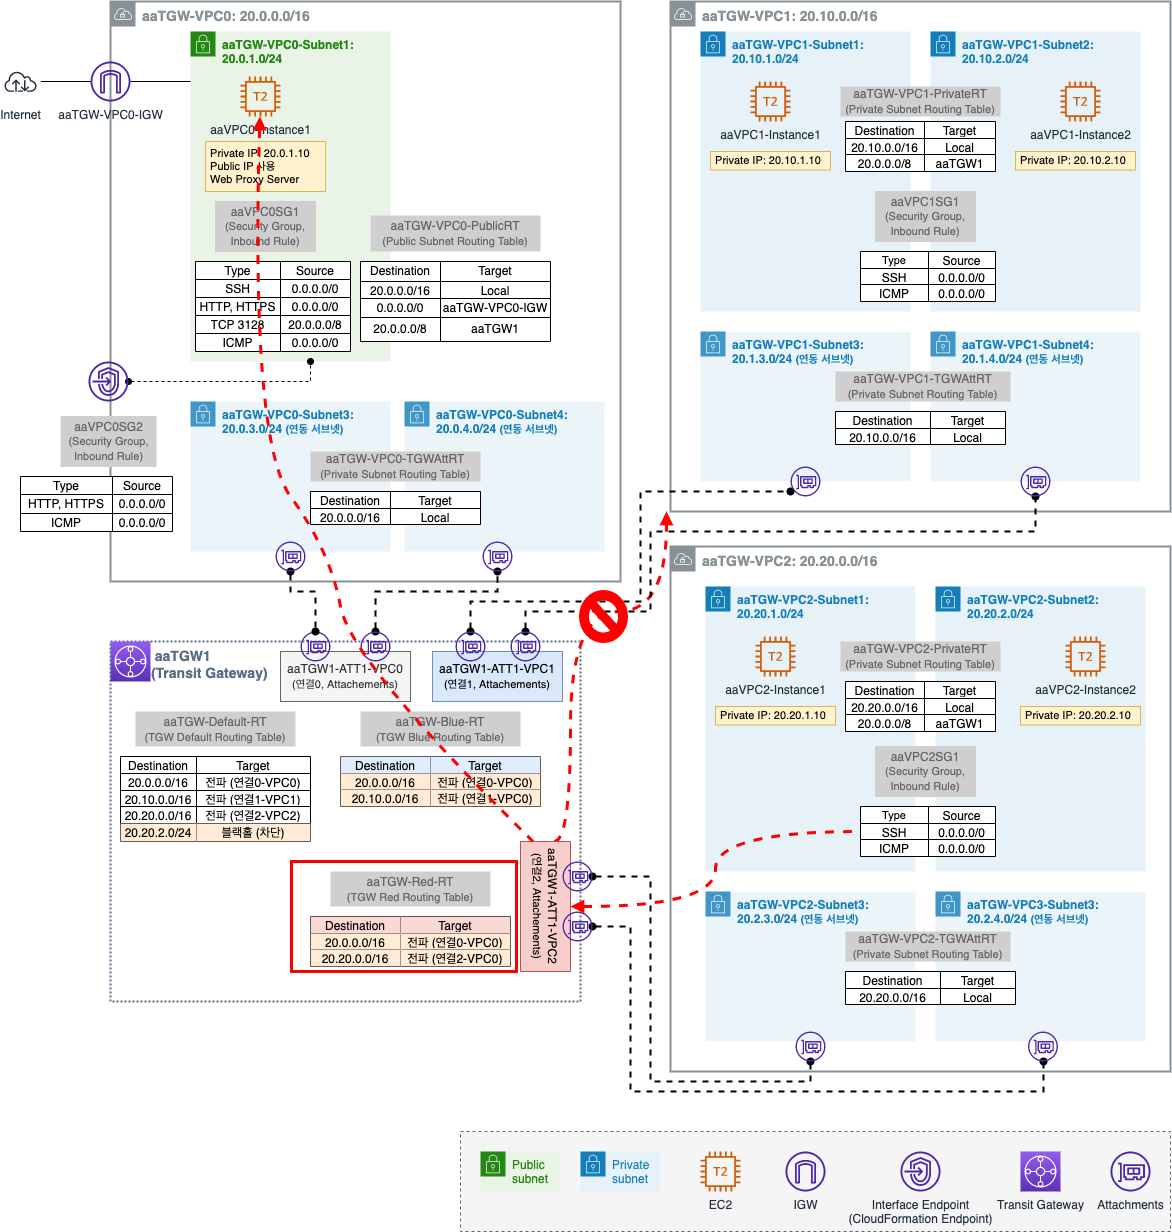
TGW Red Routing Table 에 라우팅은 VPC0,2 경로 정보가 있다.
따라서 aaVPC2-Instance1 은 VPC0,2 대역과는 통신이 가능하지만 VPC1 대역과는 통신이 불가능하다.
VPC0,1,2 대역의 Instance 들과 ping 통신 확인 (VPC0 정상 통신, VPC1 통신 불가)
# aaVPC0-Instance1 Public IP
$ ssh -i sandbox-jh.pem ec2-user@52.79.xxx.xxx

# aaVPC2-Instance1 Private IP
[ec2-user@aaVPC0-Instance1 ~]$ ssh root@20.20.1.10

# 파일 복사
[root@aaVPC2Instance1 ~]# curl -o /root/list.txt http://20.0.1.10/list.txt --silent
[root@aaVPC2Instance1 ~]# curl -o /root/pingall.sh http://20.0.1.10/pingall.sh --silent
[root@aaVPC2Instance1 ~]# chmod +x /root/pingall.sh
[root@aaVPC2Instance1 ~]# ll
합계 8
-rw-r--r-- 1 root root  54  1월 25 12:04 list.txt
-rwxr-xr-x 1 root root 204  1월 25 12:04 pingall.sh

# VPC0,1,2 대역의 Instance 들과 ping 통신 확인 (VPC0 정상 통신, VPC1 통신 불가)
[root@aaVPC2Instance1 ~]# ./pingall.sh
2022. 01. 25. (수) 12:05:32 UTC
host 20.0.1.10 is up
host 20.10.1.10 is down
host 20.10.2.10 is down
host 20.20.1.10 is up
host 20.20.2.10 is up
2.3. 블랙홀 라우팅을 이용한 통신 차단
블랙홀 라우팅을 이용하여 특정 경로의 통신만 차단해본다.
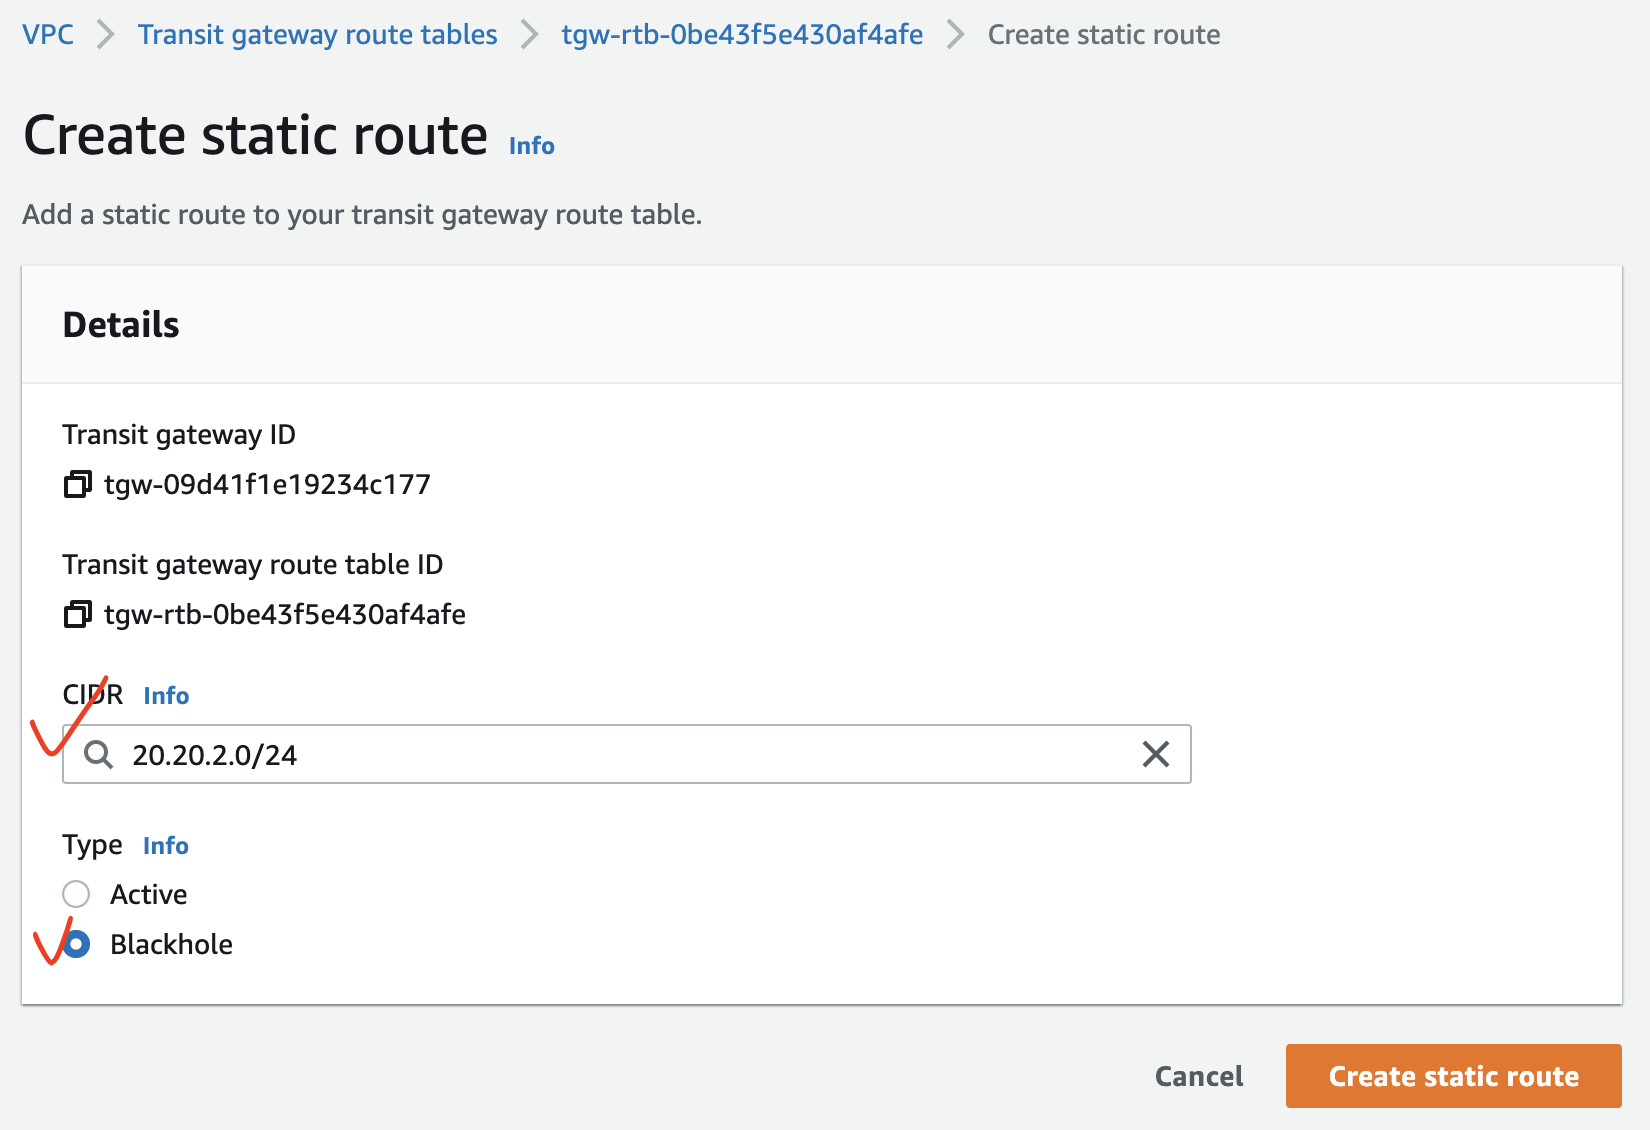
지금 aaVPC0-Instance1 은 VPC0,1,2 모든 대역으로 통신이 가능한 상태인데, 블랙홀 라우팅을 통해 VPC2 대역 중 20.20.2.0/24 대역 (aaTGW-VPC2-Subnet2) 만 차단해본다.
- 블랙홀 라우팅 설정
- 블랙홀 라우팅 동작 확인
2.3.1. 블랙홀 라우팅 설정
aaVPC0-Instance1 이 속한 aaTGW-Default-RT 에서 블랙홀 라우팅을 설정한다.
[VPC] - [Transit gateways] - [Transit gateway route tables] - [aaTGW-Default-RT 선택] - [Routes 탭] - [Create static route]
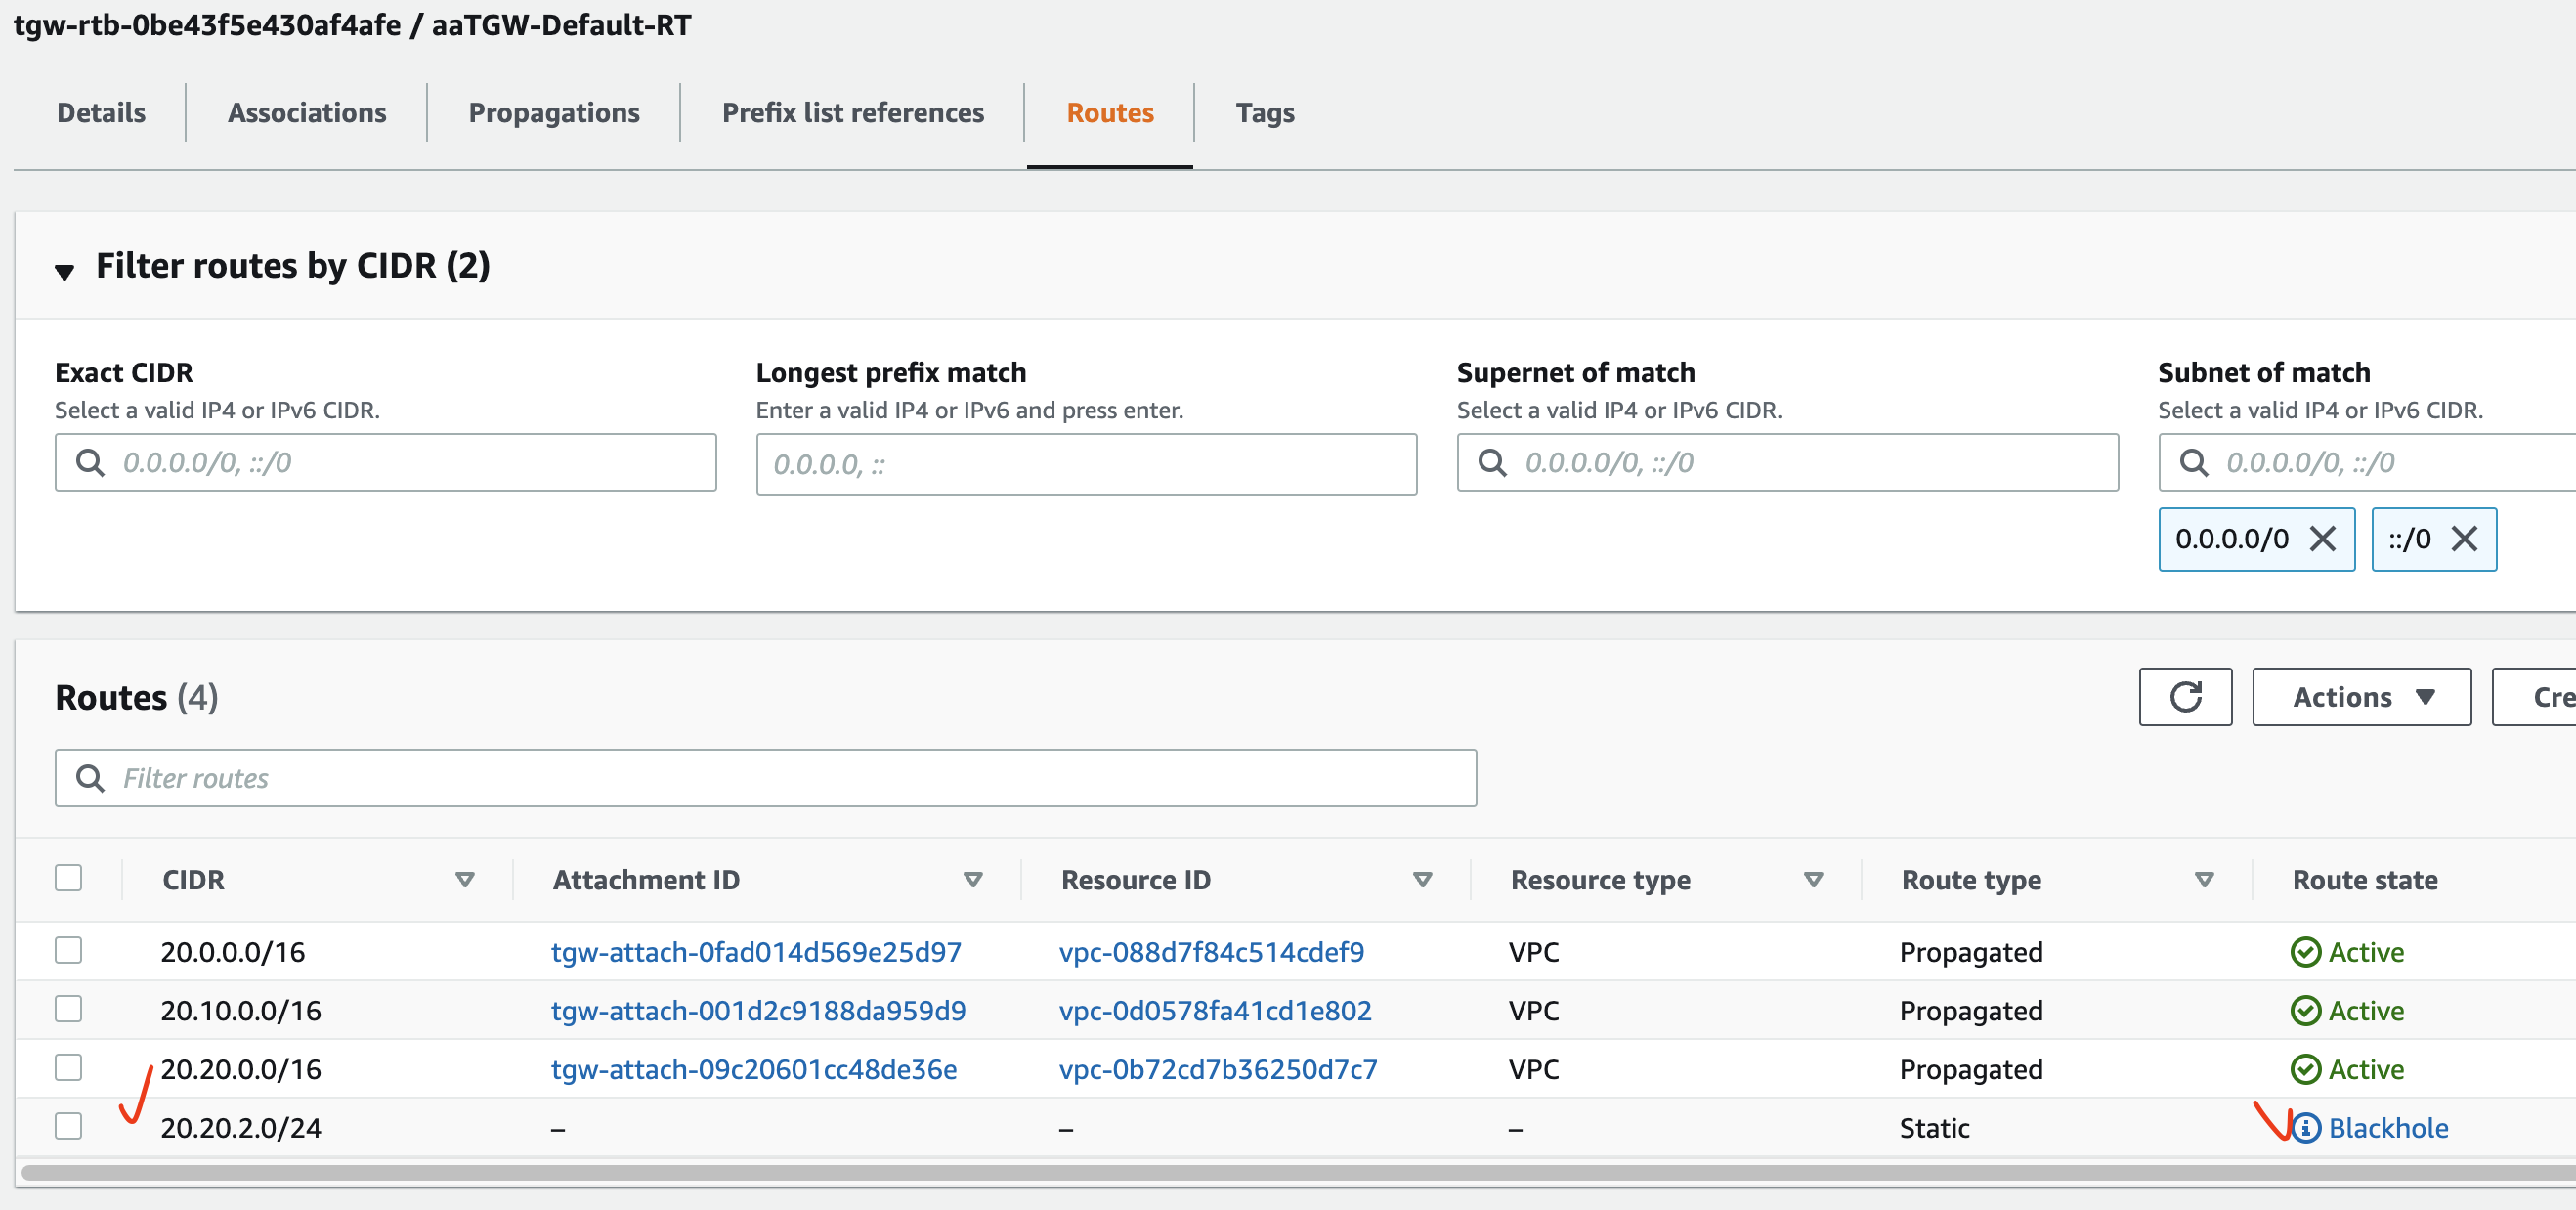
2.3.2. 블랙홀 라우팅 동작 확인
이제 aaVPC0-Instance1 Public IP 로 SSH 접속하여 통신을 확인해본다.
VPC0,1,2 대역의 Instance 들과 ping 통신 확인 (20.20.2.0/24 대역 통신 불가)
# aaVPC0-Instance1 Public IP
$ ssh -i sandbox-jh.pem ec2-user@52.79.xxx.xxx

# VPC0,1,2 대역의 Instance 들과 ping 통신 확인 (20.20.2.0/24 대역 통신 불가)
[ec2-user@aaVPC0-Instance1 ~]$ ./pingall.sh
2022. 01. 25. (수) 12:26:36 UTC
host 20.0.1.10 is up
host 20.10.1.10 is up
host 20.10.2.10 is up
host 20.20.1.10 is up
host 20.20.2.10 is down
TGW 의 Blackhole 라우팅에 의해 차단된 경우 CloudWatch 의
PacketDropCountBlackholeMetric 에서 확인 가능
2.4. Resource 삭제
- CloudFormation Stack 삭제 ([CloudFormation] - [Stacks] - [Delete])
CloudFormation Stack 이 삭제되면 위의 2.1.2. CloudFormation 을 통해 생성된 자원 확인 의 자원이 모두 삭제되었는지 확인한다.
참고 사이트 & 함께 보면 좋은 사이트
본 포스트는 김원일, 서종호 저자의 따라하며 배우는 AWS 네트워크 입문를 기반으로 스터디하며 정리한 내용들입니다.
- 따라하며 배우는 AWS 네트워크 입문
- 따라하며 배우는 AWS 네트워크 입문 - 책가이드
- 따라하며 배우는 AWS 네트워크 입문 - 팀블로그
- Site-to-Site VPN 이란?
- AWS Transit Gateway – 네트워크 관리자를 통한 글로벌 네트워크 구축 및 모니터링 중앙 집중화 (서울 리전 포함) - AWS Blog
전송 게이트웨이 네트워크 매니저 ↩ - VPC 간의 연결 방식- VPC Peering, VGW, DGW, TGW 비교
- AWS VGW vs DGW vs TGW
- Proxy (Squid) Instance - VPC Outbound Filtering 웹 프록시 Squid ↩
