Spring Security - 스프링 시큐리티 기본 구성 요소
in DEV on SpringSecurity Http-basic User-details-service Password-encoder Authentication-provider
이 포스트에서는 스프링 부트를 이용할 때 자동 구성되는 기본값에 대해 알아보고, 이러한 기본값들을 재정의하는 방법에 대해 간단히 알아본다.
스프링 부트는 미리 준비된 구성을 제공하므로 모든 구성을 작성하는 대신에 본인의 구현과 일치하지 않은 구성만 재정의하면 되는데
이러한 접근법을 설정보다 관습 이라고 함
- 스프링 시큐리티로 간단한 프로젝트 생성
- 인증과 권한 부여를 위한 기본 구성 요소로 기능 설계
- 각 기본 구성 요소의 연관성 이해를 위한 기본 계약 적용
- 주 책임에 대한 구현
- 스프링 부트의 기본 구성 재정의
개발 환경
- 언어: java
- Spring Boot ver: 3.2.2
- Spring ver: 6.1.3
- Spring Security ver: 6.2.1
- IDE: intelliJ
- SDK: JDK 17
- 의존성 관리툴: Maven
1. 스프링 시큐리티로 HTTP Basic 인증을 이용한 웹 애플리케이션
실제 운영엔 적합하지 않으므로 자격 증명의 개념만 이해하는 방향으로 보세요.
소스는 github 에 있습니다.
스프링 시큐리티로 HTTP Basic 인증을 이용하여 엔드포인트를 보호하는 방법에 대해 알아보자.
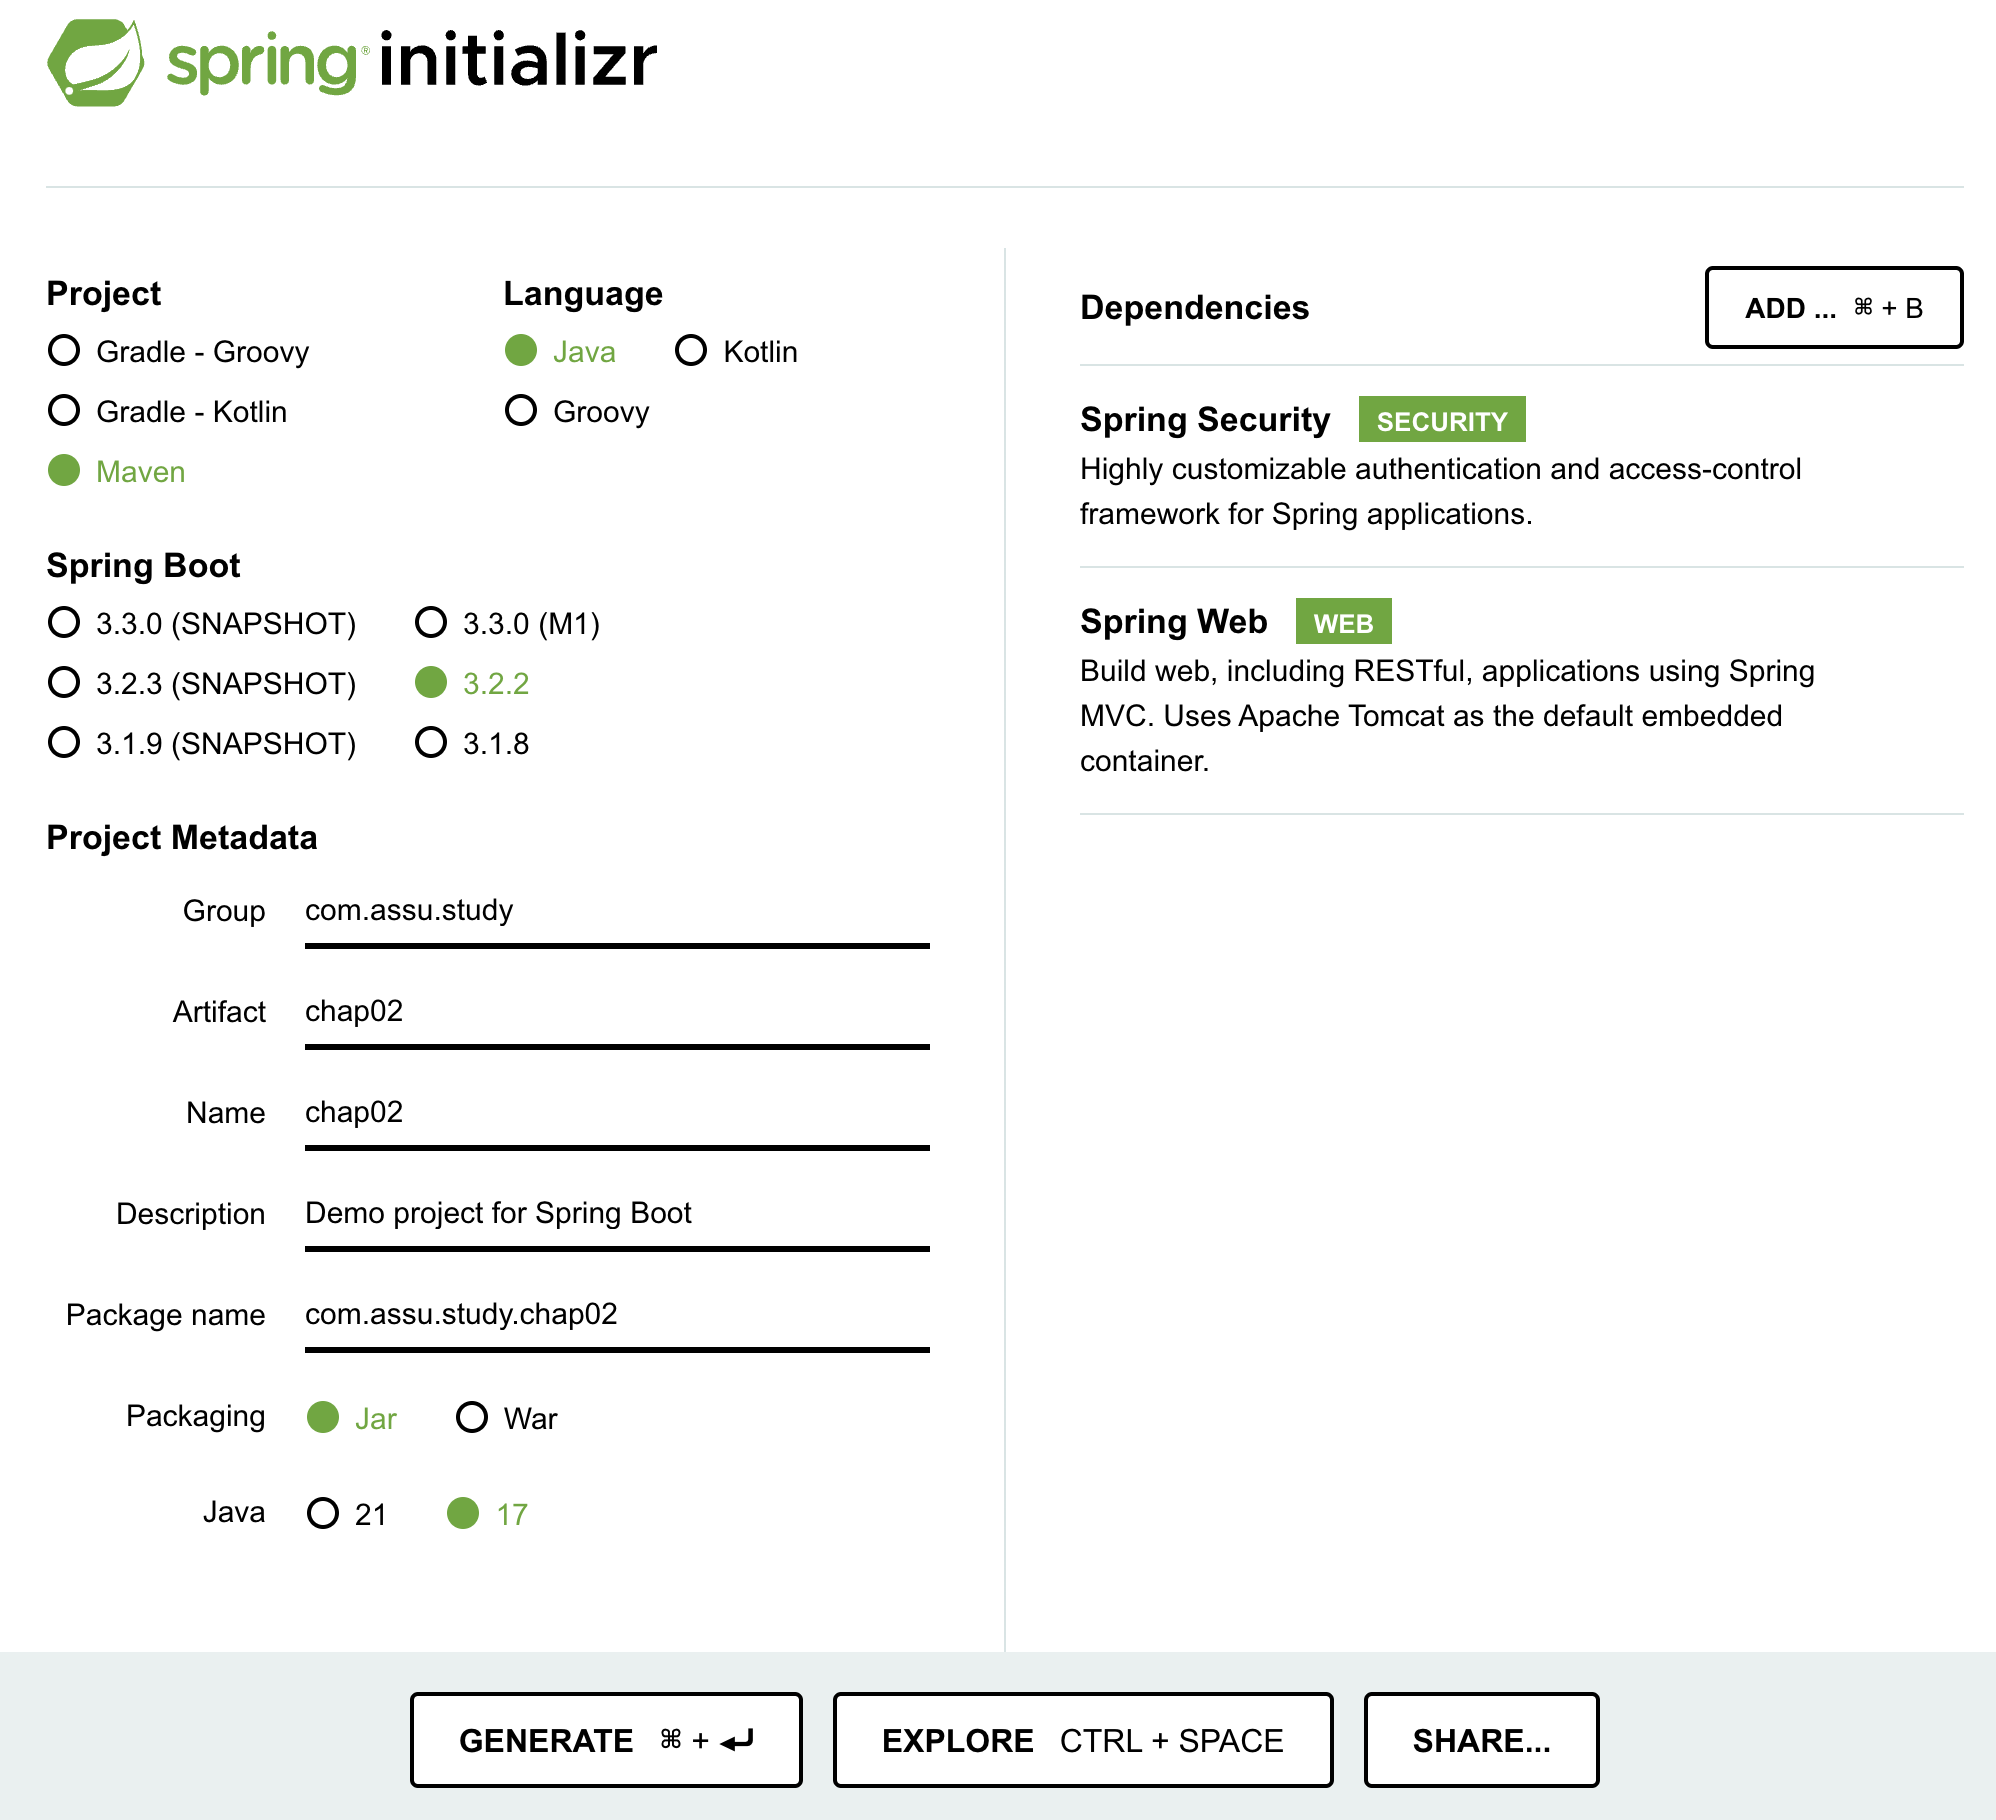
프로젝트를 만들고 종속성만 추가하면 애플리케이션이 시작할 때 스프링 부트가 사용자 이름과 암호를 포함한 기본 구성을 적용한다.
여기선 spring-boot-starter-web 과 spring-boot-starter-security 종속성만 있으면 된다.
pom.xml
<?xml version="1.0" encoding="UTF-8"?>
<project xmlns="http://maven.apache.org/POM/4.0.0" xmlns:xsi="http://www.w3.org/2001/XMLSchema-instance"
	xsi:schemaLocation="http://maven.apache.org/POM/4.0.0 https://maven.apache.org/xsd/maven-4.0.0.xsd">
	<modelVersion>4.0.0</modelVersion>
	<parent>
		<groupId>org.springframework.boot</groupId>
		<artifactId>spring-boot-starter-parent</artifactId>
		<version>3.2.2</version>
		<relativePath/> <!-- lookup parent from repository -->
	</parent>
	<groupId>com.assu.study</groupId>
	<artifactId>chap02</artifactId>
	<version>0.0.1-SNAPSHOT</version>
	<name>chap02</name>
	<description>Demo project for Spring Boot</description>

	<properties>
		<java.version>17</java.version>
	</properties>

	<dependencies>
		<dependency>
			<groupId>org.springframework.boot</groupId>
			<artifactId>spring-boot-starter-security</artifactId>
		</dependency>
		<dependency>
			<groupId>org.springframework.boot</groupId>
			<artifactId>spring-boot-starter-web</artifactId>
		</dependency>

		<dependency>
			<groupId>org.springframework.boot</groupId>
			<artifactId>spring-boot-starter-test</artifactId>
			<scope>test</scope>
			<exclusions>
				<exclusion>
					<groupId>org.junit.vintage</groupId>
					<artifactId>junit-vintage-engine</artifactId>
				</exclusion>
			</exclusions>
		</dependency>
		<dependency>
			<groupId>org.springframework.security</groupId>
			<artifactId>spring-security-test</artifactId>
			<scope>test</scope>
		</dependency>
	</dependencies>

	<build>
		<plugins>
			<plugin>
				<groupId>org.springframework.boot</groupId>
				<artifactId>spring-boot-maven-plugin</artifactId>
			</plugin>
		</plugins>
	</build>

</project>
HelloController.java
package com.assu.study.chap02.controller;

@RestController
public class HelloController {

  @GetMapping("/hello")
  public String hello() {
    return "hello";
  }
}
@RestController 애너테이션은 컨텍스트에 빈을 등록하고, 애플리케이션이 이 인스턴스를 웹 컨트롤러로 사용한다고 스프링에 알려준다.
애플리케이션을 실행하면 콘솔에 아래와 비슷한 로그가 나온다.
Using generated security password: 8f797d8a-7503-4a05-9bf7-aaae1bfb75f5

This generated password is for development use only. Your security configuration must be updated before running your application in production.
HTTP Basic 인증으로 애플리케이션의 엔드포인트를 호출하려면 이 암호를 이용해야 한다.
우선 Authorization 헤더를 이용하지 않은 채로 엔드포인트를 호출하면 401 응답이 내려온다.
$ curl -w "%{http_code}\n" http://localhost:8080/hello
401
이제 올바른 자격 증명을 지정한 후 호출해보자.
% curl -w "%{http_code}\n" -u user:19beaad8-b607-41da-a4fd-1c1d6611d206 http://localhost:8080/hello
hello200%
401 과 403
HTTP 401 권한 없음 상태 코드는 인증 실패를 의미하고, HTTP 403 금지됨 상태 코드는 권한 부여 실패를 의미함
1.1. HTTP basic 인증을 이용한 엔드포인트 호출
curl 의 -u 플래그로 HTTP Basic 사용자 이름과 암호를 설정할 수 있다.
curl 은
curl 의 -u 플래그를 이용하면 쉽게 요청할 수 있지만, 실제 요청이 어떻게 구성되는지 아는 것도 중요하므로 Authorization 헤더를 직접 만들어본다.
우선
$ echo -n user:19beaad8-b607-41da-a4fd-1c1d6611d206 | base64
dXNlcjoxOWJlYWFkOC1iNjA3LTQxZGEtYTRmZC0xYzFkNjYxMWQyMDY=
엔드포인트 호출 시 위 Base64 로 인코딩된 문자열을 Authorization 헤더값으로 넣으면 -u 플래그를 사용할 때와 같은 결과가 생성된다.
$ curl -H "Authorization: Basic dXNlcjoxOWJlYWFkOC1iNjA3LTQxZGEtYTRmZC0xYzFkNjYxMWQyMDY=" http://localhost:8080/hell
o
hello%
2. 기본 구성
위에서 스프링 시큐리티가 작동하는 것을 확인했다.
스프링 부트가 스프링 시큐리티의 무엇을 구성하는지 알아보고, 이 구성을 재정의하는 방법에 대해 알아본다.
위의 1. 스프링 시큐리티로 HTTP Basic 인증을 이용한 웹 애플리케이션 에서는 기본 사용자를 사용했고, 애플리케이션이 시작될 때마다 임의의 암호를 받아 이 암호로 엔드포인트를 호출하였다.
이 논리는 스프링 부트가 사전에 설정한 인증 공급자 (AuthenticationProvider) 에 구현되어 있다.
아래 그림은 스프링 시큐리티 아키텍처의 주 구성 요소이며, 바로 위에선 이 구성 요소들의 사전 구성된 구현을 이용하였다.
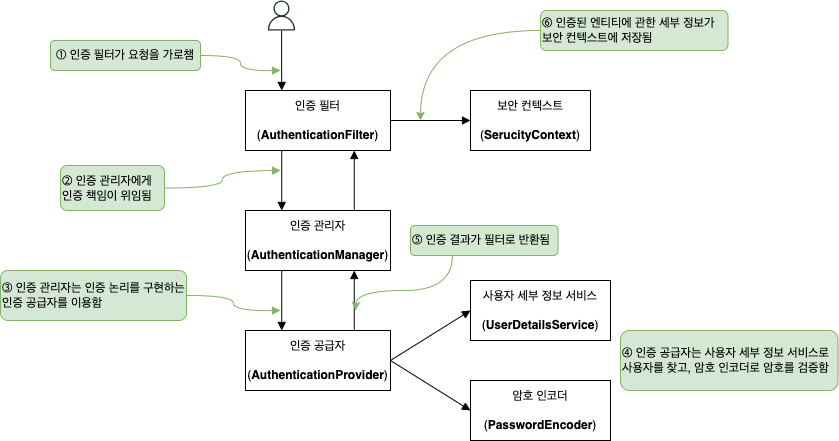
- 인증 필터 (
AuthenticationFilter)- 인증 요청을 인증 관리자에게 위임하고, 응답을 바탕으로 보안 컨텍스트를 구성
- 인증 관리자 (
AuthenticationManager)- 인증 논리를 구현하기 위해 인증 공급자를 이용하여 인증 처리
- 인증 공급자 (
AuthenticationProvider)- 인증 논리 구현
- 사용자 관리 책임을 구현하는 사용자 세부 정보 서비스 (
UserDetailsService) 를 인증 논리에 이용 - 암호 관리를 구현하는 암호 인코더 (
PasswordEncoder) 를 인증 논리에 이용
- 보안 컨텍스트 (
SecurityContext)- 인증 프로세스 후 인증 데이터를 유지 (=인증된 요청에 대한 세부 정보 저장)
UserDetailsService 와 PasswordEncoder 는 자동으로 구성되는 빈이며, 인증 공급자 (AuthenticationProvider) 는 이 빈들을 이용하여 사용자를 찾고, 암호를 확인한다.
2.1. UserDetailsService (사용자 세부 정보 서비스)
사용자 세부 정보는 스프링 시큐리티로 UserDetailsService 계약을 구현하는 객체가 관리한다.
스프링 부트가 제공하는 기본 구현은 애플리케이션의 내부 메모리에 기본 자격 증명을 등록하는 일만 한다.
이 기본 자격 증명에서 사용자 이름은 ‘user’ 이고, 기본 암호는 UUID 형식이며, 암호는 스프링 컨텍스트가 로드될 때 자동으로 생성된다.
기본 구현은 자격 증명을 애플리케이션에 보관하지 않고 메모리에 보관한다. 따라서 실제 운영 시엔 적용하기 위험하다.
2.2. PasswordEncoder (암호 인코더)
PasswordEncoder 는 암호를 인코딩하고, 암호가 기존 인코딩과 일치하는지 확인하는 역할을 한다.
UserDetailsService 처럼 PasswordEncoder 도 HTTP Basic 인증 흐름이 꼭 필요하다.
PasswordEncoder객체 구현의 상세한 내용은 Spring Security - 암호 처리 를 참고하세요.
만일 UserDetailsService 의 기본 구현을 대체할 때는 PasswordEncoder 도 지정해야 한다.
HTTP Basic 인증은 헤더값에 접두사 Basic 을 붙이고 그 뒤에 콜론 (:) 으로 구분된 사용자 이름과 암호가 포함된 문자열을 Base64 인코딩하여 붙인다.
HTTP Basic 인증
HTTP Basic 인증은 자격 증명의 기밀성을 보장하지 않음
Base64 는 단지 전송의 편의를 위한 인코딩 방법이고, 암호화나 해싱 방법이 아니므로 전송 중에 자격 증명이 탈취되면 누구나 암호를 볼 수 있음따라서 일반적으로 최소한의 기밀을 위해 HTTPS 를 함께 이용할 때가 아니면 HTTP Basic 인증은 사용하지 않음
2.3. AuthenticationProvider (인증 공급자)
AuthenticationProvider 는 인증 논리를 정의하고, 사용자와 암호의 관리를 위임한다.
AuthenticationProvider 의 기본 구현은 UserDetailsService, PasswordEncoder 에 제공된 기본 구현을 이용한다.
3. 기본 구성 재정의
기본 구성 요소 재정의하는 옵션을 알아야 맞춤형 구현을 연결하고, 애플리케이션에 맞게 보안을 적용할 수 있다.
여기선 인증에 이용되는 UserDetailsService 와 PasswordEncoder 를 구성하는 방법에 대해 알아본다.
구성 요소를 “맞춤 구성” 하는 방법은
Spring Security - 사용자 관리, Spring Security - 암호 처리 를 참고하세요.여기선 “맞춤형 구현” 을 “연결” 하는 방법에 대해 알아봅니다.
3.1. UserDetailsService 재정의
소스는 github 에 있습니다.
여기선 UserDetailsService 형식의 맞춤형 빈을 정의하여 스프링 시큐리티에 있는 기본 구성 요소를 재정의하는 방법에 대해 알아본다.
스프링 시큐리티에 있는 InMemoryUserDetailsManager 구현을 이용하여 UserDetailsService 를 재정의해볼 것이다.
InMemoryUserDetailsManager 구현은 메모리에 자격 증명을 저장하여 스프링 시큐리티가 요청을 인증할 때 이용할 수 있도록 해주며, 이를 통해 자체적으로 관리하는 자격 증명을 인증에 이용할 수 있다.
InMemoryUserDetailsManager
InMemoryUserDetailsManager구현은 실제 운영 단계의 애플리케이션에서 사용하기엔 부적절하며, 개념 증명용으로만 참고하는 것이 좋음
여기에서는UserDetailsService구현을 재정의하는 방법을 알아보는 것이 목적임
UserDetailsService구현에 대한 좀 더 상세한 내용은 3.1.UserDetailsService계약 을 참고하세요.
<?xml version="1.0" encoding="UTF-8"?>
<project xmlns="http://maven.apache.org/POM/4.0.0" xmlns:xsi="http://www.w3.org/2001/XMLSchema-instance"
         xsi:schemaLocation="http://maven.apache.org/POM/4.0.0 https://maven.apache.org/xsd/maven-4.0.0.xsd">
    <modelVersion>4.0.0</modelVersion>
    <parent>
        <groupId>org.springframework.boot</groupId>
        <artifactId>spring-boot-starter-parent</artifactId>
        <version>3.2.2</version>
        <relativePath/> <!-- lookup parent from repository -->
    </parent>
    <groupId>com.assu.study</groupId>
    <artifactId>chap02-1</artifactId>
    <version>0.0.1-SNAPSHOT</version>
    <name>chap02-1</name>
    <description>chap02-1</description>
    <properties>
        <java.version>17</java.version>
    </properties>
    <dependencies>
        <dependency>
            <groupId>org.springframework.boot</groupId>
            <artifactId>spring-boot-starter-security</artifactId>
        </dependency>
        <dependency>
            <groupId>org.springframework.boot</groupId>
            <artifactId>spring-boot-starter-web</artifactId>
        </dependency>

        <dependency>
            <groupId>org.springframework.boot</groupId>
            <artifactId>spring-boot-starter-test</artifactId>
            <scope>test</scope>
            <exclusions>
                <exclusion>
                    <groupId>org.junit.vintage</groupId>
                    <artifactId>junit-vintage-engine</artifactId>
                </exclusion>
            </exclusions>
        </dependency>
        <dependency>
            <groupId>org.springframework.security</groupId>
            <artifactId>spring-security-test</artifactId>
            <scope>test</scope>
        </dependency>
    </dependencies>

    <build>
        <plugins>
            <plugin>
                <groupId>org.springframework.boot</groupId>
                <artifactId>spring-boot-maven-plugin</artifactId>
            </plugin>
        </plugins>
    </build>

</project>
/config/ProjectConfig.java
import org.springframework.context.annotation.Bean;
import org.springframework.context.annotation.Configuration;
import org.springframework.security.core.userdetails.UserDetailsService;
import org.springframework.security.provisioning.InMemoryUserDetailsManager;

@Configuration  // 구성 클래스 표시
public class ProjectConfig {

  @Bean // 반환된 값을 스프링 컨텍스트에 빈으로 추가
  public UserDetailsService userDetailsService() {
    var userDetailsService = new InMemoryUserDetailsManager();
    return userDetailsService;
  }
}
이제 애플리케이션은 자동 구성된 기본 요소 대신에 컨텍스트에 추가한 UserDetailsService 형식의 인스턴스를 이용하므로 더 이상 콘솔에 자동 생성한 암호를 출력하지 않는다.
하지만 사용자가 없고, PasswordEncoder 가 없기 때문에 엔드포인트에 접근이 불가하다.
따라서 아래와 같은 추가 작업이 필요하다.
- 자격 증명(사용자 이름, 암호)이 있는 사용자를 하나 이상 생성
- 사용자를
UserDetailsService에서 관리하도록 추가 - 주어진 암호를
UserDetailsService가 저장/관리하는 암호를 이용하여 검증하는PasswordEncoder형식의 빈 정의
InMemoryUserDetailsManager 의 인스턴스를 대상으로 인증하는데 이용할 수 있는 자격 증명 집합을 선언하고 추가해야 하는데 지금은 미리 정의된 빌더를 이용하여 UserDetails 형식의 객체를 만든다.
UserDetails 인스턴스를 만들 때는 사용자 이름, 암호, 하나 이상의 권한을 지정해야 한다. (권한은 아무 문자열이나 지정하면 됨)
사용자 관리 방법에 대해서는 Spring Security - 사용자 관리 를 참고하세요.
/config/ProjectConfig.java
import org.springframework.context.annotation.Bean;
import org.springframework.context.annotation.Configuration;
import org.springframework.security.core.userdetails.User;
import org.springframework.security.core.userdetails.UserDetailsService;
import org.springframework.security.provisioning.InMemoryUserDetailsManager;

@Configuration  // 구성 클래스 표시
public class ProjectConfig {

  @Bean // 반환된 값을 스프링 컨텍스트에 빈으로 추가
  public UserDetailsService userDetailsService() {
    var userDetailsService = new InMemoryUserDetailsManager();

    var user = User.withUsername("assu")
        .password("1234")
        .authorities("read")
        .build();

    // UserDetailsService 에서 관리하도록 사용자 추가
    userDetailsService.createUser(user);

    return userDetailsService;
  }
}
UserDetailsService 를 재정의하면 PasswordEncoder 도 재정의해야 하는데 만일 PasswordEncoder 를 재정의하지 않은 상태로 엔드포인트를 호출하면 아래와 같은 예외가 발생하며 401 에러가 발생한다.
$ curl -w "%{http_code}" -u assu:1234 http://localhost:8080/hello
401%
java.lang.IllegalArgumentException: There is no PasswordEncoder mapped for the id "null"
이제 UserDetailsService 를 재정의 할 때 처럼 PasswordEncoder 빈을 컨텍스트에 추가한다.
/config/ProjectConfig.java
import org.springframework.context.annotation.Bean;
import org.springframework.context.annotation.Configuration;
import org.springframework.security.core.userdetails.User;
import org.springframework.security.core.userdetails.UserDetailsService;
import org.springframework.security.crypto.password.NoOpPasswordEncoder;
import org.springframework.security.crypto.password.PasswordEncoder;
import org.springframework.security.provisioning.InMemoryUserDetailsManager;

@Configuration  // 구성 클래스 표시
public class ProjectConfig {

  @Bean // 반환된 값을 스프링 컨텍스트에 빈으로 추가
  public UserDetailsService userDetailsService() {
    var userDetailsService = new InMemoryUserDetailsManager();

    var user = User.withUsername("assu")
            .password("1234")
            .authorities("read")
            .build();

    // UserDetailsService 에서 관리하도록 사용자 추가
    userDetailsService.createUser(user);

    return userDetailsService;
  }

  @Bean
  public PasswordEncoder passwordEncoder() {
    return NoOpPasswordEncoder.getInstance();
  }
}
NoOpPasswordEncoder
NoOpPasswordEncoder인스턴스는 암호에 암호화나 해시를 적용하지 않고 plain text 처럼 처리하므로 실제 운영 시엔 적절하지 않음
이제 다시 엔드포인트를 호출하면 정상적으로 호출되는 것을 확인할 수 있다.
$ curl -w "%{http_code}" -u assu:1234 http://localhost:8080/hello
hello200%
3.2. 엔드포인트 권한 부여 재정의
3.1. UserDetailsService 재정의 에서는 새로운 사용자 관리 방식에 대해 알아보았다.
이제 엔드포인트 인증 방식과 구성에 대해 알아본다.
권한 부여에 대한 좀 더 상세한 내용은
Spring Security - 권한 부여(1): 권한과 역할에 따른 액세스 제한, Spring Security - 권한 부여(2): 경로, HTTP Method 에 따른 엑세스 제한, Spring Security - 필터 를 참고하세요.
스프링 시큐리티 기본 구성에서 모든 엔드포인트는 애플리케이션에서 관리하는 유효한 사용자가 있다고 가정하고, HTTP Basic 인증 방식으로 권한 부여 방법을 이용한다.
하지만 애플리케이션의 모든 엔드포인트를 보호할 필요는 없으며, 보안이 필요한 엔드포인트에 다른 권한 부여 규칙을 적용해야 할 수도 있다.
소스는 3.1.
UserDetailsService재정의 에서 사용한 소스를 그대로 이어서 진행
WebSecurityConfigurerAdapter는 spring-security 6.0 버전 이후로 완전히 deprecated 됨
import org.springframework.context.annotation.Bean;
import org.springframework.context.annotation.Configuration;
import org.springframework.security.config.Customizer;
import org.springframework.security.config.annotation.web.builders.HttpSecurity;
import org.springframework.security.core.userdetails.User;
import org.springframework.security.core.userdetails.UserDetailsService;
import org.springframework.security.crypto.password.NoOpPasswordEncoder;
import org.springframework.security.crypto.password.PasswordEncoder;
import org.springframework.security.provisioning.InMemoryUserDetailsManager;
import org.springframework.security.web.SecurityFilterChain;

@Configuration  // 구성 클래스 표시
public class ProjectConfig {

  @Bean // 반환된 값을 스프링 컨텍스트에 빈으로 추가
  public UserDetailsService userDetailsService() {
    var userDetailsService = new InMemoryUserDetailsManager();

    var user = User.withUsername("assu")
        .password("1234")
        .authorities("read")
        .build();

    // UserDetailsService 에서 관리하도록 사용자 추가
    userDetailsService.createUser(user);

    return userDetailsService;
  }

  @Bean
  public PasswordEncoder passwordEncoder() {
    return NoOpPasswordEncoder.getInstance();
  }

  @Bean
  public SecurityFilterChain filterChain(HttpSecurity http) throws Exception {
    // 모든 요청에 인증이 필요
    http.authorizeHttpRequests(authz -> authz.anyRequest().authenticated()).httpBasic(Customizer.withDefaults());

    // 모든 요청에 인증없이 요청 가능
    //http.authorizeHttpRequests(authz -> authz.anyRequest().permitAll()).httpBasic(Customizer.withDefaults());

    return http.build();
  }
}
모든 요청에 인증이 필요한 경우
# 인증 없이 요청하면 401
$ curl -w "%{http_code}" http://localhost:8080/hello
401%

# 인증하여 요청 시 성공
$ curl -w "%{http_code}" -u assu:1234 http://localhost:8080/hello
hello200%

# 비밀 번호가 틀리면 401
$ curl -w "%{http_code}" -u assu:1234555 http://localhost:8080/hello
401%
모든 요청에 인증없이 요청 가능한 경우
# 인증 없이 요청해도 성공
$ curl -w "%{http_code}" http://localhost:8080/hello
hello200%

# 인증하여 요청해도 성공
$ curl -w "%{http_code}" -u assu:1234 http://localhost:8080/hello
hello200%

# 인증 시 비밀번호가 틀리면 401
$  curl -w "%{http_code}" -u assu:1234555 http://localhost:8080/hello | jq
{
  "timestamp": "2024-02-12T03:28:22.032+00:00",
  "status": 401,
  "error": "Unauthorized",
  "path": "/hello"
}
401
3.3. AuthenticationProvider 구현 재정의
위에서 UserDetailsService 와 PasswordEncoder 를 구성하는 방법에 대해 알아보았다.
이제 이 구성 요소들에 작업을 위임하는 AuthenticationProvider 를 맞춤 구성하는 방법에 대해 알아본다.
아래 그림을 다시 보자.
위 그림에서 보면 AuthenticationProvider 는 인증 논리를 구현하는데, AuthenticationManager 로부터 요청을 받으면 사용자를 찾는 작업은 UserDetailsService 에, 암호를 검증하는 작업은 PasswordEncoder 에 위임한다.
여기서는 바로 이 AuthenticationProvider 로 맞춤 구성 인증 논리를 구현하는 법에 대해 알아본다.
소스는 github 에 있습니다.
/security/CustomAuthenticationProvider.java
import org.springframework.security.authentication.AuthenticationCredentialsNotFoundException;
import org.springframework.security.authentication.AuthenticationProvider;
import org.springframework.security.authentication.UsernamePasswordAuthenticationToken;
import org.springframework.security.core.Authentication;
import org.springframework.security.core.AuthenticationException;
import org.springframework.stereotype.Component;

import java.util.Arrays;

/**
 * AuthenticationProvider 인터페이스 구현
 */
@Component  // 구성 클래스 표시
public class CustomAuthenticationProvider implements AuthenticationProvider {
  // 인증 논리 구현
  @Override
  public Authentication authenticate(Authentication authentication) throws AuthenticationException {
    // Principal 인터페이스의 getName() 메서드를 Authentication 에서 상속받음
    String username = authentication.getName();
    String password = String.valueOf(authentication.getCredentials());

    // 이 조건은 일반적으로 UserDetailsService, PasswordEncoder 를 호출해서 사용자 이름과 암호를 테스트함
    // 즉, 이 조건절이 UserDetailsService, PasswordEncoder 의 책임을 대체함
    if ("assu".equals(username) && "1234".equals(password)) {
      return new UsernamePasswordAuthenticationToken(username, password, Arrays.asList());
    } else {
      throw new AuthenticationCredentialsNotFoundException("AuthenticationCredentialsNotFoundException Error...!!");
    }
  }

  // Authentication 형식의 구현 추가
  @Override
  public boolean supports(Class<?> authentication) {
    return UsernamePasswordAuthenticationToken.class.isAssignableFrom(authentication);
  }
}
AuthenticationProvider.support()를 이용하는 방법은 1.2.1.AuthenticationProvider.supports()를 참고하세요.
이제 위에서 만든 AuthenticationProvider 구현을 등록하여 사용해보자.
/config/ProjectConfig.java
import com.assu.study.chap0205.security.CustomAuthenticationProvider;
import org.springframework.context.annotation.Bean;
import org.springframework.security.authentication.AuthenticationManager;
import org.springframework.security.authentication.ProviderManager;
import org.springframework.security.config.Customizer;
import org.springframework.security.config.annotation.authentication.configuration.AuthenticationConfiguration;
import org.springframework.security.config.annotation.web.builders.HttpSecurity;
import org.springframework.security.web.SecurityFilterChain;
import org.springframework.context.annotation.Configuration;

@Configuration  // 구성 클래스 표시
public class ProjectConfig {
  private final AuthenticationConfiguration authenticationConfiguration;
  private final CustomAuthenticationProvider customAuthenticationProvider;

  public ProjectConfig(AuthenticationConfiguration authenticationConfiguration, CustomAuthenticationProvider customAuthenticationProvider) {
    this.authenticationConfiguration = authenticationConfiguration;
    this.customAuthenticationProvider = customAuthenticationProvider;
  }

  @Bean
  public AuthenticationManager authenticationManager() throws Exception {
    ProviderManager providerManager = (ProviderManager) authenticationConfiguration.getAuthenticationManager();
    providerManager.getProviders().add(this.customAuthenticationProvider);
    return authenticationConfiguration.getAuthenticationManager();
  }

  @Bean
  public SecurityFilterChain filterChain(HttpSecurity http) throws Exception {
    // 모든 요청에 인증이 필요
    http.authorizeHttpRequests(authz -> authz.anyRequest().authenticated()).httpBasic(Customizer.withDefaults());

    // 모든 요청에 인증 없이 요청 가능
    //http.authorizeHttpRequests(authz -> authz.anyRequest().permitAll()).httpBasic(Customizer.withDefaults());

    return http.build();
  }
}
$ curl -w "%{http_code}" -u assu:1234 http://localhost:8080/hello
hello200%

$ curl -w "%{http_code}" http://localhost:8080/hello
401%
AuthenticationProvider인터페이스,Authentication인터페이스, 그리고 그것의 구현인UserPasswordAuthenticationToken에 대해서는 Spring Security - 인증 구현(1): AuthenticationProvider 를 참고하세요.
3.4. 구성 클래스 분리
위에선 구성 클래스를 하나로 작성했지만 실제 운영 시에는 구성이 복잡하므로 구성 클래스도 분리하는 것이 좋다.
항상 하나의 클래스가 하나의 책임만 맡도록 하는 것이 좋다.
아래는 구성 클래스들을 분리한 예시이다.
소스는 github 에 있습니다.
/config/UserManagementConfig.java
import org.springframework.context.annotation.Bean;
import org.springframework.context.annotation.Configuration;
import org.springframework.security.core.userdetails.User;
import org.springframework.security.core.userdetails.UserDetailsService;
import org.springframework.security.crypto.password.NoOpPasswordEncoder;
import org.springframework.security.crypto.password.PasswordEncoder;
import org.springframework.security.provisioning.InMemoryUserDetailsManager;

/**
 * 사용자 관리와 암호 관리를 위한 구성 클래스
 */
@Configuration
public class UserManagementConfig {
  @Bean // 반환된 값을 스프링 컨텍스트에 빈으로 추가
  public UserDetailsService userDetailsService() {
    var userDetailsService = new InMemoryUserDetailsManager();

    var user = User.withUsername("assu")
        .password("1234")
        .authorities("read")
        .build();

    // UserDetailsService 에서 관리하도록 사용자 추가
    userDetailsService.createUser(user);

    return userDetailsService;
  }

  @Bean
  public PasswordEncoder passwordEncoder() {
    return NoOpPasswordEncoder.getInstance();
  }
}
/config/WebAuthorizationConfig.java
import org.springframework.context.annotation.Bean;
import org.springframework.context.annotation.Configuration;
import org.springframework.security.config.Customizer;
import org.springframework.security.config.annotation.web.builders.HttpSecurity;
import org.springframework.security.web.SecurityFilterChain;

/**
 * 권한 부여 관리를 위한 구성 클래스
 */
@Configuration
public class WebAuthorizationConfig {
  @Bean
  public SecurityFilterChain filterChain(HttpSecurity http) throws Exception {
    // 모든 요청에 인증이 필요
    http.authorizeHttpRequests(authz -> authz.anyRequest().authenticated()).httpBasic(Customizer.withDefaults());

    // 모든 요청에 인증 없이 요청 가능
    //http.authorizeHttpRequests(authz -> authz.anyRequest().permitAll()).httpBasic(Customizer.withDefaults());

    return http.build();
  }
}
참고 사이트 & 함께 보면 좋은 사이트
본 포스트는 로렌티우 스필카 저자의 스프링 시큐리티 인 액션을 기반으로 스터디하며 정리한 내용들입니다.
- 스프링 시큐리티 인 액션
- Configuration Migrations
- Spring Boot 3.x + Security 6.x 기본 설정 및 변화
- 스프링 부트 2.0에서 3.0 스프링 시큐리티 마이그레이션 (변경점)
- WebSecurityConfigurerAdapter Deprecated 대응법
- Security WebSecurityConfigurerAdapter Deprecated 해결하기
- WebSecurityConfigurerAdapter deprecated 대응
- CustomAuthenticationProvider
- SpringSecurity Custom AuthenticationProvider 추가하는 방법 알려주세요~
