Spring Security - 인증 구현(1): AuthenticationProvider
in DEV on SpringSecurity Authentication-provider
이 포스트에서는 스프링 시큐리티 구성 요소로 인증 논리를 맞춤 구성하는 법에 대해 알아본다.
AuthenticationProvider 인터페이스를 구현하는 방법에 대해 알아본 후 요청을 나타내는 방법을 알기 위해 Authentication 인터페이스에 대해 알아본다.
- 맞춤형
AuthenticationProvider로 인증 논리 구현
개발 환경
- 언어: java
- Spring Boot ver: 3.2.2
- Spring ver: 6.1.3
- Spring Security ver: 6.2.1
- IDE: intelliJ
- SDK: JDK 17
- 의존성 관리툴: Maven
2. 기본 구성 과 1. 스프링 시큐리티 인증 구현 에도 있지만 인증에 참여하는 각 구성 요소의 역할은 아래와 같다.
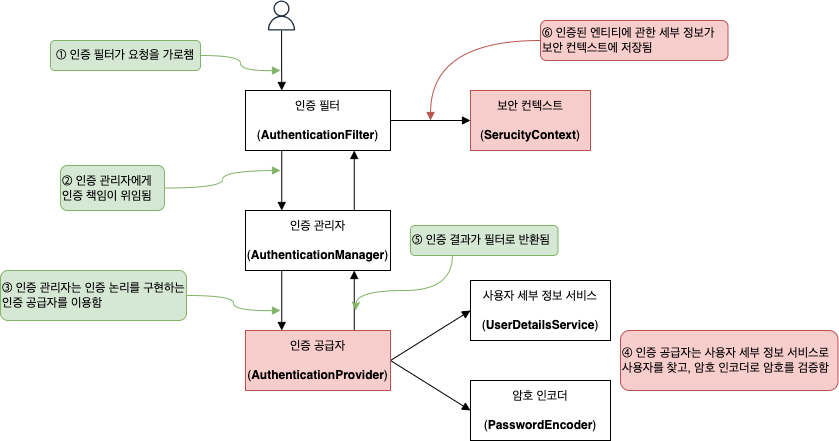
<스프링 시큐리티 인증의 전체적인 구성 요소>
- 인증 필터 (
AuthenticationFilter)- 인증 요청을 인증 관리자에게 위임하고, 응답을 바탕으로 보안 컨텍스트를 구성
- 인증 관리자 (
AuthenticationManager)- 인증 논리를 구현하기 위해 인증 공급자를 이용하여 인증 처리
- 인증 공급자 (
AuthenticationProvider)- 인증 논리 구현
- 사용자 관리 책임을 구현하는 사용자 세부 정보 서비스 (
UserDetailsService) 를 인증 논리에 이용 - 암호 관리를 구현하는 암호 인코더 (
PasswordEncoder) 를 인증 논리에 이용
- 보안 컨텍스트 (
SecurityContext)- 인증 프로세스 후 인증 데이터를 유지 (=인증된 요청에 대한 세부 정보 저장)
<스프링 시큐리티 사용자 관리, 암호 관리의 구성 요소>
UserDetails계약UserDetails인터페이스로 사용자를 기술함- 스프링 시큐리티가 관리하는 사용자를 나타냄
GrantedAuthority계약- 사용자는
GrantedAuthority인터페이스로 나타내는 권한을 하나 이상 가짐 - 사용자에게 허용되는 작업을 정의
- 사용자는
UserDetailsService계약- 사용자 이름으로 찾은 사용자 세부 정보를 반환함
UserDetailsManager계약UserDetailsService를 확장해서 암호 생성, 삭제, 변경 등의 작업을 추가함
PasswordEncoder- 암호를 암호화 또는 해시하는 방법과, 주어진 인코딩된 문자열을 일반 텍스트 암호와 비교하는 방법을 지정
즉, 인증 논리를 담당하는 것은 AuthenticationProvider 계층이며, 여기에서 요청 허용/거부를 결정하는 조건과 명령을 기술한다.
AuthenticationManager 는 HTTP Filter 계층에서 요청을 수신한 후 이 책임을 AuthenticationProvider 로 위임하는 구성 요소이다.
AuthenticationFilter계층에 대해서는 Spring Security - 필터 를 참고하세요.
본 포스트에서는 결과가 단 2가지인 인증 프로세스에 대해 살펴본다.
- 요청 엔티티가 인증되지 않음
- 사용자를 인식하지 못해 권한 부여 프로세스에 위임하지 않고 요청 거부
- 401 응답
- 요청 엔티티가 인증됨
- 사용자의 세부 정보가 저장되어 있어 이를 권한 부여에 이용
- 인증된 요청에 대한 세부 정보를
SecurityContext인터페이스의 인스턴스에 저장됨
1. AuthenticationProvider
애플리케이션에서 사용자 이름과 암호 기반의 기본 인증 구현이 부적합할 수도 있다.
예를 들어 SMS 메시지, 지문 등을 이용하는 인증 논리를 구현해야 할 경우도 있다.
일반적인 프레임워크는 많이 이용되는 구현은 지원하지만, 모든 시나리오를 해결할 수는 없다.
스프링 시큐리티에서는 AuthenticationProvider 계약으로 모든 맞춤형 인증 논리를 정의할 수 있다.
아래와 같은 순서로 맞춤형 인증 논리에 대해 알아본다.
- 스프링 시큐리티가 인증 이벤트를 나타내는
Authentication인터페이스 - 인증 논리를 담당하는
AuthenticationProvider계약 구현 - 맞춤형 인증 논리 적용
1.1. Authentication 인터페이스 (인증 프로세스 중 요청 나타내기)
여기선 스프링 시큐리티가 인증 프로세스 도중 요청을 나타내는 방법에 대해 살펴본다.
맞춤형 AuthenticationProvider 를 구현하려면 먼저 인증 이벤트 자체를 나타내는 방법에 대해 알아야 하는데, 여기서는 인증을 나타내는 계약인 Authentication 에 대해 알아본다.
Authentication
- 인증 요청 이벤트를 나타냄
- 애플리케이션에 접근을 요청한 엔티티의 세부 정보를 담음
- 인증 요청 이벤트와 관련된 정보는 인증 프로세스 도중과 이후에 사용 가능
애플리케이션에 접근 요청을 하는 사용자를 Principal 이라고 한다.
스프링 시큐리티의 Authentication 인터페이스는 Principal 계약을 확장한다.
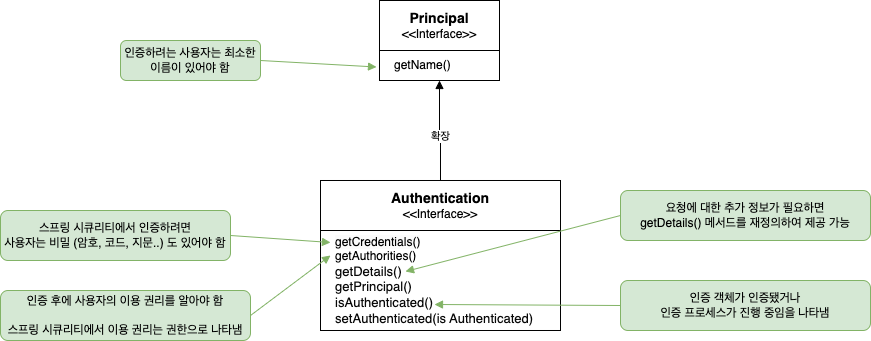
위 그림처럼 Authentication 계약은 주체만 나타내는 것이 아니라 인증 프로세스 완료 여부, 권한 컬렉션 등 인증 요청에 대한 세부 정보를 더 추가할 수 있다.
Authentication 인터페이스
package org.springframework.security.core;

import java.io.Serializable;
import java.security.Principal;
import java.util.Collection;

public interface Authentication extends Principal, Serializable {
  // 인증된 요청에 허가된 권한의 컬렉션 반환
  Collection<? extends GrantedAuthority> getAuthorities();

  // 인증 프로세스에 이용된 암호나 비밀 반환
  Object getCredentials();
  Object getDetails();
  Object getPrincipal();

  // 인증 프로세스가 끝났으면 true 반환, 아직 진행중이면 false 반환
  boolean isAuthenticated();
  void setAuthenticated(boolean isAuthenticated) throws IllegalArgumentException;
}
1.2. AuthenticationProvider 계약 구현 (맞춤형 인증 논리 구현)
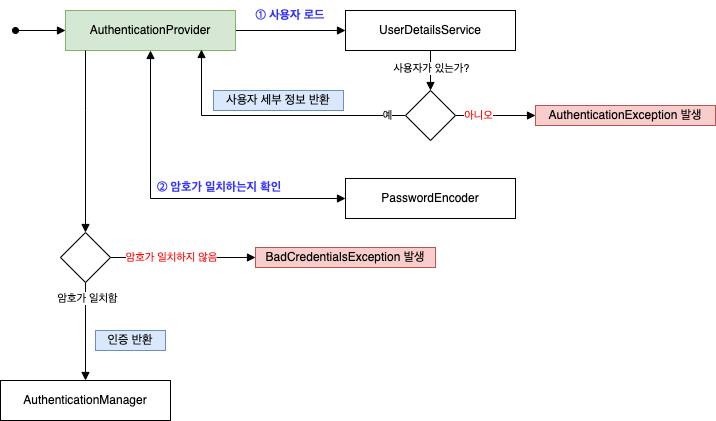
AuthenticationProvider 는 인증 논리를 처리한다.
AuthenticationProvider 인터페이스의 기본 구현은 사용자를 찾는 책임은 UserDetailsService 에게, 암호를 인증하는 프로세스는 PasswordEncoder 로 위임한다.
AuthenticationProvider 인터페이스
package org.springframework.security.authentication;

import org.springframework.security.core.Authentication;
import org.springframework.security.core.AuthenticationException;

public interface AuthenticationProvider {
  Authentication authenticate(Authentication authentication) throws AuthenticationException;

  boolean supports(Class<?> authentication);
}
1.2.1. AuthenticationProvider.authenticate()
Authentication authenticate(Authentication authentication) throws AuthenticationException;
인증 논리를 정의하려면 authenticate() 메서드를 구현해야 하는데, authenticate() 메서드는 아래와 같이 구현해야 한다.
- 인증이 실패하면 메서드는 AuthenticationException 예외를 발생시켜야 함
- 메서드가 현재
AuthenticationProvider에서 지원하지 않는 인증 객체를 받으면 null 을 반환해야 함- 이러면 HTTP 필터 수준에서 분리된 여러
Authentication형식을 사용할 가능성이 생김 필터 수준에서 여러
AuthenticationProvider사용에 대한 좀 더 상세한 내용은 Spring Security - 필터 를 참고하세요.
- 이러면 HTTP 필터 수준에서 분리된 여러
- 메서드는 완전히 인증된 객체를 나타내는
Authentication인스턴스를 반환해야 함- 이 인스턴스에 대해
isAuthenticated()는 true 를 반환하며, 인증된 엔티티의 모든 필수 세부 정보가 포함되어 있음 - 이 인스턴스에 암호화 같은 민감한 데이터는 제거 (인증한 후에는 암호가 더는 필요없으며, 이러한 세부 정보를 그대로 두면 유출될 위험이 있음)
- 이 인스턴스에 대해
1.2.1. AuthenticationProvider.supports()
boolean supports(Class<?> authentication);
supports() 메서드는 현재 AuthenticationProvider 가 Authentication 객체로 제공된 형식을 지원하면 true 를 반환하도록 구현한다.
주의할 점은 supports() 메서드가 true 를 반환해도, authenticate() 메서드가 null 을 반환하여 요청을 거부할 수 있다는 점이다.
이렇게 supports() 로 인증 유형 뿐 아니라 authenticate() 로 요청의 세부 정보를 기준으로 인증 요청을 거부하는 AuthenticationProvider 를 구현할 수 있다.
구성 요소 간 흐름으로 보면 아래와 같다.
AuthenticationManager는 사용 가능한AuthenticationProvider중 하나로 인증을 위임AuthenticationProvider는 주어진 인증 유형을 지원(supports())하지 않거나, 객체 유형은 지원하지만 해당 특정 객체를 인증하는 방법을 모르면 (authenticate()) 인증을 거부함- 인증을 평가한 후 해당 결과를
AuthenticationProvider가AuthenticationManager에게 응답함
1.3. 맞춤형 인증 논리 적용: AuthenticationProvider
이제 아래와 같은 단계로 맞춤형 AuthenticationProvider 를 구현해본다.
AuthenticationProvider계약을 구현하는 클래스 선언- 구현한
AuthenticationProvider가 어떤 종류의Authentication객체를 지원할지 결정- 구현하는
AuthenticationProvider가 지원하는 인증 유형을 나타내도록supports(Class<?> c)메서드 재정의 - 인증 논리를 구현하기 위해
authenticate(Authentication a)메서드 재정의
- 구현하는
- 구현한
AuthenticationProvider를 스프링 시큐리티에 등록
소스는 github 에 있습니다.
pom.xml
<?xml version="1.0" encoding="UTF-8"?>
<project xmlns:xsi="http://www.w3.org/2001/XMLSchema-instance" xmlns="http://maven.apache.org/POM/4.0.0"
         xsi:schemaLocation="http://maven.apache.org/POM/4.0.0 https://maven.apache.org/xsd/maven-4.0.0.xsd">
    <modelVersion>4.0.0</modelVersion>
    <parent>
        <groupId>org.springframework.boot</groupId>
        <artifactId>spring-boot-starter-parent</artifactId>
        <version>3.2.2</version>
        <relativePath/> <!-- lookup parent from repository -->
    </parent>
    <groupId>com.assu.study</groupId>
    <artifactId>chap0501</artifactId>
    <version>0.0.1-SNAPSHOT</version>
    <name>chap0501</name>
    <description>chap0501</description>
    <properties>
        <java.version>17</java.version>
    </properties>
    <dependencies>
        <dependency>
            <groupId>org.springframework.boot</groupId>
            <artifactId>spring-boot-starter-security</artifactId>
        </dependency>
        <dependency>
            <groupId>org.springframework.boot</groupId>
            <artifactId>spring-boot-starter-web</artifactId>
        </dependency>

        <dependency>
            <groupId>org.springframework.boot</groupId>
            <artifactId>spring-boot-starter-test</artifactId>
            <scope>test</scope>
        </dependency>
        <dependency>
            <groupId>org.springframework.security</groupId>
            <artifactId>spring-security-test</artifactId>
            <scope>test</scope>
        </dependency>
        <!-- Spring Data JPA, Hibernate, aop, jdbc -->
        <dependency>
            <groupId>org.springframework.boot</groupId>
            <artifactId>spring-boot-starter-data-jpa</artifactId>
        </dependency>

        <!-- mysql 관련 jdbc 드라이버와 클래스들 -->
        <!-- https://mvnrepository.com/artifact/com.mysql/mysql-connector-j -->
        <dependency>
            <groupId>com.mysql</groupId>
            <artifactId>mysql-connector-j</artifactId>
            <version>8.0.33</version>
        </dependency>
    </dependencies>

    <build>
        <plugins>
            <plugin>
                <groupId>org.springframework.boot</groupId>
                <artifactId>spring-boot-maven-plugin</artifactId>
            </plugin>
        </plugins>
    </build>

</project>
아래는 구현할 로직들의 흐름이다.
/security/CustomAuthenticationProvider.java
import org.springframework.security.authentication.AuthenticationProvider;
import org.springframework.security.authentication.BadCredentialsException;
import org.springframework.security.authentication.UsernamePasswordAuthenticationToken;
import org.springframework.security.core.Authentication;
import org.springframework.security.core.AuthenticationException;
import org.springframework.security.core.userdetails.UserDetails;
import org.springframework.security.core.userdetails.UserDetailsService;
import org.springframework.security.crypto.password.PasswordEncoder;
import org.springframework.stereotype.Component;

/**
 * `AuthenticationProvider` 계약을 구현하는 클래스
 */
@Component  // 이 형식의 인스턴스를 컨텍스트에 포함시킴
public class CustomAuthenticationProvider implements AuthenticationProvider {
  private final UserDetailsService userDetailsService;
  private final PasswordEncoder passwordEncoder;

  public CustomAuthenticationProvider(UserDetailsService userDetailsService, PasswordEncoder passwordEncoder) {
    this.userDetailsService = userDetailsService;
    this.passwordEncoder = passwordEncoder;
  }

  /**
   * 인증 논리 구현
   */
  @Override
  public Authentication authenticate(Authentication authentication) throws AuthenticationException {
    String username = authentication.getName();
    String password = authentication.getCredentials().toString();

    // UserDetails 를 가져오기 위해 UserDetailsService 구현 이용
    // 사용자가 존재하지 않으면
    //     loadUserByUsername() 는 AuthenticationException 예외 발생시킴
    //     인증 프로세스가 중단되고 HTTP 필터는 401 리턴
    UserDetails userDetails = userDetailsService.loadUserByUsername(username);

    // 사용자가 존재하면 matches() 로 암호 확인
    if (passwordEncoder.matches(password, userDetails.getPassword())) {
      // 암호가 일치하면 AuthenticationProvider 는
      // 필요한 세부 정보가 담긴 Authentication 계약의 구현을 '인증됨' 으로 표시한 후 반환함
      return new UsernamePasswordAuthenticationToken(username, password, userDetails.getAuthorities());
    } else {
      // 암호가 일치하지 않으면 AuthenticationException 형식의 예외 발생
      throw new BadCredentialsException("BadCredentialsException...!!");
    }
  }

  /**
   * AuthenticationProvider 가 어떤 종류의 Authentication 인터페이스를 지원할 지 결정
   * 이는 authenticate() 메서드의 매개 변수로 어떤 형식이 제공될지에 따라서 달라짐
   * <p>
   * AuthenticationFilter 수준에서 아무것도 맞춤 구성하지 않으면(지금은 이런 케이스) UsernamePasswordAuthenticationToken 클래스가 형식을 정의함
   */
  @Override
  public boolean supports(Class<?> authentication) {
    // UsernamePasswordAuthenticationToken 는 Authentication 인터페이스의 한 구현이며,
    // 사용자 이름과 암호를 이용하는 표준 인증 요청을 나타냄
    return authentication.equals(UsernamePasswordAuthenticationToken.class);
  }
}
supports()메서드에 대한 추가 설명을 하자면 AuthenticationFilter 수준에서 아무것도 맞춤 구성하지 않으면(지금은 이런 케이스) UsernamePasswordAuthenticationToken 클래스가 형식을 정의한다고 되어있다.
AuthenticationFilter수준에서 맞춤 구성을 하는 경우에 대한 내용은 Spring Security - 필터 를 참고하세요.
/config/ProjectConfig.java
import org.springframework.context.annotation.Bean;
import org.springframework.context.annotation.Configuration;
import org.springframework.security.core.userdetails.UserDetailsService;
import org.springframework.security.crypto.password.NoOpPasswordEncoder;
import org.springframework.security.crypto.password.PasswordEncoder;
import org.springframework.security.provisioning.JdbcUserDetailsManager;

import javax.sql.DataSource;

@Configuration
public class ProjectConfig {
  @Bean
  public UserDetailsService userDetailsService(DataSource dataSource) {
    //return new JdbcUserDetailsManager(dataSource);

    String usersByUsernameQuery = "select username, password, enabled from security.users where username = ?";
    String authsByUserQuery = "select username, authority from security.authorities where username = ?";

    JdbcUserDetailsManager userDetailsManager = new JdbcUserDetailsManager(dataSource);
    userDetailsManager.setUsersByUsernameQuery(usersByUsernameQuery);
    userDetailsManager.setAuthoritiesByUsernameQuery(authsByUserQuery);

    return userDetailsManager;
  }

  @Bean
  public PasswordEncoder passwordEncoder() {
    return NoOpPasswordEncoder.getInstance();
  }

}
/config/securityConfig.java
import com.assu.study.chap0501.security.CustomAuthenticationProvider;
import org.springframework.context.annotation.Bean;
import org.springframework.context.annotation.Configuration;
import org.springframework.security.authentication.AuthenticationManager;
import org.springframework.security.authentication.ProviderManager;
import org.springframework.security.config.annotation.authentication.configuration.AuthenticationConfiguration;

@Configuration
public class SecurityConfig {
  private final AuthenticationConfiguration authenticationConfiguration;
  private final CustomAuthenticationProvider customAuthenticationProvider;

  public SecurityConfig(AuthenticationConfiguration authenticationConfiguration, CustomAuthenticationProvider customAuthenticationProvider) {
    this.authenticationConfiguration = authenticationConfiguration;
    this.customAuthenticationProvider = customAuthenticationProvider;
  }

  /**
   * 맞춤 구성한 CustomAuthenticationProvider 구현 연결
   */
  @Bean
  public AuthenticationManager authenticationManager() throws Exception {
    ProviderManager providerManager = (ProviderManager) authenticationConfiguration.getAuthenticationManager();
    providerManager.getProviders().add(this.customAuthenticationProvider);
    return authenticationConfiguration.getAuthenticationManager();
  }
}
application.properties
spring.datasource.driver-class-name=com.mysql.cj.jdbc.Driver
spring.datasource.url=jdbc:mysql://localhost:13306/security?serverTimezone=UTC
spring.datasource.username=
spring.datasource.password=
spring.jpa.show-sql=true
#spring.jpa.defer-datasource-initialization=true
이제 curl 로 호출 시 정상적으로 인증이 되는 것을 확인할 수 있다.
# 정상 요청
$ curl -w "%{http_code}" -u assu:1234 http://localhost:8080/hello
hello200%

# 잘못된 비밀번호로 요청
$ curl -w "%{http_code}" -u assu:12345 http://localhost:8080/hello
401%

# 인증없이 요청
$ curl -w "%{http_code}" http://localhost:8080/hello
401%
클래스 디자인 구현 시 스프링 시큐리티 근간의 아키텍처를 따르지 않으면 운영에 어려움이 있다.
스프링 시큐리티 프레임워크를 이용한다면 최대한 의도된 용도에 맞게 이용해야 한다. 만일 프레임워크가 제공하는 것보다 맞춤형 코드를 작성하는 일이 많다면 한번쯤 아키텍처를 다시 봐야 한다.프레임워크는 충분히 테스트되고, 취약성을 포함하는 변경이 적다.
자체 구현을 작성하면 취약성이 포함될 가능성이 더 크다!!
참고 사이트 & 함께 보면 좋은 사이트
본 포스트는 로렌티우 스필카 저자의 스프링 시큐리티 인 액션을 기반으로 스터디하며 정리한 내용들입니다.
- 스프링 시큐리티 인 액션
- Configuration Migrations
- Spring Boot 3.x + Security 6.x 기본 설정 및 변화
- 스프링 부트 2.0에서 3.0 스프링 시큐리티 마이그레이션 (변경점)
