Docker - Nginx, Django, PostgreSQL과 도커 컴포즈
in DEV on DevOps, Docker, Docker-compose, Nginx, Django, Postgresql, Container-networking, Docker-volume, Backend-infrastructure, Gunicorn, Python-web
이 포스트에서는 Docker Compose를 활용한 다중 컨테이너 오케스트레이션에 대해 알아본다.
목차
- 1. Nginx, Django, PostgreSQL 컨테이너 연동
- 2. 컨테이너(Nginx, Django)와 로컬 호스트(PostgreSQL) 연동
- 3. 도커 컴포즈를 활용한 컨테이너 실행
- 참고 사이트 & 함께 보면 좋은 사이트
개발 환경
- Ubuntu 24.04.2 LTS
- Mac Apple M3 Max
- Memory 48 GB
1. Nginx, Django, PostgreSQL 컨테이너 연동
해당 내용을 도커 컴포즈로 구성하는 부분은 3.3. docker-compose.yml 파일 작성에 있습니다.
Docker - Django, Nginx, Gunicorn 연동에서는 Nginx(웹 서버)와 Django(애플리케이션 서버)의 연동에 대해 알아보았다.
이번에는 데이터베이스(PostgreSQL)을 추가하여 백엔드 인프라를 구축해본다.
단순히 컨테이너를 띄우는 것을 넘어, 도커 볼륨을 통한 데이터 보존과 도커 네트워크를 통한 컨테이너 간 통신 원리에 대해서도 알아본다.
여기서는 아래 3가지 컨테이너를 유기적으로 연결해본다.
- Nginx: 웹 서버(Reverse Proxy)
- Django: 웹 애플리케이션(Gunicorn 사용)
- PostgreSQL: 데이터베이스
개별 Dockerfile 을 작성하고, docker network를 통해 수동으로 3개의 컨테이너(Nginx, Django, PostgreSQL)을 연동해본다.
- 도커 볼륨을 사용하여 DB 데이터를 영구 보존한다.
- 도커 네트워크를 생성하여 컨테이너들이 IP가 아닌 이름으로 서로 통신하도록 구성한다.
- Django 설정에서 DB 호스트를 컨테이너 이름으로 지정하여 연결한다.
순서는 Dockerfile 파일 작성 → 이미지 빌드 → 컨테이너 실행 순으로 진행한다.
1.1. PostgreSQL 컨테이너 실행 및 볼륨 설정
데이터베이스 컨테이너는 데이터의 영속성(Persistence)을 보장해야 한다. 컨테이너가 삭제되더라도 데이터는 사라지면 안되기 때문이다.
이를 위해 도커 볼륨을 사용한다.
1) Dockerfile 작성
먼저 PostgreSQL 이미지를 생성하기 위한 Dockerfile 을 작성한다.
assu@myserver01:~/work/ch05$ mkdir ex06
assu@myserver01:~/work/ch05$ cd ex06

assu@myserver01:~/work/ch05/ex06$ vim Dockerfile
# FROM 명령어를 이용해 기본 베이스 이미지를 설정해주는데 postgres:15.4로 설정한다.
FROM postgres:15.4
2) 이미지 빌드
# 이미지 빌드
assu@myserver01:~/work/ch05/ex06$ docker image build . -t mypostgres03
[+] Building 2.7s (1/2)                                                                                                docker:default
...

assu@myserver01:~/work/ch05/ex06$ docker image ls
REPOSITORY     TAG       IMAGE ID       CREATED             SIZE
mypostgres03   latest    b54b1d0939f2   2 years ago         432MB
3) 도커 볼륨 생성
데이터베이스의 데이터를 저장할 볼륨을 생성한다.
# docker volume create 명령어로 도커 볼륨 생성
assu@myserver01:~/work/ch05/ex06$ docker volume create myvolume03
myvolume03

assu@myserver01:~/work/ch05/ex06$ docker volume ls
DRIVER    VOLUME NAME
...
local     myvolume03
4) 컨테이너 실행
환경변수(-e)를 통해 DB 비밀번호를 설정하고, --mount 옵션으로 앞서 만든 볼륨을 컨테이너 내부의 데이터 경로(/var/lib/postgresql)와 연결한다.
assu@myserver01:~/work/ch05/ex06$ docker container run \
  -e POSTGRES_PASSWORD=mysecretpassword \
  --mount type=volume,source=myvolume03,target=/var/lib/postgresql \
  -d mypostgres03
9e4fab1d548637e6cac444caebb78197a5cba531aa89ce57c71ee14921ca8e65

# 실행 중인 컨테이너 목록 확인
assu@myserver01:~/work/ch05/ex06$ docker container ls
CONTAINER ID   IMAGE          COMMAND                  CREATED         STATUS         PORTS      NAMES
9e4fab1d5486   mypostgres03   "docker-entrypoint.s…"   7 seconds ago   Up 6 seconds   5432/tcp   vigorous_cannon
assu@myserver01:~/work/ch05/ex06$ docker container stop 9e4fab1d5486
9e4fab1d5486
1.2. Django, Nginx, PostgreSQL 연동 준비
이제 Django, Nginx, PostgreSQL 컨테이너를 연동하기 위한 준비를 한다.

먼저 디렉터리를 정리한다.
assu@myserver01:~/work/ch05$ ls
ex01  ex02  ex03  ex04  ex05  ex06

# Django와 Nginx를 연동했던 ex05를 복사해서 ex07 디렉터리를 만든다.
assu@myserver01:~/work/ch05$ cp -r ex05 ex07
assu@myserver01:~/work/ch05$ ls
ex01  ex02  ex03  ex04  ex05  ex06  ex07

# PostgreSQL을 만든 ex06을 ex07 디렉터리 내부로 복사한다.
assu@myserver01:~/work/ch05$ cp -r ex06 ex07
assu@myserver01:~/work/ch05$ ls
ex01  ex02  ex03  ex04  ex05  ex06  ex07

assu@myserver01:~/work/ch05$ cd ex07
assu@myserver01:~/work/ch05/ex07$ ls
ex06  myDajngo02  myNginx02

assu@myserver01:~/work/ch05/ex07$ mv myDajngo02 myDajngo03
assu@myserver01:~/work/ch05/ex07$ mv myNginx02 myNginx03
assu@myserver01:~/work/ch05/ex07$ mv ex06 myPostgres03

assu@myserver01:~/work/ch05/ex07$ ls
myDajngo03  myNginx03  myPostgres03
1.3. Django 이미지 빌드(DB 설정 변경)
assu@myserver01:~/work/ch05$ tree -L 3
└── ex07
    ├── myDajngo03
    │   ├── Dockerfile
    │   ├── myapp
    │   └── requirements.txt
    ├── myNginx03
    │   ├── default.conf
    │   └── Dockerfile
    └── myPostgres03
        └── Dockerfile
Django가 기본 SQLite가 아닌 PostgreSQL을 바라보도록 설정을 변경한다.
1) settings.py 수정
DATABASES 항목을 수정한다.
HOST는 IP가 아닌 도커 컨테이너의 이름인 postgretest을 호스트명으로 사용한다.
# 수정 전
DATABASES = {
    'default': {
        'ENGINE': 'django.db.backends.sqlite3',
        'NAME': BASE_DIR / 'db.sqlite3',
    }
}

# 수정 후
DATABASES = {
    'default': {
        'ENGINE': 'django.db.backends.postgresql',
        'NAME': 'postgres',
        'USER': 'postgres',
        'PASSWORD': 'mysecretpassword',
        'HOST': 'postgretest', # 추후 실행할 postgreSQL 컨테이너 이름과 일치해야 함
        'PORT': 5432,
    }
}
2) requirements.txt 수정
PostgreSQL 연결을 위해 psycopg2-binary 라이브러리를 추가한다.
assu@myserver01:~/work/ch05/ex07/myDajngo03$ vim requirements.txt

django==5.1.3
gunicorn==23.0.0
psycopg2-binary==2.9.10
개발 환경이나 가벼운 실습에서는
psycopg2-binary가 설치가 편리하지만, 프로덕션 환경에서는 의존성 빌드 문제로 인해psycopg2를 권장한다.
psycopg2 라이브러리는 파이썬을 통해 postgreSQL을 활용하기 위해 사용하는 라이브러리이다.
3) Dockerfile 작성 및 빌드
Dockerfile 은 예전과 동일하게 사용한다.
FROM python:3.13.9

WORKDIR /usr/src/app

COPY .. .

RUN python -m pip install --upgrade pip
RUN pip install -r requirements.txt

WORKDIR ./myapp
CMD gunicorn --bind 0.0.0.0:8000 myapp.wsgi:application

EXPOSE 8000
docker image build 명령어로 도커 이미지를 빌드한다.
assu@myserver01:~/work/ch05/ex07/myDajngo03$ docker image build . -t myweb03
[+] Building 10.0s (8/10)                                                                                              docker:default
 => [internal] load build definition from Dockerfile
...

assu@myserver01:~/work/ch05/ex07/myDajngo03$ docker image ls
REPOSITORY     TAG       IMAGE ID       CREATED          SIZE
myweb03        latest    0f7939733bf1   16 seconds ago   1.19GB
mypostgres03   latest    b54b1d0939f2   2 years ago      432MB
1.4. Nginx 이미지 빌드
Nginx는 요청을 Django 컨테이너(djangotest)로 전달하는 역할을 한다.
assu@myserver01:~/work/ch05$ tree -L 3
└── ex07
    ├── myDajngo03
    │   ├── Dockerfile
    │   ├── myapp
    │   └── requirements.txt
    ├── myNginx03
    │   ├── default.conf
    │   └── Dockerfile
    └── myPostgres03
        └── Dockerfile
1) default.conf 설정
upstream 지시어에 Django 컨테이너 이름을 지정한다.
assu@myserver01:~/work/ch05/ex07/myNginx03$ cat default.conf
upstream myweb{
	server djangotest:8000; # Django 컨테이너 이름:포트
}

server{
	listen 80;
	server_name localhost;
	location /{
		proxy_pass http://myweb;
	}
}
2) Dockerfile 작성 및 빌드
assu@myserver01:~/work/ch05/ex07/myNginx03$ cat Dockerfile
FROM nginx:1.25.3
RUN rm /etc/nginx/conf.d/default.conf
COPY default.conf /etc/nginx/conf.d/
CMD ["nginx", "-g", "daemon off;"]
assu@myserver01:~/work/ch05/ex07/myNginx03$ docker image build . -t mynginx03
[+] Building 2.0s (8/8) FINISHED                                                                                                                docker:default
 => [internal] load build definition from Dockerfile
...

assu@myserver01:~/work/ch05/ex07/myNginx03$ docker image ls
REPOSITORY     TAG       IMAGE ID       CREATED         SIZE
myweb03        latest    0f7939733bf1   2 minutes ago   1.19GB
mynginx03      latest    0339a129e503   2 hours ago     192MB
mypostgres03   latest    b54b1d0939f2   2 years ago     432MB
1.5. Django, Nginx, PostgreSQL 컨테이너 실행 및 네트워크 연동
이제 Django, Nginx, PostgreSQL 컨테이너를 하나의 도커 네트워크 안에 실행시켜 서로 이름으로 통신할 수 있게 만든다.
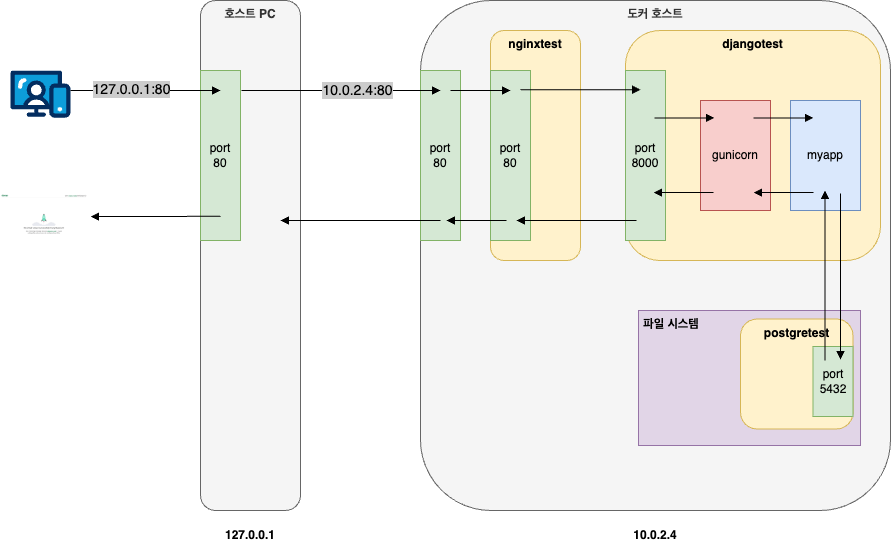
이 과정을 그림으로 나타내면 아래와 같다.

호스트에서 웹 브라우저를 실행한 후 127.0.0.1:80 d에 접속하면 포트 포워딩을 통해 10.0.2.4:80 ㅇ로 트래픽이 전달된다. 이후 nginxtest 컨테이너를 거쳐 djangotest 컨테이너에 접속할 수 있으며, djangotest 컨테이너는 postgretest 컨테이너를 통해 데이터베이스를 활용한다.
1) 도커 네트워크 생성
assu@myserver01:~/work/ch05/ex07/myNginx03$ docker network create mynetwork03
f5bab03a61d5607a95afebbc4e4ae6a376449bd5c3f45045079255549ac67c2f

assu@myserver01:~/work/ch05/ex07/myNginx03$ docker network ls
NETWORK ID     NAME          DRIVER    SCOPE
f5bab03a61d5   mynetwork03   bridge    local
2) PostgreSQL 컨테이너 실행(postgretest)
반드시 네트워크 옵션(--network)을 지정해야 한다.
assu@myserver01:~/work/ch05/ex07/myNginx03$ docker container run --name=postgretest \
--network mynetwork03 \  # --name 옵션으로 컨테이너 이름을 postgretest 라고 짓는다.
-e POSTGRES_PASSWORD=mysecretpassword \  # -e 옵션으로 PostgreSQL 컨테이너의 환경 변수 설정
--mount type=volume,source=myvolume03,target=/var/lib/postgresql \  # --mount 옵션으로 도커 볼륨 설정
-d mypostgres03  # -d 옵션으로 백그라운드로 mypsotgre03 이미지를 이용해 컨테이너 실행
c19c0a954e6b82cbf82d5ee0f061b6b208138f74089c4c34d9ff5aeb016cf426

assu@myserver01:~/work/ch05/ex07/myNginx03$ docker container ls
CONTAINER ID   IMAGE          COMMAND                  CREATED         STATUS         PORTS      NAMES
c19c0a954e6b   mypostgres03   "docker-entrypoint.s…"   6 seconds ago   Up 5 seconds   5432/tcp   postgretest
3) Django 컨테이너 실행(djangotest)
assu@myserver01:~/work/ch05/ex07/myNginx03$ docker container run -d --name djangotest --network mynetwork03 myweb03
2cc90b4c12638c595683466d68f9e2c2e82df1346eb84b0ef3a4027f53cfbd4b

assu@myserver01:~/work/ch05/ex07/myNginx03$ docker container ls
CONTAINER ID   IMAGE          COMMAND                  CREATED         STATUS         PORTS      NAMES
2cc90b4c1263   myweb03        "/bin/sh -c 'gunicor…"   6 seconds ago   Up 6 seconds   8000/tcp   djangotest
c19c0a954e6b   mypostgres03   "docker-entrypoint.s…"   3 minutes ago   Up 3 minutes   5432/tcp   postgretest
4) Nginx 컨테이너 실행(nginxtest)
외부(호스트) 통신을 위해 포트 포워딩(-p 80:80)을 설정한다.
assu@myserver01:~/work/ch05/ex07/myNginx03$ docker container run -d \
--name nginxtest \
--network mynetwork03 \
-p 80:80 mynginx03
0d35436fccd524c3cbee24fcae7381c625abc1a6f54ccf41958d0df226e7847c

assu@myserver01:~/work/ch05/ex07/myNginx03$ docker container ls
CONTAINER ID   IMAGE          COMMAND                  CREATED              STATUS              PORTS                                 NAMES
0d35436fccd5   mynginx03      "/docker-entrypoint.…"   3 seconds ago        Up 2 seconds        0.0.0.0:80->80/tcp, [::]:80->80/tcp   nginxtest
2cc90b4c1263   myweb03        "/bin/sh -c 'gunicor…"   About a minute ago   Up About a minute   8000/tcp                              djangotest
c19c0a954e6b   mypostgres03   "docker-entrypoint.s…"   5 minutes ago        Up 5 minutes        5432/tcp                              postgretest
5) 연동 확인 및 DB 마이그레이션
웹 브라우저에서 127.0.0.1:80로 접속하여 Django 페이지가 뜨는지 확인한다.
하지만 아직 DB 테이블이 생성되지 않았으므로, Django 컨테이너 내부로 들어가 마이그레이션을 수행해야 한다.
assu@myserver01:~/work/ch05/ex07/myNginx03$ docker container ls
CONTAINER ID   IMAGE          COMMAND                  CREATED              STATUS              PORTS                                 NAMES
0d35436fccd5   mynginx03      "/docker-entrypoint.…"   About a minute ago   Up About a minute   0.0.0.0:80->80/tcp, [::]:80->80/tcp   nginxtest
2cc90b4c1263   myweb03        "/bin/sh -c 'gunicor…"   3 minutes ago        Up 3 minutes        8000/tcp                              djangotest
c19c0a954e6b   mypostgres03   "docker-entrypoint.s…"   7 minutes ago        Up 7 minutes        5432/tcp                              postgretest

# 실행 중인 djangotest 컨테이너 내부에 접속해서 셸을 실행함
assu@myserver01:~/work/ch05/ex07/myNginx03$ docker container exec -it 2cc90b4c1263 /bin/bash

root@2cc90b4c1263:/usr/src/app/myapp# ls
db.sqlite3  manage.py  myapp

# 데이터베이스 연결 상태를 확인하기 위한 몇 가지 명령어를 입력한다.
root@2cc90b4c1263:/usr/src/app/myapp# python manage.py inspectdb
# This is an auto-generated Django model module.
# You'll have to do the following manually to clean this up:
#   * Rearrange models' order
#   * Make sure each model has one field with primary_key=True
#   * Make sure each ForeignKey and OneToOneField has `on_delete` set to the desired behavior
#   * Remove `managed = False` lines if you wish to allow Django to create, modify, and delete the table
# Feel free to rename the models, but don't rename db_table values or field names.
from django.db import models

# 마이그레이션 수행(DB 연결 확인 겸 테이블 생성)
root@2cc90b4c1263:/usr/src/app/myapp# python manage.py makemigrations
No changes detected

# 마이그레이션 수행(DB 연결 확인 겸 테이블 생성)
root@2cc90b4c1263:/usr/src/app/myapp# python manage.py migrate
Operations to perform:
  Apply all migrations: admin, auth, contenttypes, sessions
Running migrations:
  Applying contenttypes.0001_initial... OK
  Applying auth.0001_initial... OK
  Applying admin.0001_initial... OK
  Applying admin.0002_logentry_remove_auto_add... OK
  Applying admin.0003_logentry_add_action_flag_choices... OK
  Applying contenttypes.0002_remove_content_type_name... OK
  Applying auth.0002_alter_permission_name_max_length... OK
  Applying auth.0003_alter_user_email_max_length... OK
  Applying auth.0004_alter_user_username_opts... OK
  Applying auth.0005_alter_user_last_login_null... OK
  Applying auth.0006_require_contenttypes_0002... OK
  Applying auth.0007_alter_validators_add_error_messages... OK
  Applying auth.0008_alter_user_username_max_length... OK
  Applying auth.0009_alter_user_last_name_max_length... OK
  Applying auth.0010_alter_group_name_max_length... OK
  Applying auth.0011_update_proxy_permissions... OK
  Applying auth.0012_alter_user_first_name_max_length... OK
  Applying sessions.0001_initial... OK

# 결과 확인 후 해당 컨테이너를 빠져 나온다.
root@2cc90b4c1263:/usr/src/app/myapp# exit
exit
컨테이너를 종료한다.
assu@myserver01:~$ docker container ls
CONTAINER ID   IMAGE          COMMAND                  CREATED          STATUS          PORTS                                 NAMES
0d35436fccd5   mynginx03      "/docker-entrypoint.…"   5 minutes ago    Up 5 minutes    0.0.0.0:80->80/tcp, [::]:80->80/tcp   nginxtest
2cc90b4c1263   myweb03        "/bin/sh -c 'gunicor…"   6 minutes ago    Up 6 minutes    8000/tcp                              djangotest
c19c0a954e6b   mypostgres03   "docker-entrypoint.s…"   10 minutes ago   Up 10 minutes   5432/tcp                              postgretest

assu@myserver01:~$ docker container stop nginxtest djangotest postgretest
nginxtest
djangotest
postgretest
2. 컨테이너(Nginx, Django)와 로컬 호스트(PostgreSQL) 연동
해당 내용을 도커 컴포즈로 구성하는 부분은 3.7. 도커 컴포즈와 로컬 PostgreSQL 연동에 있습니다.
1. Nginx, Django, PostgreSQL 컨테이너 연동에서는 에서는 Nginx, Django, PostgreSQL을 모두 컨테이너로 구동하였다.
하지만 실무에서는 DB는 기존 VM이나 베어메탈 서버에 직접 설치하여 운영하고, 웹 애플리케이션만 컨테이너로 배포하는 하이브리드 구성도 매우 빈번하게 사용된다.
이번에는 PostgreSQL을 호스트(로컬)에 직접 설치하고, 도커 컨테이너 내부의 Django가 호스트의 DB에 접속하는 방법을 다룬다.
베어메탈 서버(Bare Metal Server)
가상화되지 않은 진짜 물리 서버
일반적인 가상 서버(VM)보다 비싸지만 베어메탈 서버를 쓰는 이유는 아래와 같다.
- 압도적인 성능: 가상화 계층(Hypervisor)을 거치지 않으므로 오버헤드가 없다.
- 안정성: 다른 사용자의 간섭이 전혀 없으므르 안정적인 고성능이 필요한 작업에 유리하다.
- 보안: 하드웨어 수준에서 완벽하게 격리되어 있어 보안에 민감한 금융권 등에서 선호한다.
핵심 개념은 Host Gateway(docker0)이다.
컨테이너 내부에서 호스트 머신을 바라볼 때, localhost는 컨테이너 자신을 의미한다.
따라서 호스트에 설치된 DB에 접근하기 위해서는 도커 브리지 네크워크의 게이트웨이인 docker0 인터페이스의 IP를 사용해야 한다.
2.1. PostgreSQL 로컬 설치 및 설정
먼저 우분투 호스트 환경에 PostgreSQL을 설치한다.
1) PostgreSQL 설치
공식 리포지토리를 설치하고 최신 버전을 설치한다.
# 리포지토리 설정 파일 생성
assu@myserver01:~$ sudo sh -c 'echo "deb http://apt.postgresql.org/pub/repos/apt $(lsb_release -cs)-pgdg main" > /etc/apt/sources.list.d/pgdg.list'
[sudo] password for assu:

# 리포지토리 인증키 불러옴
assu@myserver01:~$ wget --quiet -O - https://www.postgresql.org/media/keys/ACCC4CF8.asc | sudo apt-key add -
Warning: apt-key is deprecated. Manage keyring files in trusted.gpg.d instead (see apt-key(8)).
OK

# 우분투 패키지 리스트 업데이트
assu@myserver01:~$ sudo apt-get update

# PostgreSQL 설치
assu@myserver01:~$ sudo apt-get -y install postgresql

#  서비스 상태 확인
assu@myserver01:~$ sudo systemctl status postgresql
● postgresql.service - PostgreSQL RDBMS
     Loaded: loaded (/usr/lib/systemd/system/postgresql.service; enabled; preset: enabled)
     Active: active (exited) since Sun 2025-11-30 02:49:20 UTC; 1min 26s ago
   Main PID: 61302 (code=exited, status=0/SUCCESS)
        CPU: 2ms

Nov 30 02:49:20 myserver01 systemd[1]: Starting postgresql.service - PostgreSQL RDBMS...
Nov 30 02:49:20 myserver01 systemd[1]: Finished postgresql.service - PostgreSQL RDBMS.
2) 계정 및 비밀번호 설정
설치 후 기본 관리자 계정인 _postgres_의 비밀번호를 설정한다.
# postgre 사용자로 변경
assu@myserver01:~$ sudo -i -u postgres

# psql 실행
postgres@myserver01:~$ psql
psql (18.1 (Ubuntu 18.1-1.pgdg24.04+2))
Type "help" for help.

# 데이터베이스 목록 확인
postgres=# \list
                                                     List of databases
   Name    |  Owner   | Encoding | Locale Provider |   Collate   |    Ctype    | Locale | ICU Rules |   Access privileges
-----------+----------+----------+-----------------+-------------+-------------+--------+-----------+-----------------------
 postgres  | postgres | UTF8     | libc            | en_US.UTF-8 | en_US.UTF-8 |        |           |
 template0 | postgres | UTF8     | libc            | en_US.UTF-8 | en_US.UTF-8 |        |           | =c/postgres          +
           |          |          |                 |             |             |        |           | postgres=CTc/postgres
 template1 | postgres | UTF8     | libc            | en_US.UTF-8 | en_US.UTF-8 |        |           | =c/postgres          +
           |          |          |                 |             |             |        |           | postgres=CTc/postgres
(3 rows)

# 암호 설정
postgres=# \password

# 이전과 동일하게 mysecretpassword 로 설정함
Enter new password for user "postgres":
Enter it again:

# PostgreSQL 종료
postgres=# \q
postgres@myserver01:~$ exit
logout

assu@myserver01:~$
3) 외부 접속 허용 설정
기본적으로 PostgreSQL 은 로컬(localhost) 접속만 허용한다.
도커 컨테이너는 네트워크상에서 외부로 간주되므로 설정을 변경해야 한다.
pg_hba.conf 수정(인증 방식 설정): 모든 IP(0.0.0.0/0)에서의 모든 접속을 허용하도록 설정
assu@myserver01:/etc/postgresql/18/main$ pwd
/etc/postgresql/18/main

assu@myserver01:/etc/postgresql/18/main$ ls
conf.d  environment  pg_ctl.conf  pg_hba.conf  pg_ident.conf  postgresql.conf  start.conf

assu@myserver01:/etc/postgresql/18/main$ sudo vim pg_hba.conf

# IPv4 local connections:
host    all             all             127.0.0.1/32            scram-sha-256
host    all             all             0.0.0.0/0               scram-sha-256  # 외부 접근 허용을 위해 해당 코드 추가
postgresql.conf 수정(리스닝 주소 설정): DB가 모든 네트워크 인터페이스에서 요청을 기다리도록 설정
assu@myserver01:/etc/postgresql/18/main$ sudo vim postgresql.conf

# 변경 전
# - Connection Settings -

#listen_addresses = 'localhost'         # what IP address(es) to listen on;
                                        # comma-separated list of addresses;
                                        # defaults to 'localhost'; use '*' for all

# 변경 후

# - Connection Settings -

listen_addresses = '*'          # what IP address(es) to listen on;
                                        # comma-separated list of addresses;
                                        # defaults to 'localhost'; use '*' for all
설정 변경 후 반드시 서비스를 재시작한다.
# PostgreSQL 재시작
assu@myserver01:/etc/postgresql/18/main$ sudo systemctl restart postgresql

# 상태 확인
assu@myserver01:/etc/postgresql/18/main$ sudo systemctl status postgresql.service
● postgresql.service - PostgreSQL RDBMS
     Loaded: loaded (/usr/lib/systemd/system/postgresql.service; enabled; preset: enabled)
     Active: active (exited) since Sun 2025-11-30 03:08:44 UTC; 11s ago
    Process: 63541 ExecStart=/bin/true (code=exited, status=0/SUCCESS)
   Main PID: 63541 (code=exited, status=0/SUCCESS)
        CPU: 660us

Nov 30 03:08:44 myserver01 systemd[1]: Starting postgresql.service - PostgreSQL RDBMS...
Nov 30 03:08:44 myserver01 systemd[1]: Finished postgresql.service - PostgreSQL RDBMS.
2.2. Django 이미지 빌드(Host IP 연결)
# ex07을 복사해서 ex08 디렉터리를 생성한다.
assu@myserver01:~/work/ch05$ cp -r ex07 ex08
assu@myserver01:~/work/ch05$ ls
ex01  ex02  ex03  ex04  ex05  ex06  ex07  ex08

assu@myserver01:~/work/ch05$ cd ex08
assu@myserver01:~/work/ch05/ex08$ ls
myDajngo03  myNginx03  myPostgres03

# PostgreSQL 을 컨테이너로 실행하지 않을 것이므로 myPostgres03 삭제
assu@myserver01:~/work/ch05/ex08$ rm -r myPostgres03/

assu@myserver01:~/work/ch05/ex08$ mv myDajngo03 myDajngo04
assu@myserver01:~/work/ch05/ex08$ mv myNginx03 myNginx04

assu@myserver01:~/work/ch05/ex08$ ls
myDajngo04  myNginx04
여기서는 Django 와 관련된 디렉터리만 다룬다.
assu@myserver01:~/work/ch05$ tree -L 3
.
└── ex08
    ├── myDajngo04
    │   ├── Dockerfile
    │   ├── myapp
    │   └── requirements.txt
    └── myNginx04
        ├── default.conf
        └── Dockerfile
1) docker0 IP 확인
연동을 하기 전에 docker0의 IP주소를 알아야 한다. Django와 Nginx는 컨테이너 형태로 실행되지만 PostgreSQL은 호스트(가상 머신의 로컬)에 설치되어 있기 때문이다. 따라서 Django와 PostgreSQL이 서로 통신하려면 docker0을 이용해야 하므로 docker0의 IP주소를 확인한다.
컨테이너 입장에서 호스트의 IP 주소를 알아내기 위해 ifconfig 명령어로 docker0 인터페이스를 확인한다.
assu@myserver01:~/work/ch05$ ifconfig
br-06dbba6ab19f: flags=4099<UP,BROADCAST,MULTICAST>  mtu 1500
        inet 172.18.0.1  netmask 255.255.0.0  broadcast 172.18.255.255
        inet6 fe80::583d:97ff:fe5e:d314  prefixlen 64  scopeid 0x20<link>
        ether 5a:3d:97:5e:d3:14  txqueuelen 0  (Ethernet)
        RX packets 0  bytes 0 (0.0 B)
        RX errors 0  dropped 0  overruns 0  frame 0
        TX packets 0  bytes 0 (0.0 B)
        TX errors 0  dropped 0 overruns 0  carrier 0  collisions 0

br-f5bab03a61d5: flags=4099<UP,BROADCAST,MULTICAST>  mtu 1500
        inet 172.19.0.1  netmask 255.255.0.0  broadcast 172.19.255.255
        inet6 fe80::8cbb:dff:fecf:d437  prefixlen 64  scopeid 0x20<link>
        ether 8e:bb:0d:cf:d4:37  txqueuelen 0  (Ethernet)
        RX packets 0  bytes 0 (0.0 B)
        RX errors 0  dropped 0  overruns 0  frame 0
        TX packets 0  bytes 0 (0.0 B)
        TX errors 0  dropped 0 overruns 0  carrier 0  collisions 0

docker0: flags=4099<UP,BROADCAST,MULTICAST>  mtu 1500
        inet 172.17.0.1  netmask 255.255.0.0  broadcast 172.17.255.255
        inet6 fe80::345c:dfff:feb4:86f7  prefixlen 64  scopeid 0x20<link>
        ether 36:5c:df:b4:86:f7  txqueuelen 0  (Ethernet)
        RX packets 4487  bytes 351753 (351.7 KB)
        RX errors 0  dropped 0  overruns 0  frame 0
        TX packets 6926  bytes 49478032 (49.4 MB)
        TX errors 0  dropped 0 overruns 0  carrier 0  collisions 0
...
위 결과에서 호스트의 IP가 172.17.0.1 이라는 것을 알 수 있다.
2) settings.py 수정
HOST 항목에 컨테이너 이름 대신 위에서 확인한 IP 주소를 입력한다.
DATABASES = {
    'default': {
        'ENGINE': 'django.db.backends.postgresql',
        'NAME': 'postgres',
        'USER': 'postgres',
        'PASSWORD': 'mysecretpassword',
        'HOST': '172.17.0.1',
        'PORT': 5432,
    }
}
PASSWORD는 2.1. PostgreSQL 로컬 설치 및 설정에서 설정한 것과 동일하게 설정되어야 한다. 그리고 HOST도 컨테이너 이름 대신 docker0의 IP주소를 입력한다.
운영체제(Mac/Windows/Linux)에 따라 호스트 접근용 특수 DNS(host.docker.internal)를 지원하기도 하지만, 리눅스 네이티브 환경에서는
docker0IP를 사용하는 것이 가장 확실한 방법이다.
이제 requirements.txt 파일과 Dockerfile 을 확인해보자. 여기서는 해당 파일을 수정할 필요는 없다.
assu@myserver01:~/work/ch05/ex08/myDajngo04$ cat requirements.txt
django==5.1.3
gunicorn==23.0.0
psycopg2-binary==2.9.10
assu@myserver01:~/work/ch05/ex08/myDajngo04$ cat Dockerfile
FROM python:3.13.9

WORKDIR /usr/src/app

COPY . .

RUN python -m pip install --upgrade pip
RUN pip install -r requirements.txt

WORKDIR ./myapp
CMD gunicorn --bind 0.0.0.0:8000 myapp.wsgi:application

EXPOSE 8000
3) 이미지 빌드
assu@myserver01:~/work/ch05/ex08/myDajngo04$ docker image build . -t myweb04
[+] Building 2.0s (1/2)                                                                                                                         docker:default
 => [internal] load build definition from Dockerfile
...

assu@myserver01:~/work/ch05/ex08/myDajngo04$ docker image ls
REPOSITORY     TAG       IMAGE ID       CREATED          SIZE
myweb04        latest    f0323564905d   16 seconds ago   1.19GB
2.3. Nginx 이미지 빌드
이번엔 Nginx 이미지를 빌드해본다.
assu@myserver01:~/work/ch05$ tree -L 3
.
└── ex08
    ├── myDajngo04
    │   ├── Dockerfile
    │   ├── myapp
    │   └── requirements.txt
    └── myNginx04
        ├── default.conf
        └── Dockerfile
Nginx 이미지를 빌드하기 전에 해당 디렉터리를 확인해본다. default.conf 에서 여전히 djangotest:8000을 바라보고 있기 때문이다.
Dockerfile도 수정하지 않고 그대로 사용한다.
assu@myserver01:~/work/ch05/ex08/myNginx04$ ls
default.conf  Dockerfile
assu@myserver01:~/work/ch05/ex08/myNginx04$ cat default.conf
upstream myweb{
	server djangotest:8000;
}

server{
	listen 80;
	server_name localhost;
	location /{
		proxy_pass http://myweb;
	}
}

assu@myserver01:~/work/ch05/ex08/myNginx04$ cat Dockerfile
FROM nginx:1.25.3
RUN rm /etc/nginx/conf.d/default.conf
COPY default.conf /etc/nginx/conf.d/
CMD ["nginx", "-g", "daemon off;"]
Nginx 이미지를 빌드한다.
assu@myserver01:~/work/ch05/ex08/myNginx04$ docker image build . -t mynginx04
[+] Building 1.9s (2/2)                                                                                                                         docker:default
 => [internal] load build definition from Dockerfile                                                                                                      0.0s
 => => transferring dockerfile: 169B
...

assu@myserver01:~/work/ch05/ex08/myNginx04$ docker image ls
REPOSITORY     TAG       IMAGE ID       CREATED         SIZE
myweb04        latest    f0323564905d   2 minutes ago   1.19GB
mynginx04      latest    0339a129e503   22 hours ago    192MB
2.4. Django, Nginx, PostgreSQL 연동 및 검증
이제 컨테이너를 실행하여 호스트 DB와 정상적으로 통신하는지 확인한다.
1) 네트워크 생성 및 컨테이너 실행
먼저 docker network create 명령어로 도커 네트워크를 생성한다.
# 네트워크 생성
assu@myserver01:~/work/ch05/ex08/myNginx04$ docker network create mynetwork04
57e3bfab5660ec93f554d131619b28ce31764b44819be3c16d696fba5e259907

assu@myserver01:~/work/ch05/ex08/myNginx04$ docker network ls
NETWORK ID     NAME          DRIVER    SCOPE
57e3bfab5660   mynetwork04   bridge    local
Django 컨테이너
assu@myserver01:~/work/ch05/ex08/myNginx04$ docker image ls
REPOSITORY   TAG       IMAGE ID       CREATED        SIZE
myweb04      latest    f0323564905d   2 hours ago    1.19GB
mynginx04    latest    0339a129e503   23 hours ago   192MB
my-ubuntu    0.1       3eb5806116ca   13 days ago    162MB
postgres     latest    b90e9c757ca1   2 weeks ago    479MB
ubuntu       latest    f4158f3f9981   2 months ago   101MB
python       3.13.7    ce75f3f8bdaf   3 months ago   1.12GB

assu@myserver01:~/work/ch05/ex08/myNginx04$ docker container run -d --name djangotest --network mynetwork04 myweb04
ad7725953621d319c649e61690369b8c9b9201c60368287ab094425c5d658efb

assu@myserver01:~/work/ch05/ex08/myNginx04$ docker container ls
CONTAINER ID   IMAGE     COMMAND                  CREATED         STATUS         PORTS      NAMES
ad7725953621   myweb04   "/bin/sh -c 'gunicor…"   4 seconds ago   Up 3 seconds   8000/tcp   djangotest
-d 옵션으로 백그라운드 실행을 지정하고, --name 옵션으로 컨테이너 이름을 지정한다.
그리고 --network 옵션으로 사용할 도커 네트워크를 설정한다.
Nginx 컨테이너를 실행한다.
assu@myserver01:~/work/ch05/ex08/myNginx04$ docker image ls
REPOSITORY   TAG       IMAGE ID       CREATED        SIZE
myweb04      latest    f0323564905d   2 hours ago    1.19GB
mynginx04    latest    0339a129e503   23 hours ago   192MB
my-ubuntu    0.1       3eb5806116ca   13 days ago    162MB
postgres     latest    b90e9c757ca1   2 weeks ago    479MB
ubuntu       latest    f4158f3f9981   2 months ago   101MB
python       3.13.7    ce75f3f8bdaf   3 months ago   1.12GB

assu@myserver01:~/work/ch05/ex08/myNginx04$ docker container ls
CONTAINER ID   IMAGE       COMMAND                  CREATED              STATUS              PORTS                                 NAMES
0702a23877af   mynginx04   "/docker-entrypoint.…"   4 seconds ago        Up 3 seconds        0.0.0.0:80->80/tcp, [::]:80->80/tcp   nginxtest
6840db7728e2   myweb04     "/bin/sh -c 'gunicor…"   About a minute ago   Up About a minute   8000/tcp                              djangotest
Nginx 컨테이너를 실행할 때는 -p 옵션으로 도커 호스트 포트와 컨테이너 포트를 포트포워딩한다.
컨테이너가 성공적으로 연동되었는지 확인하기 위해 웹 브라우저를 실행하고 http://127.0.0.1/ 에 접속한다.
Django 환경 페이지가 나온다면 제대로 실행된 것이다.
2) DB 연결 테스트(inspectdb)
Django 컨테이너 내부로 진입하여 호스트에 설치된 PostgreSQL 정보를 읽을 수 있는지 확인한다.
assu@myserver01:~/work/ch05/ex08/myNginx04$ docker container ls
CONTAINER ID   IMAGE       COMMAND                  CREATED              STATUS              PORTS                                 NAMES
0702a23877af   mynginx04   "/docker-entrypoint.…"   4 seconds ago        Up 3 seconds        0.0.0.0:80->80/tcp, [::]:80->80/tcp   nginxtest
6840db7728e2   myweb04     "/bin/sh -c 'gunicor…"   About a minute ago   Up About a minute   8000/tcp                              djangotest

# 실행 중인 djangotest 컨테이너 내부에 접속해서 셸을 실행
assu@myserver01:~/work/ch05/ex08/myNginx04$ docker container exec -it 6840db7728e2 /bin/bash

# 파일 목록을 확인하여 manage.py 파일 존재 여부 확인
root@6840db7728e2:/usr/src/app/myapp# ls
db.sqlite3  manage.py  myapp

# 데이터베이스 연결 상태 확인
root@6840db7728e2:/usr/src/app/myapp# python manage.py inspectdb
# This is an auto-generated Django model module.
# You'll have to do the following manually to clean this up:
#   * Rearrange models' order
#   * Make sure each model has one field with primary_key=True
#   * Make sure each ForeignKey and OneToOneField has `on_delete` set to the desired behavior
#   * Remove `managed = False` lines if you wish to allow Django to create, modify, and delete the table
# Feel free to rename the models, but don't rename db_table values or field names.
from django.db import models  # 출력 결과 확인

# 결과 확인 후 해당 컨테이너 빠져나옴
root@6840db7728e2:/usr/src/app/myapp# exit
exit
assu@myserver01:~/work/ch05/ex08/myNginx04$
위 그림과 같이 Nginx와 Django는 컨테이너 형태로 되어있고, PostgreSQL은 컨테이너가 아닌 가상머신의 로컬에 설치되어 있는 것을 알 수 있다.
컨테이너를 정지시킨다.
assu@myserver01:~/work/ch05/ex08/myNginx04$ docker container stop 0702a23877af 6840db7728e2
0702a23877af
6840db7728e2
3. 도커 컴포즈를 활용한 컨테이너 실행
지금까지는 docker run 명령어를 여러 번 입력하고, 복잡한 네트워크와 볼륨 옵션을 일일이 지정하여 Nginx, Django, DB를 실행했다. 하지만 매번 이렇게 긴 명령어를 입력하는 것은 비효율적이며, 실수할 가능성도 크다.
이번에는 Docker Compose를 활용하여 단 하나의 설정 파일과 명령어로 전체 인프라를 생성하고 관리하는 방법을 알아본다.
Docker Compose는 다중 컨테이너 애플리케이션을 정의하고 실행하기 위한 도구이다.
YAML 파일에 서비스, 네트워크, 볼륨 등을 정의하면, 명령어 한 번으로 모든 서비스를 마치 오케스트라처럼 조율하여 실행할 수 있다.
3.1. 도커 컴포즈 설치
# apt 패키지 목록 업데이트
assu@myserver01:~/work/ch05/ex08/myNginx04$ sudo apt-get update

# apt-get install 명령어로 도커 컴포즈 설치
assu@myserver01:~/work/ch05/ex08/myNginx04$ sudo apt-get install docker-compose-plugin

# 설치된 도커 컴포즈 버전 확인
assu@myserver01:~/work/ch05/ex08/myNginx04$ docker compose version
Docker Compose version v2.40.3
3.2. 실습 환경 구성
1. Nginx, Django, PostgreSQL 컨테이너 연동에서 사용한 ex07 디렉터리(모든 서비스가 컨테이너로 구성된 버전)를 기반으로 실습을 해본다.
assu@myserver01:~/work/ch05$ ls
ex01  ex02  ex03  ex04  ex05  ex06  ex07  ex08

# ex07을 복사하여 ex09 생성
assu@myserver01:~/work/ch05$ cp -r ex07 ex09
assu@myserver01:~/work/ch05$ ls
ex01  ex02  ex03  ex04  ex05  ex06  ex07  ex08  ex09

assu@myserver01:~/work/ch05$ cd ex09

assu@myserver01:~/work/ch05/ex09$ ls
myDajngo03  myNginx03  myPostgres03
3.3. docker-compose.yml 파일 작성
도커 컴포즈의 핵심인 docker-compose.yml 파일을 작성한다.
이 파일은 ‘어떤 컨테이너를, 어떤 순서로, 어떤 설정으로 실행할지’ 정의한다.
assu@myserver01:~/work/ch05/ex09$ vim docker-compose.yml
# 컴포즈 파일 포맷 정보
version: "3"

services:
  # Django를 활용한 서비스 이름을 djangotest라고 지음
  djangotest:
    build: ./myDajngo03 # 이미지를 빌드할 디렉터리 경로 (Dockerfile이 위치한 경로)
    networks:
      - composenet01  # 해당 서비스가 사용할 도커 네트워크 정보
    # depends_on 은 컨테이너 실행 순서를 정할 때 사용함
    depends_on:
      - postgrestest  # 여기서는 postgrestest를 먼저 실행한 후 djangotest가 나중에 실행됨
    restart: always # 컨테이너가 정지되면 재실행함

  nginxtest:
    build: ./myNginx03
    networks:
      - composenet01
    ports:
      - "80:80" # 포트 포워딩(호스트:컨테이너)
    depends_on:
      - djangotest  # Django 앱이 실행된 후 실행
    restart: always

  postgrestest:
    build: ./myPostgres03
    networks:
      - composenet01
    environment:  # 환경 변수 설정(Dockerfile의 ENV 덮어씀)
      POSTGRES_USER: postgres
      POSTGRES_PASSWORD: mysecretpassword
      POSTGRES_DB: postgres
    volumes:
      - composevol01:/var/lib/postgresql  # 도커 볼륨 마운트
    restart: always

# 네트워크 정의(자동 생성됨)
networks:
  composenet01:

# 볼륨 정의(자동 생성됨)
volumes:
  composevol01:
docker-compose.yml의 서비스 이름(postgrestest)은 도커 네트워크 내부에서 호스트 이름(Hostname)으로 사용된다.
따라서 Django의 settings.py에 있는 HOST 설정이 이 서비스 이름과 정확히 일치해야 한다.
3.4. 빌드 및 실행
이제 한 줄의 명령어로 이미지를 빌드하고, 컨테이너를 실행한다.
up: 컨테이너 생성 및 실행-d: 백그라운드모드(Detached)--build: 이미지를 새로 빌드(소스 코드가 변경되었을 때 유용)
# --build 옵션은 컨테이너를 실행하기 전에 이미지를 빌드하라는 옵션
assu@myserver01:~/work/ch05/ex09$ docker compose up -d --build
실행 후 컨테이너 목록을 확인하면, 도커 컴포즈가 자동으로 프로젝트명-서비스명-숫자 형식으로 이름을 부여한 것을 볼 수 있다.
assu@myserver01:~/work/ch05/ex09$ docker container ls
CONTAINER ID   IMAGE              STATUS         PORTS                                 NAMES
c6febe8bf0ae   ex09-nginxtest     Up 4 minutes   0.0.0.0:80->80/tcp, [::]:80->80/tcp   ex09-nginxtest-1
ebab13bfad81   ex09-djangotest    Up 4 minutes   8000/tcp                              ex09-djangotest-1
bcf4516d01b8   ex09-postgrestest  Up 4 minutes   5432/tcp                              ex09-postgrestest-1
3.5. 연동 확인 및 검증
웹 브라우저에서 http://127.0.0.1로 접속하여 Django 페이지가 정상적으로 뜨는지 확인한다.
그 다음, 실제 DB 연결이 잘 되었는지 Django 컨테이너 내부로 들어가 확인해본다.
assu@myserver01:~/work/ch05/ex09$ docker container ls
CONTAINER ID   IMAGE               COMMAND                  CREATED          STATUS          PORTS                                 NAMES
f8303e492c0e   ex09-nginxtest      "/docker-entrypoint.…"   12 seconds ago   Up 11 seconds   0.0.0.0:80->80/tcp, [::]:80->80/tcp   ex09-nginxtest-1
717ac2611b59   ex09-djangotest     "/bin/sh -c 'gunicor…"   12 seconds ago   Up 11 seconds   8000/tcp                              ex09-djangotest-1
efe17a2c9d0a   ex09-postgrestest   "docker-entrypoint.s…"   12 seconds ago   Up 11 seconds   5432/tcp                              ex09-postgrestest-1

# Django 컨테이너 내부 접속
assu@myserver01:~/work/ch05/ex09$ docker container exec -it 717ac2611b59 /bin/bash

root@717ac2611b59:/usr/src/app/myapp# ls
db.sqlite3  manage.py  myapp

# 데이터베이스 연결 확인
root@717ac2611b59:/usr/src/app/myapp# python manage.py inspectdb
# This is an auto-generated Django model module.
# You'll have to do the following manually to clean this up:
#   * Rearrange models' order
#   * Make sure each model has one field with primary_key=True
#   * Make sure each ForeignKey and OneToOneField has `on_delete` set to the desired behavior
#   * Remove `managed = False` lines if you wish to allow Django to create, modify, and delete the table
# Feel free to rename the models, but don't rename db_table values or field names.
from django.db import models

root@717ac2611b59:/usr/src/app/myapp# exit
exit
3.6. 컨테이너 정리
이제 docker compose down 명령어를 사용하여 컨테이너를 정리한다.
이 명령어는 컨테이너 정지 및 삭제 뿐만 아니라, 컴포즈가 생성한 네트워크도 함께 삭제해주므로 매우 깔끔하다.
단, 볼륨은 기본적으로 유지된다.
assu@myserver01:~/work/ch05/ex09$ docker compose down
WARN[0000] /home/assu/work/ch05/ex09/docker-compose.yml: the attribute `version` is obsolete, it will be ignored, please remove it to avoid potential confusion
[+] Running 4/4
 ✔ Container ex09-nginxtest-1     Removed                                                                                                                 0.2s
 ✔ Container ex09-djangotest-1    Removed                                                                                                                10.1s
 ✔ Container ex09-postgrestest-1  Removed                                                                                                                 0.2s
 ✔ Network ex09_composenet01      Removed
지금까지의 과정은 단일 호스트(내 컴퓨터 하나)에서의 실습이었다. 하지만 서비스 규모가 커지면 여러 대의 서버에 컨테이너를 나눠서 실행해야 한다.
이 때 필요한 것이 바로 쿠버네티스(Kubernetes)이다.
쿠버네티스에 대한 설명은 추후 다룰 예정입니다.
3.7. 도커 컴포즈와 로컬 PostgreSQL 연동
2. 컨테이너(Nginx, Django)와 로컬 호스트(PostgreSQL) 연동에서 사용한 ex08 디렉터리(로컬 DB를 바라보는 설정이 된 Django)를 기반으로 실습을 해본다.
1) 실습 환경 구성
기존에 로컬 DB 연결 설정(HOST: 172.17.0.1)이 완료된 ex08 디렉터리를 복사하여 ex10을 만든다.
assu@myserver01:~/work/ch05$ ls
ex01  ex02  ex03  ex04  ex05  ex06  ex07  ex08  ex09

assu@myserver01:~/work/ch05$ cp -r ex08 ex10
assu@myserver01:~/work/ch05$ ls
ex01  ex02  ex03  ex04  ex05  ex06  ex07  ex08  ex09  ex10

assu@myserver01:~/work/ch05$ cd ex10
assu@myserver01:~/work/ch05/ex10$ ls
myDajngo04  myNginx04
myDajngo04 내부의 settings.py 는 이미 호스트의 docker0 IP(172.17.0.1)을 바라보도록 설정되어 있다.
2) docker-compose.yml 파일 작성
assu@myserver01:~/work/ch05/ex10$ vim docker-compose.yml
version: "3"

services:
  djangotest:
    build: ./myDajngo04
    networks:
      - composenet01
    restart: always

  nginxtest:
    build: ./myNginx04
    networks:
      - composenet01
    ports:
      - "80:80"
    depends_on:
      - djangotest
    restart: always

networks:
  composenet01:
3) 빌드 및 실행
assu@myserver01:~/work/ch05/ex10$ docker compose up -d --build

assu@myserver01:~/work/ch05/ex10$ docker container ls
CONTAINER ID   IMAGE             COMMAND                  CREATED          STATUS          PORTS                                 NAMES
b948ada1edf0   ex10-nginxtest    "/docker-entrypoint.…"   53 seconds ago   Up 53 seconds   0.0.0.0:80->80/tcp, [::]:80->80/tcp   ex10-nginxtest-1
6524743ea183   ex10-djangotest   "/bin/sh -c 'gunicor…"   53 seconds ago   Up 53 seconds   8000/tcp                              ex10-djangotest-1
4) 연동 확인
이제 컨테이너 내부에서 로컬 호스트의 DB까지 정상적으로 연결이 되었는지 확인한다.
웹 브라우저에서 http://127.0.0.1 접속하여 Django 환영 페이지 확인 후, Django 컨테이너 내부로 진입하여 inspectdb를 실행한다.
assu@myserver01:~/work/ch05/ex10$ docker container ls
CONTAINER ID   IMAGE             COMMAND                  CREATED          STATUS          PORTS                                 NAMES
b948ada1edf0   ex10-nginxtest    "/docker-entrypoint.…"   53 seconds ago   Up 53 seconds   0.0.0.0:80->80/tcp, [::]:80->80/tcp   ex10-nginxtest-1
6524743ea183   ex10-djangotest   "/bin/sh -c 'gunicor…"   53 seconds ago   Up 53 seconds   8000/tcp                              ex10-djangotest-1

# Django 컨테이너 접속
assu@myserver01:~/work/ch05/ex10$ docker container exec -it 6524743ea183 /bin/bash

root@6524743ea183:/usr/src/app/myapp# ls
db.sqlite3  manage.py  myapp

# DB 연결 확인
root@6524743ea183:/usr/src/app/myapp# python manage.py inspectdb
# This is an auto-generated Django model module.
# You'll have to do the following manually to clean this up:
#   * Rearrange models' order
#   * Make sure each model has one field with primary_key=True
#   * Make sure each ForeignKey and OneToOneField has `on_delete` set to the desired behavior
#   * Remove `managed = False` lines if you wish to allow Django to create, modify, and delete the table
# Feel free to rename the models, but don't rename db_table values or field names.
from django.db import models
root@6524743ea183:/usr/src/app/myapp# exit
exit
5) 리소스 정리
assu@myserver01:~/work/ch05/ex10$ docker compose down
WARN[0000] /home/assu/work/ch05/ex10/docker-compose.yml: the attribute `version` is obsolete, it will be ignored, please remove it to avoid potential confusion
[+] Running 3/3
 ✔ Container ex10-nginxtest-1   Removed                                                                                                                   0.2s
 ✔ Container ex10-djangotest-1  Removed                                                                                                                  10.3s
 ✔ Network ex10_composenet01    Removed
참고 사이트 & 함께 보면 좋은 사이트
본 포스트는 장철원 저자의 한 권으로 배우는 도커&쿠버네티스를 기반으로 스터디하며 정리한 내용들입니다.
