Kubernetes - Pod 실행, Deployment 관리(Scale/Rollout/Rollback)
in DEV on DevOps, Kubernetes, K8s, Pod, Deployment, Replicaset, Scaling, Rollout, Rollback, Manifest, Yaml, Container-orchestration
쿠버네티스는 컨테이너 오케스트레이션의 표준이다.
하지만 방대한 기능과 낯선 용어들로 인해 처음 접하는 사람들에게 진입 장벽이 있을수도 있다.
이 포스트에서는 쿠버네티스의 가장 기본이 되는 실행 단위인 Pod와, 실제 운영 환경에서 애플리케이션을 배포하고 관리하는 핵심 리소스인 디플로이먼트(Deployment)에 대해 알아본다.
명령형(Imperative) 방식과 선언형(Declarative, 매니페스트 활용) 방식의 차이를 이해하고, 왜 쿠버네티스에서 디플로이먼트를 사용해야 하는지에 대해 알아본다.
- 쿠버네티스 Pod 실행
- 간단한 명령형 도구(CLI), IaC(Infrastructure as Code)의 기초가 되는 YAML 매니페이스 작성법
- 디플로이먼트 아키텍처
- 디플로이먼트와 레플리카셋(ReplicaSet), 그리고 Pod 간의 관계
- 애플리케이션 생명주기 관리
- 서비스의 안정성을 보장하는 스케일링(Scaling)
- 무중단 배포를 위한 롤아웃(Rollout)
- 장애 대응을 위한 롤백(Rollback)
목차
개발 환경
- Ubuntu 24.04.2 LTS
- Mac Apple M3 Max
- Memory 48 GB
- Kubernetes: v1.29.15
1. 쿠버네티스 기초
여기서는 클러스터가 정상적으로 동작하는지 확인하고, 가장 작은 배포 단위인 파드를 실행해본다.
CLI를 통해 직접 파드를 실행하는 방법과 실무에서 주로 사용하는 매니페스트(YAML) 파일을 통해 파드를 관리하는 방법에 대해 알아본다.
1.1. 쿠버네티스 구성 및 상태 확인
쿠버네티스 클러스터는 크게 2가지 영역으로 나뉜다.
- 마스터 노드(Control Plane)
- 클러스터 전체를 관리하고 제어함
- API 서버, 스케줄러, 컨트롤러 매니저 등이 있으며, 사용자의 요청(API)을 받아 워커 노드에 명령을 내림
- 워커 노드(Worker Node)
- 실제 애플리케이션 컨테이너(파드)가 실행되는 곳
클러스터 정보 확인(cluster-info)
kubectl cluster-info 명령은 마스터 노드(Control Plane)와 핵심 서비스(CoreDNS 등)가 정상적으로 실행 중인지 보여준다.
➜  ~ ssh -p 2201 assu@127.0.0.1

assu@myserver01:~$ kubectl cluster-info
Kubernetes control plane is running at https://10.0.2.4:6443
CoreDNS is running at https://10.0.2.4:6443/api/v1/namespaces/kube-system/services/kube-dns:dns/proxy

To further debug and diagnose cluster problems, use 'kubectl cluster-info dump'.
노드 목록 확인(get nodes)
클러스터를 구성하는 노드들의 상태를 확인한다.
assu@myserver01:~$ kubectl get nodes
NAME         STATUS   ROLES           AGE   VERSION
myserver01   Ready    control-plane   22h   v1.29.15
myserver02   Ready    <none>          22h   v1.29.15
myserver03   Ready    <none>          22h   v1.29.15
- ROLES
control-plane은 마스터 노드,<none>은 일반 워커 노드
- STATUS
- 모든 노드가
Ready상태여야 정상적으로 파드를 스케줄링할 수 있음
- 모든 노드가
파드 목록 상세 확인
기존에 실행 중인 파드가 있는지 확인해본다.
-o wide 옵션을 사용하면 파드가 어떤 노드에 배치되었는지, 어떤 IP를 할당받았는지 자세히 알 수 있다.
assu@myserver01:~$ kubectl get pod
NAME          READY   STATUS      RESTARTS   AGE
hello-world   0/1     Completed   0          18h

assu@myserver01:~$ kubectl get pod -o wide
NAME          READY   STATUS      RESTARTS   AGE   IP              NODE         NOMINATED NODE   READINESS GATES
hello-world   0/1     Completed   0          18h   192.168.131.3   myserver02   <none>           <none>
- IP
- 파드에 할당된 가상 IP(192.168.131.3)
- NODE
- 해당 파드가 myserver02 노드에서 실행되었음을 알 수 있음
확인이 끝났으면 테스트용 파드를 삭제하여 리소스를 정리한다.
assu@myserver01:~$ kubectl delete pod hello-world
pod "hello-world" deleted

assu@myserver01:~$ kubectl get pod
No resources found in default namespace.
1.2. 명령형(Imperative) Pod 실행
쿠버네티스에서 파드를 실행하는 가장 간단한 방법은 kubectl run 명령어를 사용하는 것이다.
이를 명령형 커맨드라고 한다.
hello-world 이미지를 사용하여 파드를 생성해본다.
assu@myserver01:~$ kubectl run hello-world --image=hello-world --restart=Always
pod/hello-world created
실행된 리소스들의 상태를 확인한다.
get all 명령어를 파드뿐 아니라 서비스, 디플로이먼트 등 관련 리소스를 한 번에 조회한다.
# pod 의 정보와 서비스 정보 조회
assu@myserver01:~$ kubectl get all
NAME              READY   STATUS      RESTARTS     AGE
pod/hello-world   0/1     Completed   1 (5s ago)   8s

NAME                 TYPE        CLUSTER-IP   EXTERNAL-IP   PORT(S)   AGE
service/kubernetes   ClusterIP   10.96.0.1    <none>        443/TCP   22h
hello-world 컨테이너는 “Hello World” 라는 텍스트를 출력하고 즉시 종료되는 프로세스이다. 하지만 우리는 --restart=Always(기본값)로 설정했기 때문에, 쿠버네티스는 종료된 컨테이너를 계속 되살리려고 한다.
이 과정이 반복되면 상태가 CrashLoopBackOff로 변경될 수 있다. (위 예시에서는 잠시 Completed 상태)
Pod 의 정보를 보면 Pod 이름은 hello-world 이고, 상태와 재시작 횟수를 알 수 있다. STATUS가 CrashLoopBackOff 라면 컨테이너가 재시작되기 전에 대기하고 있는 상태이다.
service/kubernetes는 쿠버네티스 API 통신을 위한 기본 서비스이므로 삭제하면 안된다.
서비스(Service)에 대한 내용은 Kubernetes - 서비스(ClusterIP, NodePort, LoadBalancer, ExternalName)를 참고하세요.
테스트가 끝났으면 파드를 삭제한다.
assu@myserver01:~$ kubectl delete pod hello-world
1.3. 매니페스트(Manifest)를 활용한 Pod 실행
실제 운영 환경에서는 kubectl run과 같은 일회성 명령보다 선언형(Declarative) 방식을 선호한다.
원하는 상태를 YAML 파일로 정의하고, 이를 쿠버네티스에게 전달하는 방식이다.
이 파일을 매니페스트(Manifest)라고 한다.
작업 디렉터리 생성
assu@myserver01:~/work$ mkdir -p ch09/ex01
assu@myserver01:~/work$ cd ch09/ex01
매니페스트 작성(nginx-test01.yml)
Nginx 웹 서버를 띄우기 위한 명세서를 작성한다.
assu@myserver01:~/work/ch09/ex01$ vim nginx-test01.yml
apiVersion: v1
kind: Pod             # 생성할 오브젝트의 종류 (여기서는 Pod)
metadata:
  name: nginx01       # Pod의 이름
spec:
  containers:         # Pod 안에서 실행할 컨테이너들의 목록
    - name: nginx-test01  # 컨테이너의 이름
      image: nginx:latest # 사용할 도커 이미지
매니페스트 적용 및 확인
작성한 파일을 kubectl apply -f 명령어로 클러스터에 적용한다.
-f 옵션은 파일을 지정한다는 의미이다.
assu@myserver01:~/work/ch09/ex01$ kubectl apply -f nginx-test01.yml
pod/nginx01 created

assu@myserver01:~/work/ch09/ex01$ kubectl get pod
NAME      READY   STATUS    RESTARTS   AGE
nginx01   1/1     Running   0          22s
Running 상태가 확인되면 Nginx 컨테이너가 정상적으로 실행 중인 것이다.
매니페스트를 이용한 삭제
매니페스트 파일로 생성한 리소스는 해당 파일을 참조하여 삭제할 수도 있다.
이는 관리해야 할 리소스가 많을 때 유용하다.
assu@myserver01:~/work/ch09/ex01$ kubectl delete -f nginx-test01.yml
pod "nginx01" deleted

assu@myserver01:~/work/ch09/ex01$ kubectl get pod
No resources found in default namespace.
2. 디플로이먼트(Deployment)
위에서 파드를 직접 생성해보았다. 하지만 실제 운영 환경에서는 파드만 하나 띄워놓는 경우는 거의 없다. 파드가 죽으면 서비스도 죽기 때문이다.
쿠버네티스에서는 디플로이먼트라는 상위 개념을 통해 파드를 관리한다.
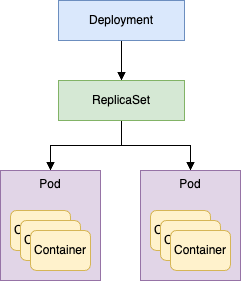
디플로이먼트를 이해하기 위해서는 먼저 레플리카셋(ReplicaSet)의 개념을 알아야 한다.
- 레플리카셋(ReplicaSet)
- 지정된 수(Replicas)만큼의 파드가 항상 실행되도록 보장함(가용성 보증)
- 디플로이먼트(Deployment)
- 레플리카셋을 관리하는 컨트롤러
- 배포 전략(롤링 업데이트, 롤백 등)을 담당함
즉, 사용자는 디플로이먼트에게 명령을 내리고, 디플로이먼트는 레플리카셋을 조정하며, 레플리카셋이 최종적으로 파드를 생성하거나 삭제하는 구조이다.
2.1. 디플로이먼트 실행(명령형)
가장 기본적인 형태로 디플로이먼트를 생성해본다.
➜  ~ ssh -p 2201 assu@127.0.0.1

# 디플로이먼트 생성, 이미지는 hello-world 사용
assu@myserver01:~$ kubectl create deployment deploy-hello --image=hello-world
deployment.apps/deploy-hello created
리소스 확인 및 관계 이해
kubectl get all 명령어를 통해 생성된 리소스들의 관계를 파악하는 것이 중요하다.
# 쿠버네티스 클러스터에 대한 대부분의 리소스 정보 확인
assu@myserver01:~$ kubectl get all
NAME                                READY   STATUS             RESTARTS     AGE
pod/deploy-hello-7c478bcd59-r5rf2   0/1     CrashLoopBackOff   1 (3s ago)   8s

NAME                 TYPE        CLUSTER-IP   EXTERNAL-IP   PORT(S)   AGE
service/kubernetes   ClusterIP   10.96.0.1    <none>        443/TCP   23h

NAME                           READY   UP-TO-DATE   AVAILABLE   AGE
deployment.apps/deploy-hello   0/1     1            0           8s  # 디플로이먼트 생성 확인

NAME                                      DESIRED   CURRENT   READY   AGE
replicaset.apps/deploy-hello-7c478bcd59   1         1         0       8s
위 출력 결과를 보면 deploy-hello 디플로이먼트가 생성되면서 자동으로 _deploy-hello-7c478bcd59_라는 레플리카셋이 만들어졌고, 그 레플리카셋이 최종적으로 파드를 생성한 것을 볼 수 있다.
개별 리소스를 따로 확인할 때는 아래와 같이 한다.
assu@myserver01:~$ kubectl get deployment,replicaset,pod
NAME                           READY   UP-TO-DATE   AVAILABLE   AGE
deployment.apps/deploy-hello   0/1     1            0           2m26s

NAME                                      DESIRED   CURRENT   READY   AGE
replicaset.apps/deploy-hello-7c478bcd59   1         1         0       2m26s

NAME                                READY   STATUS             RESTARTS      AGE
pod/deploy-hello-7c478bcd59-r5rf2   0/1     CrashLoopBackOff   4 (44s ago)   2m26s
쿠버네티스는 아래 약어를 지원한다.
- deployment → deploy
- replicaset → rs
- pod → po
assu@myserver01:~$ kubectl get deploy,rs,po
NAME                           READY   UP-TO-DATE   AVAILABLE   AGE
deployment.apps/deploy-hello   0/1     1            0           2m54s

NAME                                      DESIRED   CURRENT   READY   AGE
replicaset.apps/deploy-hello-7c478bcd59   1         1         0       2m54s

NAME                                READY   STATUS             RESTARTS      AGE
pod/deploy-hello-7c478bcd59-r5rf2   0/1     CrashLoopBackOff   4 (72s ago)   2m54s
테스트가 끝났으므로 삭제한다.
상위 개념인 디플로이먼트만 삭제하면 하위 리소스인 레플리카셋과 파드는 자동으로 정리된다.
assu@myserver01:~$ kubectl delete deployment deploy-hello
deployment.apps "deploy-hello" deleted

assu@myserver01:~$ kubectl get deploy,rs,po
No resources found in default namespace.
2.2. 레플리카셋(ReplicaSet) 조정과 자가 치유
레플리카셋의 핵심 기능은 원하는 파드의 개수(Replicas)를 유지하는 것이다.
이번에는 nginx 이미지를 사용하여 3개의 파드를 띄워본다.
파드 개수를 조절하려면 레플리카셋을 직접 다루는 것이 아니라 디플로이먼트를 통해야 한다.
assu@myserver01:~$ kubectl create deployment deploy-nginx --image=nginx --replicas=3
deployment.apps/deploy-nginx created
상태를 확인해보면 3개의 파드가 동시에 실행된 것을 확인할 수 있다.
assu@myserver01:/etc/cni/net.d$ kubectl get deploy,rs,po
NAME                           READY   UP-TO-DATE   AVAILABLE   AGE
deployment.apps/deploy-nginx   3/3     3            3           37s

NAME                                      DESIRED   CURRENT   READY   AGE
replicaset.apps/deploy-nginx-7f979874cf   3         3         3       37s

NAME                                READY   STATUS    RESTARTS   AGE
pod/deploy-nginx-7f979874cf-72n49   1/1     Running   0          37s
pod/deploy-nginx-7f979874cf-bc77l   1/1     Running   0          37s
pod/deploy-nginx-7f979874cf-x7slk   1/1     Running   0          37s
-o wide 옵션을 통해 각 파드가 어떤 노드(myserser03)에 배치되었고, 어떤 IP를 가졌는지 확인할 수 있다.
파드가 여러 노드에 분산되어 있어도 이들은 하나의 디플로이먼트 그룹으로 관리된다.
assu@myserver01:/etc/cni/net.d$ kubectl get deploy,rs,po -o wide
NAME                           READY   UP-TO-DATE   AVAILABLE   AGE   CONTAINERS   IMAGES   SELECTOR
deployment.apps/deploy-nginx   3/3     3            3           28s   nginx        nginx    app=deploy-nginx

NAME                                      DESIRED   CURRENT   READY   AGE   CONTAINERS   IMAGES   SELECTOR
replicaset.apps/deploy-nginx-7f979874cf   3         3         3       28s   nginx        nginx    app=deploy-nginx,pod-template-hash=7f979874cf

NAME                                READY   STATUS    RESTARTS   AGE   IP                NODE         NOMINATED NODE   READINESS GATES
pod/deploy-nginx-7f979874cf-72n49   1/1     Running   0          28s   192.168.149.132   myserver03   <none>           <none>
pod/deploy-nginx-7f979874cf-bc77l   1/1     Running   0          28s   192.168.149.131   myserver03   <none>           <none>
pod/deploy-nginx-7f979874cf-x7slk   1/1     Running   0          28s   192.168.149.133   myserver03   <none>           <none>
위를 보면 해당 파드들의 주소가 192.168.149.13x 이고, 해당 파드가 실행 중인 노드 위치는 myserver03이라는 것을 알 수 있다.
위 내용을 그림으로 나타내면 아래와 같다.
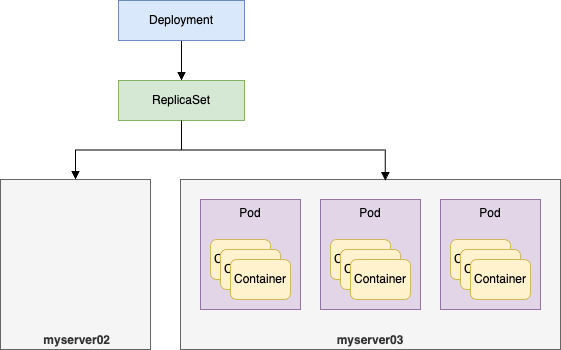
실행된 파드들이 만일 myserver02 에 1개, myserver03에 2개로 나뉘어져 있어도 실행된 파드들은 하나의 레플리카셋, 하나의 디플로이먼트에 속한 것이다.
트러블 슈팅: 파드가 Running 상태가 아닐 때
혹시 파드가 생성되었는데 Pending 이나 CrashLoopBackOff 상태에서 멈춰있고, 네트워크 관련 문제가 의심된다면 CNI(Calico) 설정을 확인해봐야 할 수 있다. (가상머신 환경 등에서 IP 자동 탐지가 실패하는 경우)
assu@myserver01:~$ kubectl edit installation default

# 편집기 진입
...

# spec -> calicoNetwork -> nodeAddressAutodetectionV4 부분 수정
    nodeAddressAutodetectionV4:
#      firstFound: true
      interface: "enp0s8"  # 본인 환경에 맞는 인터페이스명 입력
자가 치유 테스트
이제 실행 중인 파드 하나를 강제로 삭제해보자.
assu@myserver01:$ kubectl delete pod deploy-nginx-7f979874cf-72n49
pod "deploy-nginx-7f979874cf-72n49" deleted
잠시 후 리스트를 다시 조회하면 새로운 파드가 생성된 것을 확인할 수 있다.
assu@myserver01:/$ kubectl get deploy,rs,po
NAME                           READY   UP-TO-DATE   AVAILABLE   AGE
deployment.apps/deploy-nginx   3/3     3            3           14m

NAME                                      DESIRED   CURRENT   READY   AGE
replicaset.apps/deploy-nginx-7f979874cf   3         3         3       14m

NAME                                READY   STATUS    RESTARTS   AGE
pod/deploy-nginx-7f979874cf-bc77l   1/1     Running   0          14m
pod/deploy-nginx-7f979874cf-rpw7p   1/1     Running   0          72s
pod/deploy-nginx-7f979874cf-x7slk   1/1     Running   0          14m
파드 하나를 지웠지만 레플리카셋은 3개로 설정되었으므로 즉시 새로운 파드를 생성하여 개수를 맞춘다.
이제 디플로이먼트를 삭제한다.
assu@myserver01:/$ kubectl delete deployment deploy-nginx
deployment.apps "deploy-nginx" deleted

assu@myserver01:/$ kubectl get deploy,rs,po
No resources found in default namespace.
2.3. 매니페스트를 활용한 디플로이먼트 실행(선언형)
실무에서는 복잡한 설정을 관리하기 위해 YAML 매니페스트를 사용한다.
매니페스트 파일 작성(deploy-test01.yml)
디플로이먼트 매니페스트는 파드 매니페스트보다 구조가 좀 더 복잡하다.
특히 Selector(선택자)와 Label(라벨) 의 관계를 잘 이해해야 한다.
➜  ~ ssh -p 2201 assu@127.0.0.1

assu@myserver01:~$ ls
custom-resources.yaml  work
assu@myserver01:~$ cd work

assu@myserver01:~/work$ ls
ch04  ch05  ch06  ch09
assu@myserver01:~/work$ cd ch09

assu@myserver01:~/work/ch09$ ls
ex01
assu@myserver01:~/work/ch09$ mkdir ex02
assu@myserver01:~/work/ch09$ ls
ex01  ex02
assu@myserver01:~/work/ch09$ cd ex02
assu@myserver01:~/work/ch09/ex02$
assu@myserver01:~/work/ch09/ex02$ vim deploy-test01.yml
apiVersion: apps/v1   # Pod 생성 시에는 v1, 디플로이먼트와 같이 리소스를 관리하는 오브젝트인 경우 apps 그룹의 v1 버전 사용
kind: Deployment    # 생성할 오브젝트 종류 지정
metadata:
  name: deploy-test01  # 생성할 디플로이먼트 이름 지정
spec:   # 생성할 디플로이먼트의 상태 정의
  replicas: 3  # 생성할 레플리카셋 개수 정의
  # (중요)디플로이먼트가 어떤 파드를 관리할 지 지정하는 규칙
  selector:
    matchLabels:
      app.kubernetes.io/name: web-deploy    # matchLabels의 app.kubernetes.io/name 으로 지정되는 이름은 selector로 적용하는 이름이 되므로 이는 Pod를 생성했을 때의 이름과 동일해야 함
  # 생성할 Pod의 템플릿(파드 명세서)
  template:
    metadata:
      # (중요) 위 selector의 matchLabels와 정확히 일치해야 함
      labels:
        app.kubernetes.io/name: web-deploy  # 디플로이먼트가 관리할 Pod 라벨
    spec:   # Pod의 spec 정의
      containers:
        - name: nginx
          image: nginx:latest
spec.selector.matchLabels 에 정의된 라벨은 spec.template.metadata.labels에 정의된 라벨과 반드시 일치해야 한다.
이 연결고리를 통해 디플로이먼트는 자신이 관리해야 할 파드를 식별한다.
매니페스트 적용 및 확인
assu@myserver01:~/work/ch09/ex02$ kubectl apply -f deploy-test01.yml
deployment.apps/deploy-test01 created  # 디플로이먼트 생성 확인
정상적으로 3개의 파드가 실행되었는지 확인한다.
assu@myserver01:~/work/ch09/ex02$ kubectl get deploy,rs,po
NAME                            READY   UP-TO-DATE   AVAILABLE   AGE
deployment.apps/deploy-test01   3/3     3            3           8m53s

NAME                                       DESIRED   CURRENT   READY   AGE
replicaset.apps/deploy-test01-5b8c666f54   3         3         3       8m53s

NAME                                 READY   STATUS    RESTARTS   AGE
pod/deploy-test01-5b8c666f54-jhblh   1/1     Running   0          8m53s
pod/deploy-test01-5b8c666f54-mlphs   1/1     Running   0          8m53s
pod/deploy-test01-5b8c666f54-vcdtd   1/1     Running   0          8m53s
이제 생성한 리소스를 정리한다.
assu@myserver01:~/work/ch09/ex02$ kubectl delete -f deploy-test01.yml
deployment.apps "deploy-test01" deleted

assu@myserver01:~/work/ch09/ex02$ kubectl get deploy,rs,po
No resources found in default namespace.
2.4. 스케일(Scale): 파드 개수 조정
애플리케이션 운영 중 트래픽이 급증하면 어떻게 해야 할까?
쿠버네티스에서는 replicas 수치를 조정하여 수평적 확장을 매우 쉽게 수행할 수 있는데, 이를 스케일링이라고 한다.
assu@myserver01:~/work/ch09$ pwd
/home/assu/work/ch09
assu@myserver01:~/work/ch09$ ls
ex01  ex02

assu@myserver01:~/work/ch09$ cp -r ex02 ex03
assu@myserver01:~/work/ch09$ ls
ex01  ex02  ex03

assu@myserver01:~/work/ch09$ cd ex03
assu@myserver01:~/work/ch09/ex03$ ls
deploy-test01.yml
초기 상태 배포(Replicas: 3)
# apply 명령어로 디플로이먼트 실행
assu@myserver01:~/work/ch09/ex03$ kubectl apply -f deploy-test01.yml
deployment.apps/deploy-test01 created
정상적으로 3개의 파드가 실행 중인 것을 확인한다.
# 결과 확인
assu@myserver01:~/work/ch09/ex03$ kubectl get deploy,rs,po
NAME                            READY   UP-TO-DATE   AVAILABLE   AGE
deployment.apps/deploy-test01   3/3     3            3           9s

NAME                                       DESIRED   CURRENT   READY   AGE
replicaset.apps/deploy-test01-5b8c666f54   3         3         3       9s

# 파드가 3개 실행되는 것 확인
NAME                                 READY   STATUS    RESTARTS   AGE
pod/deploy-test01-5b8c666f54-492h4   1/1     Running   0          9s
pod/deploy-test01-5b8c666f54-6xc8c   1/1     Running   0          9s
pod/deploy-test01-5b8c666f54-lhgt6   1/1     Running   0          9s
스케일 아웃(Scale Out)
이제 파드의 개수를 3개에서 5개로 늘려보자.
매니페스트 파일(deploy-test02.yml)을 생성하고 replicas 항목을 수정한다.
assu@myserver01:~/work/ch09/ex03$ ls
deploy-test01.yml
assu@myserver01:~/work/ch09/ex03$ cp deploy-test01.yml deploy-test02.yml
assu@myserver01:~/work/ch09/ex03$ ls
deploy-test01.yml  deploy-test02.yml
...
spec:
  replicas: 5  # 레플리카셋 개수를 3에서 5로 수정(스케일 아웃)
...
수정된 매니페스트를 적용한다.
# 현재 실행 중인 파드가 3개인 것 확인
assu@myserver01:~/work/ch09/ex03$ kubectl get pod
NAME                             READY   STATUS    RESTARTS   AGE
deploy-test01-5b8c666f54-492h4   1/1     Running   0          3m22s
deploy-test01-5b8c666f54-6xc8c   1/1     Running   0          3m22s
deploy-test01-5b8c666f54-lhgt6   1/1     Running   0          3m22s

# 수정한 yml 파일 적용
assu@myserver01:~/work/ch09/ex03$ kubectl apply -f deploy-test02.yml
deployment.apps/deploy-test01 configured  # 설정되었다는 메시지 확인
이제 결과를 확인해보자.
# 2개의 파드가 신규 추가됨
assu@myserver01:~/work/ch09/ex03$ kubectl get pod
NAME                             READY   STATUS    RESTARTS   AGE
deploy-test01-5b8c666f54-492h4   1/1     Running   0          3m36s
deploy-test01-5b8c666f54-6xc8c   1/1     Running   0          3m36s
deploy-test01-5b8c666f54-dg856   1/1     Running   0          7s
deploy-test01-5b8c666f54-k2kf8   1/1     Running   0          7s
deploy-test01-5b8c666f54-lhgt6   1/1     Running   0          3m36s

assu@myserver01:~/work/ch09/ex03$ kubectl get deploy,rs,po
NAME                            READY   UP-TO-DATE   AVAILABLE   AGE
deployment.apps/deploy-test01   5/5     5            5           5m2s

NAME                                       DESIRED   CURRENT   READY   AGE
replicaset.apps/deploy-test01-5b8c666f54   5         5         5       5m2s

NAME                                 READY   STATUS    RESTARTS   AGE
pod/deploy-test01-5b8c666f54-492h4   1/1     Running   0          5m2s
pod/deploy-test01-5b8c666f54-6xc8c   1/1     Running   0          5m2s
pod/deploy-test01-5b8c666f54-dg856   1/1     Running   0          93s
pod/deploy-test01-5b8c666f54-k2kf8   1/1     Running   0          93s
pod/deploy-test01-5b8c666f54-lhgt6   1/1     Running   0          5m2s
AGE 컬럼을 보면 기존 3개는 그대로 유지되고, 새로운 2개의 파드만 추가된 것을 알 수 있다.
이제 리소스를 정리한다.
assu@myserver01:~/work/ch09/ex03$ kubectl delete -f deploy-test02.yml
deployment.apps "deploy-test01" deleted

assu@myserver01:~/work/ch09/ex03$ kubectl get deploy,rs,po
No resources found in default namespace.
2.5. 롤아웃(Rollout): 무중단 배포
애플리케이션의 버전을 업데이트할 때, 서비스를 중단하지 않고 배포하는 것을 롤아웃이라고 한다.
디플로이먼트는 기본적으로 롤링 업데이트(Rolling Update) 전략을 사용하여, 구버전 파드를 하나씩 줄이고 신버전 파드를 하나씩 늘리는 방식으로 배포를 진행한다.
여기서는 롤아웃을 통해 이미 배포되어 있는 컨테이너의 버전을 업데이트해본다.
2.3. 매니페스트를 활용한 디플로이먼트 실행(선언형) 에서 사용한 ex02 디렉터리를 복사하여 ex04를 만든다.
assu@myserver01:~/work/ch09$ pwd
/home/assu/work/ch09
assu@myserver01:~/work/ch09$ ls
ex01  ex02  ex03

assu@myserver01:~/work/ch09$ cp -r ex02 ex04
assu@myserver01:~/work/ch09$ ls
ex01  ex02  ex03  ex04

assu@myserver01:~/work/ch09$ cd ex04
assu@myserver01:~/work/ch09/ex04$ ls
deploy-test01.yml

assu@myserver01:~/work/ch09/ex04$ mv deploy-test01.yml deploy-test03.yml
assu@myserver01:~/work/ch09/ex04$ ls
deploy-test03.yml
deploy-test03.yml(Nginx v1.24 배포)
# 수정 전
spec:
  containers:
    - name: nginx
      image: nginx:latest

# 수정 후
spec:
  containers:
    - name: nginx
      image: nginx:1.24
이제 디플로이먼트를 실행한다.
assu@myserver01:~/work/ch09/ex04$ kubectl apply -f deploy-test03.yml
deployment.apps/deploy-test01 created
assu@myserver01:~/work/ch09/ex04$ kubectl get deploy,rs,po
NAME                            READY   UP-TO-DATE   AVAILABLE   AGE
deployment.apps/deploy-test01   3/3     3            3           88s

NAME                                       DESIRED   CURRENT   READY   AGE
replicaset.apps/deploy-test01-54c55bbc54   3         3         3       88s

NAME                                 READY   STATUS    RESTARTS   AGE
pod/deploy-test01-54c55bbc54-24ppz   1/1     Running   0          88s
pod/deploy-test01-54c55bbc54-2w5vd   1/1     Running   0          88s
pod/deploy-test01-54c55bbc54-xdn9v   1/1     Running   0          88s
배포 후 kubectl describe로 현재 적용된 이미지를 확인한다.
assu@myserver01:~/work/ch09/ex04$ kubectl describe deployment deploy-test01

...
Pod Template:
  Labels:  app.kubernetes.io/name=web-deploy
  Containers:
   nginx:
    Image:        nginx:1.24  # 파드의 Nginx 버전 확인
...
버전 업데이트(v1.24 → v1.25)
이제 Nginx의 버전을 1.25로 업데이트해본다.
assu@myserver01:~/work/ch09/ex04$ ls
deploy-test03.yml

assu@myserver01:~/work/ch09/ex04$ cp deploy-test03.yml deploy-test04.yml
assu@myserver01:~/work/ch09/ex04$ ls
deploy-test03.yml  deploy-test04.yml
assu@myserver01:~/work/ch09/ex04$ vim deploy-test04.yml
# 수정 전
spec:
  containers:
    - name: nginx
      image: nginx:1.24

# 수정 후
spec:
  containers:
    - name: nginx
      image: nginx:1.25
diff 명령어로 변경 사항을 미리 확인하는 습관을 매우 중요하다.
assu@myserver01:~/work/ch09/ex04$ diff deploy-test03.yml deploy-test04.yml
24c24
<           image: nginx:1.24
---
>           image: nginx:1.25
변경된 매니페스트를 적용한다.
assu@myserver01:~/work/ch09/ex04$ kubectl apply -f deploy-test04.yml
deployment.apps/deploy-test01 configured
롤링 업데이트 과정 확인
kubectl get pod를 반복해서 실행하거나 -w(watch) 옵션을 사용하면 기존 파드가 Terminating 되고 새로운 파드가 ContainerCreating → Running 상태로 변하는 과정을 실시간으로 볼 수 있다.
# 일부 파드가 새로 생성 중인 것을 알 수 있다.
assu@myserver01:~/work/ch09/ex04$ kubectl get pod
NAME                             READY   STATUS              RESTARTS   AGE
deploy-test01-54c55bbc54-24ppz   1/1     Running             0          5m53s
deploy-test01-54c55bbc54-2w5vd   1/1     Running             0          5m53s
deploy-test01-54c55bbc54-xdn9v   1/1     Running             0          5m53s
deploy-test01-7696c56d99-fflr9   0/1     ContainerCreating   0          11s

assu@myserver01:~/work/ch09/ex04$ kubectl get pod
NAME                             READY   STATUS    RESTARTS   AGE
deploy-test01-7696c56d99-6b7db   1/1     Running   0          16s
deploy-test01-7696c56d99-fflr9   1/1     Running   0          29s
deploy-test01-7696c56d99-tclmn   1/1     Running   0          3s
업데이트가 완료된 후 상태를 자세히 살펴보자.
assu@myserver01:~/work/ch09/ex04$ kubectl describe deployment deploy-test01

Name:                   deploy-test01
Namespace:              default
CreationTimestamp:      Sat, 20 Dec 2025 04:27:07 +0000
Labels:                 <none>
Annotations:            deployment.kubernetes.io/revision: 2  # 리비전 증가
Selector:               app.kubernetes.io/name=web-deploy
Replicas:               3 desired | 3 updated | 3 total | 3 available | 0 unavailable
StrategyType:           RollingUpdate
MinReadySeconds:        0
RollingUpdateStrategy:  25% max unavailable, 25% max surge
Pod Template:
  Labels:  app.kubernetes.io/name=web-deploy
  Containers:
   nginx:
    Image:        nginx:1.25  # Nginx 버전이 변경됨
...
- StrategyType: RollingUpdate
- 서비스 중단을 방지하기 위한 기본 전략
- revision: 2
- 배포 이력이 2번째로 업데이트됨
이번에는 뒤의 2.6. 롤백(Rollback): 이전 버전으로 복구 과 이어지므로 디플로이먼트를 삭제하지 않는다.
2.6. 롤백(Rollback): 이전 버전으로 복구
배포한 새 버전(v1.25)에 버그가 있다면 쿠버네티스는 rollout undo 명령어로 이전 리비전(revision)으로 즉시 되돌릴 수 있다.
# rollout 명령어로 롤백 진행
assu@myserver01:~/work/ch09/ex04$ kubectl rollout undo deployment deploy-test01
deployment.apps/deploy-test01 rolled back  # 롤백 확인
롤백이 진행되면 다시 파드들이 교체된다. 완료 후 버전을 확인해보자.
# 실행 중인 파드 정보 확인
assu@myserver01:~/work/ch09/ex04$ kubectl get pod
NAME                             READY   STATUS    RESTARTS   AGE
deploy-test01-54c55bbc54-gx2dl   1/1     Running   0          4s
deploy-test01-54c55bbc54-h4b24   1/1     Running   0          5s
deploy-test01-54c55bbc54-rzkcz   1/1     Running   0          6s

#  Nginx 버전 확인
assu@myserver01:~/work/ch09/ex04$ kubectl describe deployment deploy-test01
Name:                   deploy-test01
Namespace:              default
CreationTimestamp:      Sat, 20 Dec 2025 04:27:07 +0000
Labels:                 <none>
Annotations:            deployment.kubernetes.io/revision: 3  # 리비전 3
Selector:               app.kubernetes.io/name=web-deploy
Replicas:               3 desired | 3 updated | 3 total | 3 available | 0 unavailable
StrategyType:           RollingUpdate
MinReadySeconds:        0
RollingUpdateStrategy:  25% max unavailable, 25% max surge
Pod Template:
  Labels:  app.kubernetes.io/name=web-deploy
  Containers:
   nginx:
    Image:        nginx:1.24  # Nginx 버전이 1.25에서 1.24로 변경됨
    Port:         <none>
    Host Port:    <none>
이미지가 _nginx:1.24_로 돌아온 것을 확인할 수 있다.
주목할 것은 Revision이 3으로 증가했다는 점이다.
쿠버네티스에서 롤백은 ‘시간을 되돌리는 것’이 아니라 ‘과거의 설정을 적용한 새로운 배포’로 취급되기 때문이다.
이제 리소스를 삭제한다.
assu@myserver01:~/work/ch09/ex04$ kubectl delete -f deploy-test04.yml
deployment.apps "deploy-test01" deleted

assu@myserver01:~/work/ch09/ex04$ kubectl get deploy,rs,po
No resources found in default namespace.
정리하며..
- Pod
- 쿠버네티스에서 실행되는 가장 작은 단위의 애플리케이션
- Deployment & ReplicaSet
- 파드를 직접 관리하기 보다 디플로이먼트를 통해 선언적으로 관리하는 것이 표준
- 디플로이먼트는 레플리카셋을 제어하여 파드의 개수(가용성)을 보장함
- Scaling
replicas값을 조정하여 손쉽게 서비스를 확장하거나 축소함
- Rollout & Rollback
- 디플로이먼트를 통해 무중단 배포(Rolling Update)를 수행하고, 문제 발생 시 즉시 이전 버전으로 복구(Rollback)함
참고 사이트 & 함께 보면 좋은 사이트
본 포스트는 장철원 저자의 한 권으로 배우는 도커&쿠버네티스를 기반으로 스터디하며 정리한 내용들입니다.
